Quick Start GuideChroma-Q®Inspire XTTM Terminal Strip, InspireTM Terminal Strip,Inspire MiniTM Terminal Strip
For a full product manual please visit https://chroma-q.comPart Number: CHINHLRGBWXT, CHINHLRGBWXTW,CHINHLRGBW32E, CHINHLRGBW42E, CHINHLRGBW65E, CHINHLW32E, CHINHLW42E, CHINHLW65E,CHINMINIHLRGBWT, CHINMINIHLRGBWTWModel: 632-8220, 632-8221, 632-1500, 632-1600, 632-1700, 632-2500, 632-2600, 632-2700, 632-6500, 632-6505Software Version (Engine) 2.2
Overview
The Chroma-TQM InspireTM Terminal Strip LED house light features a single light engine with high-powered LEDs (RGBW), a fully homogenized optic, and controlled via the InspireTM External Control Box. Through the Inspire External Control Box, the fixture can be controlled remotely through the ANSI E1.11 USITT DMX 512-Aprotocol.
Safety
- This product is for professional use only. It is NOT intended for domestic or outdoor use.
- The bright flash of light during power-up and continuous strobe effect may cause epileptic seizures.
 Caution
 - This product must be used with a safety cable.
Cabling
Figure 1: Sample System Diagram
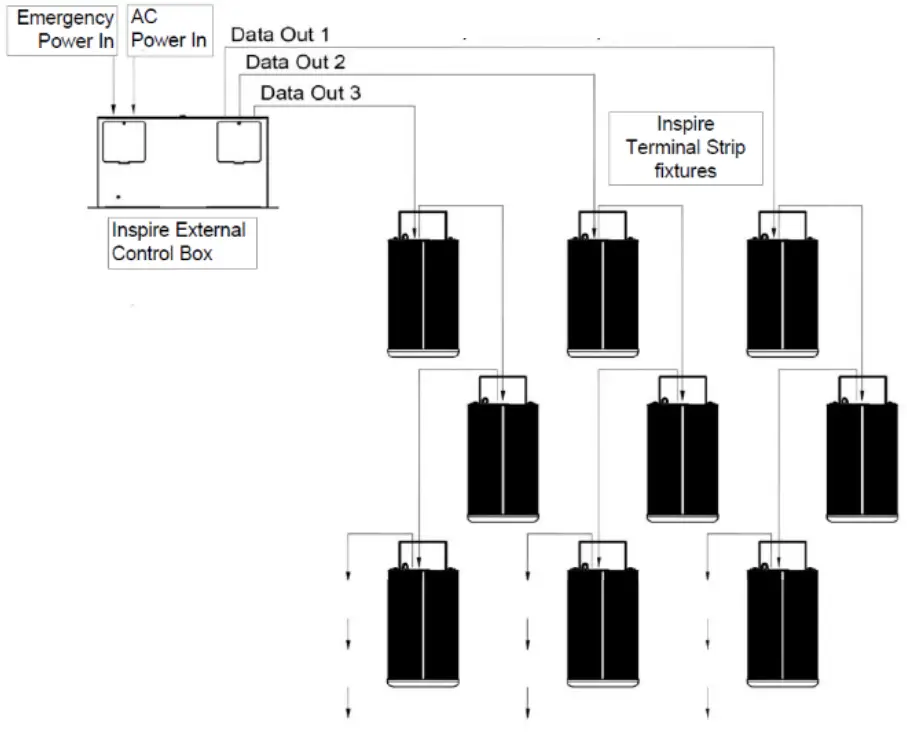
Maximum DMX cable length from Data Out 1/2/3 to the 1st fixture must not exceed 500’/152m.Note: Emergency Power in is the input connection from an alternative power source for emergency
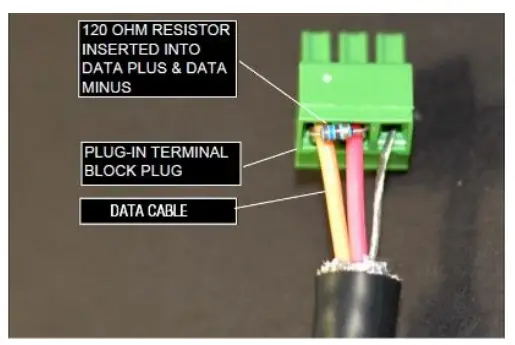
Figure 2: Power & Data ConnectionsNote: The DMX cable connected to the first Terminal Strip fixture from each Data Output of the External Control Box must be terminated with a 120 resistor. See Inspire Terminal Strip User Manual for details.
To connect the wiring for power and control data:
- The Power Input Connector Box (figure 3) is supplied with the fixture and is not attached. It must be mounted as described in the following steps
| Figure 3: Power Connection: Connector Box |
Figure 4: Power Connection: Light Fixture |
- Insert the power cable with the appropriate ½” NPT Connector or Cable Strain Relief through the Connector Box (Figure 3). The hole on the connector box has a Suitable dimension to attach a ½” NPT connector to it. The Power Input Terminal Block Plug has three soft wires attached to it. Attach the provided wires to the wiring for the AC power input with Quick Connectors or Market Connectors (Figure 3).
- Put the Quick / Market Connectors inside the Connector Box. Plug the wired Terminal Block Plug into the Power Input Terminal Block Header (Figure 4).Figure 5: Data Terminal Block headers connection
- Connect the DMX control data cables from the Inspire External Control Box / another Inspire Light Fixture to the Terminal Block Plug. Ensure that the bare wire is not visible. Some insulation of the wire must be inside the hole. The maximum strip length is 4 mm (Figure 5). Plug Terminal Block Plug into the Terminal Block headers at the rear of the fixture (Figure 2 & 5).
Figure 6: Data Connection
- Put the Connector Box in place and fasten the Connector Box with a capacitive screw.Figure 7: Data In- First Fixture
Notes:
- IMPORTANT: Termination resistors (supplied with the External Control Box) are REQUIRED on the first fixture in each data run (Figure 5) see User Manuals for more details.
- For DMX & data wires use Belden 9729 or CAT5e/6.
- Max. cable distance from DATA OUT to the first fixture must not exceed 152m/500 ft.
- * Emergency Power is shown as an example only and may not be used on all projects.
Mounting
A mounting bracket is built into the enclosure for overhead applications. Secure the fixture with a safety bond. A fixing hold is built into the enclosure. Optional accessories are also available for mounting Inspire light fixtures.
Optics
The Inspire XT is provided with a lens that delivers a beam angle of approximately 32°. Using a lens from the included Spread Lens kit will increase the beam to approximately 42° or 65°. For lens installation details, consult the instruction included with the kit.The Inspire Terminal Strip can be built with either a Narrow, Medium or Wide lens. The beam angles are Narrow: ~32°; Medium: ~42°; Wide: ~65°.The Inspire Mini Terminal Strip is built with a wide lens with a beam angle of approximately ~65°. The Optional Spreader Lens Kit is available for changing the beam angle of any Inspire Light Fixture.
Control
The control functions are accessed through the Touch Screen display at the front panel of the Inspire External Control Box. The features of the Touch Screen Display are shown in Figure 8.Figure 8: Main screen of the External Control Box
Further Information
Please refer to the Chroma-Q InspireTM manual for more detailed information. A copy of the manual can be found at the Chroma-Q website https://chromaq.com/support/downloads
Approvals & Disclaimer
The information contained herein is offered in good faith and is believed to be accurate. However, because conditions and methods of use of our products are beyond our control, this information should not be used in substitution for customer’s tests to ensure that Chroma-Q products are safe, effective, and fully satisfactory for the intended end-use. Suggestions of use shall not be taken as inducements to infringe any patent. Chroma-Q sole warranty is that the product will meet the Chroma-Q sales specifications in effect at the time of shipment. Your exclusive remedy for breach of such warranty is limited to refund of purchase price or replacement of any product shown to be other than as warranted.
Chroma-Q reserves the right to change or make alterations to devices and their functionality without notice due to ongoing research and development.
The Chroma-Q Space Force has been designed specifically for the lighting industry. Regular maintenance should be performed to ensure that the products perform well in the entertainment environment.
If you experience any difficulties with any Chroma-Q products please contact your selling dealer. If your selling dealer is unable to help please contact [email protected]. If the selling dealer is unable to satisfy your servicing needs, please contact the following for full factory service:
|
Outside North America:Tel: +44 (0)1494 446000Fax: +44 (0)1494 461024 |
North America:Tel: +1 416-255-9494Fax: +1 416-255-3514[email protected] |
report this adFor further information please visit the Chroma-Q website at https://chroma.com.Chroma-Q is a trademark, for more information on this visit https://chroma-q.com/trademarks.The rights and ownership of all trademarks are recognized.InspireTM XT,,InspireTM, InspireTM Mini QSG V1.0QSG P/N: 632-0707
References
[xyz-ips snippet=”download-snippet”]