CIARRA CAS75206P 30 Inch Wall Mounted Stainless Steel Range Hood User Manual
Dear customer
Congratulations on purchasing this device. This instruction manual is designed to provide you with all required instructions related to the installation, use and maintenance of the appliance. In order to operate the unit correctly and safety, please read this instruction manual carefully before installation and usage.
The cooker hood use high quality materials, and is made with a streamlined design. Equipped with large power electric motor and centrifugal fan, it also provides strong suction power, low noise operation, non-stick grease filter and easy assembly installation.Please note that we are constantly updating our manuals.Due to continuous development, we reserve the right to make technical changes including errors or other aberrations without notice. This is particularly true for measurements and cut-out dimensions respectively.
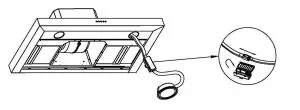
Scan the QR code to get access to contact CIARRA Amazon Service if you have any question.

Safety
READ AND SAVE THESE INSTRUCTIONS
![]() WARNING
WARNING
 TO REDUCE THE RISK OF FIRE, ELECTRIC SHOCK, OR INJURY TO PERSONS, OBSERVE THE FOLLOWING:
 Use this unit only in the manner intended by the manufacturer. If you have questions, contact the manufacturer at the address or telephone number listed in the warranty.
- Before servicing or cleaning unit, switch power off at service panel and lock the service disconnecting means to prevent power from being switched on accidentally. When the service disconnecting means cannot be locked, securely fasten a prominent warning device, such as a tag, to the service panel.
- Installation work and electrical wiring must be done by a qualified person(s) in accordance with all applicable codes and standards, including fire-rated construction.
- Sufficient air is needed for proper combustion and exhausting of gases through the flue (chimney) of fuel burning equipment to prevent back drafting. Follow the heating equipment manufacturer’s guidelines and safety standards such as those published by the National Fire Protection Association (NFPA) and the American Society for Heating, Refrigeration and Air Conditioning Engineers (ASHRAE) and the local code authorities.
- When cutting or drilling into wall or ceiling, do not damage electrical wiring and other hidden utilities.
- Ducted fans must always be vented to the outdoors.
- Do not use this unit with any additional solid-state speed control device.
- To reduce the risk of fire, use only metal ductwork.
- This unit must be grounded.
- As an alternative, this product may be installed with the ULapproved cord kit designated for the product, following instructions packed with the cord kit.
- When applicable local regulations comprise more restrictive installation and/or certification requirements, the aforementioned requirements prevail on those of this document and the installer agrees to conform to these at his own expense.
![]() WARNING
WARNING
TO REDUCE THE RISK OF A RANGE TOP GREASE FIRE:
- Never leave surface units unattended at high settings. Boil overscause smoking and greasy spillovers that may ignite. Heat oils slowly on low or medium settings.
- Always turn hood ON when cooking at high heat or whenflambeing food.
- Clean ventilating fan frequently. Grease should not be allowed toaccumulate on fan, filters or in exhaust ducts.
- Use proper pan size. Always use cookware appropriate for thesize of the surface element.
TO REDUCE THE RISK OF INJURY TO PERSONS IN THE EVENT OF A RANGE TOP GREASE FIRE, OBSERVE THE FOLLOWING*:
- SMOTHER FLAMES with a close-fitting lid, cookie sheet or metaltray, then turn off the burner. BE CAREFUL TO PREVENTBURNS. IF THE FLAMES DO NOT GO OUT IMMEDIATELY,EVACUATE AND CALL THE FIRE DEPARTMENT.
- NEVER PICK UP A FLAMING PAN — You may be burned.
- DO NOT USE WATER, including wet dishcloths or towels — Thiscould cause a violent steam explosion.
- Use an extinguisher ONLY if:a)You own a Class ABC extinguisher and you know how tooperate it.b)The fire is small and contained in the area where it started.c)The fire department has been called.d)You can fight the fire with your back to an exit.
*Based on “Kitchen Fire Safety Tips” published by NFPA.
![]() CAUTION
CAUTION
- For indoor use only.
- For general ventilating use only. Do not use to exhaust hazardous or explosive materials and vapors.
- To avoid motor bearing damage and noisy and/or unbalanced fan blade, keep drywall spray, construction dust, etc. off range hood.
- Your hood motor has a thermal overload which will automatically shut off the motor if it becomes overheated. The motor will restart when it cools down. If the motor continues to shut off and restart, have the hood serviced.
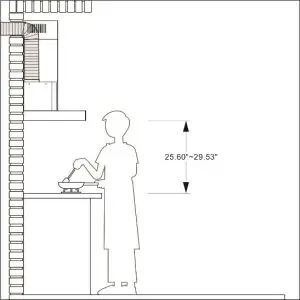
- For best capture of cooking fumes, the bottom of the hood MUST NOT BE LESS than 25.6” and at a maximum of 30” above the cooking surface.
- Always follows the cooking equipment manufacturer’s requirements regarding the ventilation needs.
- To reduce the risk of fire and to properly exhaust air, be sure to duct air outside — Do not exhaust air into spaces within walls or ceiling or into attics, crawl space or garage.
- When installing, servicing or cleaning the unit, it is recommended to wear safety glasses and gloves.
- Please read specification label on product for further information and requirements.
Specifications
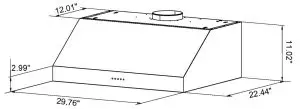
Note: The manufacturer reserves the right to change any technological improvement or modification without prior notice.
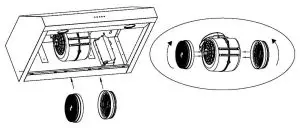
Components
Installation
Prepare for installation:
- If you have an outlet to the outside, your cooker hood can be connectedas below picture by means of an extraction duct (enamel, aluminum,flexible pipe or inflammable material with an interior diameter of 150mm).Choose a straight, short duct run to allow the hood to perform mostefficiently. Long duct runs, elbows and transitions will reduce theperformance of the hood. Use as few of them as possible. When possible,use at least 2 foot straight runs before any turns. Larger ductwork may berequired for best performance with longer duct runs.
- Before installation, turn the unit off and unplug it from the outlet.
- The cooker hood should be placed at a distance of 25.6~30inches abovethe cooking plane for best effect.
Recommended Tools for Installation
- Measuring tape
- Phillips screwdriver no. 2
- Flat blade screwdriver (to open knockout holes)
- Drill, 1/8” drill bit and 1½” hole saw (to mark holes for ducting and cut electrical access hole)
- Wood shims (2) and wood screws (4) (required for standard installation to framed cabinet)
- Saw (to cut holes for ducted application)
- Sheet metal shears (ducted installation only, for duct adjustment)
- Pliers (ducted installation only, for duct adjustment)
- Metal foil duct tape (for ducted applications)
- Scissors (to cut metal foil duct tape)
- Pencil
- Wire stripper
- Strain relief, 1/2” diameter (to secure house wiring cable to the hood)
![]() CAUTION: Before proceeding to the installation, check the contents of the box. If items are missing or damaged, contact the manufacturer.
CAUTION: Before proceeding to the installation, check the contents of the box. If items are missing or damaged, contact the manufacturer.
Observe all governing codes and ordinances. Have a qualified technician install the range hood. It is the installer’s responsibility to comply with installation clearances specified on the model/ serial rating plate. The manufacturer declines all responsibility for improper installation and does not accept responsibility for appliance warranty in the event of damage caused by incorrect installation.
![]() Attention: Observe the warning in the instruction sheet concerning the operation of the appliance when air is discharged from the room.
Attention: Observe the warning in the instruction sheet concerning the operation of the appliance when air is discharged from the room.
When the range hood and appliance supplied with energy other than electricity are simultaneously in operation, the negative pressure in the room must be not exceed 4 Pa (4×10⁻⁵ Bar).
Install the Hood(VENT OUTSIDE):If present, remove all protective poly film from the hood and/or parts.This product can be installed in two different ways (Way 1 and Way 2). Below picture shows the 1:1 hole drawing of different installation methods.

Way 1:
- According to the 1:1 hole drawing of Way1, Drill two Ø8mm holes on thewall;( This step can be ignore if the wall is wooden and instead to usescrews to install directly, no need to drill.)
- Install the wall plug, insert the upper two wall plugs with 0.24″*1.57″screws, do not lock too tight them first, and leave a gap of no less than0.39″ ;
- Put the cooker hood onto the top two screws, and lock the screws tight;
- Lock the lower two holes with 0.24″*1.57″ screws.
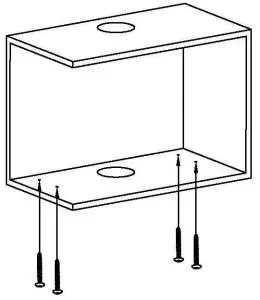
Way 2:
- According to the 1:1 hole drawing of Way 2, mark the following positions with pencil under the cabinet, and use the drilling tool to open the air pipe hole and power cord hole in turn;
- Align the air ventilation port of the cook hood with the cabinet ventilation hole at the bottom, pass the power cord through the power hole, and then use four 0.24″*1.57″ screws to lock into the corresponding position of the pencil marked in the cabinet, and leave a gap of no less than 0.39″ ;
- Put the cooker hood onto the four screws, and lock the screws tight;
- Lock the lower two holes with 0.24″*1.57″ screws;
- Put the Aluminum Flex Pipe on the air outlet of the cooker hood and fix thetube with the Cable Ties.
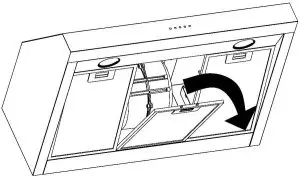
Activated Carbon Filter Installation(VENT INSIDE):If you do not have an outlet to the outside, exhaust pipe is not required and the installation is similar to the one shown in section “Installation (Vent outside)”
- Activated carbon filter can be used to trap odors.In order to install the activated carbon filter, the grease filter should bedetached first. Press the lock and pull it downward.
- Plug the activated carbon filter into the unit and turn it in clockwisedirection. Repeat the same on the other side.
- Install the grease filter. If the activated carbon needs to be replaced, please turn it in anti-clockwise direction.
NOTE:
- Make sure the filter is securely locked. Otherwise, it would loosen and cause dangerous.
- When the activated carbon is installed, the suction of the cooker hood will be reduced.
Operation
Always turn your hood on before you begin cooking to establish an air flow in the kitchen.Let the blower run for a few minutes to clear the air after you turn off the range. This will help keep the whole kitchen cleaner and fresher.
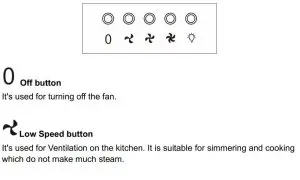
Push button/Electronic button
Operate the hood as follows:
Cleaning and Maintenance
Proper maintenance of the Range Hood will assure proper performance of the unit.
MOTORThe motor is permanently lubricated and never needs oiling. If the motor bearings make excessive or unusual noise, replace the motor with the exact service motor. The fan blade should also be replaced.
The motor is permanently lubricated and never needs oiling. If the motor bearings make excessive or unusual noise, replace the motor with the exact service motor. The fan blade should also be replaced.
GREASE FILTERSThe grease filters should be cleaned frequently. Use a warm dishwashing detergent solution. Grease filters are dishwasher safe.
Clean all-metal filters in the dishwasher using a non-phosphate detergent. Discoloration of the filters may occur if using phosphate detergents, or as a result of local water conditions – but this will not affect filter performance. This discoloration is not covered by the warranty. To minimize or prevent discoloration, hand wash filters using a mild detergent.
FAN BLADEThe fan blade should be cleaned frequently. Use a clean cloth soaked with warm detergent solution.
ACTIVATED CARBON FILTERThe activated carbon filter should be changed every 3 months depending on the conditions of use. Replace more often if your cooking style generates extra grease, such as frying and wok cooking. These filters are not washable and cannot be restored. Refer to installation instructions included with activated carbon filter.
STAINLESS STEEL CLEANING
Do:
- Regularly wash with clean cloth or rag soaked with warm water and mild soap or liquid dish detergent.
- Always clean in the direction of original polish lines.
- Always rinse well with clear water (2 or 3 times) after cleaning. Wipe dry completely.
- You may also use a specialized household stainless steel cleaner.
Don’t:
- Use any steel or stainless steel wool or any other scrapers to remove stubborn dirt.
- Use any harsh or abrasive cleansers.
- Allow dirt to accumulate.
- Let plaster dust or any other construction residues reach the hood. During construction/ renovation, cover the range hood to make sure no dust sticks to the stainless steel surface.
Avoid when choosing a detergent:
- Any cleaners that contain bleach will attack stainless steel.
- Any products containing: chloride, fluoride, iodide, bromide will deteriorate surfaces rapidly.
- Any combustible products used for cleaning such as acetone, alcohol, ether, benzol, etc., are highly explosive and should never be used close to a range.
PAINTED FINISH CLEANING:Clean with warm water and mild detergent only. If discoloration occurs, use a finish polish such as automotive polish. (DO NOT use rough abrasive cleaner or porcelain cleaner.)
LED REPLACEMENT
- Circular/ Rectangle LED lamp:
- If need to replacement the LED lamp, the grease filter should be detached first. Press the lock and pull it downward.
- Push the LED lamp holder out from the cabinet by hand, pull out the LED lamp and the wire together, open the power protection cover, pull out the plug and replace the LED lamp of the corresponding model.
![]() CAUTION:Before cleaning or repairing and replacing accessories, please make sure to shut down the power before operation, so as to avoid electric shock, damage to human body and even endanger life safety!
CAUTION:Before cleaning or repairing and replacing accessories, please make sure to shut down the power before operation, so as to avoid electric shock, damage to human body and even endanger life safety!
Troubleshooting
![]()
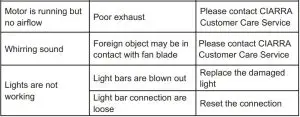
If problem persists after the above checks, please contact CIARRA Customer Care Centre for assistance.
Environmental protection
Waste electrical products should not be disposed of with household waste. Please recycle where facilities exist. Check with your Local Authority or retailer for recycling advice.
By ensuring this product is disposed of correctly, you will help prevent potential negative consequences for the environment and human health, which could otherwise be caused by inappropriate waste handling of this product.
The symbol on the product indicates that this product may not be treated as household waste. Instead it shall be handed over to the applicable collection point for the recycling of electrical and electronic equipment.
Disposal must be carried out in accordance with local environmental regulations for waste disposal.
For more detailed information about treatment, recovery and recycling of this product, please contact your local city office, your household waste disposal service or the shop where you purchased the product.
report this ad[xyz-ips snippet=”download-snippet”]