
CIELO B REEZ® P LUS
 Smart Wi-Fi Controller for air conditioners & heat pumps(User Manual)
STEP 1A: MOUNTING & PLACEMENT
Cielo Breez Plus can be wall-mounted using the wall mounting kit or placed on a table using a table stand (both included in the box). Please mount your Breez Plus on a wall or place it on a table in AC’s line of sight and power it up. For optimal placement and control:
- Place Breez Plus within 13 feet (4 meters) and in the line of sight of your air conditioner or heat pump for optimal results.
- To avoid deviated sensor readings, do not place Breez Plus where it may be exposed to excessive sunlight or other heat sources.
STEP 1B: POWERING UP OPTIONS
- Breez Plus can be powered up using a 5V adapter (always use the provided power adapter and USB cable for optimal results). OR
- Through wired connection options of 24V or 12V (from your existing thermostat wiring). For details on wired connections, please refer to pages 16-17 of this user manual.
Please DO NOT use any other voltage level to power up Breez Plus. Please choose ONLY ONE power-up option i.e. either 5V OR 24/12V.
Special Note: It is strongly advised that whenever there is a need to use the remote control for AC/Heat Pump, point it towards Breez Plus while performing any action. This way, your AC/Heat Pump and Cielo Home App will always be in sync.
STEP 1C: IR SIGNALS – CIELO BREEZ PLUS
Breez Plus has four transmitters to send IR signals to the air conditioner. One towards the front, one towards the top, and one each on top corners at 45 degrees.
Important: Please ensure that the IR signal reaches your air conditioner from either of these transmitters.
 Need Help?
Visit our website: www.cielowigle.com and select `Support’(OR) Email us at: [email protected](OR) Call us at : +1 (425) 529-5775 (9:00AM – 9:00PM EST, Mon-Fri)
STEP 1D: PRIOR TO APP INSTALLATION
Your Smart Phone
- Make sure that your smartphone’s Wi-Fi is turned ON.
- Make sure that your smartphone has internet access.
Your Wi-Fi Router
- Make sure that you have a working internet connection on your Wi-Fi router.
- Make sure that there is no proxy server or authencaon server configured on your internet connection.
- Make sure that there is no captive portal on your Wi-Fi router.Important: Make sure that IP isolation or client isolation is turned OFF on your Wi-Fi router.
STEP 2A: APP INSTALLATION
- Go to the App Store / Play Store.
- In `search’ second type `Cielo Home’.` Cielo Home’ App
- Once the `Cielo Home’ App is displayed, tap the `GET’ buon.
- Open the App are the installation is complete.
STEP 2B: LOG IN/REGISTER
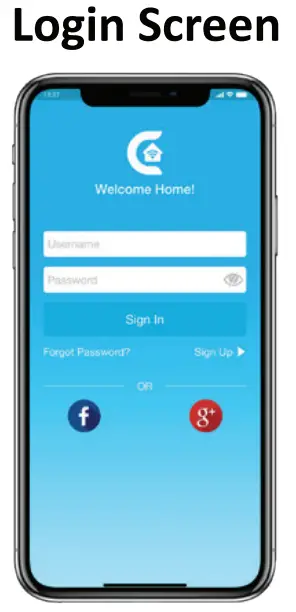
- Tap ` Let’s Get Started’ buon on the next screen.
- You can either create a new user account or log in as an existing user.
- As an existing user, enter your username and password and tap the `Sign In’ button.
- If you are a new user, tap the `Sign Up’ buon and fill in the information.
STEP 3A: REGISTRATION – iOS USERS
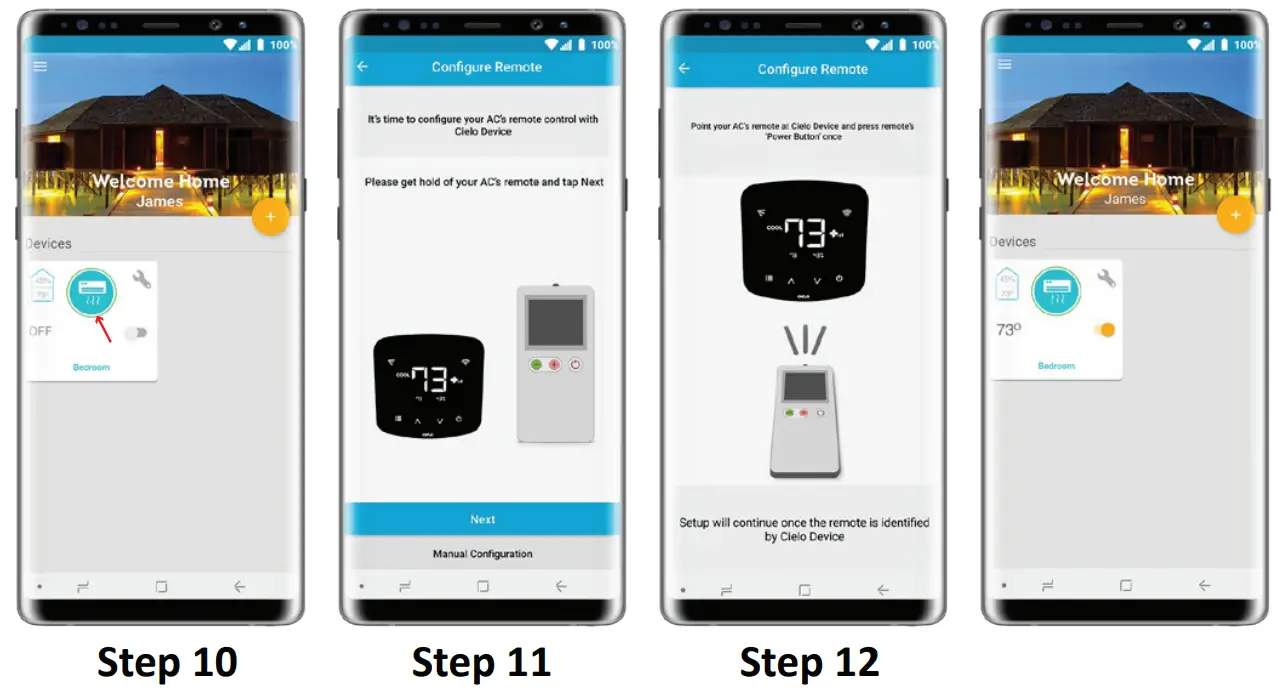
Note: The registration process is meant to connect the Breez Plus to your home Wi-Fi network through the `Cielo Home’ App.Step 1: Aer successful login, you are at the Home screen.Step 2: Tap the `+` buon as shown in the red circle.Step 3: Go to your phone’s Wi-Fi settings.Step 4: Connect your phone to Cielo Device Wi-Fi (Cielo_xxxx_xxxxxx).Step 5: Go back to the `Cielo Home’ App.Note: For iOS 13.0 & above, location permission is required to complete the registration process. You may disable it later.Step 6: Your phone will show the list of available Wi-Fi networks.Step 7: Select your Wi-Fi network from the list (there should be No captive portal or port blocking on your selected network).Step 8: Enter the password of your Wi-Fi network and tap the `Connect’ buon.Step 9: Customize your device with a name of your choice (for example, Bedroom, Lounge, Office, etc.) and tap on `Done.Step 10: If the circle around the AC icon is not green please refresh the home screen by swiping downwards (Pull-to-refresh).
Step 11: Once the circle around the AC icon is green, tap on it to start AC’s remote control configuration process.Step 12: Get hold of your AC’s remote and tap `Next’.Step 13: Point your AC’s remote at Cielo Device and press remote’s ‘Power Buon’ once. It will start processing & configuration.
The registration process is complete. Enjoy the unlimited controls!
Quick Tip: All four buttons at the boom of Breez Plus will blink once at the same me aer receiving the remote control’s signal. If they do not blink, please check the batteries of the remote control.
STEP 3B: REGISTRATION – ANDROID USERS
Note: The registration process is meant to connect the Breez Plus to your home Wi-Finetwork through the `Cielo Home’ App. Step 1: Aer successful login, you are at the home screen.Step 2: Tap the `+’ buon as shown in the red circle.Note: For Android OS 8.1 & above, location permission is required to complete the registration process. You may disable it later.Step 3: Tap the `Wi-Fi Sengs’ buon as shown in the red rectangle.Step 4: Connect your phone to Cielo Device Wi-Fi (Cielo_xxxx_xxxxxx).Step 5: Go back to the `Cielo Home’ App.
Step 6: Select your Wi-Fi from the drop-down list (there should be No captive portal or port blocking on your selected network).Step 7: Enter the password of your Wi-Fi network and tap the `Connect’ buon.Step 8: Customize your device with a name of your choice (for example, Bedroom, Lounge, Office, etc.) and tap on `Done.Step 9: If the circle around the AC icon is not green please refresh the home screen by swiping downwards (Pull-to-refresh).
Step 10: Once the circle around the AC icon is green, tap on it to start AC’s remote control configuration process.Step 11: Get hold of your AC’s remote and tap `Next’.Step 12: Point your AC’s remote at Cielo Device and press remote’s ‘Power Buon’ once. It will start processing & configuration.
The registration process is complete. Enjoy the unlimited controls!
Quick Tip: All four buttons at the boom of Breez Plus will blink once at the same me are receiving the remote control’s signal. If they do not blink, please check the batteries of the remote control.
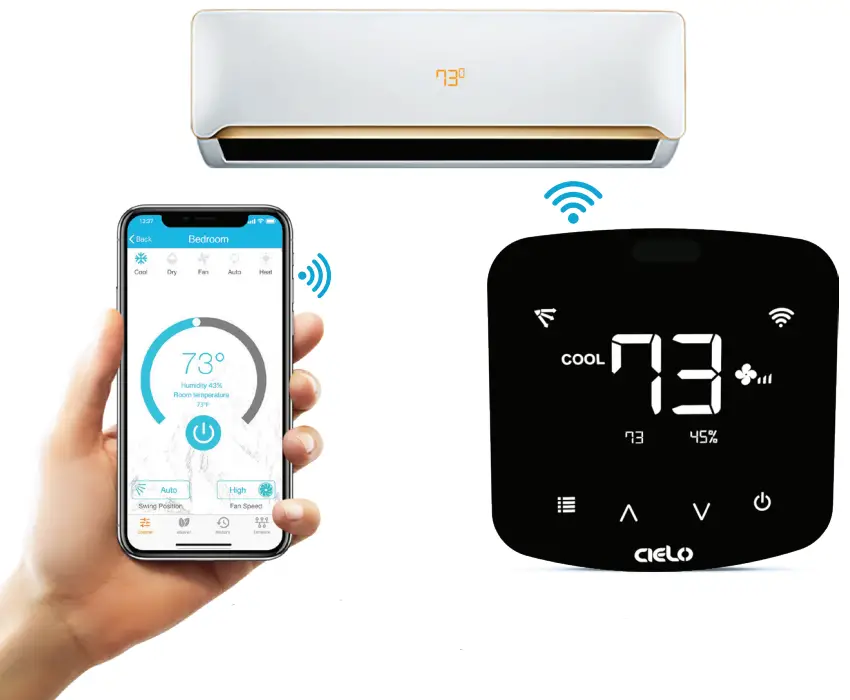
YOUR HOME SCREEN
Your home screen shows the real me status of all your Cielo Devices.
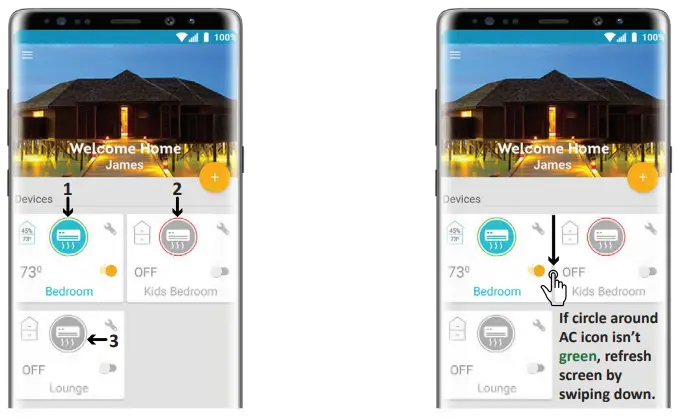
A registered Cielo Device can show either of the 3 statuses, outlined in circles:
1 – Green – The device is online. You’re good to go!2 – Red – The device is offline. (try following options)– Ensure your phone is connected to a working internet connection.– Refresh the home screen by swiping downwards (Pull-to-refresh).– Ensure the device is connected to a working internet connection.3- Grey – The device is offline. (try following options)– Ensure your phone is connected to a working internet connection– Refresh the home screen by swiping downwards (Pull-to-refresh).
ENJOY THE UNLIMITED FUNCTIONALITIES
Cielo Breez Plus Works With Amazon Alexa & the Google Assistant
Technical Support
Our dedicated team of experts is there to help from 9 AM to 9 PM EST (Mon-Fri).Please contact us at +1 (425) 529-5775 or visit our website: www.cielowigle.com and select ‘Support’.Cielo’s Support page has extensive help material available including:
- Detailed user manual.
- Detailed user guides to configure Cielo Device with Amazon Alexa & the Google Assistant.
- Device registration videos.
- FAQs.
- Troubleshootting tips for different scenarios & various use cases.
QUICK TIP: CONFIGURING THE RIGHT REMOTE CONTROL FOR YOUR AC
Cielo Device auto detects relevant remote control for your AC during the registration process. If it is not working with your AC, please select your remote model manually or contact Cielo Support for help at +1 (425) 529-5775 or visit our website: www.cielowigle.com and select ‘Support’.
For manual selection, follow these steps:

- Screen A: Go to device settings by tapping ‘wrench’ the symbol on the registered device.
- Screen B: Select ‘Change Appliance’.
- Screen C: Select ‘Manual Configuration’.
- Screen D: Select the ‘Manufacturer’ & ‘Remote Control Model Number’ of your AC from the drop-down lists and tap ‘Update’.
Quick Tip: Remote control model number is usually found at the backside of remote control as shown in the image.
BREEZ PLUS – LOCAL CONTROL OPTIONS
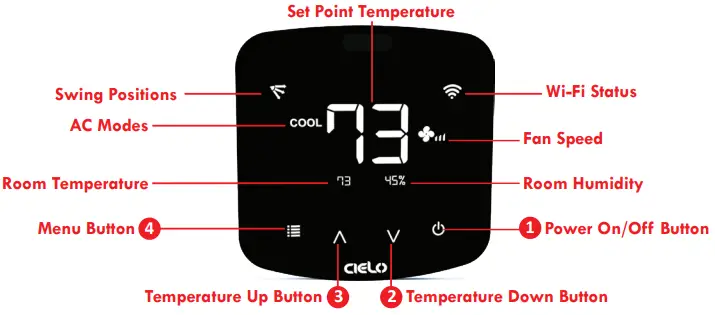
Adjusting the temperature of your AC:Use the up or down button to set the temperature of your choice.Changing the mode of your AC:Touch the menu button once. The AC modes will start blinking. Use the up or down button to select the mode (e.g. Cool, Heat, etc.). Your selected mode is set.Changing the fan speed:Touch the menu button twice. The fan speed icon will start blinking. Use the up or down button to change the fan speed. Your selected fan speed is set.Adjusting the swing position:Touch the menu button thrice. The swing position icon will start blinking. Use the up or down button to select the swing position. Your selected swing position is set.Changing multiple settings in one go:You can set mode, swing position & fan speed in one go. Touch the menu buon once and select the mode of your choice. Touch the menu buon again and adjust the fan speed. Touch the menu button again and select the swing position. All your settings are completed in one go.
Turning the display of Breez Plus On/Off:Press the Temperature Down Buon for six seconds and release.Locking/Unlocking the display Interface:Press and hold Temperature Up and Temperature Down buttons simultaneously for six seconds and release.Enabling/Disabling Wi-Fi of Breez Plus:Press and hold the Temperature Up Buon for six seconds and release.Rising the Wi-Fi of Breez Plus:Press and hold Temperature Up and Power buttons simultaneously for six seconds and release.
Wi-Fi IconsCase 1: Stable Wi-Fi Icon – The device is connected to the internet, showing the Wi-Fi strength.Case 2: Blinking Wi-Fi Icon – The device is in broadcast (AP) mode. Please complete the registration process as per step 3A/3B of this manual. If the device is already registered, refer to case 3.Case 3: Wi-Fi Icon with small triangle – Device connected with the router but has no internet access. Please ensure you have a working internet connection and restart the device.
INSTRUCTIONS FOR BREEZ PLUS WIRED CONNECTIONS (24V OR 12V)
Step 1:Switch off power by using the master switch or main circuit breaker. This is very important for your safety.
Step 2:Find a point where 24V or 12V is available (e.g. the point where thermostat wiring is available). Ensure that chosen point is also in the line of sight of your AC.Please DO NOT use any other voltage level to power up Breez Plus.
Step 3:Choose C & R wires. Pull these wires and pass them through the hole of the backplate of Breez Plus. Screw-in the backplate of Breez Plus into the wall.
Step 4:Breez Plus has two connections marked as 24V at its back. Connect C & R wires at these two connections.
Step 5:Press fit the Breez plus on its backplate.
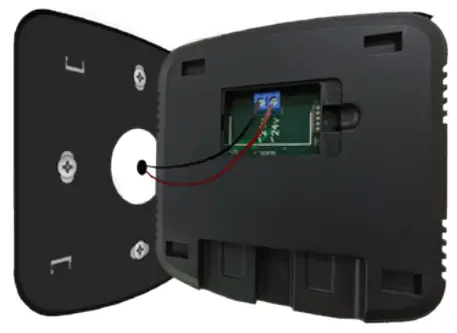
Your Installation is complete. Please switch on the power from the mains.
Note: In case of any doubt, please contact a local professional for making the wired connections. You can also use Breez Plus with a 5V adapter (included in the box).
LIMITED WARRANTY & END USER HARDWARE & LICENSE AGREEMENT
- LIMITED PRODUCT WARRANTY FOR END USERS Cielo WiGle Inc. warrants to the owner of the enclosed Cielo WiGle Inc. branded product contained in this box (‘Product’) will be free from defects in materials and workmanship for a period of one (1) year from the date of delivery, following the original retail purchase (the `Warranty Period’). If the Product fails to conform to this Limited Warranty during the Warranty Period, Cielo will, at its sole discretion, either repair or replace any defective Product or component. Repair or replacement may be made with a new or refurbished product or components, at Cielo WiGle Inc.’s sole discretion. If the Product or a component incorporated within it is no longer available, Cielo WiGle Inc. may replace the Product with a similar Product at Cielo WiGle Inc.’s sole discretion. This is your sole and exclusive remedy for breach of this Limited Warranty. Any Product that has either been repaired or replaced under this Limited Warranty will be covered by the terms of this Limited Warranty for the longer of ninety (90) days from the date of delivery or the remaining Warranty Period. This Limited Warranty is non-transferable from the original purchaser to subsequent owners and the Warranty Period will not be extended in duration or expanded in coverage for any such transfer.
- WARRANTY CONDITIONS; HOW TO GET SERVICE IF YOU WANT TO CLAIM UNDER THIS LIMITED WARRANTY Before being able to claim under this Limited Warranty, the owner of the Product must (a) notify Cielo WiGle Inc. of the intention on to claim by vising our website during the Warranty Period and providing a description of the alleged failure, and (b) comply with Cielo WiGle Inc.’s returns shipping instructions.
- WHAT THIS LIMITED WARRANTY DOES NOT COVER This warranty does not cover the following (collectively `Ineligible Products’): Products marked as `sample’ or sold `AS IS’; or Products that have been subject to (a) modifications, alterations, tampering, or improper maintenance or repairs; (b) handling, storage, installation, testing, or use not in accordance with the Product User manual or other instructions provided by Cielo WiGle Inc. ; (c) abuse or misuse of the Product; (d) breakdowns, fluctuations, or interruptions in electric power or the telecommunications network; or (e) Acts of God, including lightning, flood, tornado, earthquake, or hurricane. This warranty does not cover consumable parts unless damage is due to defects in materials or workmanship of the Product, or software (even if packaged or sold with the product). Unauthorized use of the Product or software can impair the Product`s performance and may invalidate this Limited Warranty.
- DISCLAIMER OF WARRANTIES EXCEPT AS STATED ABOVE IN THIS LIMITED WARRANTY, AND TO THE MAXIMUM EXTENT PERMITTED BY APPLICABLE LAW, CIELO WIGLE INC. DISCLAIMS ALL EXPRESS, IMPLIED, AND STATUTORY WARRANTIES AND CONDITIONS WITH RESPECT TO THE PRODUCT, INCLUDING THE IMPLIED WARRANTIES OF MERCHANTABILITY AND FITNESS FOR A PARTICULAR PURPOSE. TO THE MAXIMUM EXTENT PERMITTED BY APPLICABLE LAW, CIELO WIGLE INC. ALSO LIMITS THE DURATION OF ANY IMPLIED WARRANTIES OR CONDITIONS TO THE DURATION OF THIS LIMITED WARRANTY.
- LIMITATION OF DAMAGES IN ADDITION TO THE ABOVE WARRANTY DISCLAIMERS, IN NO EVENT WILL CIELO WIGLE INC. BE LIABLE FOR ANY CONSEQUENTIAL, INCIDENTAL, EXEMPLARY, ACCIDENTAL, OR SPECIAL DAMAGES, INCLUDING ANY DAMAGES FOR LOST DATA OR LOST PROFITS, ARISING FROM OR RELATING TO THIS LIMITED WARRANTY OR THE PRODUCT, AND CIELO WIGLE INC.’S TOTAL CUMULATIVE LIABILITY ARISING FROM OR RELATED TO THIS LIMITED WARRANTY OR THE PRODUCT WILL NOT EXCEED THE AMOUNT ACTUALLY PAID FOR THE PRODUCT BY THE ORIGINAL PURCHASER.
- LIMITATION OF LIABILITY THE CIELO WIGLE INC. ONLINE SERVICES (‘SERVICES’) PROVIDE YOU INFORMATION (‘PRODUCT INFORMATION’) REGARDING YOUR CIELO WIGLE INC.’S PRODUCTS OR OTHER PERIPHERALS CONNECTED TO YOUR PRODUCTS (‘PRODUCT PERIPHERALS’).
LIMITED WARRANTY & END USER HARDWARE & LICENSE AGREEMENT (CONT’D)
THE TYPE OF PRODUCT PERIPHERALS THAT MAY BE CONNECTED TO YOUR PRODUCT MAY CHANGE FROM TIME TO TIME WITHOUT LIMITING THE GENERALITY OF THE DISCLAIMERS ABOVE. ALL PRODUCT INFORMATION IS PROVIDED FOR YOUR CONVENIENCE, `AS IS’, AND `AS AVAILABLE. CIELO WIGLE INC. DOES NOT REPRESENT, WARRANT, OR GUARANTEE THAT PRODUCT INFORMATION WILL BE AVAILABLE, ACCURATE, OR RELIABLE OR THAT PRODUCT INFORMATION OR USE OF THE SERVICES OR PRODUCT WILL PROVIDE SAFETY IN YOUR HOME. YOU USE ALL PRODUCT INFORMATION, THE SERVICES, AND THE PRODUCT AT YOUR OWN DISCRETION AND RISK. YOU WILL BE SOLELY RESPONSIBLE FOR, AND CIELO WIGLE INC. DISCLAIMS ANY ASSOCIATED DAMAGES, INCLUDING TO YOUR WIRING, FIXTURES, ELECTRICITY, HOME, PRODUCT, PRODUCT PERIPHERALS, COMPUTER, MOBILE DEVICE, AND ALL OTHER ITEMS AND PETS IN YOUR HOME, RESULTING FROM YOUR USE OF THE PRODUCT INFORMATION, SERVICES, OR PRODUCT. PRODUCT INFORMATION PROVIDED BY THE SERVICES IS NOT INTENDED AS A SUBSTITUTE FOR DIRECT MEANS OF OBTAINING THE INFORMATION.
IN ADDITION TO THE ABOVE, IN NO EVENT WILL CIELO WIGLE INC. BE LIABLE FOR ANY CONSEQUENTIAL, INCIDENTAL, EXEMPLARY, ACCIDENTAL, OR SPECIAL DAMAGES, INCLUDING ANY DAMAGES ARISING DUE TO THE USAGE OF PRODUCT OR PRODUCT PERIPHERALS. THE MAXIMUM DAMAGES, IN ANY CASE, WILL NOT EXCEED THE AMOUNT ACTUALLY PAID FOR THE PRODUCT BY THE ORIGINAL PURCHASER.
Manufacturer: Cielo WiGle Inc. Redmond, WA, USA
Technical Specifications
Cielo Breez Plus Wi-Fi Smart Controller forAir Conditioners & Heat PumpsModel: BP101WADimensions: 110 x 110 x 25.5 mm (L x W x H) maxOperating Voltage: 5V DC or 24VOperating Power: 0.5WPeak Power: 2WRadio: 2.4 GHz Wireless ModuleWireless Module: IEEE 802.11 b/g/nProcessor: ARM 32bitMaterial: PC + ABS + PMMAColor: Black, Matie finishedPlacement: Wall Mount or Table Stand
![]()
Contains FCC ID: 2ADUIESP-12-FThis device is compatible with part 15 of the FCC Rules.Operation is subjected to the following two conditions: (1) This device may not cause harmful interference, and (2) this device must accept any interference received, including interference that may cause undesired operation.For any queries, visit: www.cielowigle.com
IC:25194-BP101WACAN ICES-3(B)/NMB-3(B)This device contains license-exempt transmitter(s)/receiver(s) that comply with Innovation, Science, and Economic Development Canada’s license-exempt RSS(s). Operation is subject to the following two conditions:(1) This device may not cause interference; and (2) This device must accept any interference, including interference that may cause undesired operation of the device. The term “IC: ” before the cervical/registration number only signifies that the Industry Canada technical specifications were met. This product meets the applicable Industry Canada technical specifications.
References
[xyz-ips snippet=”download-snippet”]