City Theatrical QolorFLEX® 5×2.5A 900MHz/2.4GHz Multiverse® Dimmer (5942) Quick Start Guide
475 Barell Ave., Carlstadt, NJ 07072Voice: 800-230-9497, 201-549-1160Fax: 201-549-1161
Setup and Operation
Introduction
The QolorFLEX 5×2.5A 900MHz/2.4GHz Multiverse Dimmer requires standard DC power from 5-30VDC. The input voltage must be the same as the load connected to the output ports requires.
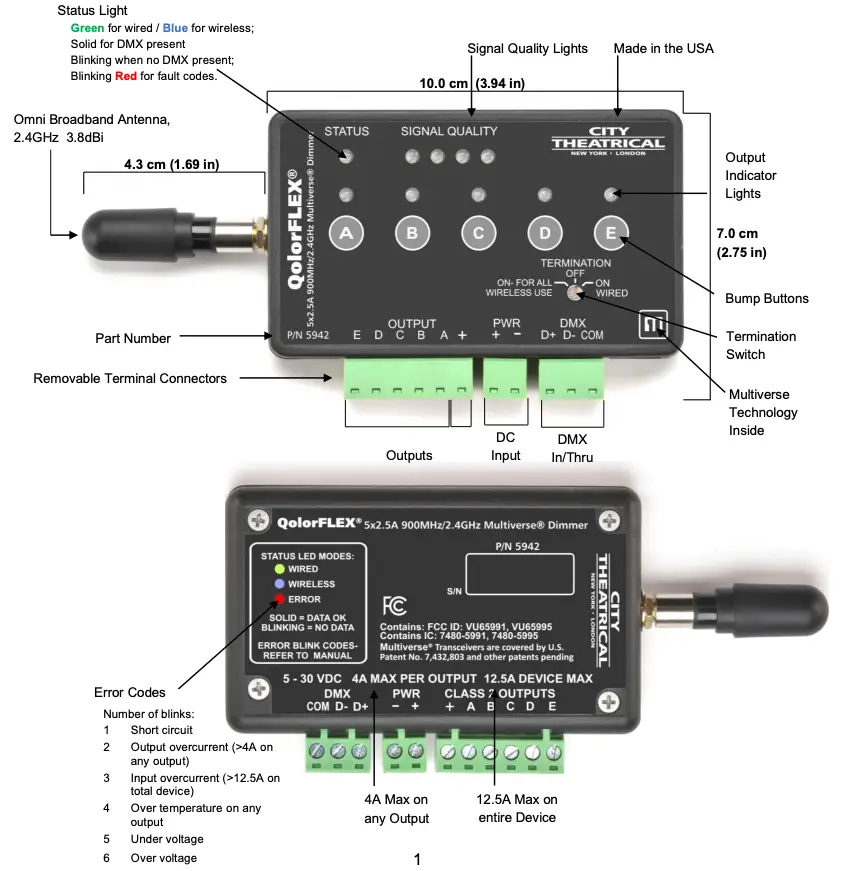
Connect your power supply’s DC “+” and “-” to the two DC input terminals on the 5942 labelled “PWR” “+” and “-”.
Connect the “+” lead(s) of the load device(s) to the “+” “OUTPUT” terminal, and connect the “-” leads of the load device(s) to “A”, “B”, “C”, “D”, and “E” “OUTPUT” terminals.
NOTE: Terminal connectors may be detached from the unit for ease of wiring. Check wiring connections carefully before reinserting connectors, and reinsert connectors carefully into their intended positions.
Use the “A”, “B”, “C”, “D”, and “E” bump buttons to check your connections prior to applying DMX control.To set DMX Termination Switch:
- “ON FOR ALL WIRELESS USE”
- “OFF”: When used as a wired dimmer and DMX is passing through to another DMX device
- “ON WIRED”: When used as a wired dimmer and it is the last device in a DMX chain
Important setup information!
Unit ships defaulted to “wired” mode, and RDM configuration begins in that mode. The status light shows green for wired mode, blue for wireless mode, and red for fault detected.
Revert to wired mode and reset all factory defaults by holding down the “A” and “E” bump buttons together for five seconds until the “STATUS” and “SIGNAL QUALITY” lights flash in unison.
Revert to wired mode without changing any other settings by holding down the “B” and “D” bump buttons together for five seconds until the “STATUS” and “SIGNAL QUALITY” lights flash in unison.
Factory Default Settings
DMX tab
- RDM Traffic Enabled
- DMX Port Label: Label
- Universe 1
- DMX Address 1
- DMX Personality 8-Bit (5ch)
Dimmer tab
- Bump Buttons Enabled
- Apply to All: No
- Device Label: Default Dim 1 Label
- Curve Logarithmic (LED)
- Output Response Time 100ms Ramp Time
- Modulation Frequency 5000Hz-LED
- Control Offset 0
Multiverse Tab
- DMX Input Mode Wired
- SHoW ID 24250
- Antenna Selection Omni
- Output Power Max
- SHoW Key 0
Info
- DMX Fail Mode:
- Hold last look before changing to a level: Infinite
- Hold level before blacking out: Infinite
Setup
To configure as a WIRED device using an RDM controller:Start by connecting an XLR5M to three position Phoenix jumper, such as City Theatrical PN5950 XLR5M and XLR5F to Three Position Phoenix Connector Female, 6″, or one that you craft yourself, so you can attach an RDM controller such as a City Theatrical DMXcat.Using RDM, discover your 5942.
DMX Tab
- Enable or disable RDM traffic downstream of device
- Set DMX Port Label (user selectable name)
- Set Universe (must match between Transmitter and 5942)
- Set DMX Address
- DMX Personality (8- or 16-bit)
Dimmer Tab
- Enable or disable bump buttons
- Select “Apply to All” to apply your choices to all five Dimmers. Note: This must be selected before making any setting changes.
- Set Device Label (user selectable name)
- Select Dimmer Curve (changes the slope of the dimmer curve)
- Select Output Response Time (lengthens the dimmer response time to achieve smoother dimming)
- Modulation Frequency (sets the dimming PWM to prevent interference or flickering with film and video camera shutters)
- Set Control Offset (At very, very low levels in slow fades, the LED emitters may energize at different times. If for instance the red circuit is turning on before green and blue, you can offset the time that the green and blue outputs begin to fade by raising the value of the Control Offset above zero. Range is -32,768 to +32,767. Try an offset of 100 first and adjust from there.
Apply DMX and verify system is working.
To configure as a WIRELESS device using an RDM controller:Start by connecting an XLR5M to three position Phoenix jumper, such as City Theatrical P/N5950 XLR5M and XLR5F to Three Position Phoenix Connector Female, 6″, or one that you craft yourself, so you can attach an RDM controller such as a DMXcat.If starting from default mode, your 5942 will be in Wired mode, and the green status light will be blinking. Using RDM, discover your 5942.
DMX Tab
- Enable or disable RDM traffic downstream of device
- Set DMX Port Label (user selectable name)
- Set Universe (must match between Transmitter and 5942)
- Set DMX Address
- DMX Personality (8- or 16-bit)
Dimmer Tab
- Enable or disable bump buttons
- Select “Apply to All” to apply your choices to all five Dimmers.
- Set Device Label (user selectable name)
- Select Dimmer Curve
- Select Output Response Time (lengthens the dimmer response time to achieve smoother dimming)
- Modulation Frequency (sets the dimming PWM to prevent interference or flickering with film and video camera shutters)
- Set Control Offset (At very, very low levels in slow fades, the LED emitters may energize at different times. If for instance the red circuit is turning on before green and blue, you can offset the time that the red and green outputs begin to fade by raising the value of the Control Offset above zero. Range is -32,768 to +32,767.
Multiverse Tab
- (skip setting DMX Input Mode for now)
- Select SHoW ID (Choose any 2.4GHz or 900MHz SHoW ID to match your Transmitter settings)
- Select Antenna Setting if not default Omni (other choices are Internal, Panel, Yagi)
- Select Output power if not default Max (other choices are Low, Medium, High)
- Choose a SHoW Key, if desired.
NOTE: Universe, SHoW ID and SHoW Key must match between Transmitter and 5942.
- Now change the DMX Input Mode from the default Wired, to Wireless. At this point, you will lose control over the 5942 since it is now a wireless device and will receive an error message, the STATUS light will turn blue and will be blinking if there is no DMX being received, and will be solid blue if you have a Transmitter already properly set and operating nearby.
Apply DMX through a transmitter set on the same SHoW ID, SHoW Key, and Universe, and verify system is working. Note: RDM traffic needs to be enabled at the transmitter to view the wireless 5942 in RDM.
To configure as a WIRED or WIRELESS device using the City Theatrical USB Configurator controller: Download the City Theatrical USB Configurator from the 5942 webpage on the CTI website, and install the program on your computer (Mac or PC). Connect your computer to your 5942 via a USB to micro USB cable. Select your serial port from the Serial Port tab in the USB Configurator program. Follow the instructions (above) as you would for using an RDM controller for wired or wireless use.
Trouble Codes
Number of blinks:
1 Short circuit2 Output overcurrent (>4A on any output)3 Input overcurrent (>12.5A on total device)4 Over temperature on any output5 Under voltage6 Over voltage
[xyz-ips snippet=”download-snippet”]