
CITY THEATRICAL QolorFLEX 5×2.5A 900MHz/2.4GHz Multiverse Dimmer User Manual
Foreword
Safety Notice
- This product is designed for use in dry locations only. Exposure to rain or moisture may cause damage to the transceiver and increase risk of electrical shock.
- Check all external wiring before applying power.
Compliance
This device complies with Part 15 of the Federal Communications Commission (FCC) Rules. Operation is subject to the following two conditions:(1) This device may not cause harmful interference.(2) This device must accept any interference received, including interference that may cause undesired operation.CAUTION: Changes or modifications to this unit not expressly approved by the party responsible for compliance could void the user’s authority to operate this equipment.
IC Statement
This device complies with Industry Canada’s license-exempt RSSs. Operation is subject to the following two conditions:(1) This device may not cause interference; and(2) This device must accept any interference, including interference that may cause undesired operation of the device.
Introduction
QolorFLEX 5×2.5A 900MHz/2.4GHz Multiverse Dimmer (P/N 5942) is a constant voltage, five output dimmer that can be controlled wirelessly using City Theatrical’s Multiverse or SHoW DMX Neo wireless DMX/RDM technology, or with wired DMX. This dimmer provides 20-bit PWM resolution and 16-bit or 8-bit control for extremely smooth dimming at the low end of the dimming curve. It uses detachable input and output connectors to make wiring easy. Configuration is performed using RDM, such as with a City Theatrical DMXcat® , or with City Theatrical’s USB Configuration program for PC/MAC. A mounting bracket is included with the Dimmer to allow easy mounting to scenery. This dimmer is designed and built in the USA by City Theatrical. It pairs perfectly with QolorFLEX 5-in-1 LED Tape for ideal use in props and costumes, or for areas where space is a concern.
Features
- Wireless or wired DMX input
- Wired DMX output
- Mounting bracket included
- Compatible with all Multiverse and SHoW DMX Neo SHoW IDs
- User selectable choice of 2.4GHz or 900MHz radio
- DMX termination selector switch
- Per channel level indicator lights
- Per channel PWM frequency, response time, and curve selections
- Per channel bump buttons, with disable function
- Per channel offsets to balance the point at which each dimmer first turns on (important for perfect low end balance)
- DMX data loss options
- Micro USB port for firmware updates and configuration
- Class 2 outputs
- Error detection and signal light for short circuits, over current, over/under voltage, over temperature
Part Numbers
| Part # | Description |
| 5942 | QolorFLEX 5×2.5A 900MHz/2.4GHz Multiverse Dimmer |
Product Detail

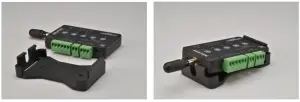
Mounting
A plastic mounting clip is included with each QolorFLEX 5×2.5A Multiverse Dimmer. Two mounting holes are provided for mounting to scenery. Simply insert the bottom end of the dimmer into the mounting clip and press it into the flexible holding clips on top.
Specifications
|
Specifications |
Description |
| Frequency | 900MHz / 2.4GHz |
| Universe(s) | 1 |
| Size (with antenna) | 5 5/8″ (14.3cm) L x 2 3/4″ (7.0cm) W x 5/8″ (1.6cm) H |
| Weight | 0.15 lbs. (0.07 Kg) |
| Operating Temperature | 0ºC – 35ºC |
| Construction | NEMA 4 IP20 ABS Plastic |
| Connections | Pluggable connectors |
| Mounting | Plastic bracket included |
| Dimming Information | |
| Voltage Range | 5 – 30 VDC |
| PWM Frequencies (Hz) | 60, 1.2K, 2.4K, 5K, 12K, 24K, 50K |
| Power | 4A/channel maximum; 12.5A total |
| Control Resolution | 8-bit; 16-bit |
| PWM Resolution | 20-bit |
| Radio Information | |
| Broadcast Power | Antenna dependent; 100mW EIRP |
| Broadcast Modes | Adaptive, Full, Low, Mid, High, Max |
| Ethernet Protocols | N/A |
| SHoW IDs | Multiverse: 237; Neo: 70 |
| Latency | 4ms average |
| RF Sensitivity | -95dBm |
| Antenna | Dual band omnidirectional, 900MHz/2.4GHz 1.8dBi/3.8dBi |
| RDM Features | RDM Proxy, RDM Responder |
| Product Information | |
| Firmware | User updateable via micro USB |
| Configuration | RDM, City Theatrical USB Configuration Program (PC/Mac) |
| Use Environment | Indoor |
| Warranty | One year |
| Manufacturing Origin | USA |
| Compliance | RoHS, FCC, IC |
Configuration
Installation
The QolorFLEX 5×2.5A 900MHz/2.4GHz Multiverse Dimmer requires standard DC power from 5-30VDC. The input voltage must be the same as the load connected to the output ports requires.
Connect your power supply’s DC “+” and “-” to the two DC input terminals on the 5942 labelled “PWR” “+” and “-”.
Connect the “+” lead(s) of the load device(s) to the “+” “OUTPUT” terminal, and connect the “-” leads of the load device(s) to “A”, “B”, “C”, “D”, and “E” “OUTPUT” terminals.
NOTE: Terminal connectors may be detached from the unit for ease of wiring. Check wiring connections carefully before reinserting connectors, and reinsert connectors carefully into their intended positions.
Use the “A”, “B”, “C”, “D”, and “E” bump buttons to check your connections prior to applying DMX control.
To set DMX Termination Switch:
- “ON FOR ALL WIRELESS USE”
- “OFF”: When used as a wired dimmer and DMX is passing through to another DMX device
- “ON WIRED”: When used as a wired dimmer and it is the last device in a DMX chain
Multiverse, DMX, and RDM Settings
Important setup information!
Unit ships defaulted to “wired” mode, and RDM configuration begins in that mode.
The status light shows green for wired mode, blue for wireless mode, and red for fault detected (see pages 5 or 18 for fault codes).
Revert to wired mode and reset all factory defaults by holding down the “A” and “E” bump buttons together for five seconds until the “STATUS” and “SIGNAL QUALITY” lights flash in unison.
Revert to wired mode without changing any other settings by holding down the “B” and “D” bump buttons together for five seconds until the “STATUS” and “SIGNAL QUALITY” lights flash in unison.
Factory Default Settings
DMX tab
- RDM Traffic Enabled
- DMX Port Label: Label
- Universe 1
- DMX Address 1
- DMX Personality 8-Bit (5ch)
Dimmer tab
- Bump Buttons Enabled
- Apply to All: No
- Device Label: Default Dim 1 Label
- Curve Logarithmic (LED)
- Output Response Time 100ms Ramp Time
- Modulation Frequency 5000Hz-LED
- Control Offset 0
Multiverse Tab
- DMX Input Mode Wired
- SHoW ID 24250
- Antenna Selection Omni
- Output Power Max
- SHoW Key 0
Info– DMX Fail Mode:Hold last look before changing to a level: Infinite Hold level before blacking out: Infinite
Setup
To configure as a WIRED device using an RDM controller:
Start by connecting an XLR5M to three position Phoenix jumper, such as City Theatrical PN5950 XLR5M and XLR5F to Three Position Phoenix Connector Female, 6″, or one that you craft yourself, so you can attach an RDM controller such as a City Theatrical DMXcat.
Using RDM, discover your 5942.
DMX Tab
- Enable or disable RDM traffic downstream of device
- Set DMX Port Label (user selectable name)
- Set Universe (must match between Transmitter and 5942)
- Set DMX Address
- DMX Personality (8 or 16 bit)
Dimmer Tab
- Enable or disable bump buttons – Select “Apply to All” to apply your choices to all five Dimmers. Note: This must be selected before making any setting changes. – Set Device Label (user selectable name)
- Select Dimmer Curve (changes the slope of the dimmer curve, see pg. 12 for all choices)
- Select Output Response Time (lengthens the dimmer response time to achieve smoother dimming, see pg. 12 for all choices)
- Modulation Frequency (sets the dimming PWM to prevent interference or flickering with film and video camera shutters, see pg. 12 for all choices)
- Set Control Offset (At very, very low levels in slow fades, the LED emitters may energize at different times. If for instance the red circuit is turning on before green and blue, you can offset the time that the green and blue outputs begin to fade by raising the value of the Control Offset above zero. Range is -32,768 to +32,767. Try an offset of 100 first and adjust from there.
Apply DMX and verify system is working.
To configure as a WIRELESS device using an RDM controller:
Start by connecting an XLR5M to three position Phoenix jumper, such as City Theatrical P/N5950 XLR5M and XLR5F to Three Position Phoenix Connector Female, 6″, or one that you craft yourself, so you can attach an RDM controller such as a DMXcat.
If starting from default mode, your 5942 will be in Wired mode, and the green status light will be blinking.
Using RDM, discover your 5942.
DMX Tab
- Enable or disable RDM traffic downstream of device
- Set DMX Port Label (user selectable name)
- Set Universe (must match between Transmitter and 5942)
- Set DMX Address
- DMX Personality (8 or 16 bit)
Dimmer Tab
- Enable or disable bump buttons – Select “Apply to All” to apply your choices to all five Dimmers. – Set Device Label (user selectable name)
- Select Dimmer Curve (changes the slope of the dimmer curve, see pg. 12 for all choices)
- Select Output Response Time (lengthens the dimmer response time to achieve smoother dimming, see pg. 12 for all choices)
- Modulation Frequency (sets the dimming PWM to prevent interference or flickering with film and video camera shutters, see pg. 12 for all choices)
- Set Control Offset (At very, very low levels in slow fades, the LED emitters may energize at different times. If for instance the red circuit is turning on before green and blue, you can offset the time that the red and green outputs begin to fade by raising the value of the Control Offset above zero. Range is -32,768 to +32,767.
Multiverse Tab
- (skip setting DMX Input Mode for now) – Select SHoW ID (Choose any 2.4GHz or 900MHz SHoW ID to match your Transmitter settings) See page 15 or Multiverse Transmitter, Node, SHoW Baby, or SHoW DMX Neo products manuals for more information on SHoW IDs.
- Select Antenna Setting if not default Omni (other choices are Internal, Panel, Yagi)
- Select Output power if not default Max (other choices are Low, Medium, High)
- Choose a SHoW Key, if desired.NOTE: Universe, SHoW ID and SHoW Key must match between Transmitter and 5942.
- Now change the DMX Input Mode from the default Wired, to Wireless. At this point, you will lose control over the 5942 since it is now a wireless device and will receive an error message, the STATUS light will turn blue and will be blinking if there is no DMX being received, and will be solid blue if you have a Transmitter already properly set and operating nearby.
Apply DMX through a transmitter set on the same SHoW ID, SHoW Key, and Universe, and verify system is working. Note: RDM traffic needs to be enabled at the transmitter to view the wireless 5942 in RDM.
To configure as a WIRED or WIRELESS device using the City Theatrical USB Configurator controller:Download the City Theatrical USB Configurator from the 5942 webpage on the CTI website, and install the program on your computer (Mac or PC). Connect your computer to your 5942 via a USB to micro USB cable. Select your serial port from the Serial Port tab in the USB Configurator program. Follow the instructions (above) as you would for using an RDM controller for wired or wireless use.
RDM Settings
Menu Descriptions
The full 5942 menu is reachable through RDM via the City Theatrical DMXcat app, other RDM controllers, or the City Theatrical USB Configurator. The following screenshots show what the menus look like in the DMXcat app.
DMX Screen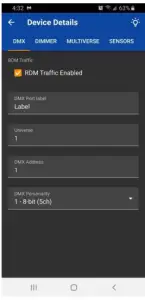 Use the “Light Bulb” icon to do an RDM identify command tothe 5942. All indicator lights will flash.Enable/disable RDM traffic downstream of the 5942.Relabel the DMX port on the 5942.Choose universe number.Choose starting DMX address for the five dimmers.Choose between 8 or 16-bit dimming.
Dimmer Screen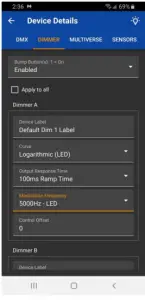 Enable/Disable Bump Buttons.Apply changes made to all Dimmers.Edit Label.Choose Dimming Curve (default is Logarithmic (LED); other choices are Square Law (incan); Linear; and Non-Dim).Choose Output Response Time (default is 100ms ramp time; other choices range from 10ms to 400ms).Choose Modulation Frequency (default is 5000Hz-LED; other choices range from 60Hz Incan to 50000Hz LED, including 1200Hz Candle mode).Choose Control Offset (default is 0)
Multiverse Screen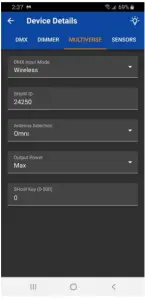 Select Wired or Wireless operation (default is Wired).Select SHoW ID (default is 24250) See information on page 15 about SHoW ID. SHoW ID must match on Transmitter and receiving devices.Select Antenna in use (default is Omni).Select Output Power (default is Max).Select SHoW Key (default is 0) If optional SHoW Key is used, it must match on Transmitter and all receiving devices.
Sensors ScreenUse the Sensors screen to monitor various data collected by the Dimmer.Press record to record a level for future comparison. Press reset to reset high and low values.
Info ScreenShows Device Model DescriptionShows City Theatrical as manufacturer (made in USA).Device Label (user editable).Shows Software Version.Shows Bootloader Software Version.Restore all configuration options to their factory default settings.Shows RDM UID.DMX Fail Mode: Choose what action device will take upon loss of DMX.Hold last look for a user selectable amount of time, before changing to a user selectable level (set below).Hold user selectable level for a user selectable amount of time before blacking out.
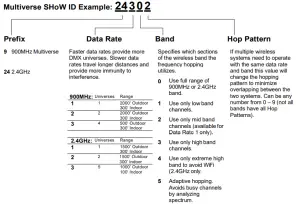
Multiverse SHoW IDs
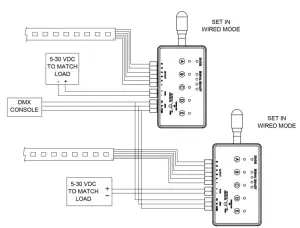
System Diagram

Troubleshooting
|
Symptom |
Solution(s) |
| Unit does not power up. | Check that power supply is outputting voltage. |
| Check polarity of DC voltage connection from power supply to dimmer. | |
| Unit powers up but can’t be controlled. | Use bump buttons to check that output is wired correctly. |
| If operating in wireless mode, check that SHoW ID and SHoW Key (if used) and universe match your Transmitter and that DMX present light on dimmer is solid blue.Check that “Wireless” has been selected on Multiverse tab of setup screen. | |
| If operating in wired mode, check that the DMX present light on dimmer is solid green. Check that “Wired” has been selected on Multiverse tab of setup screen. | |
| Check the starting DMX address, and that the lighting controller is outputting that address. Check console patch. | |
|
Additional troubleshooting: |
For wireless systems, SHoW ID, SHoW Key (if used) and universe must match on Transmitter and all receiving devices. |
| If using a wired DMX connection, check polarity of connections carefully using a meter. Pin 1 = common, Pin 2 =DMX ”-“ , PIN 3 =DMX “+” | |
| Check LED tape connections carefully. Some tapes use the red wire to designate the “+” connection, and some use the black wire. Check the circuit board of the LED tape carefully to confirm. When wired correctly, the bump buttons will light each circuit before DMX is applied. Troubleshoot tape connection problems first before troubleshooting DMX problems. | |
| Dimmer trouble codes: Status light will blink red when problems are encountered. | Number of blinks:
|
Firmware Updates
City Theatrical issues firmware updates occasionally to add features or to fix bugs. The firmware version is found on the Info section of the 5942. Firmware updates are found on the CTI website on the 5942 Downloads tab. Update instructions and the firmware files themselves are found in that download.
Accessories
|
P/N |
Name |
| 5950 | XLR5M and XLR5F to Three Position Phoenix Connector (5942) Female, 6″ |
| 5951 | Phoenix Connector, Six Position for 5942, Female |
| 5952 | Phoenix Connector, Three Position for 5942, Female |
| 5668 | Phoenix Connector, Two Position for 5942, Female |
| 5954 | Mounting Plate for 5942 |
| 5984 | Antenna, Omni, 900MHz/2.4GHz 1.8dBi/3.8dBi Stubby, Dual Band |
Customer Service
City Theatrical, Inc. 475 Barell AvenueCarlstadt, NJ 07072USAPhone: (800) 230-9497 or (201) 549-1160Fax: (201) 549-1161Phone: +44 (0) 20 8949 5051[email protected]
City Theatrical LtdOffice 31, Units 1-3, Wyvern Estate, Beverley WayNew Malden, Surrey KT3 4PHUnited KingdomPhone: +44 (0) 20 8949 5051[email protected]
 report this ad
For additional resources and documentation, please visit our website: www.citytheatrical.com
References
[xyz-ips snippet=”download-snippet”]