Cleverio WiFi Sous Vide Cooker User Manual
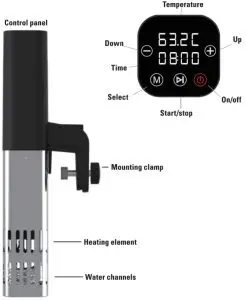
Overview
Specifications
- Temperature range: 25-90 °C (about 75 °C is max. over 12 litre)
- Resolution: 0.1 °C
- Timer: 1 min – 72 h
- Capacity: 6 -15 litre
- Input: 220-240V-
- Power: 800 W
- Power cable length: 1.2 m
Preparation
- Place the mounting clamp at edge of the cooking vessel and tighten the screw.
- Fill water into the cooking vessel. Observe the min. and max. markings on the cooker. Also keep in mind that the water evaporates during use. Refill if necessary. Sous Vide water balls (not included) are recommended for temperatures above 75 °C with water volumes of 12 – 15 litres to avoid evaporation.
- Connect the cooker to a wall outlet.
On/offPress to turn the device on or off. Press and hold for 5 seconds for Wi•Fi connection.
Start/stopStarts and stops the heating.
SelbectShift between time and temperature setting. Press and hold the button for 3 seconds to change between Celsius and Fahrenheit. This can be done when the device isn’t actively in a work cycle.
Up/DownAdjust the temperature or time. Press and hold down for rapid increase/decrease.In temperature setting, press button once for a 0.1 °C change (25.90 °C).In time setting, press button once for a 1 minute change 11 min – 2 h) and 30 minute change (2 – 72 h).
Operation
Use the cooker in a cooking vessel with a capacity from 6 to 15 litre. Use for example a large pot or similar. Connect the power cable to a wall plug. the device will emit a beep and the display will blink then display 88.88 for a short period of time. Press shortly on the On/off button to activate the device. The display will show the default time and temperature (8:00 and 56 °C).
Press the Select button. The temperature will flash and can be adjusted with the Up and Down buttons.
Press the Select button again and set the time.
When the time and temperatures are set, press the Start/stop button to start the cooker. During the pre-heating the display shows the current temperature followed by four dashes that will blink. When the set temperature is reached the cooker beeps.
You can pause or reset the current program by pressing the Start/stop button. The last set temperature and time will be shown on the display during pre-heating. If you press the button when the program has begun (and pre-heating is finished) the display will show remaining time and last set temperature. Repeat the above mentioned steps to set new settings.
When the timer ends five long beeps will sound and the display will show “CND”. Press start/stop to show the default temperature and time. You can now turn the device off by shortly pressing the on/off button.
Cooking guide
Different types of meat are ideal to cook using the sous vide method as they get more tender and flavour filled. Also fish, eggs and vegetables can be cooked with a perfect result. The cooking time depends on the thickness of the food, rather than the weight of the food.
Food preparation
- All food items to be used for cooking using the Sous Vide method should be of the highest quality and absolutely fresh.
- Ensure that all meat and seafood has been stored below 5 °C before preparation begins.
- Make sure that the food pouches are clean and have not been contaminated by dirt or other food contaminants.
- Use detergent and warm water to wash the food preparation area.
- Separate the raw ingredient preparation area from the finished product area.
- Wash hands well before commencing any food preparation.
- Ensure that the cooking pouch is completely sealed before cooking commences.
- Ensure that the cooking pouch is still completely sealed when cooking has finished.
- If the food is not going to be consumed immediately, plunge the pouch containing the food into iced water to reduce temperature quickly. Refrigerate until required.
Steps to Sous vide cooking
- Seasoning the foodTo enhance the flavour of the food, marinade or add spices, herbs, butter or oil to the vacuum pouch prior to sealing.
- Vacuum sealing the foodSous vide cooking requires food to be vacuum sealed inside pouches to ensure excess air and moisture are removed, so the natural taste and nutritional quality of the food is captured. If a vacuum sealer is not available ordinary plastic bags can be used as an alternative. Make sure all air is removed by placing the bag in water with the opening above the surface. Most air will escape that way. Seal it with a knot.
- Cooking the foodWhen the set water temperature has been reached, place the pouches carefully in the water. Ensure the pouches are fully submerged, and that water can easily circulate around the pouches.
- Searing the foodWhen sous vide cooking is completed, finish off by searing to improve the appearance and flavour of the food. This is particularly suited for meat and fish. Remove the food from the pouch. Quickly sear in a hot pan.
Temperature guide
The below information is a guide to setting the temperatures and times for your cooking. You may need to adjust for your individual tastes.
Cooking temperatures for meat (beef, lamb and pork)
- Rare: 52 00
- Medium rare: 56 °C
- Medium: 60 °C
- Medium well: 65 °C
- Well done: 71 °C
Cooking temperatures for poultry
- With boot: 82 °C
- Without bone: 44 °C
Cooking temperature for fish
- Rare: 47 °C
- Medium rare: 56 °C
- Medium: 60 °C
General temperature for vegetables
- 83 C 8/ C
Temperature and time chart
| Food | Temperature | Time Holding | Time | Thickness |
| Beep & Lamp | ||||
| Tenderloin | sirloin 52 °C or higher | 1 hour | Up to 6 hours | 1-2 cm |
| Rib eye. rump. T-bone | 52 °C or higher | 2 hours | Up to 2 hours | 2-5 cm |
| Blade, chuck, leg of lamb, shoulder, shanks, game meats | 52 °C or higher | 8 hours | Up to 8 hours | 4-6 cm |
| Belly | 82 °C | 10 hours | Up to 12 hou | 3-6 cm |
| Ribs | 59 °C | 10 hours | Up to 12 hours | 2.3 cm |
| Pork chops | 56 °C or | 4 hours | Up to 6 hours | 2-4 cm |
| Pork roast | 56 °C or higher | 10 hours | Up to 12 hours | 5.7 cm |
| Poultry | ||||
| Chicken breast with bone | 82 °C | 2 hours | Up to 3 hours | 3-5 cm |
| Chicken breast without bone | 64 °C | 1 hour | Up to 2 hours | 3-5 cm |
| Chicken thigh with bone | 82 °C | 1.5 hours | Up to 3 hours | 3-5 cm |
| Chicken thigh without bone | 64 °C | 1 hour | Up to 2 hours | 3.5 cm |
| Chicken legs | 82 °C | 2 hours | Up to 3 hours | 5-7 cm |
| Duck breast | 64 °C | 2 hours | Up to 2 hours | 3-5 cm |
| Fish | ||||
| Lean fish | 47 °C or higher | 1 hour | Up to 1 hour | 3.5 cm |
| Fatty fish | 47 °C or higher | 1 hour | Up to 1 hour | 3-5 cm |
| Shellfish | ||||
| Shrimp | 60 °C | 1 hour | Up to 1 hour | 2-4 cm |
| Lobster tail | 60 °C | 1 hour | Up to 1 hour | 4-6 cm |
| Scallops | 60 °C | 1 hour | Up to 1 hour | Up to 1 hour |
| Vegetables | ||||
| Root vegetables | 83 °C or higher | 1 hour | Up to 2 hours | 1-5 cm |
| Tender vegetables | 83 °C or higher | 1 hour | Up to 2 hours | 1.5 cm |
Note
Holding time represents the longest suggested period of time the food can remain in the water before the texture starts to change.Longer cooking times may result in an altered texture of finished foods.These times and temperatures are guidelines. Further cooking may be required to achieve desired result.All thicknesses are measured once the food has been vacuum sealed.Thinner cuts of meat will cook more quickly.
Cleaning
If the device has been active for 60, 120 or 180 hours the unit will display an to indicate that the device should be cleaned before being used again. Avoid using detergents on the plastic handle/pieces.
How to remove lime deposits
Please use acetic acid with the concentration 2.5% – 8% for cleaning, 0.1 litres acetic acid per 1 litres of water (the proportion 1:10), and set 40 T for 3H.
Repeat if necessary. Wipe the unit dry before storing.
How to remove grease
Use water and a small amount of washing up liquid and immerse to max level. Set the temperature to the lowest setting and let it run for 1 hour.
Troubleshooting
- Error code El (water low sensor)The water level is lower than the MIN mark on the sous vide cooker. Turn off and add enough water.
- Error code E2 (open loop)The circulator will stop if the temperature sensor is caught in an open loop caused by a loose connection wire. Contact the retailer if this error message is displayed.
- Error Code E3 (faulty temperature sensor)The circulator will stop if the temperature sensor is broken and/or shortcircuits. Contact the retailer if this error message is displayed.
- Error code E4 (dry boil / temperature high sensor)This happens if the water level is too low and the water low sensor doesn’t work. Turn off, fill up more water and let the cooker cool down.
Safety information
This appliance is intended to be used in household and similar applications such as:
- staff kitchen areas in shops, offices and other working environments.
- farm houses.
- by client in hotels, motels and other residential type environment.
- bed and breakfast type environments.
- This appliance can be used by children aged from 8 years and above and persons with reduced physical, sensory or mental capabilities or lack of experience and knowledge if they have been given supervision or instruction concerning use of the appliance in a safe way and understand the hazards involved.
- Children shall not play with the appliance.
- Cleaning and user maintenance shall not be made by children without supervision.
- Keep the appliance and its cord out of reach of from children less than 8 years.
- If the supply cord is damaged, it must be replaced by the manufacturer, its service agent or similarly qualified persons in order to avoid a hazard.
- Do not operate the unit on an inclined surface.
- Do not move or cover the unit whilst in operation. Use your unit well away from walls and curtains, and don’t use in confined spaces.
- Do not touch any metal surfaces of the unit while it is in use as they will be hot.
- Use handles and oven mitts to move the unit, the cooking pan and the lid when hot.
- Do not operate the unit without water in the cooking vessel.
- Be careful when lifting the unit after cooking. Always lift the unit away from you as unit is hot and can result in serious burns.
- Never place face over the unit.
- Unplug the unit when not in use and before cleaning.
- Allow the unit to cool before cleaning.
- Do not use the unit on the stovetop, inside a microwave oven or inside an oven.
- Read carefully and save all the instructions provided with an appliance.
- Always turn the power off before you insert or remove a plug.
- Remove by grasping the plug – do not pull on the cord.
- Turn the power off and remove the plug when the appliance is not in use and before cleaning.
- Do not use your appliance with an extension cord unless this cord has been checked and tested by a qualified technician or service person.
- Always use your appliance from a power outlet of the voltage (AL. only) marked on the appliance.
- Children should be supervised to ensure that they do not play with the appliance.
- The temperature of accessible surfaces may be high when the appliance is operating.
- Never leave an appliance unattended while in use.
- Do not use an appliance for any purpose other than its intended use.
- Do not place an appliance on or near a hot gas flame, electric element or on a heated oven.
- Do not place on top of any other appliance.
- Do not let the power cord of an appliance hang over the edge of a table or bench top or touch any hot surface.
- Do not operate any electrical appliance with a damaged cord or after the appliance has been damaged in any manner. Appliances are not intended to be operated by means of an external timer or separate remote control system.
- Do not immerse beyond the max. marking.
- The plastic part of appliance must not be immersed, not even while cleaning.
- The appliance is used to cook food only.
- Do not misuse the appliance.
- The heating element surface is subject to residual heat after use.
- Do not touch the metal surface.
- Only use fresh food, it should be sealed in an airtight plastic bag (polyethylene or polyamide material).
- Time and temperature are critical in the cooking process because some bacteria can grow in food in the absence of oxygen and produce toxin.
- Closely follow the recipes carefully.
- If the food will not be consumed within 4 hours, it is beneficial to cook until the food is pasteurized.
- Always keep the container opening to the atmosphere.
- The appliance must be supplied through a residual current device IRCD) having a rated residual operating current not exceeding 30 mA.
Wifi & app operation
- Download the app from Google Play or Apple App store. You can search for “Smart life – smart living” from app store.
- For new users, register a new account. For existing users, log into the Smarter Home app.
- Before initiating the connection. Press and hold the power button for 5 seconds until a beep is heard. The red power button changes to blinking in blue when connecting. If the machine does not connect to the wifi within 3 minutes. power of. then on the machine and repeat the previous steps.
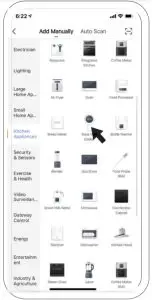
- Open app and press” +” to add device, or use the add device button.
- Select the type of device as” Sous Vide Cooker”

- Select “Other Mode”
- Select “AP Mode”
- Ensure the WiFi light is slowly flashing, then press on the orange button at the bottom of the screen to confirm.
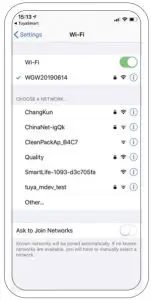
- Enter your wifi password and press confirm. Kind remind that 5GHz is not available until now.
-
Press on the orange button at the bottom of the screen to confirm.
- Go to network settings in your phone and connect to the “Smart life XXX” connection. There is no password to enter, Then return back to the app to complete setup. The app will connect with the device automatically, once successfully connected the flashing blue power button will turn to solid blue. If disconnected, the power button will shine in red.


 report this ad
NOTE: The unit can work as usual without the wifi connection. since the app needs to update regularly, the pairing process may differ from the manual. If this happens, please follow the instructions in the app.
[xyz-ips snippet=”download-snippet”]