
CLIPSAL Wiser Link MIP

This instruction sheet must be kept for further use.Visit our website www.clipsal.com to download the technical documents of Wiser Link products.PLEASE NOTE
- This equipment must be installed and maintained by a qualified electrician.
- All relevant local, regional and national regulations must be followed during the installation and the use of this equipment.
- The manufacturer assumes no responsibility in case of failure to follow the instructions given in this document.
Description
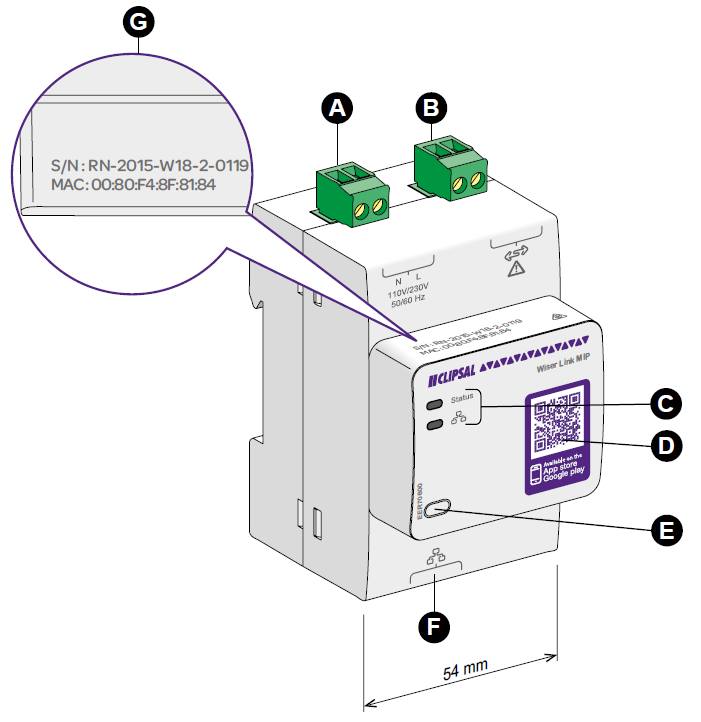
A: Power supply connectorPower supply (Neutral – Line)B: Communication connectorConnection to Wiser Link EM5.C: Communication indicatorsStatus: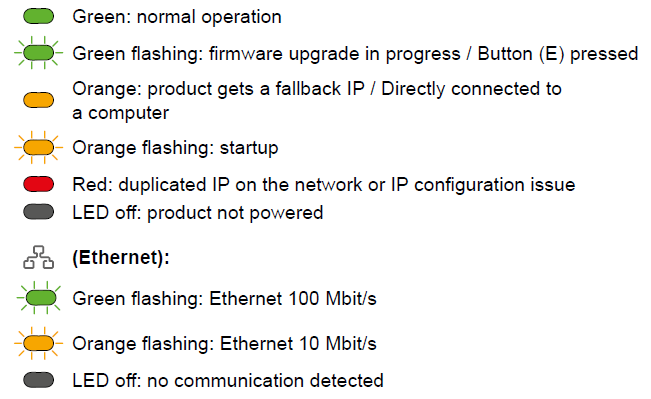
D: QR code to access Wiser Link ApplicationE: Button
- Reset password
- User registration
F: RJ45 Ethernet ConnectionG: Device Serial number and MAC address
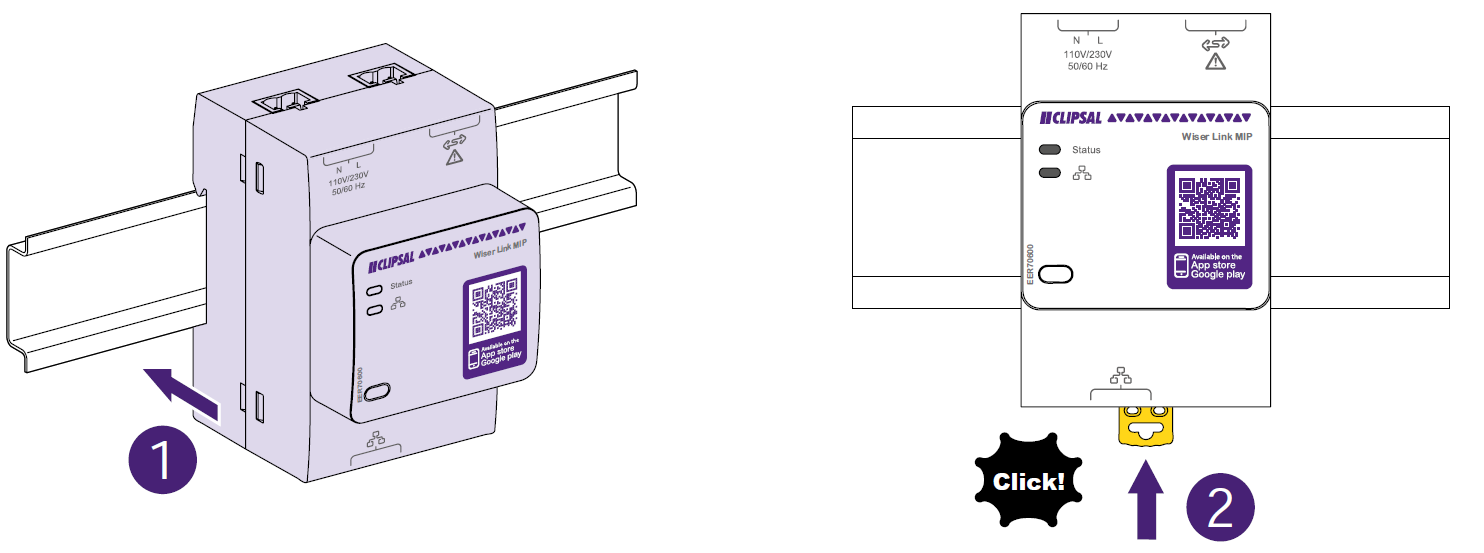
Installation
HAZARD OF ELECTRIC SHOCK, EXPLOSION, OR ARC FLASH
- Disconnect all power before installing this equipment.
- Use only insulated tools to connect the Wiser Link MIP to the Wiser Link EM5 energy meter.
- Failure to follow these instructions will result in death or serious injury.

Wiring
HAZARD OF EQUIPMENT DAMAGE
- Plug the power-supply connector (Neutral-Line) into the power-supply socket with marking N-L on the MIP product.
- Plug the communication connector (communication link with Wiser Link EM5) into the communication socket with marking .
- Failure to follow these instructions can result in equipment damage.
Wiring between the Wiser Link MIP and Wiser Link EM5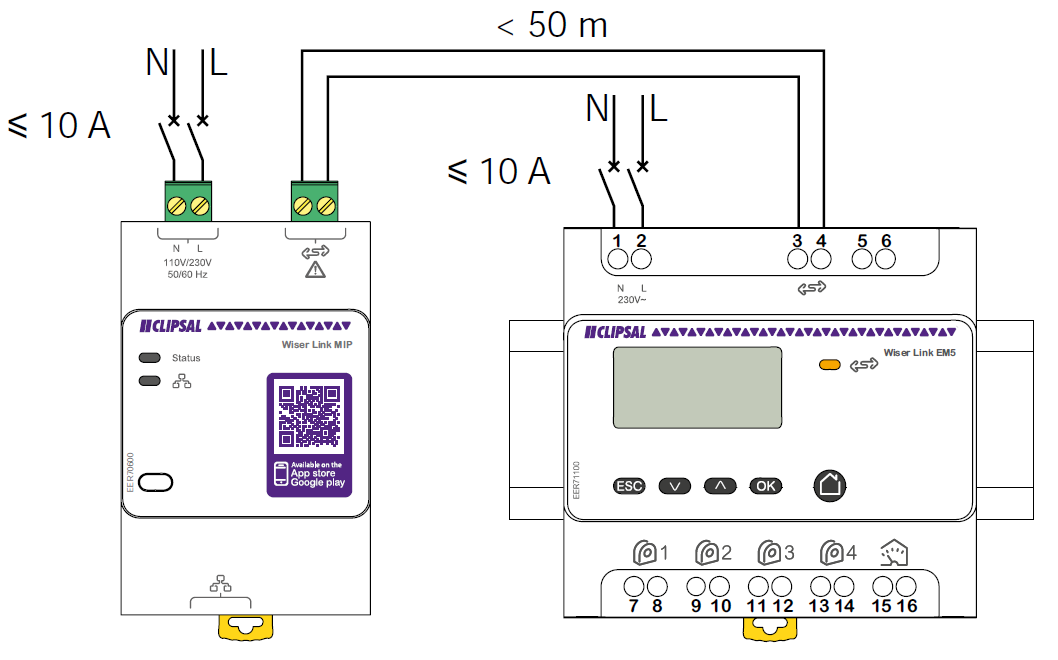
Operational wiring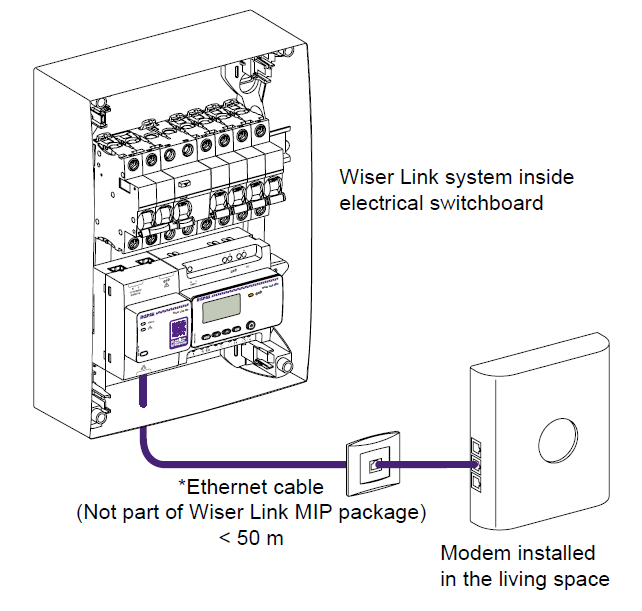
*PLEASE NOTE: If no modem is available during installation, then ethernet cable from Wiser Link MIP to an expected location of modem should still be installed.Reference standard AS/NZS 3000 and TS009.
Registration
Connection to access Wiser Link MIP embedded webpages
Option 1: Direct connection via laptop (starting from Windows 7 and above)Connect your Ethernet cable directly between Wiser Link MIP and your laptop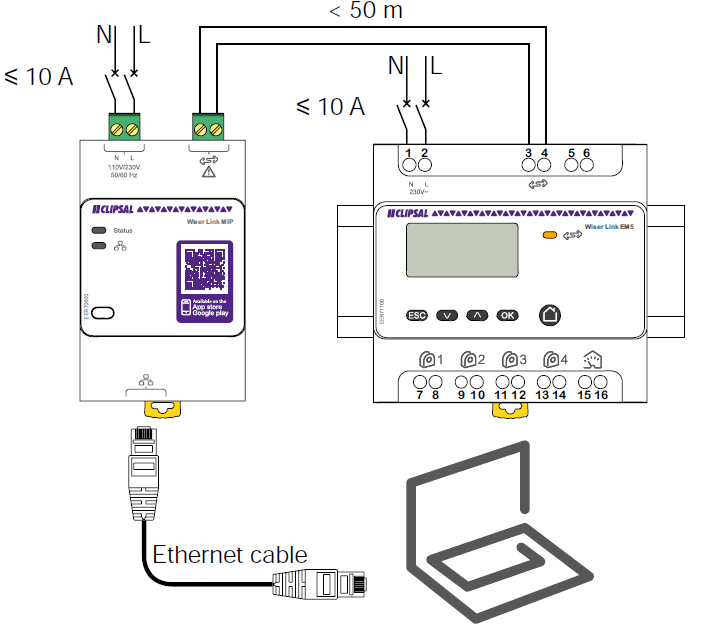
| Step | Action |
| 1 | Click on the “Start button” of your laptop. |
| 2 | Click on “Computer” on the start menu. |
| 3 | Click on “Network”. |
| 4 | Double click on the Wiser Link icon which appears automatically*. For example: my WiserLink-8184 (the last four characters shown match the last four characters of MAC address printed on the Wiser Link MIP). |
| 5 | Welcome to the Home page of your Wiser Link MIP. |
*If Wiser Link icon does not appear on “Network” automatically then goto “IP settings” menu on Wiser Link EM5 LCD screen and note the IP address. For more details please go to chapter 6 of the Wiser link EM5 Installation sheet.
Option 2: Wireless connection via modem/routerConnect the Wiser Link MIP via Ethernet cable to the modem / WIFI router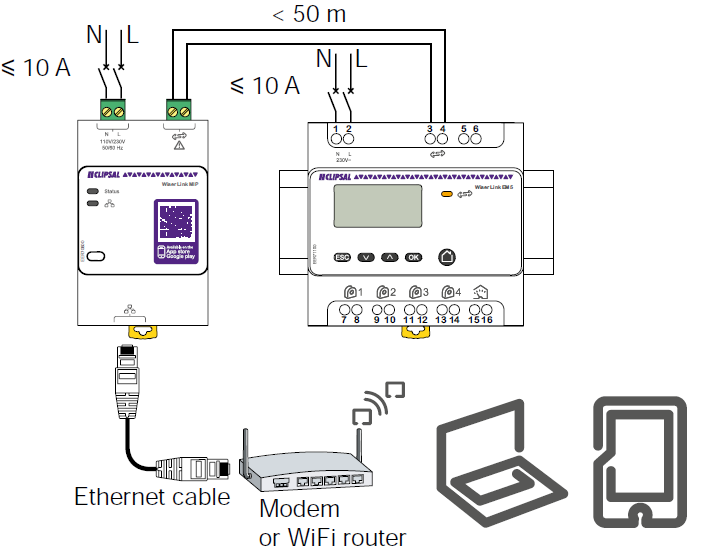
| Step | Action |
| 1 | Connect your Laptop/Tablet/Smart Phone wirelessly to the same local network created by your WiFi router. |
| 2 | Go to the LCD screen of your Wiser Link EM5 device. |
| 3 | Press the button then press the button twice to access the IP setting Menu. Click on button and note the IP address displayed. |
| 4 | Open a browser on your laptop and type this IP address and press “Enter”. |
| 5 | Welcome to the Home page of your Wiser Link MIP. |
Commissioning
Access your Wiser Link MIP embedded webpages
First login
| Step | Action |
| 1 | In ”User name” field, type admin. |
| 2 | In ”Password” field, type admin. |
| 3 | Click on ”Login” button. |
| 4 | At first login, it’s recommended to change the password in Account menu. |
Change password:Alternatively, on the login page, click on ”Forgot your password?” and follow the instructions.
Settings
- Go to Settings menu and click on the product that you want to configure.
- Wiser Link EM5 configurationName of current inputs can be customized to reflect the loads which are monitored.NOTE: Please ensure the “Quick Start Guide” is completed with installation details and load descriptions and passed onto the end user.
- Wiser Link MIP configurationThis page is reserved for installers or advanced users only. Network settings can be customized to match specific IP network architecture.
Operation
- Click on ”Device Status” menu to check the list of detected devices and the parameters such as communication status between Wiser Link EM5 and Wiser Link MIP and connection status between Wiser link MIP and Internet.
- Click on ”Home” menu to test the instant consumption and cumulated energy consumption.The consumptions can be reset by clicking the ”Reset my consumption” button.
Firmware Upgrade
To take benefit of the latest available functions, it is recommended to upgrade the Wiser Link system firmware:
- From your laptop download the latest system firmware file from www.clipsal.com
- Login to the system with your laptop (Refer to Chapter 5.1)
- Go to ”Maintenance” menu
- Click on “Firmware Upgrade” sub-menu
- Select the system firmware file that you have downloaded
- Click on the button “Upgrade Firmware” to download the file selected
Technical data
- Power supply: 110/230 Va ±15%
- Frequency: 50-60 Hz
- Maximum consumption: 5 VA
- Operating temperature: -25 °C … +50 °C
- Relative humidity: 93 % at 40 °C
- Elevation (for use): 0…2000 m
- Overvoltage category: III
- Pollution degree: 2
- EMC according IEC 61000-6-1 (2005) and IEC 61000-6-3 (2005)
- Degree of protection according to IEC 60529
- Front face IP40
- Casing IP20
- Communication with Wiser Link EM5
- Bit rate: 9600 bit/s
- Voltage: 0-24 Vc (not SELV)
- Connection: (2 wires) non polarized cable
- Maximum length: < 50 m
- Ethernet network interface
- Ethernet T-base10/100 Mbit/s
- Maximum cable length: 100 m
- Cable type: Cat6 STP
- DHCP client
This product must be installed, connected and used in compliance with prevailing standards and/or installation regulations.
Clipsal Australia Ply Ltd reserves the right to change specifications, modify designs and discontinue items without incurring obligation and whilst every effort is made to ensure that descriptions, specifications and other information in this catalogue are correct, no warranty is given in respect thereof and the company shall not be liable for any error therein.© 07-2015 Clipsal Australia Pty Ltd – All rights reserved.The identified trademarks and copyrights are the property of Clipsal Australia Pty Ltd unless otherwise noted.![]()
References
[xyz-ips snippet=”download-snippet”]