![]() SC200 & SC200DOwners Manual
SC200 & SC200DOwners Manual
 Configurable Dash Cam
INTRODUCTION
Congratulations! You made the smart choice by purchasing an SC Series Dash Cam from Cobra.SC Series cameras provide peace of mind by continuously recording the road in beautiful HD video. With cutting-edge features, phenomenal video quality, and an industry-leading focus on user experience, SC Dash Cams are the best solution to record your ride. This User Manual covers the SC 200 and SC 200D.
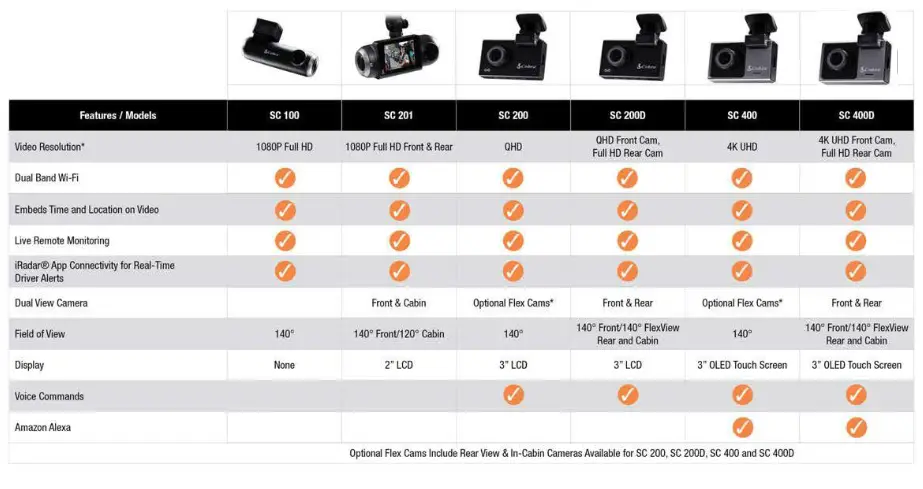
SC 200 DASH CAM FEATURES
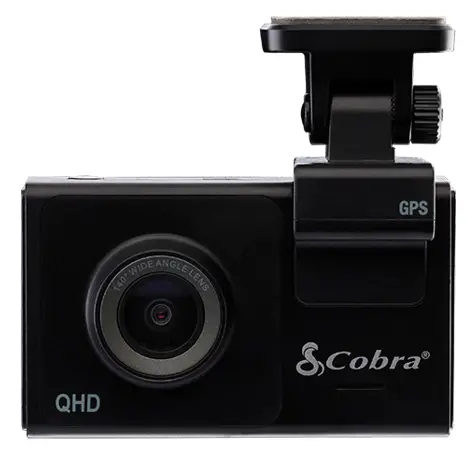
Dual LensWith 1600P QHD single-view recording. Full HD 1080P when recording in dual-view.Dual-Band Wi-FiFlawless ConnectivityInstant Driver AlertsRed-Light & Speed Cameras, Police, and Community Radar alerts140°Field of ViewEmbedded GPSLocation and Speed Information3” DisplayCrystal Clear LCDIncludesSC200: 8GB SD CardSC200D: 16GB SD CardDisplay Interface Supports these Languages: English
PRODUCT SERVICE AND SUPPORT
For any questions about operating or installing this new Cobra product, PLEASE CONTACT COBRA FIRST…do not return this product to the retail store. The contact information for Cobra will vary depending on the country in which you purchased and utilize the product. For the latest contact information, please go to www.cobra.com/support.
WHAT’S IN THE BOX
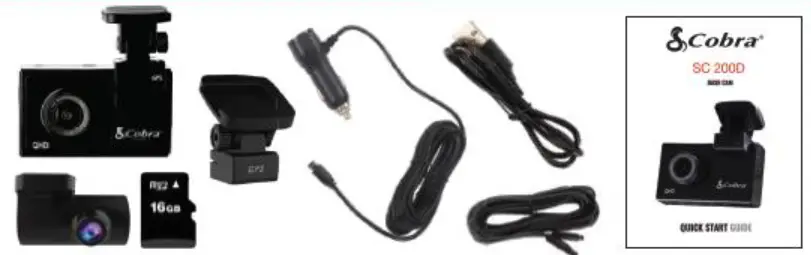
SC200DWhat’s Included:
- SC 200 Dash Cam
- Rear View Camera
- 16GB MicroSD Card
- Adhesive Mount & GPS Attachment
- Vehicle Charger
- Micro USB Data Cable
- Rear Cam ExtensionCable
- Quick Start Guide
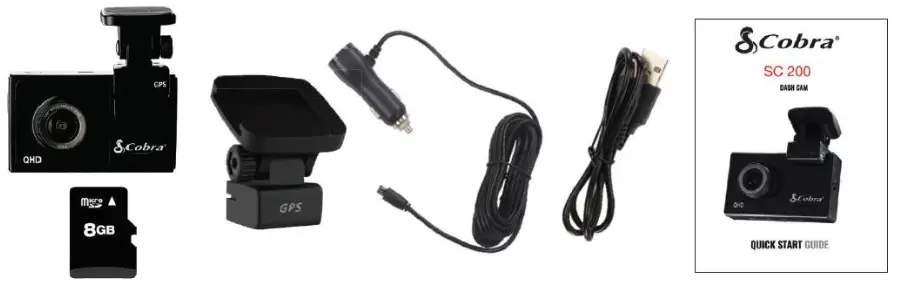
SC200What’s Included:
- SC 200 Dash Cam
- 8GB MicroSD Card
- Adhesive Mount & GPS Attachment
- Vehicle Charger
- Micro USB Data Cable
- Quick Start Guide
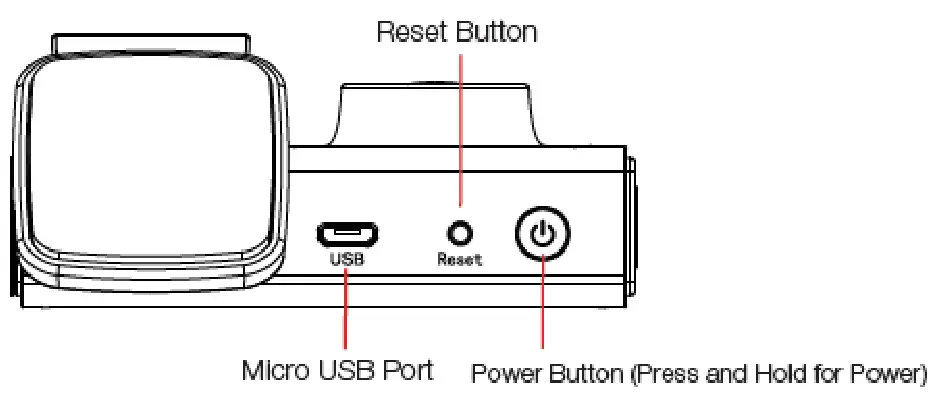
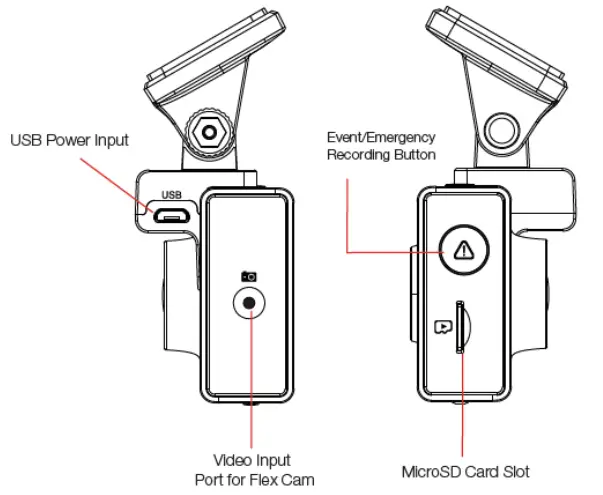
HARDWARE INTERFACE
|
INSTALLATION
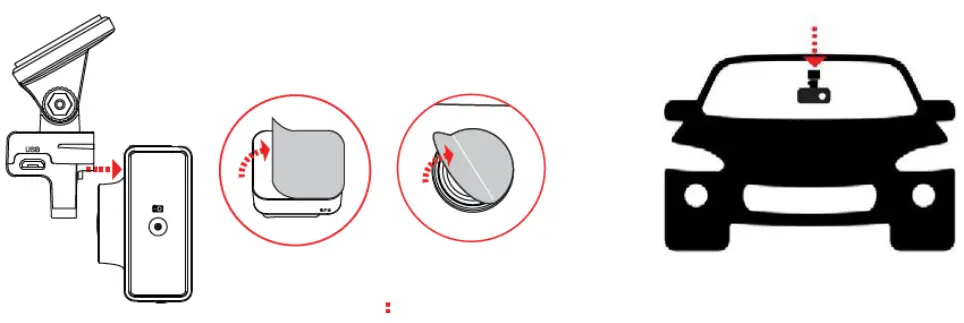
- MOUNTTo install the Adhesive Windshield Mount, slide the dash cam onto the mount. Remove protective film from the camera lens and display. Find the spot on your windshield where you would like to mount the camera and confirm the placement. Reminder, this is an adhesive mount, so it is important to mount correctly the first time. Next, peel the plastic film off the 3M adhesive and press the mount FIRMLY onto the windshield.
 For a View of the Road Behind YouConnect Extension Cable to the Video Input Port on the Dash Cam and run the cable along the floor of your car. Connect the Extension Cable to the Rear Camera and attach to the vehicle’s back window. Please orient the rear camera so it faces out the windshield as shown here.
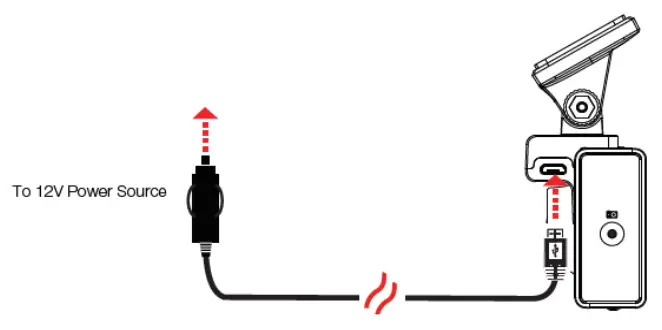
 - POWERPlug one end of the supplied 12V Vehicle Power Adapter into your vehicle’s cigarette lighter, and the other end into the micro USB port. The unit will automatically turn on and start recording. To manually power on the device PRESS AND HOLD the Power button until the display activates.Note: A Hardwire Kit is available at www.cobra.com for a more permanent installation that allows for discrete routing of the power cable and recording while your vehicle is off.
- DRIVE!Your dashcam is designed for easy operation. After powering the camera will instantly begin loop recording. When the MicroSD Card is full the oldest footage will be deleted to make way for the new. If you witness something that you do not want to be deleted simply press the Emergency Record button and it will be saved.
 For a View of the Road Behind YouConnect Extension Cable to the Video Input Port on the Dash Cam and run the cable along the floor of your car. Connect the Extension Cable to the Rear Camera and attach to the vehicle’s back window. Please orient the rear camera so it faces out the windshield as shown here.
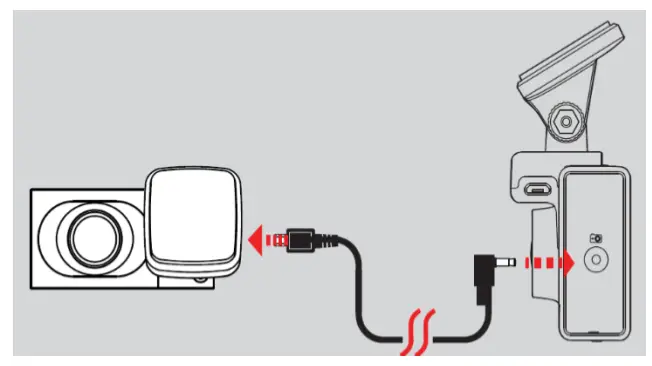
 Note: A Hardwire Kit is available at
 BASIC OPERATION
POWERING ON THE DEVICEThe device will power on automatically when plugged in and can also be powered by PRESSING AND HOLDING the On/Off button until the display activates (when connected to power).LOOP RECORDINGS:Once the SD card is full, the camera will continuously overwrite the oldest footage recorded with recent recordings. To protect a clip so that it will not be overwritten, press the Emergency Record/Favorites Button ![]() so that the clip is moved into the locked content partition.EMERGENCY RECORDINGS:An Emergency Recording is triggered when the Emergency Record/Favorites Button
so that the clip is moved into the locked content partition.EMERGENCY RECORDINGS:An Emergency Recording is triggered when the Emergency Record/Favorites Button ![]() is pressed or when the G-Sensor registers a significant impact (hard braking or collision). Emergency Recordings create locked files that are not overwritten by Continuous Loop Recording. To ensure that important footage is not lost surrounding an incident, the prior video clip is locked if the incident happens within 30 seconds of the beginning or end of a clip.THE MICRO SD MEMORY CARDThe device comes with a Micro SD memory card. To remove the SD card, press firmly on the SD card to push it further into the slot. There will be a click and the SD card will pop out on release. Extract the card and replace it as necessary by inserting a card into the slot and pressing it until it locks in place. This camera is compatible with Micro SD cards up to 256GB. Please be sure to format the card in-camera before use. Class 10 high-endurance cards from reputable brands are recommended for constant video recording of a dash camera.NAVIGATING MENUSWhen in a menu, press
is pressed or when the G-Sensor registers a significant impact (hard braking or collision). Emergency Recordings create locked files that are not overwritten by Continuous Loop Recording. To ensure that important footage is not lost surrounding an incident, the prior video clip is locked if the incident happens within 30 seconds of the beginning or end of a clip.THE MICRO SD MEMORY CARDThe device comes with a Micro SD memory card. To remove the SD card, press firmly on the SD card to push it further into the slot. There will be a click and the SD card will pop out on release. Extract the card and replace it as necessary by inserting a card into the slot and pressing it until it locks in place. This camera is compatible with Micro SD cards up to 256GB. Please be sure to format the card in-camera before use. Class 10 high-endurance cards from reputable brands are recommended for constant video recording of a dash camera.NAVIGATING MENUSWhen in a menu, press![]() or
or ![]() to navigate to the menu item you want to select or change and then press
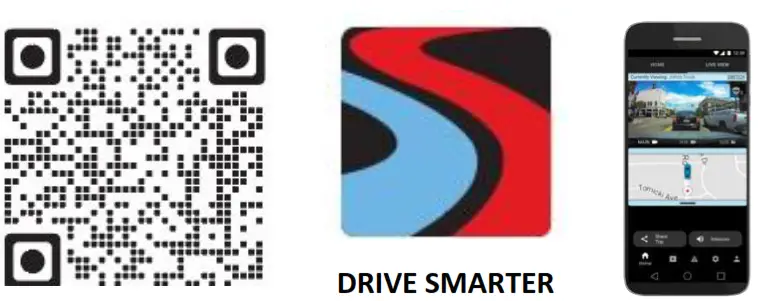
to navigate to the menu item you want to select or change and then press ![]() to select or change the option associated with that item. Pressing at any time will exit the menu without saving changes.VOLUME ADJUSTModels with LCD displays allow the user to select “Volume” in the setting menu and adjust the volume of notifications and voice announcements. Both products with LCD displays and without allowing for volume adjustment using the Drive Smarter Mobile App.INITIAL SETUPWhen first powered on, the device will show you the video stream and automatically begin loop recording.When the Dash Cam is first turned on, we strongly recommend pairing it with the DriveSmarter App to download the latest firmware and ensure your camera contains the latest features. Please follow the directions below to pair the app with the camera.DRIVE SMARTER® APP CONNECTIONYour Dash Cam uses a Bluetooth® connection to the Drive Smarter app. Smartphone integration allows for…Cloud Video Management: View your camera’s footage from the phone without having to connect the camera or SD card to the computer. From here you can download videos and save them to your phoneLive-View: Viewing a live stream into the camera when within proximity of the camera’s WiFi network.MayDay: Cobra’s MayDay feature allows you to create an emergency contact and auto-upload your location and MayDay notice when the camera’s G-Sensor detects a severe impact/collision.Over-The-Air Firmware Updates: Have the latest features and bug fixes loaded to your camera via the mobile application.
to select or change the option associated with that item. Pressing at any time will exit the menu without saving changes.VOLUME ADJUSTModels with LCD displays allow the user to select “Volume” in the setting menu and adjust the volume of notifications and voice announcements. Both products with LCD displays and without allowing for volume adjustment using the Drive Smarter Mobile App.INITIAL SETUPWhen first powered on, the device will show you the video stream and automatically begin loop recording.When the Dash Cam is first turned on, we strongly recommend pairing it with the DriveSmarter App to download the latest firmware and ensure your camera contains the latest features. Please follow the directions below to pair the app with the camera.DRIVE SMARTER® APP CONNECTIONYour Dash Cam uses a Bluetooth® connection to the Drive Smarter app. Smartphone integration allows for…Cloud Video Management: View your camera’s footage from the phone without having to connect the camera or SD card to the computer. From here you can download videos and save them to your phoneLive-View: Viewing a live stream into the camera when within proximity of the camera’s WiFi network.MayDay: Cobra’s MayDay feature allows you to create an emergency contact and auto-upload your location and MayDay notice when the camera’s G-Sensor detects a severe impact/collision.Over-The-Air Firmware Updates: Have the latest features and bug fixes loaded to your camera via the mobile application.
http://drivesmarter.com/downloads
CONNECTION INSTRUCTIONS
- Start the Drive Smarter App and log in/create an account.
- Follow the instructions in the Drive Smarter App to create a vehicle and connect the camera
- When complete, a chime will sound on the camera and it will appear as Connected in the Drive Smarter App.
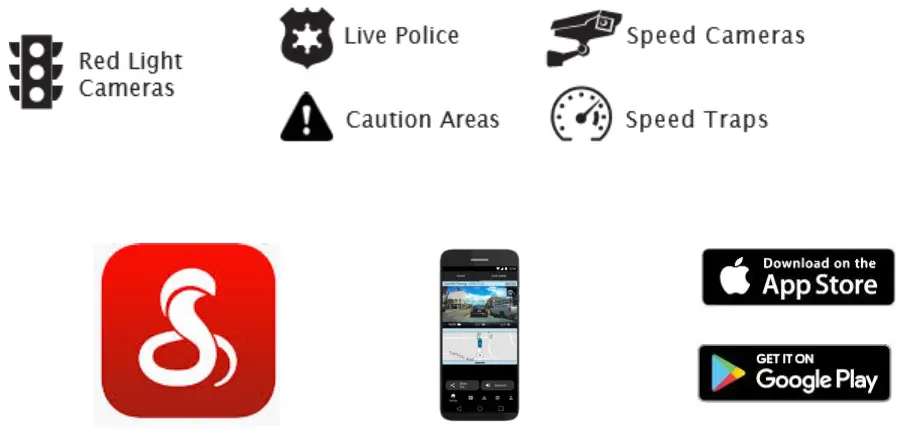
iRADAR® APP CONNECTIONConnecting to the iRadar App enables your camera to receive real-time driver alerts about what is on the road ahead including:
CONNECTION INSTRUCTIONS
For iPhone® 6s and later.
- Power on your dashcam and be sure that Bluetooth is enabled
- Make sure your iPhone’s Bluetooth is ON. The dash cam will NOT APPEAR in the iPhone’s Bluetooth Settings Menu.
- Start the Cobra iRadar App. Press the Menu button in the upper left of the app and select Devices. Follow the on-screen instructions to complete the pairing and connection.
- When complete, a “connected” chime will sound and the Bluetooth icon will turn white on the dashcam display.
For Android™ Devices.
- Power on your dashcam.
- Enter your Android device’s Bluetooth Settings Menu.
- Scan for Devices and select Drive HD to pair.
- Enter the Cobra iRadar App. A “connected” chime will sound, and the Bluetooth icon will turn white on the dashcam display
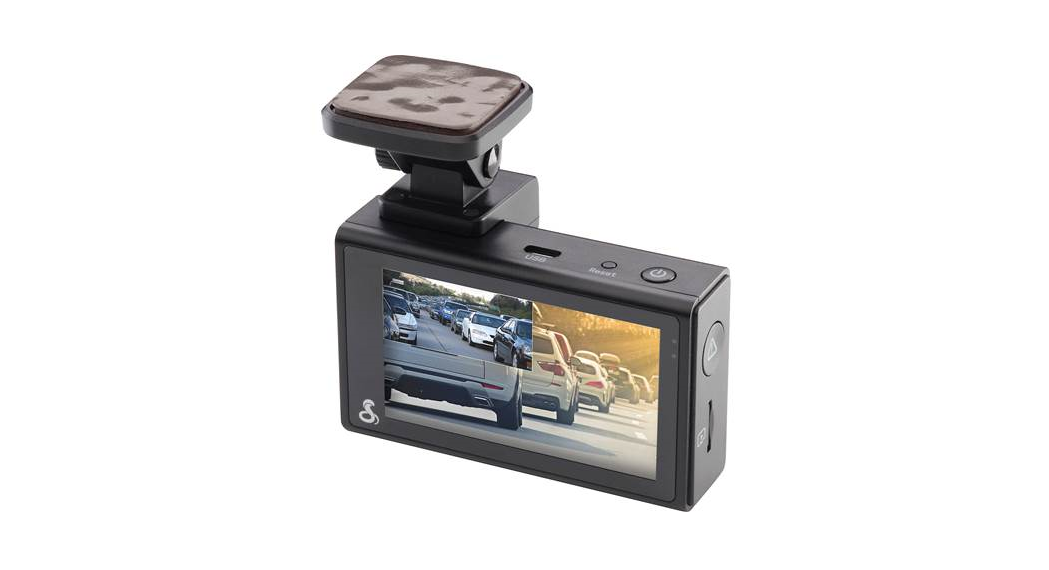
VIDEO SCREENThe Video Screen is the home screen for the device. With the SC200, based on settings, you can have one view or two views (picture-in-picture).VIDEO SCREEN BASICS:When first powered on, the display will show you what the camera sees.Note that the button functions are different depending on whether the unit is currently recording or not.When first turned on or connected to power, the dash camera is in Loop Recording mode.Loop recording must be stopped for the unit to enter the Settings Menu.
Button Functions (Recording Stopped):
| Access the dash cam’s Settings menu. | |
| Takes a snapshot and stores it in the Photo Folder. | |
| Enters the playback menu to review previous recordings and photos. | |
| Begins loop recording. |
Button Functions (While Recording):
| When pressed the camera saves the current clip from being overwritten. | |
| Takes a snapshot and stores it in the Photo Folder. | |
| Toggles the microphone on/off. Note that the icon on the button indicates the action that will be taken when the button is pushed, not the current setting. The current setting is shown on the status bar at the top of the screen. | |
| Stops loop recording. While in an Emergency Recording you will be asked to confirm. |
STATUS BAR ICONS:![]()
A – Indicates when camera is loop recording![]() Hazard icon appears in the status bar if an Emergency Recording is in progress. The videos is being locked.B – Indicates the recording time of the current clipC – Indicates resolution of current recordingD – Indicates loop clip time (1 minute, 2 minutes, 3 minutes)E – Indicates whether the microphone is active or mutedF – Indicates if Motion Detection is enabledG – Indicates that WiFi is enabled on the Dash Cam, WiFi connection is possible if paired with phoneH – Red icon indicates that GPS is on, but there is no satellite lock. Green GPS icon indicates that the GPS has a satellite lock.I – Indicates that Bluetooth is enabled, Bluetooth connection is possible if paired with the phone – Indicates that Parking Mode is enabled
Hazard icon appears in the status bar if an Emergency Recording is in progress. The videos is being locked.B – Indicates the recording time of the current clipC – Indicates resolution of current recordingD – Indicates loop clip time (1 minute, 2 minutes, 3 minutes)E – Indicates whether the microphone is active or mutedF – Indicates if Motion Detection is enabledG – Indicates that WiFi is enabled on the Dash Cam, WiFi connection is possible if paired with phoneH – Red icon indicates that GPS is on, but there is no satellite lock. Green GPS icon indicates that the GPS has a satellite lock.I – Indicates that Bluetooth is enabled, Bluetooth connection is possible if paired with the phone – Indicates that Parking Mode is enabled
VIDEO SETTINGS
Video Resolution:This setting allows you to set the following resolutions on your SC 200. Higher resolutions will give you a clearer image but take up more space on the memory card.
The available resolutions are:
| 1600P QHD1080P Full HD720P HD720P HD | 2560 x 1440 30 Frames per Second (Front View Only)1920×1080 30 Frames per Second1280×720 60 Frames per Second1280×720 30 Frames per Second |
Loop Clip Time:This setting allows you to control the duration of each individual movie clip on the device. Video clips be set to durations of 1 minute, 2 minutes, or 3 minutes.
VIDEO AND PHOTO PLAYBACK MODE
This device stores video and pictures on its removable Micro SD Card. Playback mode will allow you to review the saved video and photos and playback the video with sound. To select a video or photo for playback navigate with the arrows and select with the OK key. The Back key will return you to the previous screen. Photos can be viewed and deleted. It is not necessary to lock photo files – they are not overwritten by continuous loop recording.
VOICE ANNOUNCEMENTS
Your camera can warn you when you are approaching red-light and speed-cameras, user-reported police, radars detected in the area, accidents, and more from our community of users. When connected to the iRadar Mobile App, your camera can tell you what kind of threat you are approaching (For example: “Police Spotted Ahead” or “Accident Ahead”) to help keep you safe onthe road.
VOICE COMM$ANDS
Your unit supports the following voice commands to keep your hands on the wheel and your eyes on the road. Note: Please ensure you turn down your stereo when controlling the unit with your voice.
|
Say |
Camera Action |
| ‘Front Video On” | The front-View camera is displayed on the screen |
| “Rear Video On” | A rear-View camera is displayed on the screen (optional accessory camera required) |
| “Record Video” | Toggles recording on/off |
| “Lock Video” | (If currently recording), The camera locks the video and tags it as Favorite |
| (If not currently recording), The camera begins emergency recording, locks first video, and tags as favorite | |
| “Screen On” | Turn Display On |
| “Screen Off’ | Turn Display Off |
| “Take Photo” | Takes a photo of the front and/or rearview and saves to the “Photos” folder |
MEMORY CARD STORAGE
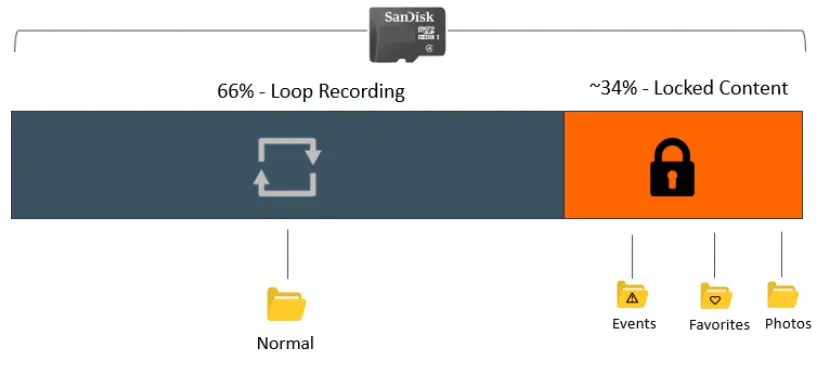
![]() LOOP RECORDINGS:Once the SD card is full, the camera will continuously overwrite the oldest footage recorded with recent recordings. To protect a clip so that it will not be overwritten, press the Emergency Record/Favorites Button so that the clip is moved into the locked content partition.
LOOP RECORDINGS:Once the SD card is full, the camera will continuously overwrite the oldest footage recorded with recent recordings. To protect a clip so that it will not be overwritten, press the Emergency Record/Favorites Button so that the clip is moved into the locked content partition.![]() EMERGENCY RECORDINGS:An Emergency Recording is triggered when the Emergency Record/Favorites Button is pressed or when the G-Sensor registers a significant impact (hard braking or collision). Emergency Recordings create locked files that are not overwritten by Continuous Loop Recording. To ensure that important footage is not lost surrounding an incident, the prior video clip is locked if the incident happens within 30 seconds of the beginning or end of a clip.
EMERGENCY RECORDINGS:An Emergency Recording is triggered when the Emergency Record/Favorites Button is pressed or when the G-Sensor registers a significant impact (hard braking or collision). Emergency Recordings create locked files that are not overwritten by Continuous Loop Recording. To ensure that important footage is not lost surrounding an incident, the prior video clip is locked if the incident happens within 30 seconds of the beginning or end of a clip.
PHOTOS:Photos are automatically saved in the Locked partition of the SD card.
![]() You may be occasionally asked to “Format the SD Card” by the camera. This will delete all SD card content and help the memory card continue operating properly. Please save all-important footage by downloading via the Drive Smarter app or by manually uploading to your PC before doing this.
You may be occasionally asked to “Format the SD Card” by the camera. This will delete all SD card content and help the memory card continue operating properly. Please save all-important footage by downloading via the Drive Smarter app or by manually uploading to your PC before doing this.
SAFETY$ FEATURES
The SC Series Dash Cams come with several safety features designed to protect you and your vehicle. You can adjust the level of protection that fits you via Camera and Drive Smarter App settings.G-Sensor Impact Detection:Your Dash Cam includes a built-in G-Sensor which allows the device to determine when the car has been in a collision. If it detects a collision, it automatically locks the recording being made at the time of the accident. Additionally, if the event occurs within 30 seconds of the start or end of a clip, the adjacent recording will also be locked so you always have at least 30 seconds saved from before and after the event. You can use this setting to set the sensitivity of the G-Sensor from 1-3 or turn it off. Level 1 is the easiest to activate the G-sensor. Level 3 will only lock videos when the most severe impacts are detected. Locked videos created as a result of a G-sensor impact detection are stored in the Events folder on the SD card.Parking Mode & Motion Detection:Parking Mode uses the Motion Sensor and G-Sensor to monitor while your vehicle is parked. The idea is that when you are parked, the dashcam will be “sleeping”, but it will monitor surroundings for motion along with G-Sensor impacts. If it detects motion or if it detects an impact, then the unit will wake up and start recording. The camera will enter parking mode after 5 minutes. If there is no motion is during this period, the display will turn off and the recording will stop (the camera monitors for g-sensor impacts or motion). If the motion is detected or if a G-sensor impact above Level 1 is triggered, the unit will wakeup and start saving 1-minute clips for as long as the activity is being detected.Notes:
- Parking Mode only works properly if the dashcam is powered. Either the Cigarette Lighter Socket must remain on with the ignition off, or the dashcam must be hardwired to a constant power source (please check www.cobra.com for available accessories).
- If you park where there is lots of activity that keeps triggering the motion sensor, then the unit might never time out and enter the sleep state. For this, you can use the “Auto Surveillance Shutoff” setting to prevent unnecessary recording.If leaving your vehicle off for more than 48 hours (or less if your battery is old) please use the “Auto Surveillance Shutoff” setting to set a time limit on Parking Mode and prevent your battery from being drained.
- You can choose to have your camera monitor for impacts and/or motion by controlling the ‘Parking Mode’ and ‘Motion Detection’ settings separately.
![]() Lane Departure WarningThe Lane Departure Warning System (LDWS) provides audible and visual warnings as you approach a lane boundary. It will indicate whether you are departing the lane to the left or to the right.Note that this feature relies solely on analyzing video of the road ahead and, therefore, works best on clearly marked roads with good visibility. This feature is for informational purposes only. See the Trademark Acknowledgement, Warnings, and Regulatory Information section below for the full legal disclaimer for using this feature.
Lane Departure WarningThe Lane Departure Warning System (LDWS) provides audible and visual warnings as you approach a lane boundary. It will indicate whether you are departing the lane to the left or to the right.Note that this feature relies solely on analyzing video of the road ahead and, therefore, works best on clearly marked roads with good visibility. This feature is for informational purposes only. See the Trademark Acknowledgement, Warnings, and Regulatory Information section below for the full legal disclaimer for using this feature.![]() Forward Collision WarningThe Frontal Collision Warning System (FCWS) provides audible and visual warnings if you are quickly approaching an obstacle in the road ahead.Note that this feature relies solely on analyzing video of the road ahead and therefore works best with good visibility. This feature is for information purposes only. See the Trademark Acknowledgement, Warnings, and Regulatory Information section below for the full legal disclaimer for using this feature.
Forward Collision WarningThe Frontal Collision Warning System (FCWS) provides audible and visual warnings if you are quickly approaching an obstacle in the road ahead.Note that this feature relies solely on analyzing video of the road ahead and therefore works best with good visibility. This feature is for information purposes only. See the Trademark Acknowledgement, Warnings, and Regulatory Information section below for the full legal disclaimer for using this feature. Speed AlertThe Speed Alert system uses the GPS included in your camera to monitor your speed. In the ADAS Settings menu, you can set a speed limit for yourself. If the camera detects that you are driving faster than your pre-set speed limit, it will alert you with an audible tone and by flashing the alert on the camera display.
GENERAL SETTINGS
Video Resolution:Allows you to select the desired video resolution for loop recordings and emergency videos.Lower resolution settings result in smaller file sizes, which results in more space on the SD card.Loop Clip Time:Loop recordings and emergency videos can be saved in 1 min, 2 min, or 3 min clips depending on your preference. Smaller (1 min) files are easier to transfer to your phone and share.Wi-Fi:Allows enabling/disabling WiFi connection on the device and viewing the camera’s WiFi name and password.GPS:GPS can be disabled if needed. Enabling this setting allows your recordings to have an exact GPS location stamped on the footage. This also always allows you to know the location of your vehicle if the camera is wired via a hardwire kit and connected to a WiFi hotspot is installed in the car.Bluetooth:Allows you to disable Bluetooth if needed. Bluetooth is enabled by default. Note: The camerawill not be able to connect to the Drive Smarter App if Bluetooth is disabled.Display:Setting allows you to choose the feeds that are displayed on the screen while the camera is powered. Choose Front view, cabin view, or Picture in Picture (Front View and Cabin View)Date/Time:
- Enable “Automatic” mode to have date/time settings based on the camera’s GPS signal.Having the correct date and time ensures that timestamps associated with your videos are accurate. In this mode, you will still have to ensure that you have picked the correct “Time Zone” and enabled or disabled “Daylight Savings” based on your location.
- To manually set the date and time, the cursor down to “Manual”, and select it. You will now be able to enter Date and Time information.
Voice Commands:Voice Commands can be toggled on/off in this setting.Microphone:Microphone can be enabled or disabled via settings or on the main screen. When disabled your recorded videos will be silent. Voice Commands are not affected by turning off the microphone.Motion Detection:Enabling Motion Detection allows your camera to monitor movement around the camera (changes in light) which can be used to record any suspicious activity around the vehicle when parked. This setting screen allows you to choose which of the available cameras should be used to monitor for activity. If leaving your vehicle off for more than 48 hours (or less if your battery is old) please use the “Auto Surveillance Shutoff” setting to set a time limit on Motion Detection and prevent your battery from being drained.Note: For Motion Detection to work the camera needs to be connected via hardwire kit (part:= CA-MICRO USB-001) or be plugged into an ‘always on’ Cigarette Lighter Socket. You can check if your vehicle has an ‘always on’ CLA adapter online or in the vehicle’s owner’s manual.Parking Mode:Enabling Parking Mode allows your camera to monitor for changes in its internal G-Sensor/accelerometer. Bumps, Collisions, and break-ins can trigger the G-Sensor to save valuable footage from the moment of impact. If leaving your vehicle off for more than 48 hours (or less if your battery is old) please use the “Auto Surveillance Shutoff” setting to set a time limit on Motion Detection and prevent your battery from being drained.Note: For Parking Mode to work the camera needs to be connected via hardwire kit (part: CAMICROUSB-001) or be plugged into an ‘always on’ Cigarette Lighter Socket. You can check if your vehicle has an ‘always on’ CLA adapter online or in the vehicle’s owner’s manual. Surveillance Auto Shutoff: If leaving your vehicle off for more than 48 hours (or less if your battery isold) please use the “Auto Surveillance Shutoff” setting to set a time limit on Motion Detection and Parking Mode to preventyour battery from being drained.G-Sensor:You can use this setting to set the sensitivity of the G-Sensor from 1-3 orturn it off. Level 1 is the easiest to activate the G-sensor. Level 3 is the setting that will only lock videos when the most severeimpacts are detected. Level 1 is recommended for most users.Watermark (Date/Time, Speed, GPS, Driver ID Video StampThe watermark settings allow you to toggle having the date/time, speed, GPS coordinates, the Cobra logo, and a custom Driver ID be stamped into the bottom of all recorded video.Driver ID Watermark:This setting allows you to associate a Driver ID with the camera (for example John, Employee 12, etc). This allows you to set the name of the driver which will be stamped on the footage as part of the watermark.Exposure:This allows you to adjust how light or dark videos and images will appear on the camera.Button Beep:Turns the sound on or off for button presses.Note:This only affects normal button presses. Error messages or Voice Announcements are not affected by this setting. Screen Saver:Allows you to set duration after which the device’s display turns off with the camera still recording. This setting is useful to avoid distracted driving and having a bright LED screen when driving at night.Interior Night Vision:The interior camera’s infrared LEDs allow for clear recording at night. You can set this to be always on, off, or select Auto to allow the camera to detect low-light conditions and automatically enable Interior Night Vision recording.Language:This setting allows you to pick the on-screen language for the camera unit.Driver Assistance (ADAS):ADAS features allow you to receive warnings when you are in danger of colliding with an object in front of you (Forward Collision Warning), drifting out of your lane (Lane Departure Warning), and Speeding beyond a limit you can pre-set for yourself (Speed Alert). You can toggle each of these alerts on/off within this menu.
To use ADAS features, please ensure that the camera’s vision system is properly calibrated and that the dash camera is properly oriented relative to the road ahead.
To Calibrate:Cursor over the “Calibration” item and press “OK” to select.For a properly mounted dash camera,
- The vertical line would appear to divide the windshield into equal parts.
- The horizontal line would align with the front edge of your vehicle’s hood if your hood is visible.
iRadar Network Alerts:This setting allows the user to program real-time driver alerts acquired from the iRadar network. Here you can choose to have the camera make a voice announcement when there is a red-light camera or speed-camera ahead or to simply display the warning on the LCD display. You can also choose to turn notifications from the unit off completely and simply follow along using theiRadar App.Drive Smarter Services:These settings allow you to select which videos you would like auto-uploaded to the Drive Smarter App for sharing/review. You can also choose to have Incident Reports sent to your insurance provider, as well as Mayday, alerts sent to your Emergency Contact if a severe G-Sensor event is detected.Speed UnitsChoose between miles/hour or kilometers/hour as the speed unit stamped in the watermark.Volume:Allows you to raise and lower the volume of notifications and button beeps from your camera.WDR:Enabling a Wide Dynamic Range allows your camera to accurately capture footage in very bright conditions. Enabling this feature is recommended for most recording conditions.GPS Format:Choose between Decimals and Degrees as the GPS format that is stamped in the watermark.Frequency:Choose between 50Hz and 60Hz as your operating frequency if you are experiencing flickering in your video.Format Reminder:Choose the recurrence at which you are reminded to format the Micro SD card. Formatting theSD card frequently ensures your videos are protected and the SD card is saving content properly.Delete Videos Reminder:Set this to be periodically reminded to free up locked video content so that the camera does not run out of “Emergency Recordings” and “Favorites” space.Restore Defaults:Resets the device to factory settings. Note that restoring defaults will NOT erase data on your memory card.Format SD Card:Allows you to format the inserted SD Card. NOTE: This action will permanently delete all data on the card. It is recommended to format any new card and periodically format existing cards.AboutYou can use this setting to view your camera electronic serial number, manufacturer part number, and Firmware.
FIRMWARE UPDATES
![]() Ensure the camera is connected to a constant power source during the update process. Failure to do so could result in your unit becoming non-functional. Your vehicles cigarette lighter socket or a household outlet works best
Ensure the camera is connected to a constant power source during the update process. Failure to do so could result in your unit becoming non-functional. Your vehicles cigarette lighter socket or a household outlet works best
Using the Drive Smarter App
- View the current firmware version under the About menu item on the Dash Cam
- Stop loop recording
- Press the MENU button, cursor down to the ABOUT item
- Note the firmware version shown on the screen
- Power up your camera by connecting to constant power sources such as your vehicle’s CLA adapter or a household outlet.
- When you connect your camera, the app will check if a newer firmware update is available on the server.
- Press ‘Download’ on the notification to download the latest Firmware.
- Follow the instructions on the Drive Smarter Mobile Application. If successful, the camera’s LEDs will begin blinking while the firmware is being installed.
- To check that the Firmware update was successful, you can check the ‘About’ screen in your camera’s settings menu
Using a Mac or PCFor optimal performance, check www.cobra.com periodically for software updates.
- View the current firmware version under the About menu item on the Dash Cam
- Stop loop recording
- Press the MENU button, cursor down to the ABOUT item
- Note the firmware version shown on the screen
- Connect the Dash Cam to your computer using the included USB to Micro-USB cable.
- Power on the Dash Cam and select Connect to Computer using the record/select button.
- The camera will be listed in Windows Explorer/Finder.
- Download the update file from www.drivesmarter.com and save it to your computer. It will end with “.bin” as the file extension.Note: You do not need to double-click or open this file on the computer.
- Copy/paste or drag the update file you downloaded .bin file into the root directory of the Camera’s SD Card.
- Wait for the file to transfer and then safely disconnect the Dash Cam from the computer. The Dash Cam will turn off.
- Plug the Micro USB cord into a reliable power source such as your home’s outlet or your vehicle’s CLA adapter. The Dash Cam will turn on and automatically boot into the Firmware Update Menu.
- Follow the directions on the camera display to update firmware if the unit has one. Units without displays will update automatically.
- You can check if your camera is up to date by checking the firmware in your camera’s ‘About’ setting submenu in the camera or via the app.
CAMERA SPECIFICATIONS
TROUBLESHOOTING
If your unit does not appear to be operating properly, please follow these troubleshooting steps:
- Make sure the power cord is properly connected.
- Make sure the socket of your vehicle’s cigarette lighter is clean and free of corrosion.
- Make sure the power cord’s cigarette lighter adapter is firmly seated in your cigarette lighter
- Make sure you have downloaded the latest firmware to your unitFAQ
- Where do I mount/position my Dash Camera on the windshield?a. Power on your dashcam so you can see the camera’s view while mounting. We recommend centering your camera and mounting it under the rear-view mirror.If your unit has a display, you can use the Camera’s “Calibrate” feature found in the ADAS menu to line up your view. SC100 users can use the Drive Smarter app to get a live view of what the camera is seeing to help with mounting.
- What is the largest MicroSD card size I can use in my camera?a. We recommend using a Class 10 Micro SD card from a reputable vendor up to the following sizes.
Model SC100 SC201 SC200
Max SD Card Size 128GB 256GB 256GB - Why is my unit not powering up?a. Please ensure your unit is properly connected. If you have turned the unit off, press and hold the power button to turn it on again.If you are using Parking Mode and Motion Detection Mode with a hardwire kit, the unit might not “wake up” when you enter. Simply begin driving and when your unit detects this it will wake up and begin recording.
- Why do recordings of the cabin/vehicle’s interior appear black and white?
- This is the normal operation of the Infrared LED night-vision camera. Infrared recording allows the camerato accurately record your vehicle’s cabin in low-light conditions. You can turn Infrared recordings off in the settings menu.
- How do I use Parking Mode and Motion Detection?a. Parking Mode and Motion Detection can be turned on in the camera’s settings. These two features will monitor your vehicle automatically when the unit is connected directly to the car’s vehicle via hardwire kit (check for availability at www.cobra.com).Note: When the car is parked your unit will go into a low-power “standby”/sleeping state where it monitors for activity. The unit will automatically wake up when it detects significant motion or driving.
- Why is my unit not getting a GPS Lock (GPS icon is red)?a. The GPS inside the device locks in with the satellite best when you are on the road. You may not be able to get a GPS lock while in your garage, parking structures, or if testing the camera in your home.
TRADEMARKS ACKNOWLEDGEMENT, WARNINGS, and REGULATORY INFORMATION
Cobra and the snake design are proprietary trademarks of Cobra Electronics Corporation, USA. Other trademarks and trade names are those of their respective owners. Cobra Electronics Corporation™ is a trademark of Cobra Electronics Corporation, USA.The Bluetooth® word mark is a registered trademark owned by Bluetooth SIG, Inc. and any use of such marks by Cobra Electronics Corporation is under license. Other trademarks and trade names are those of their respective owners.The Driver Awareness Alert display feature is subject to US Patent Numbers 8,842,004 and 8,970,422 and additional pending US Patent Applications.Warning! The forward-collision warning system (FCWS) feature, when turned on, is for limited informational purposes only. The FCWS doesNOT replace a driver’s responsibility to use safe driving judgment, comply with all traffic regulations, and observe all road and driving conditions at all times. The FCWS uses the camera to provide a warning of upcoming vehicles [and large objects] and, as a result, may have reduced or no functionality in low visibility or certain weather conditions.The driver is responsible for the safe operation and control of the vehicle. Do not substitute your driving judgment with the information provided by this feature. Cobra disclaims liability for injuries, damages, or death arising from the use of this feature.Warning! The Lane Departure Warning System (LDWS) feature, when turned on, is for limited informational purposes only. The LDWS doesNOT replace a driver’s responsibility to use safe driving judgment, comply with all traffic regulations, and observe all road and driving conditions at all times. The LDWS uses the camera to provide a determine if the vehicle is drifting toward or departing from designated lane markings and, as a result, may have limited functionality in low visibility or certain weather conditions or when driving on unmarked or poorly marked roads.”Driver is responsible for the safe operation and control of the vehicle. Do not substitute your driving judgment with the information provided by this feature. Cobra disclaims liability for injuries, damages, or death arising from the use of this feature.NOTE: This device complies with part 15 of FCC rules: Operation is subject to the following two conditions: (1) This device may not cause harmful interference, and (2) This device must accept any interference received including interference that may cause undesired operation.CAUTION: Modifications or parts not approved by Cobra Electronics Corporation may violate FCC Rules and void authority to operate this equipment. This device complies with RSS-310 of Industry Canada. Operation is subject to the condition that this device does not cause harmful interference.CAN ICES-3B/NMB-3B.DISPOSAL OF ELECTRONIC EQUIPMENT: This product may contain hazardous substances that could impact health and the environment if not disposed of properly.The crossed-out wheeled bin symbol indicates that the product should not be disposed of along with the household waste. It should be handed over to an applicable collection point for the recycling of electrical equipment. By ensuring that this product is disposed of correctly you will help/prevent potential negative impacts on the environment.If you need more information on the collection, reuse, and recycling systems, please contact your local civic office or the shop where it was originally purchased.
 report this ad
References
[xyz-ips snippet=”download-snippet”]