
CSTV-130User Manual

 In the box
 In the box
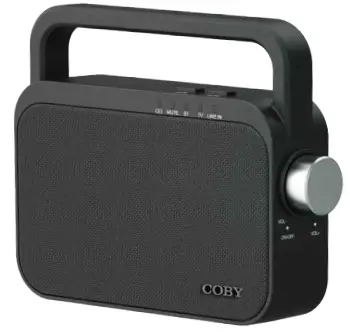
- 1 x CSTV-130 Wireless TV Speaker
- 1 x Speaker Dock
- 1 x AC Power Adapter
- 1 x Micro USB Charging Cable
- 1 x Optical Cable
- 1 x AUX Cable
- 1 x User Manual
Overview
 Overview
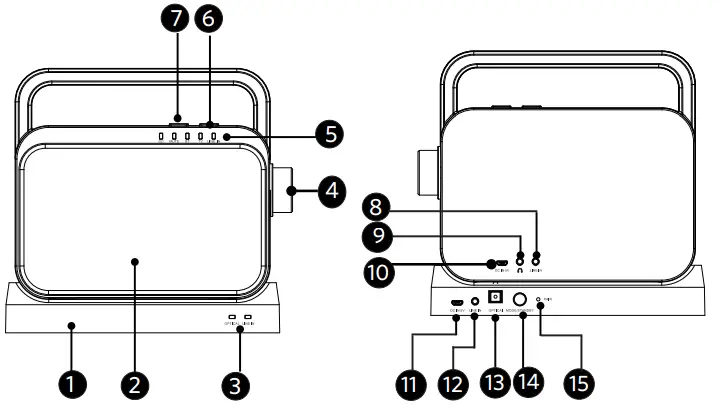
- Dock
- Speaker
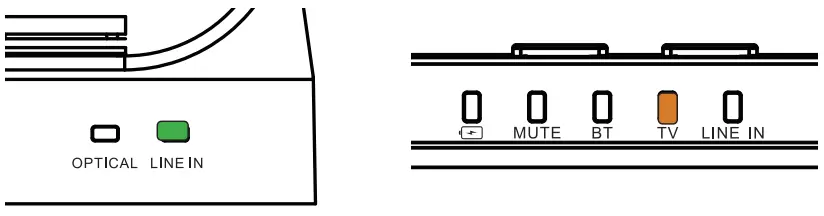
- Dock LED Indicators – Indicates the status of the Dock.
- Power/Volume Knob – Turns the Speaker on/off and adjusts the volume level.
- Speaker LED Indicators – Indicates the status of the Speaker, including 5 LEDs to indicate battery status, Mute Mode, Bluetooth mode, TV mode, Aux-In mode.
- Mode Button (Speaker) – Press repeatedly to toggle between the Speaker’s Bluetooth mode, TV mode, and Aux-In mode.
- Mute Button – Press to mute or resume sound for playback.
- 3.5 mm AUX Input Jack (Speaker) – For playing music from headphone output or AUX Output of another device.
- Headphone Output Jack – For listening to TV audio with headphones.
- Micro USB Charging Port – For charging the Speaker.
- DC 5V Power Jack – Power input for the Dock.
- 3.5 mm AUX Input Jack (Dock) – For playing music from the headphone output or AUX Output of another device.
- Optical Input Port – Alternate connector to TV audio.
- Mode/Standby Button (Dock) – Press repeatedly to toggle between TV Mode and Aux-In Mode, press and hold to enter Standby Mode.
- Pair/Reset button – For manually pairing the Speaker with the Dock or restore the Speaker to factory settings.
Charging your Speaker
There are three methods for charging the Speaker.
Method 1Connect the supplied Power Adapter to an AC power source and to the DC 5V Power Jack of the Dock, then place the TV Speaker onto the Dock with the two metal pins aligned to begin charging.
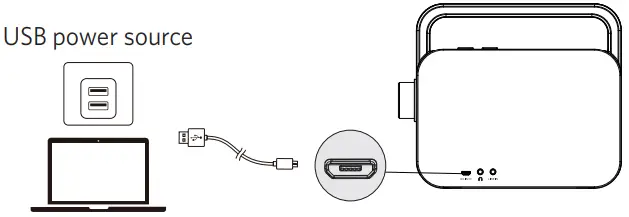
Method 2Connect the supplied USB cable to a USB power source and to the DC 5V Power Jack of the Dock (Micro USB Port), then place the TVSpeaker onto the Dock to begin charging.
 Note: Some TVs come with a USB power output port, you can also directly plug the supplied USB cable into the TV’s USB port to charge the speaker. Make sure your V’s USB power output is 5V/1A so that it can power the dock on, refer to your TV’s user manual.
Method 3Connect the supplied USB Cable to the Mirco USB Charging Port of the Speaker and to a USB power source to begin charging.
 Battery status indication on Speaker LED
| Slowly flashing red | Charging |
| Steady red | Fully charged |
| Slowly flashing green | Battery low |
Powering On/Off
 Powering On/Off
- Power the Speaker on/offTo power on the Speaker, turn the Power/Volume button clockwise until you hear a click.To power off the Speaker, turn the Power/Volume button counterclockwise until you hear a click.
- Power the Dock on/offTo power on the dock, connect the supplied Power Adapter to the DC 5V Power Jack of the Dock and to an AC power source. If the Dock is powered on, the Dock LED Indicator will light up.To power off the Dock, disconnect the Power Adapter from the AC power source.To set the Dock to Standby Mode, press and hold the Mode/Standby Button on the Dock until the Dock LED Indicator slowly flashes.
Pairing your Speaker and the Dock
 Pairing your Speaker and the Dock
When the Speaker and Dock are both powered on, they will pair together automatically.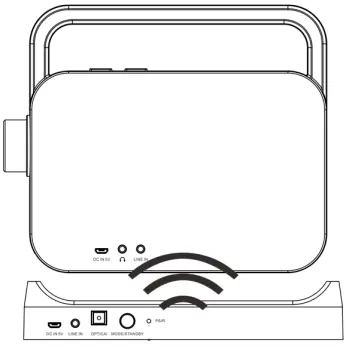
 Connecting to your TV through an optical cable (TV Mode)
Step 1. Pull out and remove the rubber protector nubs on both ends of the supplied Optical Cable.Step 2. Connect the supplied Optical Cable to the Optical Port of the Dock and to your TV’s Optical Port.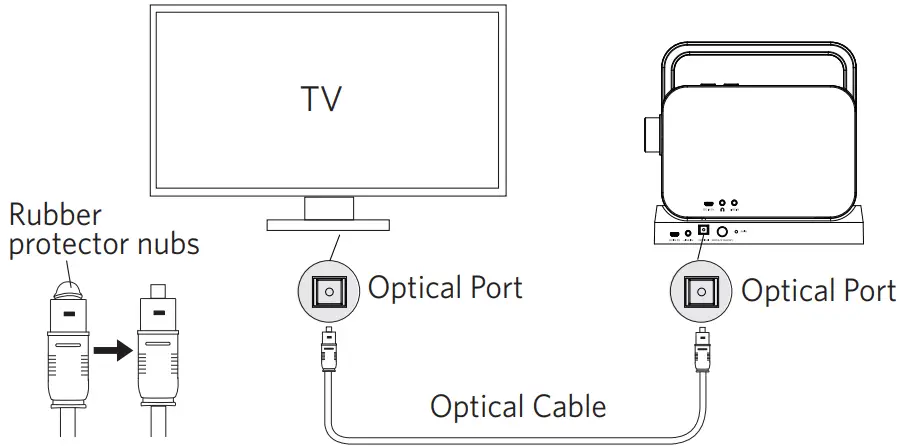 Step 3. Press the MODE Button on both the Speaker and Dock to select TV Mode, the TV LED Indicator on both the Speaker and Dock will turn orange.

- Step 4. Make sure the audio settings on your connected TV are set to PCM or Optical audio format.Note: If your TV has the sound settings set to Dolby or another format, your Speaker may not function properly. You must change the sound output to PCM or Optical audio. Refer to your TV’s user manual.
Connecting through an audio cable ( TV Mode)
Step 1. Connect one end of the supplied AUX Cable to the AUX-In (Line In) port of the Dock and to the Headphone Output or AUX utport of your device ( Like your TV, smartphone, laptop, etc.).
Step 2. Press the Mode Button repeatedly on the Dock to select Line In Mode and on the speaker to select TV Mode, the Line In LED Indicator on the Dock will turn green, the Line In LED indicator on the speaker will turn orange.
Connecting through an audio cable (AUX-In Mode)
Step 1. Connect one end of the supplied AUX Cable to the AUX-In (Line In) Port of the Speaker and to the Headphone Output or AUX Outport of your device (Like your TV, smartphone, laptop, etc.).
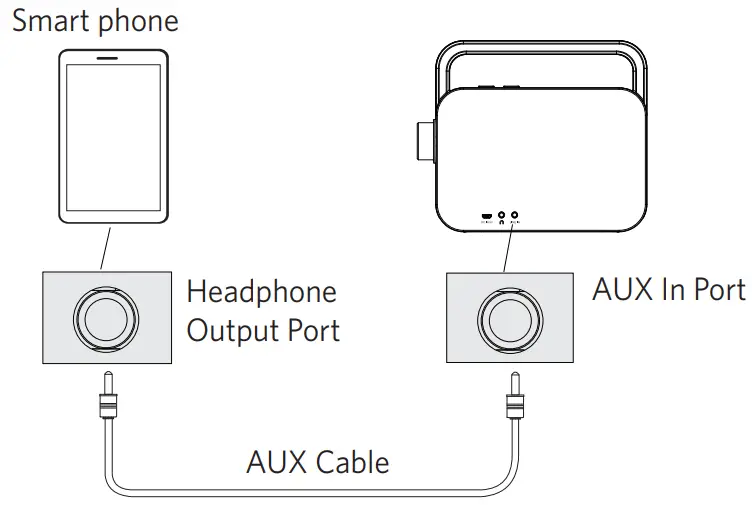 Step 2. Press the Mode Button repeatedly on the Speaker to select Line In Mode, the Line In LED Indicator on the Speaker will turn green.
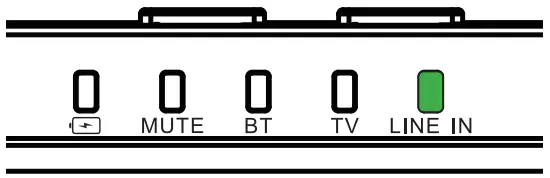 Note: When an AUX cable is connected, it will automatically unpair from any actively paired Bluetooth® device.
Bluetooth connection with your device (Bluetooth Mode)
 Bluetooth connection with your device (Bluetooth Mode)
Step 1. Press the Mode Button on the Speaker to select and enter Bluetooth Mode, the Bluetooth LED Indicator on the Speaker will rapidly flash blue.
 report this ad

Note: The Speaker will automatically be paired with your last successfully connected media device next time they are both turned on.
Audio playback
Note: The Speaker can be used to play audio both on its own and while connected to the Dock (Please note that the distance between the speaker and dock should be within 100 feet.).Listening to music with your headphones
Connect wired headphones or earbuds to the Headphone Output Jack on the Speaker. You can use the Speaker’s Volume Knob and Mute Button here as well.
Troubleshooting
| Problem | Solution |
| Bluetooth mode is not working. | 1. On your phone’s Bluetooth settings, tap Forget the device to clear the Speaker’s Bluetooth connection from your device.2. Turn your phone’s Bluetooth off, then turn it on again.3. Ensure your Speaker is set to Blue-tooth mode, search for “CSTV-130”, then tap “CSTV-130” to reconnect. |
| The Speaker will not pair with the Dock. | 1. Turn off the Speaker.2. Power on the Dock, use a metal pin to press, and hold the PAIR button for 3 seconds.3. Turn on the Speaker and press the PAIR button again to re-pair the Speaker and the Dock. |
| Audio from the Speaker sounds distorted. | Select PCM 2.0 (or PCM stereo) as the audio output. |
| The Speaker is not re-responsive to any input. | Check if the Speaker’s battery is dead, and charge it if so. If not, reset the speaker by pressing the Pair button. |
Specifications
| Model Name | CSTV-130 |
| Playtime | Up to 8 hours |
| Power Input for dock | 5V, 1 A |
| Power input for speaker | 5V, 1A |
| Charging time | 4 hours |
| Charge Voltage | 3.7 V |
| Battery Type | Rechargeable Lithium-ion |
| Battery capacity | 2500mAh |
| Power consumption | 5W x 2 |
| Driver (full range) | 53mm |
| Range | 30m/100 ft |
| Bluetooth version | V 5.0 |
| Frequency | 2.4 GHz |
Safety Statement
 Safety Statement
Safety Precautions
- Avoid dropping.
- Do not disassemble this device.
- Do not expose this device to rain or moisture or submerge in water.
- Ideal temperatures are 0°C to 35°C. Avoid extreme temperatures.
- Keep the device away from excessive heat, such as sunshine, fire, or the like.
- Do not use the device outdoors during thunderstorms.
- Use original or certified cables.
- The Power Adapter is used as the disconnect device for the dock.Ensure that the socket-outlet is easily accessible after installation.
- Hands must be dry when plugging the power cord into an AC outlet to prevent electrical shock. Do not damage the power cord by disassembling, bending, pulling, or exposing it to heat as it may cause a fire or electrical shock.
- Make sure to completely insert the power plug into an AC outlet. Insecure connections can cause a fire.
- Do not use any corrosive cleaner/oil to clean.
- To prevent damage to your device’s parts or internal circuits, do not use it in dusty, smoky, damp, or dirty environments.
- Do not use, store or transport the device where flammables or explosives are stored. Using your device in these environments increases the risk of explosion or fire.
FCC Statement
FCC ID: 2AMSOCSTV-130This device complies with Part 15 of the FCC Rules. Operation is subject to the following two conditions:
- this device may not cause harmful interference, and
- this device must accept any interference received, including interference that may cause undesired operation.
Warning: Changes or modifications notexpressly approved by the party responsible for compliance could void the user’s authority tooperate the equipment.
Note: This equipment has been tested and found to comply with the limits for a Class B digital device, pursuant to Part 15 of the FCC Rules. These limits are designed to provide reasonable protection against harmful interference in a residential installation.This equipment generates, uses, and can radiate radio frequency energy and, if not installed and used in accordance with the instructions, may cause harmful interference to radio communications. However, there is no guarantee that interference will not occur in a particular installation. If this equipment does cause harmful interference to radio or television reception, which can be determined by turning the equipment off and on, the user is encouraged to try to correct the interference by one or more of the following measures: (1) Reorient or relocate the receiving antenna. (2) Increase the separation between the equipment and receiver. (3) Connect the equipment into an outlet on a circuit different from that to which the receiver is connected. (4) Consult the dealer or an experienced radio / TV technician for help.
Notice![]() This product complies with the radio interference requirements of the European Community.
This product complies with the radio interference requirements of the European Community.
 This symbol means the product must not be discarded as household waste and should be delivered to an appropriate collection facility for recycling.Follow local rules and never dispose of the product and rechargeable batteries with normal household waste. Correct disposal of old products and rechargeable batteries helps prevent negative consequences for the environment and human health.
DisclaimerAll information, design, and specifications contained in this manual were correct at the time of this publication. As the product goes under continuous upgrades and changes, however, the final device may have slight differences. The contents of this manual are subject to change without prior notice, and Fesco Group will not be liable for any errors contained herein or for incidental or consequential damages in connection with the furnishing performance or use of this manual.© 2021 Fesco Distributors, Inc., All rights reserved.The information contained in this user manual and all accompanying documentation is copyrighted and all rights are reserved. This publication may not be copied for commercial purposes in any form, in whole or in part without the prior written consent of Fesco Group. The COBY logo is a trademark of Fesco Distributors, Inc., use of the COBY logo for commercial purposes without the prior written consent of the company may constitute trademark infringement.![]() BluetoothThe Bluetooth® word mark and logos are registered trademarks owned by the Bluetooth SIG, Inc., and any use of such marks by Fesco Distributors, Inc. is under license. Other trademarks and trade names are those of their respective owners.
BluetoothThe Bluetooth® word mark and logos are registered trademarks owned by the Bluetooth SIG, Inc., and any use of such marks by Fesco Distributors, Inc. is under license. Other trademarks and trade names are those of their respective owners.
References
[xyz-ips snippet=”download-snippet”]