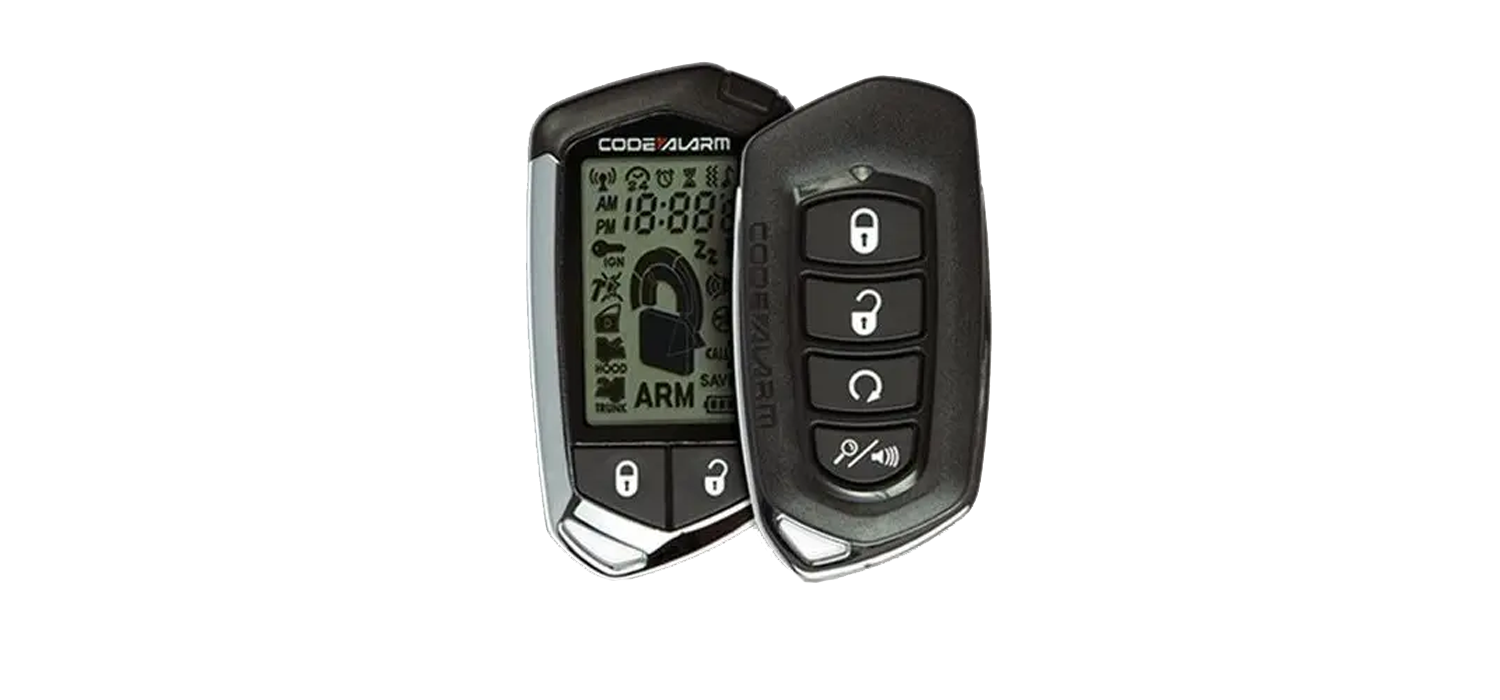
CODE ALARM
PROFESSIONAL SERIESOwner’s GuideFor Models:caRS & ca2LCD5, ca2LCD5E
Deluxe Vehicle Remote Start and Keyless Entry System
IMPORTANT NOTE: The operation of the Security and Convenience System as described in this manual isapplicable to most vehicles. However, due to the configuration of some vehicles, some functions AND/ORSAFETY PRECAUTIONS may not apply. Please see your installing dealer for more information.
2020 Voxx Electronics Corporation. All rights reserved.
Using Your Remote Control
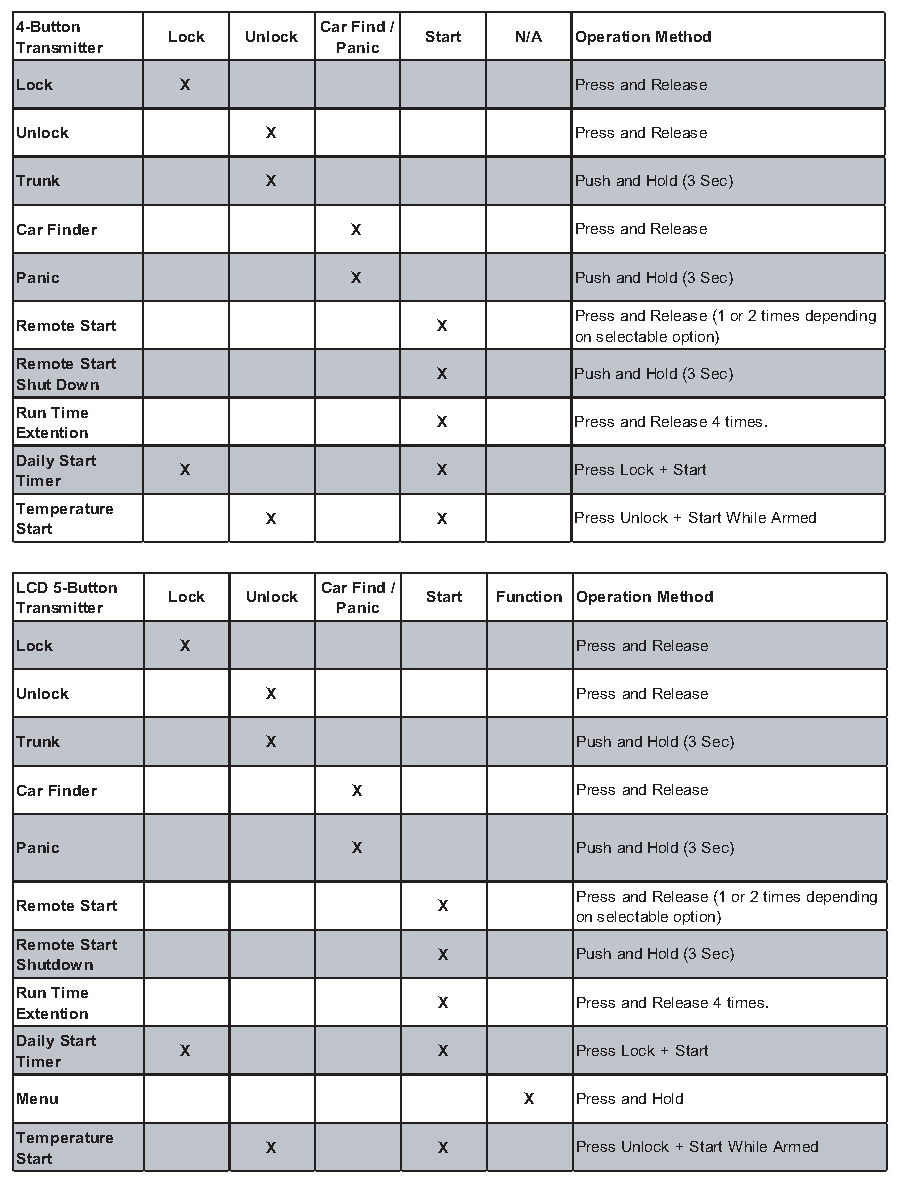
Using the Keyless EntryThe ![]() button is used to lock the vehicle’s doors, the
button is used to lock the vehicle’s doors, the ![]() button is used to unlock the vehicle’s doors. To lock or unlock the doors simply press and release the desired function button one time. For your convenience, the parking lights will flash once when the doors are unlocked and twice when the door are locked.
button is used to unlock the vehicle’s doors. To lock or unlock the doors simply press and release the desired function button one time. For your convenience, the parking lights will flash once when the doors are unlocked and twice when the door are locked.
NOTE: The system is equipped with a feature called Silent Choice. If enabled, the system requires a second press of the ![]() or
or ![]() button to activate an audible locking/ unlocking response from the vehicle. If your system is set up for 2 step unlock, a third press of unlock will activate the audible response.
button to activate an audible locking/ unlocking response from the vehicle. If your system is set up for 2 step unlock, a third press of unlock will activate the audible response.
Two Stage Door Unlock (Optional)If this feature is enabled on your system, pressing the ![]() button one time will unlock only the driver’s door. Press
button one time will unlock only the driver’s door. Press ![]() again within three seconds to unlock the remaining doors.
again within three seconds to unlock the remaining doors.
Activating the Trunk Release Feature (Optional)If this feature is enabled on your system, pressing and holding the ![]() button for 3 seconds will open the vehicle’s trunk or hatch.
button for 3 seconds will open the vehicle’s trunk or hatch.
Activating the AUX 1 Output (Optional)If this feature is enabled on your system, pressing the ![]() and
and ![]() buttons simultaneously will activate an optional feature. This feature can be programmed for a wide range of functions like power window or sunroof automation, please consult your installing dealer to determine the functionality of your system.
buttons simultaneously will activate an optional feature. This feature can be programmed for a wide range of functions like power window or sunroof automation, please consult your installing dealer to determine the functionality of your system.
Using the Progressive Car Finder FeaturePress the ![]() button to locate your vehicle. The system will flash the parking lights and sound 5 times at low volume, increasing in volume each time the button is pressed.
button to locate your vehicle. The system will flash the parking lights and sound 5 times at low volume, increasing in volume each time the button is pressed.
Using the Personal Protection Alarm (Panic)Press and hold the ![]() button for 3 seconds to activate the personal protection alarm. During panic mode, the normal function of the transmitter
button for 3 seconds to activate the personal protection alarm. During panic mode, the normal function of the transmitter ![]() and
and ![]() buttons will be suspended. The transmitter’s and buttons can be used to lock and unlock the door (if the option is installed). To stop the alarm, press and hold the
buttons will be suspended. The transmitter’s and buttons can be used to lock and unlock the door (if the option is installed). To stop the alarm, press and hold the ![]() button on the transmitter again for 3 seconds. The system will automatically stop after 30 seconds.
button on the transmitter again for 3 seconds. The system will automatically stop after 30 seconds.
Programmed Transmitter NotificationAs a security precaution each time the vehicle’s ignition is turn on the status LED light with flash the number of transmitters programmed into the system. This helps to identify unauthorized transmitters from accessing your vehicle. If you believe an unauthorized transmitter has been programmed to your system, contact your installing dealer for assistance.
Valet ModeWhen valet mode is activated the status LED will light solid, and all security and remote start functions will be disabled. To enter or exit valet mode simply follow the steps outlined below:
- Turn the vehicle’s ignition ON.
- Push and hold the programming/valet button.
- The LED will turn on solid when valet mode is active
- Release the programming/valet button.
User Selectable Notification ChirpsSystem ARM/DISARM chirps can be toggled ON or OFF without entering the programming feature banks.
- Turn the ignition ON then OFF.
- Press and release the valet/programming button 3 times. The system will respond with 1 chirp for ON or 2 chirps for OFF.
User Selectable LED
This feature will control whether the LED is ON or OFF when the system is Armed/ Locked and can be toggled ON or OFF without entering the programming feature banks.
- Turn the ignition ON, OFF, ON, OFF.
- Press and release the valet/programming button 3 times. The system will respond with 1 chirp for ON or 2 chirps for OFF.
Basic Security (Optional Programming Feature)
The basic security feature of the system will monitor the vehicle’s doors and ignition circuit and will sound the alarm in the event of unauthorized entry. Note that this feature is defaulted OFF and must be turned on in feature programming. This feature may also require additional parts and or labor at the time of installation.
Arming the Security SystemTo arm the system, exit the vehicle, close all doors, then press the button. The parking lights will flash 2 times, indicating the system is armed, has locked the doors (if equipped and connected) and activated the starter disable feature. The LED status indicator will blink steadily, once per second.
NOTE: The system is equipped with a feature called Silent Choice. If enabled, the system requires a second press of the button to activate an audible arming response from the vehicle.
Hidden Alarm FunctionPress the ![]() button first, within 3 seconds press the
button first, within 3 seconds press the ![]() button to activate the hidden alarm function. The security system will arm with “Hidden Alarm Function” in which the siren / horn will be silenced if the system is triggered.
button to activate the hidden alarm function. The security system will arm with “Hidden Alarm Function” in which the siren / horn will be silenced if the system is triggered.
Disarming the Security SystemTo disarm the system press the ![]() button. The parking lights will flash 1 time, indicating the system is disarmed and has unlocked the doors (if equipped and connected).
button. The parking lights will flash 1 time, indicating the system is disarmed and has unlocked the doors (if equipped and connected).
NOTE: The system is equipped with a feature called Silent Choice. If enabled, the system requires a second press of the ![]() button to activate an audible disarming response from the vehicle. If your system is set up for 2 step unlock, a third press of unlock will activate the audible response.
button to activate an audible disarming response from the vehicle. If your system is set up for 2 step unlock, a third press of unlock will activate the audible response.
Manually Overriding the Security SystemYour system can be disarmed without the use of the transmitter. This is necessary, since you will need the ability to operate your vehicle if the transmitter is lost or its battery fails. To by-pass the alarm system;
- Open the vehicle door. The alarm will sound.
- Turn the ignition key to the ON position.
- Within 10 seconds, press and release the valet push button switch.
The alarm system will stop sounding and enter the (by-passed) mode. You can now start and operate the vehicle normally
Using Your Remote Starter
Remote Start Ready Mode must be enabled if your vehicle is equipped with a manual transmission.
Remote Start Ready Mode – Manual Transmission Vehicles Only To activate the remote start function, the system must first be in Remote Start Ready Mode. Follow the steps below to enter remote start ready mode.
- While the engine is running by the ignition key;a. Place the transmission in neutral.b. Set the parking brake
- With your foot off the brake pedal, press and release the
 button to activate the remote start. The LED will flash 3 times and the parking lights will turn on to confirm the system has remote started.
 - Remove the keys from the ignition, the vehicle will remain running.
- Exit the vehicle and close all vehicle doors.
- Within 1 minute of step 1, press the button to lock the vehicle’s doors. The vehicle will shutdown and sound 2 short chirps then 1 long chirp to confirm ready mode is set.
Cancelling Remote Start Ready Mode – Manual Transmission Vehicles OnlyThe system will exit remote start ready mode if any of the following occur:Open any doorOpen the hood or trunk (if connected)Press the brakeRelease the parking brakeTurn the ignition ON
Remote Starting Your VehicleTo activate the remote start function, press and release the ![]() button 2 times within 2 seconds. The system will sound, the parking lights will flash 1 time and the system will check the vehicle to ensure it is safe to start. If all safety parameters are correct, the vehicle will start. The vehicle’s parking lights will turn on (or flash depending on system settings) as a visual indication that the vehicle has started and is running.
button 2 times within 2 seconds. The system will sound, the parking lights will flash 1 time and the system will check the vehicle to ensure it is safe to start. If all safety parameters are correct, the vehicle will start. The vehicle’s parking lights will turn on (or flash depending on system settings) as a visual indication that the vehicle has started and is running.
If your vehicle stalls or does not start, the system will pause 5 seconds, then try 3 more times to start the vehicle (a total of 4 attempts). The system will pause 5 seconds between each start attempt.
Remote Start ShutdownPress and hold the ![]() button for 3 seconds to turn the vehicle off.
button for 3 seconds to turn the vehicle off.
Entering the Vehicle while it is Running via Remote Vehicle Start
- Unlock the vehicle’s doors.
- Enter the vehicle. DO NOT PRESS THE BRAKE PEDAL!
- Insert the key into the ignition switch and turn to the ON or RUN position.
- Press the brake pedal. The remote vehicle starter will disengage and the vehicle will operate normally.
To Enter & Exit the Vehicle while (Manual Transmission) Remote Start ReadyMode is already active without cancelling Remote Start Ready Mode.If ready mode has already been activated and you need to enter the vehicle, possibly to retrieve an item, and will exit the vehicle without driving it, you can keep ready mode active by following the steps below.
- With Ready Mode already previously set, activate the remote start.
- While under control of the remote start open vehicle door to retrieve items.
- Exit the vehicle and close all doors.
- Press the button, the unit waits 3 seconds and then shuts down, the system will verify all doors have been closed then will emit the 2 short/1 long tone and light flash pattern indicating Manual TransmissionReady Mode is active.
Note: If the 2 short/1 long tone is not heard then Ready Mode has not been set.
Using the “Quick-stop” FeatureIf you want to make a short stop and keep your vehicle running (to keep the interior warm or cool), the quick-stop feature allows you to do this while keeping your vehicle secure and your keys with you.
To engage Quick Stop:
- Stop the vehicle and place the transmission in PARK.
- With your foot off the brake pedal, press and release the button 2 times within 2 seconds. The LED will flash 3 times to confirm quick stop is entered.
- Remove the keys from the ignition and exit the vehicle. Press the button to lock the vehicle’s doors if desired.
To engage Quick Stop – Manual Transmission Vehicles:
- With the vehicle running, foot off the brake, parking brake set ON.
- Press and release the button to activate remote start.
- Exit the vehicle close all doors (Door Open/All Doors Close)
- Press and release the button.
- Within 3 seconds press the button:The unit enters Quick Stop Mode and will remain running until remote start time-out and then shut down. (Remote Start Ready Mode is NOT active)
Note: Do not leave children or animals unattended in the vehicle when using the quick-stop feature.
Preheating or Precooling the Vehicle’s interiorBefore exiting the vehicle, set the temperature controls to the desired setting and operation. After the system starts the vehicle, the heater or air conditioner will activate and heat or cool the vehicle’s interior to your setting.
User Programmable Run Time / Run Time ExtensionThe system has the ability to allow the user to extend the time the vehicle will be running under control of the remote start. This will only extend the run time back to the current run time setting during the current remote start cycle. If your system is set to run 15 minutes and the time remaining is 4 minutes, extending the run time will reset the countdown timer to 15 minutes and your vehicle will continue to run for another 15 minutes. Follow the steps below to extend the vehicle’s run time.
- The remote start must already be active.
- Press and release the button 4 times.
- The system will chirp 1 time and flash the parking lights 4 times to confirm that the run time has been reset.
Operating the Daily Start TimerThe system has the ability to start your vehicle based on a 24-hour countdown timer.This feature requires a two-part activation sequence. From the remote, while in range of the vehicle, pressing both the ![]() &
& ![]() buttons together will activate the 24 hour countdown timer (the vehicle will start 24 hours from this time). Next, When you are finished operating the vehicle for the day, perform the following steps to complete the
buttons together will activate the 24 hour countdown timer (the vehicle will start 24 hours from this time). Next, When you are finished operating the vehicle for the day, perform the following steps to complete the
- Turn the ignition ON/OFF (vehicle must be disarmed).
- Within 10 seconds, while pressing the brake, press and release the button twice.
- The vehicle will emit 2 chirps and flash the parking lights 4 times.
Temperature Start ModeThe system has the ability to start the vehicle if the temperature drops below a preset temperature threshold. Once activated, the system will start the vehicle every 2 or 3 hours, for a 48 hour period, based on the temperature setting and will be cancelled if the vehicle is started with the key or remote started by the transmitter. Temperature is read from the module, located below the dashboard in most instances, and the vehicle’s interior temperature may vary from the ambient temperature.
1. The vehicle must be armed.2. Press and release both the ![]() &
& ![]() buttons together.3. The vehicle will emit 1 chirp and flash the parking lights 1 time.
buttons together.3. The vehicle will emit 1 chirp and flash the parking lights 1 time.
Note: This feature is defaulted OFF and must be set in option programming.
Remote Start Safety FeaturesFor safety and security reasons, the system will shutdown or prevent the remote vehicle starter from activating if any of the following occur:
- The vehicle’s hood is open.
- The brake pedal is pressed prior to turning the ignition key to the ON position.
- The engine is over-revved (tach checking only).
- Valet Mode is active. Refer to the Valet Mode section of this manual on page 4.
- Remote Start Ready Mode is not set. Manual transmission vehicle’s only.
System LED, Light Flashes, and Siren/Horn Indications
Status LED Flash Indications
| LED Flashes | Function |
| OFF | Disarmed / Unlocked |
| Slow Flash | Armed / Locked |
| Fast Flash | Passive Arming Countdown |
| ON (Solid) | Valet Mode |
| 2 Flashes | Zone 2 Trigger, Hood / Trunk |
| 3 Flashes | Zone 3 Trigger, Door |
| 5 Flashes | Zone 5 Trigger, Ignition |
Siren/Horn Chirp Indications
| Chirps | Function |
| 1 | Disarm / Unlock |
| 2 | Arm / Lock |
| 3 | Door Ajar Upon Arming |
| 4 | Disarm / Triggered |
| 5 | Car Find |
Parking Light Flash Indications
| Flashes | Function |
| 1 | Disarm / Unlock |
| 2 | Arm / Lock |
| 3 | Disarm / Triggered |
| 5 | Car Find |
| ON (Solid or Slow Flash) | Remote Started |
Remote Start Shutdown Diagnostics
| Parking Light Flashes | Shutdown Zone |
| 3 Flashes | Hood / Brake Input |
| 4 Flashes | Remote Start Valet Mode |
| 5 Flashes | Manual Transmission Mode not ready |
| 7 Flashes | Tach not learned / Crank Average not learned |
To manually enter diagnostics and view the last shutdown, turn the ignition ON and press and release the button.
Additional 2-Way LCD Remote Control Functions
Additional Features of the Optional 2 Way LCD Remote Control
Check Vehicle StatusPress and release F 2 times then press ![]() within 3 seconds, the transmitter will display the current status of the vehicle.
within 3 seconds, the transmitter will display the current status of the vehicle.
Display IlluminationPress and hold the F button for 1 second. The display will illuminate for 5 seconds.
Melody / Vibration ModeTo have the remote control vibrate, play a melody tone or both each time it receives a response from the vehicle press and release F then press and hold ![]() for 2 seconds.
for 2 seconds.
Button BeepsTo toggle button beeps on or off press and release F then press and hold ![]() for 2 seconds.
for 2 seconds.
Battery Save ModeWhile in POWER SAVE MODE the 2-way LCD transmitter will NOT look for any incoming signals from the main unit until a button is pressed. The LCD screen will display SAVE to indicate that power save mode is ON. To enter power save mode press and hold F for 5 seconds.
Clear Flashing Icons and Melody SoundPress the F button 3 times within 3 seconds. This will clear the melody sound and flashing icons on the LCD screen.
Stopping LCD Trigger MelodyTo stop the alarm trigger melody if the system has been triggered WITHOUT disarming the system, press any button one time only, this will not send a command to the vehicle at this time and the alarm will continue to sound.
Button LockPress and release F then press hold the ![]() for 2 seconds to toggle the button lock on or off. When the button lock is active, the remote control will beep/vibrate 2 times when a button is pressed indicating it is locked.
for 2 seconds to toggle the button lock on or off. When the button lock is active, the remote control will beep/vibrate 2 times when a button is pressed indicating it is locked.
IlluminationPress and release F 2 times then press and hold ![]() for 2 seconds to toggle illumination on or off. When on, the display will illuminate when it receives or sends a command.
for 2 seconds to toggle illumination on or off. When on, the display will illuminate when it receives or sends a command.
2 Car ModeTo control a second security system enter 2 car mode by pressing F then press ![]() and
and ![]() together for 3 seconds. When the II icon appears on the transmitter’s LCD screen it will control the second security system. Use the same method to exit 2 car mode and resume control of the original vehicle’s security system.
together for 3 seconds. When the II icon appears on the transmitter’s LCD screen it will control the second security system. Use the same method to exit 2 car mode and resume control of the original vehicle’s security system.
NOTE: A second security system must be installed and the LCD transmitter must be learned to it before this feature will operate the additional system.
Parking Meter CountdownThe parking meter countdown timer has 6 preset times, to access the preset times and begin countdown press and release F then press and hold ![]() for 2 seconds, each additional press of
for 2 seconds, each additional press of ![]() will increase the countdown time.
will increase the countdown time.
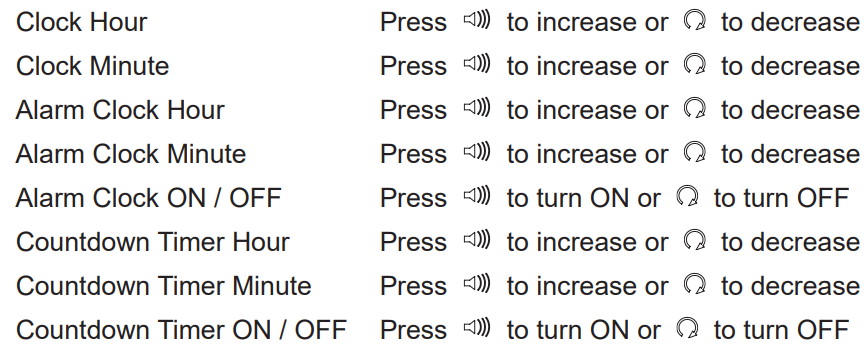
Adjusting the Clock and Timer SettingsThe clock, alarm clock and programmable countdown timer are accessed through the Function Menu. Press and hold F for 3 seconds to access the function menu, once you have accessed the feature menu press and release F to scroll through each feature and follow the steps below to adjust the settings for each. Press and hold F for 2 seconds to exit the menu.
LCD Remote Control ICON’s
Replacing Remote Control Batteries
4 Button Remote Control – Model CAT4MThe batteries inside each remote control should last approximately 1 year under normal use. When the batteries become weak you will notice the remote control range (the distance from the vehicle the remote control will work) deteriorate and the small LED on the remote control will dim. To replace the remote control batteries:
- Remove 1 screw then disassemble the halves of the remote control by unsnapping the back of the case.
- Remove the old battery, observing the +/- symbols on the batteries and replace with a new battery.
- Reassemble the halves of the remote control and reinstall 1 screw.
- Test operation of the remote control.
2 Way LCD Remote Control – Model CATLCDThe AAA battery inside the 2-way LCD remote control should last approximately 6 months under normal use. When the battery becomes weak you will notice the remote control range (the distance from the vehicle the remote control will work) deteriorate and the battery icon on the LCD remote control will show 1 bar or less.
- Gently slide the battery cover off of the remote control.
- Remove the old AAA battery, observing the +/- symbols on the battery, and replace with a new AAA battery.
- Gently slide the battery cover on to the back of the remote control.
- Test operation of the remote control.
CODE ALARM
LIMITED LIFETIME WARRANTY
Applies to Code Alarm Series Control Modules, Sirens, Sensors, and Relays.Voxx Electronics Corporation (the Company) warrants to the original purchaser of this product that should this product or any part thereof, (other than transmitters) under normal use and conditions, be proven defective in material or workmanship during the lifetime of the vehicle, in which it was originally installed from the date of original purchase such defect(s) will be repaired or replaced with new or reconditioned product, (at the Company’s option) without charge for parts or repair labor. A transmitter is warranted for 12 months from the date of original purchase.
To obtain repair or replacement within the terms of this Warranty, the product is to be delivered with proof of warranty coverage (e.g. dated bill of sale), specification of defect(s), transportation prepaid, to an approved warranty station. This Warranty is not transferable.
This Warranty does not cover damage to the vehicle’s electrical system or costs incurred for removal or reinstallation of the product. This Warranty does not cover batteries, broken LCD or OLED display screens, nor apply to any product or part thereof which, in the opinion of the Company, has suffered or been damaged through alteration, improper installation, mishandling, misuse, abuse, neglect, accident, or by removal or defacement of the factory serial number/bar code label(s).
This Warranty is in lieu of all other express warranties or liabilities.
ANY IMPLIED WARRANTIES, INCLUDING ANY IMPLIED WARRANTY OF MERCHANTABILITY, SHALL BE LIMITED TO THE DURATION OF THIS WRITTEN WARRANTY. IN NO CASE SHALL THE COMPANY BE LIABLE FOR ANY CONSEQUENTIAL OR INCIDENTAL DAMAGES FOR BREACH OF THIS OR ANY OTHER WARRANTY.
No person or representative is authorized to assume for the Company any liability other than expressedherein in connection with the sale of this product.
The company does not warrant that this product cannot be compromised or circumvented.
THE EXTENT OF THE COMPANY’S LIABILITY UNDER THIS WARRANTY IS LIMITED TO THE REPAIR OR REPLACEMENT PROVIDED ABOVE AND, IN NO EVENT, SHALL THE COMPANY’S LIABILITY EXCEED THE PURCHASE PRICE PAID BY PURCHASER FOR THE PRODUCT WITHOUT COST OF INSTALLATION.
Some states do not allow limitations on how long an implied warranty lasts or the exclusion or limitation of incidental or consequential damage so the above limitations or exclusions may not apply to you. This Warranty gives you specific legal rights and you may also have other rights which vary from state to state.
Voxx Electronics Corporation, 180 Marcus Blvd., Hauppauge, New York 11788 / 1-800-645-4994
Voxx Electronics Corporation.Customer Service 1-800-421-3209WWW.CODE-ALARM.COM
FCC COMPLIANCEThis device complies with Part 15 of the FCC rules and with RSS-210 of Industry Canada. Operation is subject to the following two conditions:
- This device may not cause harmful interference, and
- This device must accept any interference received, including any interference that may cause undesired operation.
Warning!Changes or modifications not expressly approved by the party responsible for compliance could void the user’s authority to operate the equipment.
 report this ad
PATENTED: www.voxxintl.com/company/patents
References
[xyz-ips snippet=”download-snippet”]