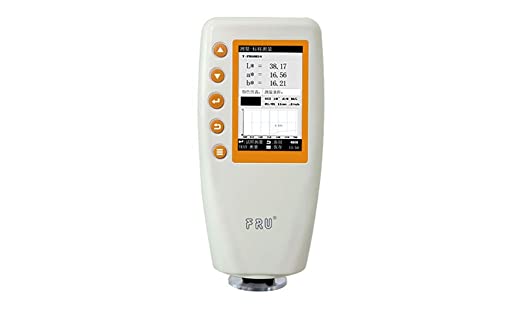
Colorimeter Appearance User Manual
Notes
- Storage
- Upon long time no use, put the instrument into a packing box.
- Store the instrument in a cool and dry environment with a temperature at -10oC~50oC and relative humidity under 85%.
- Use
- When using the instrument, the ambient temperature should be 0oC 40oC, relative humidity at 85% without condensation.
- Do not use the instrument under the conditions of strong magnetic field, ratting dust and smoke to avoid unexpected data and performance failure.
- Prevent foreign objects as liquid powder or solid etc, from entering into the instrument to avoid unexpected measurement data.
Overview
The Colorimeter is a professional colorimeter designed and produced subject to the relevant standards of International Commission on Illumination (CIE) and national stands. Being with brand new imported key components, the instrument is well designed and features in precision, stability, ease handling, easy to learn and cost-effective.
The instrument applies to the color quality control, color difference control, color difference analysis, sampling testing and online testing industries as textile, printing and dyeing, garments, shoes, leather, chemical, plastic, pigment, paint, ink, printing, metal, photography and toys etc, as well as to the auxiliary color matching during the processes as injection, linking, painting and spraying coating etc.
Structure
Appearance
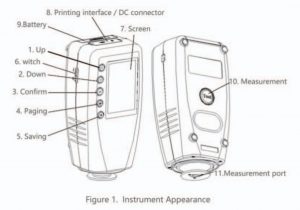
UP![]() : Move the position of the cursor in the screen, adjust the value of the activated items.Down
: Move the position of the cursor in the screen, adjust the value of the activated items.Down![]() : Move the Position of the cursor in the screen, adjust the valiue of the activated items. Paging
: Move the Position of the cursor in the screen, adjust the valiue of the activated items. Paging![]() : Switching between tabs. Saving
: Switching between tabs. Saving![]() : Save settings. Confirm
: Save settings. Confirm ![]() : Confirm or activate selected items in the screen (a blue background of the item will be change to a green background after activation); fast switching between “Standard” and “Sample measurement”.Show screen _________ Show measurement result etc.Measurement ________ MeasuringMeasurement Port _______ Optical channel for measuring.Switch ______ In (I) or out (0) of the instrument.Printing interface _____ Connect to the print the measuring data.Battery cover _______ cover for the special lithium battery.Compartment DC connector _________ dedicated power adapter connector.
: Confirm or activate selected items in the screen (a blue background of the item will be change to a green background after activation); fast switching between “Standard” and “Sample measurement”.Show screen _________ Show measurement result etc.Measurement ________ MeasuringMeasurement Port _______ Optical channel for measuring.Switch ______ In (I) or out (0) of the instrument.Printing interface _____ Connect to the print the measuring data.Battery cover _______ cover for the special lithium battery.Compartment DC connector _________ dedicated power adapter connector.
Power
- The Colorimeter is powered by dedicated power adapter or special lithium batteries, the use of other facilities for power supply may damage the Colorimeter.
- Ensure that the switch is on out (O) before connecting to the power adpater or mounting the battery.
Battery
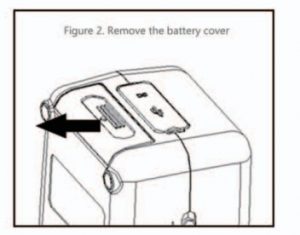
- First check and confirm if the switch is on out (O), then following the arrow direction as shown on Figure 2, take out the battery cover by pressing down.

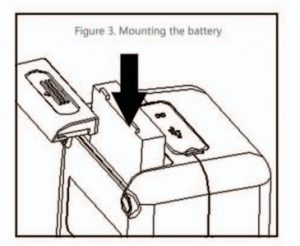
- Mount the battery into the compartment as shown in Figure 3, pay attention to the front and back of the battery.
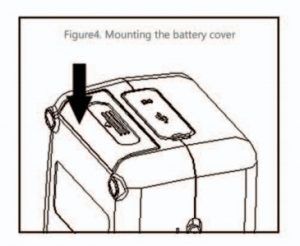
- Follow the directions on Figure 4, press up to mount the battery into the compartment.
Power Adapter
- First check and confirm if the Switch is on out (O).
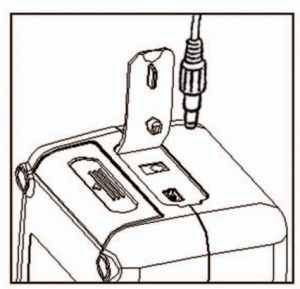
- Plug the input cable of the power adapter as shown on Figure 5 into the DC connector, and then start the Colorimeter.
Operation
Turn on
- Before turning on the instrument check if the external power has been connected or the battery has been mounted, ensuring a power supply to the instrument, then start the instrument, the screen will show starting Logo.
- After the completion of boot interface, instrument into the self test program, ensure the normal working of the instrument.
Color Difference Measurement
- There are two steps for the color difference measurement which are “Type Sample Measurement” and “Sample Measurement”.
- The type sample measurement gets the standard color parameters of a type sample.
- The sample measurement gets the parameters of the sample needed to be measured, while calculates the color difference data between the sample and the type sample.
Type Sample Measurement
- As shown on Figure 6, the Type Sample measurement can be performed to ge the color parameters of a Type Sample.The color parameters measured will be shown on the measurement page.
- In the upper right corner of the page to display the test current conditions, including light sources, lighting and light mode.
Sample Measurement
- After completing the Type Sample measurement, if it is required to measure the clor difference between the Type Sample and the Sample, press “Paging” to switch the screen to “SAM.” page as shown on Figure 7, the color difference parameter measured will be shown on the measurement page.
Check out Information
Type Sample Record
- Press “Paging” to jump to “Check our Information” page as shown on Figure 8 to check the saved data by “Up” and “Down” keys, if required.
- In the current page, press “save” button can be activated in Figure 9 dialog box, choose “sample into” or “Standard delete” Operation.
Sample Record
- After selecting the Type Sample to be checked, select “Sample Record” option to switch the screen to the Sample record page of the Type Sample as shown on Figure 10, than select Sample record by “Up” and “Down” keys to check out the color difference records of each Sample.
Product Specification
| Model | WR-10QC |
| Repeated Accuracy | ∆4mm |
| Applicable Area | Small,Arc,flat surface |
| Location method | Positoing block + cross positioning |
| Color Space | CIEL*a*b* |
| Color Difference Formula | ∆E*ab |
| Illumination condition | CIE: 8/d |
| Light Source | D65 |
| Sensor | Photodiode |
| Observer | CIE 10˚ Standard observer |
| Measurement Range | L: 0-100 |
| Storage | Type: 100 Sample: 20000 |
| Lifetime of Bulb | 5 years more than 1.6 million measurements |
| Screen | TFT true color (16:9) |
| Language | English/Chinese |
| Working Temperature | 0˚C-40˚C (32˚F-104˚F) |
| Storage Temperature | -20˚C-50˚C (-4˚F-122˚F) |
| Humidity | Relative humidity less than 85% without condensation |
| N.W/G.W | 330g/1kgs |
| Size | 172*80*60MM |
| Packing Size | 199*68*99MM |
| Charging Time | 8hrs |
| Battery | Li-ion battery, 5000 times Measurement |
| Standard Accessories | AC adapter/ 3000mAh Li-ion battery/ User Manual |
| Optional Accessories | Postioning block, Micro Printer |
[xyz-ips snippet=”download-snippet”]