V1. 05/18CTSHU001.2
Hummer Steering Wheel Control Interface
Vehicle Application
| Hummer H2Hummer H3 | 2003 – 20072006 – 2009 |
Key Features
- Retains Steering Wheel Controls
- Retains Vehicle Warning Chimes
- Retains Standard BOSE Amplified Systems
NB: Not for use with Digital BOSE Systems (Y91/Z75). Does not retain OnStar
The information provided in this document is subject to change without notice due to manufacturer changes and/or improvements to the product/s.
ABOUT THIS PRODUCT
CTSHU001.2CAN-Bus Steering Wheel Control Interface for select Hummer vehicles with standard BOSE amplified systems. Retains steering wheel controls, vehicle warning chimes and standard BOSE amplified systems. Not for use with digital BOSE systems (Y91/Z75). Does not retain OnStar
WIRING COLOUR CODES
| Purple | Right Rear Speaker + | Yellow | Permanent 12V |
| Purple/Black | Right Rear Speaker – | Black | Ground |
| Green | Left Rear Speaker + | Red | Ignition 12V |
| Green/Black | Left Rear Speaker – | Orange | Illumination |
| Grey | Right Front Speaker + | ||
| Grey/Black | Right Front Speaker – | ||
| White | Left Front Speaker + | ||
| White/Black | Left Front Speaker – |
PRIOR TO INSTALLATIONRead the manual prior to installation. Technical knowledge is necessary for installation. The place of installation must be free of moisture and away from heat sources. Please ensure that the correct tools are using during the installation to avoid damage to the vehicle or product. Connects2 can not be held responsible for the installation of this product.
TECHNICAL SUPPORTConnects2 Ltd. want to provide a fast and suitable resolution to any problems encountered during installation of this product. To get in touch with our dedicated technical support team, please fill in a ticket at support.connects2.com and provide as much information as possible.
FOLLOW US ON SOCIAL MEDIAfor all the latest updates
/CONNECTS2Watch us on YouTube
/CONNECTS2Like us on facebook
CONNECTS2LTDFollow us on instagram
OCONNECTS2Follow us ontwitter
 CONNECTS2LTDFollow us onlinkedin
CONNECTS2BLOG.COMFollow our blog onwordpress
FITTING GUIDE
- Remove and disconnect the original head unit.
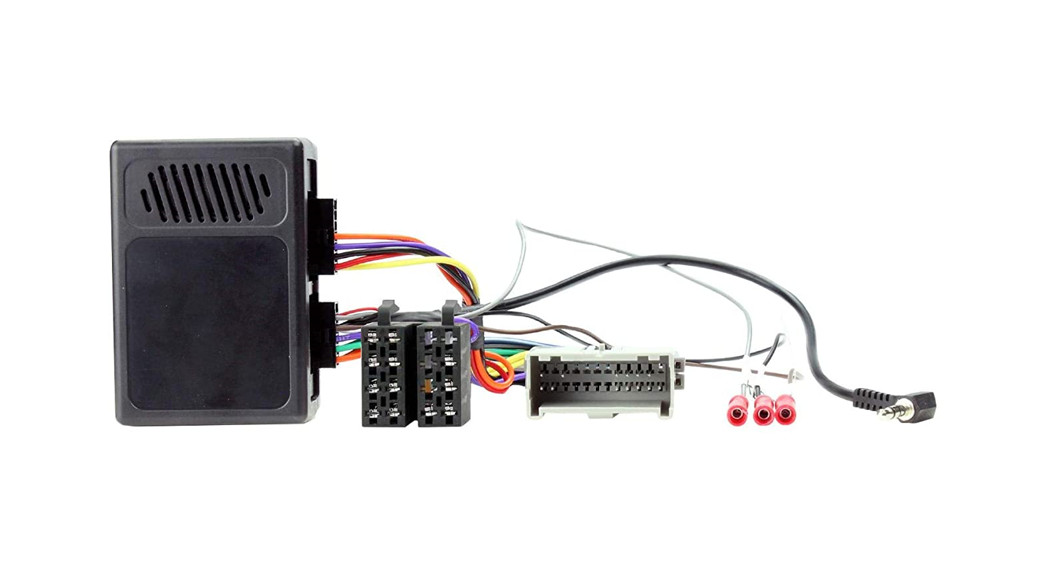
- Connect the 12 way molex connector of the head unit patch lead (supplied separately) to the interface (Connection A, Fig. 1). Do not connect the 14 way molex connector (Connection B) at this stage.

- Connect the opposite end of head unit patch lead to the head unit steering wheel control input on the back of the aftermarket head unit.NB: This may be a 3.5mm jack plug or a wire input depending upon the head unit brand being fitted. Please see the head unit installation manual for further information on where to connect.Important: This step must be completed before connecting power to the interface. Failure to so do may result in no steering wheel control function.
- Connect the 14 way molex connector to the interface (Connection B, Fig. 1)
-
Connect the male power/speaker ISO harness to the female power/speaker ISO harness from the aftermarket head unit. For aftermarket head units without an ISO connector, please refer to “Wiring Colour Codes” on Pg. 2
www.connects2.comFITTING GUIDE -
Connect the female vehicle specific connectors on the harness to the male vehicle connector from the vehicle. Test head unit for correct operation.
STEERING WHEEL CONTROL FUNCTIONALITY
| 1 | Mute/Voice Activation |
| 2 | Preset/Band |
| 3 | Source |
| 4 | Source |
| 5 | Track + |
| 6 | Volume + |
| 7 | Volume – |
| 8 | Track – |
References
[xyz-ips snippet=”download-snippet”]