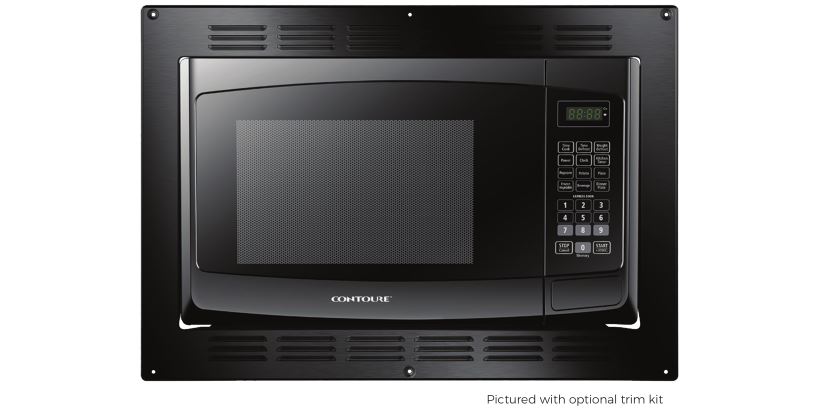
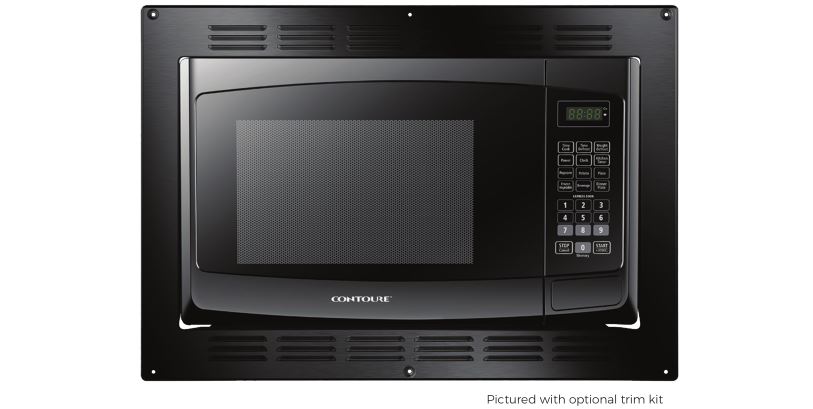
CONTOURE MID-SIZE 0.9 / 1.0 CU.FT Built In
Black Microwave Oven Instruction Manual
Before using your appliance, please read this manual carefully & keep it for future reference.
Welcome & Congratulations
Thank you for purchasing this quality CONTOURE® Built-in Microwave Oven.
Congratulations on your new deluxe cooking appliance.
For your safety and full enjoyment of this product, always read the instruction book carefully before using.
Don’t forget to register your product at www.contoureusa.com for updates and other relevant information.
This manual contains important information on the installation, use, and care of your appliance. Please read this manual carefully before installation and operation of this machine to prevent injury and property damage and to take full advantage of your new microwave oven’s benefits and features.
IMPORTANT SAFETY & PRECAUTIONS
What you need to know about Safety Instructions:
Warnings and Important Safety Instructions in this manual DO NOT cover all possible conditions and situations that may occur. It is your responsibility to use common sense, caution and care when installing, maintaining and operating this appliance.
Important Safety Symbols & Precaution Warnings:
![]() WARNINGThis symbol indicates that hazards or unsafe practices may cause serious personal injury or death. To reduce the risk of fire, explosion, electric shock, or personal injury when using your appliance, these basic safety precautions MUST be followed. These warnings are to prevent injury to you and to others, please follow them explicitly. After reading this section, keep it in a safe place for future reference.
WARNINGThis symbol indicates that hazards or unsafe practices may cause serious personal injury or death. To reduce the risk of fire, explosion, electric shock, or personal injury when using your appliance, these basic safety precautions MUST be followed. These warnings are to prevent injury to you and to others, please follow them explicitly. After reading this section, keep it in a safe place for future reference.
State of California Proposition 65 Warnings:
![]()
![]()
![]()
![]()
![]()
![]()
![]()
![]()
![]()
![]()
![]()
![]()
![]()
![]()
![]()
![]()
![]()
![]()
![]()
![]()
![]()
![]()
![]()
![]()
![]()
![]()
![]()
![]()
![]()
![]()
![]()
![]()
![]()
![]()
![]()
![]()
![]()
![]()
![]()
![]()
![]()
![]()
![]()
![]()
![]()
![]()
![]()
![]()
![]()
![]()
![]()
![]()
![]()
![]()
![]()
![]()
![]()
![]()
![]()
![]()
![]()
![]()
![]()
![]()
![]()
![]()
![]()
![]()
![]()
![]()
![]()
![]()
![]()
![]()
![]()
![]()
![]()
![]()
![]()
![]()
![]()
![]()
![]()
![]()
- Read all instructions before using this appliance.
- Read and follow the specific warning: PRECAUTIONS TO AVOID POSSIBLE EXPOSURE TO EXCESSIVE MICROWAVE ENERGY
- This appliance must be grounded. Connect only to properly grounded outlet. See Grounding Instructions.
- Some products such as whole eggs and sealed containers (for example, closed glass jars) can explode and should NOT be heated in this appliance.
- DO NOT use corrosive chemicals or vapors in this appliance.
- Use this appliance only for its intended use as described in this manual.
- This oven is specifically designed to heat or cook food. It is not designed for industrial or laboratory use.
- As with any appliance, close supervision is necessary and required when it is used by children.
- DO NOT operate this appliance if it has a damaged cord or plug, if it is not working properly or if it has been damaged or dropped.
- This appliance should be serviced only by qualified service technicians.
- DO NOT cover or block any openings on the appliance
- DO NOT store or use this appliance outdoors.
- DO NOT use this product near water, for example, near a kitchen sink, in a wet basement, near a swimming pool, or similar location.
- DO NOT immerse cord or plug in water.
- Keep cord away from heated surfaces.
- DO NOT let cord hang over edge(s) of tables, or countertops.
- When cleaning surfaces of door and oven that come together on closing the door, only use mild, nonabrasive soaps or detergents applied with a sponge or soft cloth.
![]()
![]()
![]()
![]()
![]()
![]()
![]()
![]()
![]()
![]()
![]()
![]()
![]()
![]()
![]()
![]()
![]()
![]()
![]()
![]()
![]()
![]()
![]()
![]()
![]()
![]()
![]()
![]()
![]()
![]()
![]()
![]()
![]()
![]()
![]()
![]()
![]()
![]()
![]()
![]()
![]()
![]()
![]()
![]()
![]()
![]()
![]()
![]()
![]()
![]()
![]()
![]()
![]()
![]()
![]()
![]()
![]()
![]()
![]()
![]()
![]()
![]()
![]()
![]()
![]()
![]()
![]()
![]()
![]()
![]()
![]()
![]()
![]()
![]()
![]()
![]()
![]()
![]()
![]()
![]()
![]()
![]()
![]()
![]()
- DO NOT overcook food.
- Carefully attend to the appliance when paper, plastic or other combustible materials are placed inside the oven to facilitate cooking.
- Remove the wire twist-ties from paper or plastic bags before placing bag in oven.
- If materials inside the oven ignite, keep oven door closed, turn oven off, and disconnect the power cord, or shut off power at the fuse or circuit breaker panel.
- DO NOT use the interior for storage purposes.
- DO NOT leave paper products, cooking utensils or food in the oven when not in use.
- Visible bubbling or boiling when the container is removed from the microwave is not always present. This could result in very hot liquids suddenly boiling over when the container is disturbed or a utensil is inserted into the liquid.
![]()
![]()
![]()
![]()
![]()
![]()
![]()
![]()
![]()
![]()
![]()
![]()
![]()
![]()
![]()
![]()
![]()
![]()
![]()
![]()
![]()
- DO NOT use straight-sided containers with narrow necks. Use wide-mouth containers.
- Stir liquid both before and halfway through heating it.
- DO NOT overheat liquid.
- Use extreme care when inserting a spoon or other utensils into the container. This may also cause delayed eruptive boiling.
- After heating, allow the container to stand in the microwave oven for at least 20-seconds before removing the container.
- Touching some of the internal components can cause serious personal injury or death.
- DO NOT disassemble this appliance.
- DO NOT use an extension cord with this appliance. If the power cord is too short, have a qualified electrician install an outlet near the appliance. Use of an extension cord can negatively affect the unit’s performance.
![]()
![]()
![]()
![]()
![]()
![]()
![]()
![]()
![]()
![]()
![]()
![]()
![]()
![]()
![]()
![]()
![]()
![]()
![]()
![]()
![]()
![]()
![]()
![]()
![]()
![]()
![]()
![]()
![]()
![]()
![]()
![]()
![]()
![]()
![]()
![]()
![]()
![]()
![]()
![]()
![]()
![]()
![]()
![]()
![]()
![]()
![]()
![]()
![]()
![]()
![]()
![]()
![]()
![]()
![]()
![]()
![]()
![]()
![]()
![]()
![]()
![]()
![]()
![]()
![]()
![]()
![]()
![]()
![]()
![]()
![]()
![]()
![]()
![]()
![]()
![]()
![]()
![]()
![]()
![]()
![]()
![]()
![]()
![]()
- NEVER use the microwave oven without the turntable and support.
- NEVER turn the turntable over so that a large dish can be placed inside the microwave oven.
- The turntable turns clockwise and counterclockwise.
- ALWAYS have food in the microwave oven when it is turned on to absorb the microwave energy.
- DO NOT test the microwave oven without food. Operating with no food or food that is low in moisture can cause fire, charring or sparking.
- It is normal for the microwave oven’s exterior to be warm to the touch when cooking or reheating.
- The microwave oven is for food preparation ONLY.
- Handle glass turntable carefully and place cookware on it gently to avoid possible breakage.
- Use only the correctly specified bag size when using the present popcorn program.
- The oven has several built-in safety switches to ensure that the power remains off when the door is open. DO NOT tamper with these switches.
- DO NOT cook bacon directly on the turntable.
- Excessive local heating of the turntable may cuase the turntable to break.
- DO NOT heat baby bottles or baby food in the microwave oven. Uneven heating / hotspots may occur and cause injury.
- DO NOT attempt to deep-fry in your microwave oven.
- DO NOT attempt home canning in this microwave oven. It is impossible to be sure all contents of the jar have reached boiling temperature.
- Failure to maintain the oven in a clean condition could lead to deterioration that could adversely affect the life of the appliance and possibly result in a hazardous situation.
- DO NOT use the oven for anything other than food preparation.
- DO NOT use the oven to dry clothes or newspapers.
Understanding Your Oven:
- When using the oven at power levels below 100% you might hear the magnetron cycling on and off.
- Condensation is a normal part of microwave cooking. The humidity in a room and the moisture in food will influence the amount of moisture that condenses in the oven. Usually, covered foods will not cause as much condensation as uncovered foods.
- When using your own recipes or package directions please check the food a minute or two before the minimum time and add time accordingly (if needed).
![]()
![]()
![]()
![]()
![]()
![]()
![]()
![]()
![]()
![]()
![]()
![]()
![]()
![]()
![]()
![]()
![]()
![]()
![]()
![]()
![]()
- Arcing is a spark or electrical flash that crackels and/or pops. Acring can produce heat that is very intense and can damage the interior of the microwave or container(s) used.
- Arcing can also cause fire. Arcing occurs when metal containers are used in the microwave. Arcing can also occur when the use of metal skewers, metal clamps, or twist ties from plastic bags used for food items such as bread are not removed.
- Remove the wire twist-ties from paper or plastic bags before placing bag in oven.
- To prevent arcing, use materials that are microwave safe and follow instructions from the container manufacturers.
- Plastic cookware designed for microwave cooking should be used carefully. Some plastic containers advertised as “microwave safe” plastic containers may not be as tolerant of overcooking conditions like their glass or ceramic counterparts. These containers may soften or char if subjected to short periods of overcooking. In longer exposures to overcooking, the food and cookware may ignite.
- Use “microwave safe” plastics only in strict compliance with the recommendations provided by the cookware manufacturer.
- DO NOT microwave empty cups or containers.
- DO NOT permit children to use plastic cookware unsupervised.
Materials You CAN Use in a Microwave:
- It is not required to buy all new cookware after purchasing your microwave oven.
- Many of the cookware pieces you already own can be used successfully in your new microwave oven.
Caution Personal Injury Hazard:
- Tightly closed containers may explode.
- Closed containers should be opened and plastic pouches should be pierced before cooking.
- Some non-metallic materials are not safe to use for microwaving. If in doubt, you can test the material in question using the following procedure, Material / Container Test:
- Fill a “microwave-safe” container with 1 cup of cold water (250 ml) along with the material you’re testing.
- Cook on maximum power for 3-seconds.
- Carefully feel the material or container. If the material or container is warm, DO NOT use it for microwave cooking.
- DO NOT exceed a 1-minute cooking time for this test.
- Please take precautions when testing all “microwave-safe” materials and or containers.
- DO NOT allow children to conduct this test.
Cookware and Cooking Materials:
- Cookware and other materials MUST fit on the turntable.
- Always use oven mitts or pot holders because cookware can become hot.
Installation Instructions
![]()
![]()
![]()
![]()
![]()
![]()
![]()
![]()
![]()
![]()
![]()
![]()
![]()
![]()
![]()
![]()
![]()
![]()
![]()
![]()
![]()
The installation of this appliance MUST be performed by a qualified technician or service company.
Failing to have a qualified technician or service company install the oven may result in electric shock, fire, an explosion, problems with the product or injury.
Keep all packaging materials out of the reach of children. DO NOT allow children to use them for play.The electrical requirements are 120-volt, AC, 60 Hz, 15 AMP or more protected electrical supply. It is recommended that a separate circuit serving only the microwave oven be provided.
Radio Interference:
- Operation of your micrwoave oven may cause interference to your radio, TV or similar equipment.
- If there is interference, it may be reduced or eliminated by using the following steps:
- Clean the door of the microwave and seal the surface of the oven.
- Change the orientation of the receiving antenna used by the radio or TV.
- Relocate the microwave oven with respect to the receiver.
- Plug the microwave oven into a different outlet so that the microwave and receiver are on different branch circuits.
WARNINGPrecautions to Avoid Possible Exposure to Excessive Microwave Energy:
- DO NOT attempt to operate this oven with the door open, this can result in harmful exposure to microwave energy. It is important not to break or tamper with the safety interlocks.
- DO NOT place any object between the oven front face and the door or allow soil or cleaner residue to accumulate on sealing surfaces.
- DO NOT operate the oven if it is damaged.
- It is very important that the oven door closes properly and that there is no damage to the door (for example, make sure that the door is not bent).
- It is very important that the oven door closes properly and there is no damage to hinges, latches and door seals (for example, make sure that the highest, latches or door seals are not broken or loosened).
- The oven should never be adjusted or repaired by anyone except properly qualified service personnel.
- If the microwave unit is not kept clean, its surface may be degraded and lead to a hazardous situation.
Danger Precautions to Avoid Possible Electrical Shock Hazard:
- Touching some of the internal components can cause serious personal injury or death.
- DO NOT disassemble this appliance.
![]()
![]()
![]()
![]()
![]()
![]()
![]()
![]()
![]()
![]()
![]()
![]()
![]()
![]()
![]()
![]()
![]()
![]()
![]()
![]()
![]()
- Improper use of the grounding can result in electric shock.
- DO NOT plug into an outlet until appliance is properly installed and grounded.
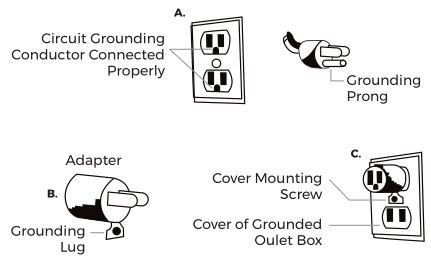
- This microwave should be properly grounded for your safety. In the event of electrical short circuit, grounding reduces the risk of electric shock by providing an escape wire for the electric current. This appliance is equipped with a cord having a grounding wire with a grounding plug. The plug must be plugged into an outlet that is properly installed and grounded. Consult a qualified electrician or serviceman if the grounding instructions are not completely understood or if doubt exists as to whether the appliance is properly grounded. CONTOURE does not accept any liability for damage to the microwave oven or personal injury resulting from failure to observe the correct electrical connection procedures.
- This microwave oven is equipped with a 3-prong grounding plug. It must be plugged into a wall receptacle that is properly installed and grounded.
- DO NOT, under any circumstances, cut or remove the third ground prong from the power cord supplied.
- DO NOT use an extension cord with this appliance. If the power cord is too short, have a qualified electrician or service technician install an outlet near the appliance. Use of an extension cord can negatively affect the performance of the unit.
![]()
![]()
![]()
![]()
![]()
![]()
![]()
![]()
![]()
![]()
![]()
![]()
![]()
![]()
![]()
![]()
![]()
![]()
![]()
![]()
![]()
![]()
![]()
![]()
![]()
![]()
![]()
![]()
![]()
![]()
![]()
![]()
![]()
![]()
![]()
![]()
![]()
![]()
![]()
![]()
![]()
![]()
If the power supply cord is too short, only have a qualified electrician or serviceman install an outlet near the appliance.
- The power supply cord and plug must be connected to a separate 120 Volt, 60 Hz, 15 AMP or more branch circuit, single grounded receptacle. The receptacle should be located inside the cabinet directly above the microwave oven mounting location as shown below.

- If it is necessary to use an extension cord, use only a 3-wire extension cord that has a 3-pronged gounding plug, and a 3-slot receptacle that will accept the plug on the appliance.
Setting Up Your Oven:
Remove all packaging materials and accessories from the carton and oven cavity. Examine your new oven for any damage, like dents, or a broken door. DO NOT continue with installation if the oven is damaged.
Turn Table Installation:NEVER place the glass tray upside down. The glass tray should NEVER be restricted.
Both glass tray and turntable ring assembly must always be used during cooking.
All food and containers of food should always be placed on the glass tray for cooking.
If you are missing your glass tray or turntable ring assembly or it cracks or breaks, please reach out to customer service (see the warranty section for further information).
Please reference the diagram below to help during installation.
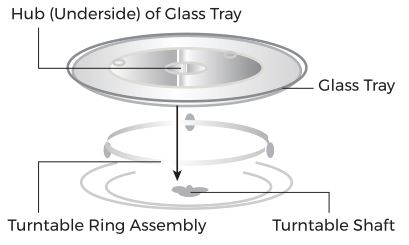

(1) Place the turntable ring in the round depression in the bottom of the microwave oven so that it turns freely.
(2) Place the glass turntable (flat side up) on the turntable ring so that the hub engages the turntable shaft in the bottom of the oven. When correctly installed, the glass turntable should not turn freely.
Parts & Accessories:
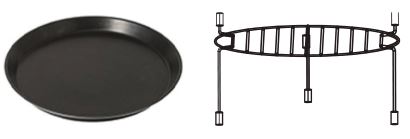
Your new oven comes with the following accessories:
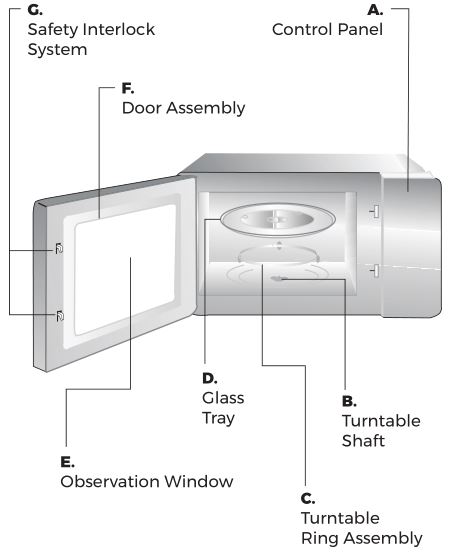

This oven also includes a BONUS easy-to-clean baking tray to use while your favorite foods; like pizza, cookies and more! The grill rack provided cannot be used when the microwave function is operating and must be placed on the glass tray.

Control Panel & Features:
Please reference the diagram below to help understand the features and functions on the control.
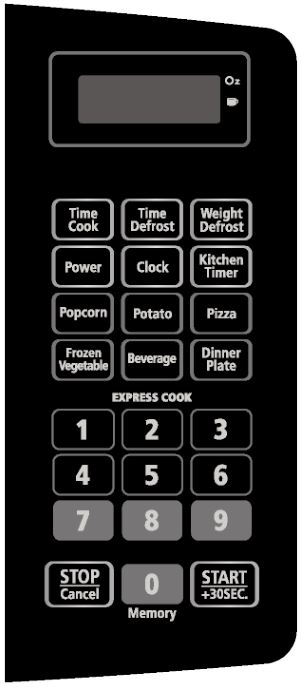

1. Time Cook2. Time Defrost3. Power4. Clock5. Auto Menus:· Popcorn· Potato· Pizza· Fresh Vegetable· Beverage· Dinner Plate6. Number Buttons: 0-97. Weight Defrost8. Kitchen TImer Function9. Stop / Cancel10. Memory Function11. Start / +30Sec.
Operating Your Oven
Setting the Display Clock:
After the microwave is plugged in the LED display on the oven will display “0:00” and a buzzer will beep once.
For Example: To set 10:30 AM or PM
1. Press CLOCK and the buzzer will beep once.2. Press the number keys, “1, 0, 3, 0.”3. Press CLOCK to finish this setting.
*This is a 12-hour clock from 1:00 to 12:59. If the time set is not appropriate, your selection will be invalid. A buzzer will sound twice and return to a waiting state.If the electrical power supply to your oven is interrupted during cooking, the program will be erased. When the power is restored, press CLOCK and reset the clock for the correct time of day.
Microwave Cooking:
For best results while using your oven, please note the following:
- Foods taken from the freezer or refrigerator will take longer to cook than the same foods would if at room temperature.
- Small pieces of foods will cook more quickly than larger ones. Foods of similar size and shape will cook more evenly when cooked together. For more even cooking results, reduce the power levels when cooking larger pieces of food.
- Foods that have more moisture will cook more evenly
- While constant stiring is not necessary, if you stir foods (casseroles, vegetables, etc) from the outside to the center heat will distribute more evenly and the foods will cook faster.
- Place delicate areas of food toward the center of the turntable tray
- Arrange unevenly shaped foods with thicker or fatter parts towards the outside of the turntable tray.
- To help cook food more evenly, some foods may need to be turned over halfway through cooking.
- After food has been removed from the microwave, cover the food with foil or a casserole lid and let it stand to finish cooking. The length of stand time will depend on the density and surface area of the food item you’re cooking.
- Letting food stand will help the food finish cooking in the center and avoid overcooking the outer edges.
- Foods, like sandwiches, that contain prebaked bread should be wrapped prior to placing them in the microwave. Wrapping these foods will help prevent the food items from drying out as they heat.
Begin Microwave Cooking:
- Press “TIME/COOK” to select microwave cooking. “0:00” will flash to remind you to input the cooking time.
- Press the number keys to adjust the desired cooking time. For example, to cook for 10 minutes: Select “1,0,0,0” in turn.
- The maximum cooking time is 99 minutes and 99 seconds.
Microwave Cooking / Power Levels:
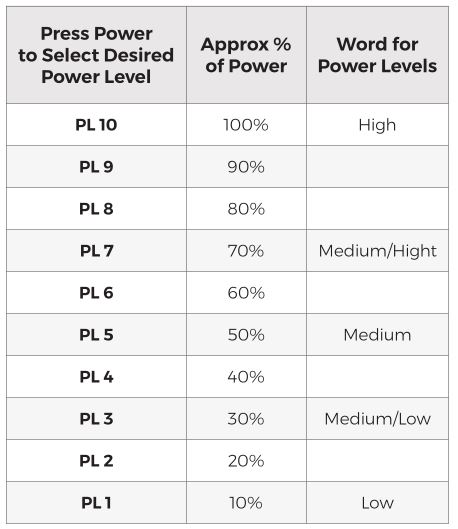
- Press “POWER” to adjust the different power levels.
- Press the number keys to select the desired power level.
- Press “START/PAUSE” to begin cooking (The cooking time will automatically count down).
There are 10 different power levels available:

Stop / Clear:
Touch the STOP/CLEAR pad if you would like to:
1. Erase your selection if you made a mistake during program selection.2. Cancel the kitchen timer set or return the time to the display.3. Touch once to temporarily stop the oven druing cooking or twice to cancel a program.
Multiple Stage Cooking:
Two stages of cooking can be used at once. One stage is defrosting, one stage is microwave cooking. If one stage is defrosting, it will automatically be put on the first stage.
Below is an example to defrost food for 5 minutes, then cook using 100% microwave power for 5 minutes.
- Press DEFROST twice to set the time.
- Press the number keys, “5, 0, 0” to set the desired defrost time.
- Press POWER once, PL10 will show on the display.
- Press the number keys “5, 0, 0” to set the desired cooking time.
- Press START/ +30 SEC to begin Multi-Stage Cooking.
- Microwave cooking can be set as two stages only. The Defrost program and Auto Menu cannot work in multi-stage cooking.
- When the first stage finishes, a buzzer will sound once and the second stage begins cooking.
- During cooking, each time the “ADD 30 SEC” button is selected, 30 seconds will be added to the cooking time (up to 99-minutes and 99-seconds).
- If you want to use Multi-Stage cooking together with the grill feature, press the BROIL/GRILL key once, G-1 will show on the display. Press START/+30 SEC to begin Multiple Stage Cooking with the grill (browner).
Speed Cooking:
- If you would like to instantly begin cooking, press a number on the number pad to begin. For example, to cook for five minutes, press 5.
- From standby mode, press “ADD30SEC” to instantly begin cooking for 30-seconds.
- To increase cooktime in 30-second increments (this does not apply to auto cook or defrost), press “ADD30SEC.”
- To check or select a power level while cooking, press “POWER” and the current power level will be displayed. Then press the number key to select the desired power level.
- Defrost and Auto Menus will not work during speed cooking functions.
Using Express Cooking:
- Since your ovens power level is preset to 100%, EXPRESS COOKING is a short cut to oven programming.
- You can select cooking times in increments of 1 to 6 minutes or 30-seconds.
- Press EXPRESS COOK to select a cooking time in increments of 1 to 6 minutes by preseeing the numbers on the number pad (1-6).
- Your oven will start right away once the number pad is pressed.
- Press START/+30SEC to increase cooking time by 30-second increments OR press START/+30SEC to cook for 30-seconds only.
Defrosting with Your Microwave:
This is the perfect feature if you want to defrost foods. For best results, use food directly from the freezer.
Defrost by Time:
- Press DEFROST twice so the oven displays dEF2. Micr. and indicators will light.
- Use the number keys to set defrosting time.
- Press START/+30SEC to begin defrosting. Once half of the defrost time passes, the buzzer will sound twice to remind you to turn over the food.
Defrost by Weight:
- Press DEFROST once so the oven displays dEF1. Micr. and indicators will light.
- Use the number keys to set defrosting weight within the range of 4-1000 ounces.
- Press START/+30SEC to begin defrosting.
Turning on the Oven Light:
- Press “SURFACE LIGHT ON/OFF” once to turn on the light.
- Press “SURFACE LIGHT ON/OFF” twice to turn off the light.
Setting the Timer:
- Press “TIMER” and the timer indicator will light.
- Use the number keys to input the desired cooking time. The maximum cooking time is 99-minutes and 99-seconds.
- Press “TIMER” again and the timer will begin to count down. The buzzer will sound when the cooking time has finished.
Popcorn Menu:
The popcorn setting is designed to make popcorn based on the popcorn’s bag weight.
Press “POPCORN” repeatedly to select your popcorn bag’s weight. Once the correct weight is selected press “START” to begin.
1. For 3.3 Oz / Press Once2. For 3.0 Oz / Press Twice3. For 1.75 Oz / Press Three Times
Only use popcorn packaged for Microwave Oven use.
DO NOT try to pop un-popped kernels.
Beverage Menu:
The beverage setting heats one to three cups of a beverage at a time. Use the below recommendations to determine the setting to use.
Press “BEVERAGE” repeatedly to select the correct number of servings. Once the correct serving size is selected press “START” to begin.
1. 1 Cup / Press Once2. 2 Cups / Press Twice3. 3 Cups / Press Three Times
Carefully test for desired temperature after heating. Re-heat if necessary.
Potato:
Pierce potato and place directly on turntable. We recommend lining potato with a paper towel.
Using the Child Lock:
- To lock the microwave oven, press and hold “STOP/CLEAR” for three seconds.
- The microwave beeps and a lock indicator will appear on the display.
To unlock the microwave, press and hold “STOP/ CLEAR” until the lock indicator disappears (around 3 seconds).
Dinner Plate (Re-Heat):
This setting allows you to reheat precooked foods from the refrigerator, making cooking leftovers quick and easy.
We recommend keeping larger portions and vegetables towards the outside of the plate or cutting large items into smaller pieces. Dense foods, like mashed potatoes reheat better if flattened.
Only use microwave-safe lids or microwave-safe plastic wrap to cover foods.
Only reheat ONE plate at a time.
Fresh / Frozen Vegetables:
We receommend adding 1 tablespoon of water power serving size (1-cup) of corn, peas, carrots or most beans.
When cooking cruciferous vegetables do not add additional water, cook immediately after washing.
For softer or more tender vegetables we recommend using a microwave-safe lid.
After cooking and removing vegetables from oven, stir, cover with a microwave-safe lid and let stand for at least 5 minutes prior to serving.
Care & Maintenance
Cleaning:For hygienic reasons the appliance interior, including accessories, should be cleaned regularly.
![]()
![]()
![]()
![]()
![]()
![]()
![]()
![]()
![]()
![]()
![]()
![]()
![]()
![]()
![]()
![]()
![]()
![]()
![]()
![]()
![]()
CAUTION: This appliance may NOT be connected during cleaning. Danger of electrical shock! Before cleaning switch the appliance off. NEVER clean the appliance with a steam cleaner. Moisture could accumulate in electrical components, causing danger of electrical shock! Hot vapors can lead to the damage of plastic parts. The appliance must be dry prior to plugging it back in.
- For best performance and for safety reasons, keep the oven clean inside and outside. Take special care to keep the inner door panel and oven free from food and grease build-up.
- DO NOT use any abrasive cleaners on the microwave. Wipe the microwave oven inside and out with a soft cloth and warm (not hot) mild detergent solution. Then rinse and wipe completely dry.
- Wipe splatters immediately with a wet paper towel, especially after cooking greasy foods like chicken or bacon.
- Clean your microwave oven weekly or more often, if needed.
- Keep the inside (cavity) of the oven clean. Food particles and spilled liquids can stick to the oven walls, causing the oven to work less efficiently.
- Wipe up spills immediately. Use a damp, clean cloth and mild soap. DO NOT use harsh detergents or abrasive cleaners.
- To help loosen baked-on food particles or liquids, heat 2-cups of water (add the juice of 1 lemon if you desire to keep the oven fresh smelling) in a 4-cup measuring glass at High power for 5-minutes or until boiling. Let stand in oven cavity for 1 to 2 minutes.
- Remove the glass turntable tray from the oven when cleaning the oven cavity or tray. To prevent the glass turntable from breaking, handle with care and do not put it in water immediately after cooking. Wash the turntable tray in warm sudsy water or in the dishwasher.
- Clean the outside surface of the micrwoave with soap and a clean damp cloth. Dry with a clean soft cloth. To prevent damage to the operating parts of the oven, do not let water seep into any vents or openings.
- If children are around, use extreme caution, this unit should NOT be accessible to child’s play.
- Wash the oven door window with very mild soap an water. Be sure to use a soft clean cloth to avoid scratching.
- If steam accumulates inside or outside the oven door, wipe with a soft cloth. Steam can accumulate when operating the oven in high humidity and in no way indicates microwave leakage.
- Never operate the oven without food in the oven cavity; this can damage the magnetron tube or glass tray. You may wish to leave a cup of water standing inside the oven when it is not in use to prevent damage if the oven is accidentally turned on.
Keep Your Oven Clean:
Your oven was designed with an easy to sanitize stainless-steel interior.
- ONLY use mild, non-abrasive soaps or detergents with a soft cloth or sponge to clean the oven’s surface and oven walls.
- DO NOT clean any part of this oven without unplugging the cord.
- DO NOT use commercial oven cleaner on any part of your microwave.
- DO NOT clean any part of this oven without unplugging the cord.
- DO NOT wash turntable immediately after cooking. Let it cool prior to placing it in water to prevent risk of breakage.
- DO NOT drop turntable and shaft or it can break.
- Make sure you carefully put the turntable and shaft back in the oven after cleaning.
- DO NOT operate the oven without the turntable, turntable shaft and the ring assembly properly in place.
- We recommend wiping down the control panel with a damp cloth and drying it thoroughly.
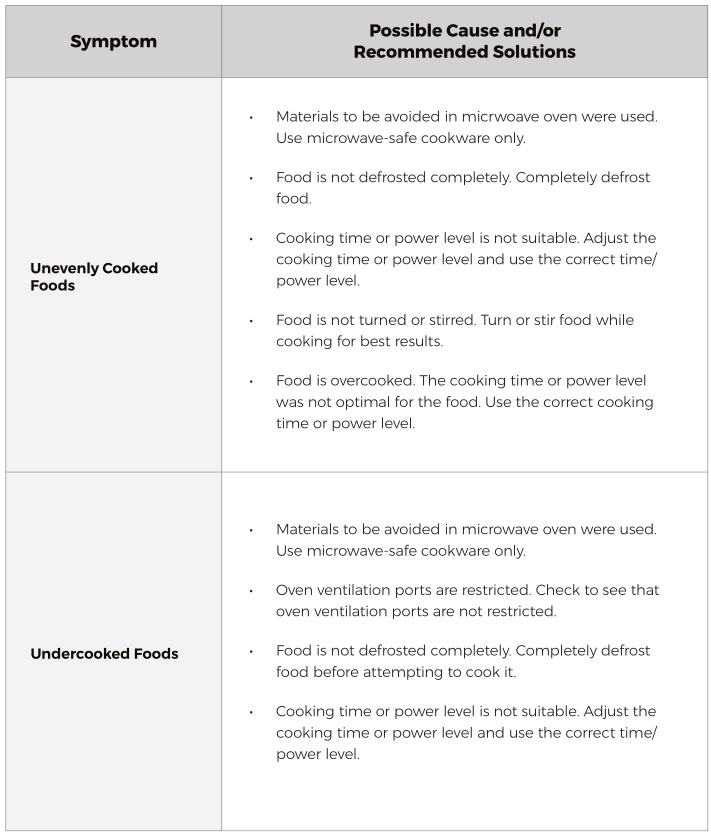
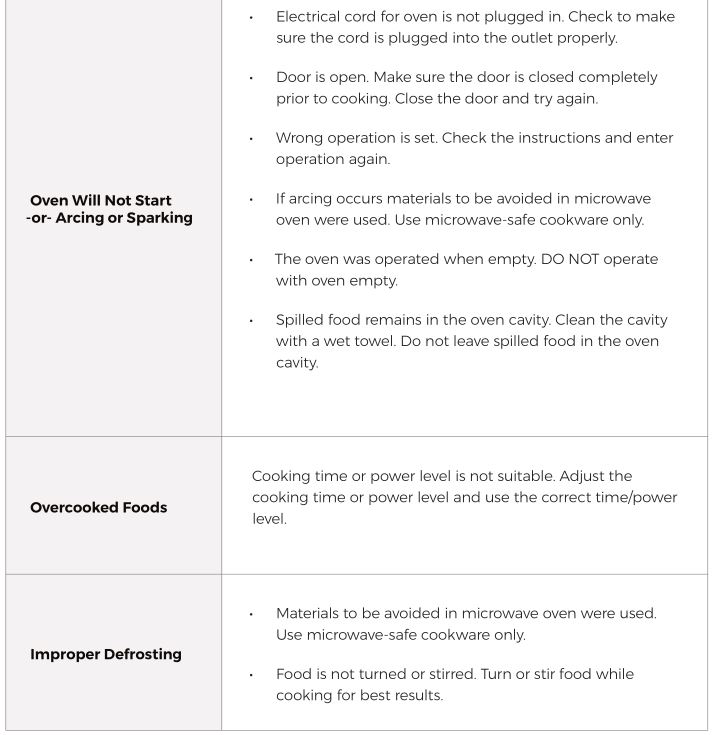
Troubleshooting Guide
First try the solutions suggested here prior to a service call.


Product Warranty
This warranty is available to consumers only. You are a consumer if you own a CONTOURE product that was purchased at a retail store for personal, family or household use. Except as otherwise required under applicable law, this warranty is not available to retailers or other commercial purchasers or owners.
Warranty registration is not mandatory, but doing so will help us to service you more quickly if you need to present a warranty claim or notify you if there is a product recall. Please go online to submit your product registration form. Return of product registration does not eliminate the need for the consumer to maintain the original proof of purchase in order to obtain the warranty benefits. In the event that you do not have proof of purchase date, the purchase date for warranty purposes will be the date of manufacture.
NQP warrants CONTOURE Products (“product”) to be free of all defects in material and workmanship for the applicable period specified below commencing from the date of original purchase. This warranty extends to the original buyer only.
Ninety (90) Day Full Warranty Parts & Labor:
Within ninety (90) days from the date of original purchase, NQP/CONTOURE in its sole discretion, will either repair or replace, free of charge, any part proving defective in material or workmanship.
All warranty repairs and service must be performed at a NQP/CONTOURE location of service by an authorized NQP/CONTOURE technician. All expenses related to replacing or repairing a defective part under this ninety (90) day warranty shall be assumed by NQP/ CONTOURE except the cost of transporting the product to and from NQP/CONTOURE, which shall be assumed by the buyer. If the product is replaced, the replacement will be with a product that is identical or equivalent to the warranted product. If the product cannot be repaired or replaced, NQP/CONTOURE will issue a refund to the buyer for the original purchase price less that amount directly attributable to use by the buyer.
Disclaimer of implied warranties; limitation of remedies:
Customer’s sole and exclusive remedy under this limited warranty shall be product repair or replacement as provided herein. Claims based on implied warranties, including warranties of merchantability or fitness for a particular purpose, are limited to one year or the shortest period allowed by law, but not less than one year. NQP/CONTOURE shall not be liable for consequential or incidental damages such as property damage and incidental expenses resulting from any breach of this written limited warranty or any implied warranty. Some states and provinces do not allow the exclusion or limitation of incidental or consequential damage or limitations on the duration of implied warranties, so these limitations or exclusions may not apply to you. This written warranty gives you specific legal rights. You may also have other rights that vary from state to state.
One (1) Year Limited Warranty:
After the expiration of the ninety (90) day warranty, and within one (1) year from the date of original purchase, NQP/CONTOURE NQP will replace any part proving defective in material or workmanship with a product that is identical or equivalent to the warranted part. The buyer shall assume the cost of transporting the defective product to and from NQP/CONTOURE and will assume the cost of labor associated with repair.
How to Obtain Warranty Service:
Upon discovery of any defect, malfunction, or nonconformity in the warranty-covered product, the buyer should visit www.contoureusa.com and submit a warranty claim online.
For any questions regarding your warranty you may also email us at [email protected]
Notice to Buyer:
This warranty gives the buyer specific legal rights, and the buyer may also have other rights, which vary from state to state. You have the right to bring any action at law or equity to resolve disputes concerning or to enforce the provisions of this warranty. Every implied warranty, including any statutory warranty or condition of merchantability or fitness for a particular purpose, is disclaimed except to the extent prohibited by law, in which case such warranty or condition is limited to the duration and extent of this written warranty.
For added protection and secure handling of any CONTOURE product that is being returned, we recommend that you use a traceable, insured delivery service. NQP/CONTOURE cannot be held responsible for in-transit damage or for packages that are not delivered to us. Lost and/or damaged products are NOT covered under warranty. Please be sure to include your return address, daytime phone number, description of the product defect, product model number (located on the product), original date of purchase and any additional pertinent information pertaining to the product’s return.
Warranty Exclusions:
This warranty does not apply to any costs, repairs or services for the following:
- Products with original serial numbers that have been removed, altered or cannot be readily determined or products purchased “as-is.”
- Product that has been transferred from its original owner to another party or removed outside of the USA or Canada.
- Products used in commercial setting(s).
- Service calls to correct the installation of the warranty-covered products, to explain the usage of the product to the buyer, or to reset or replace home circuit breakers or fuses.
- Service calls which do not involve malfunction or defects in materials or workmanship, or for appliances not in ordinary household use or used other than in accordance with the provided instructions.
- Repairs necessitated by use other than normal home use / Products used in commercial settings.
- Damage resulting from misuse, abuse, accidents, alterations, improper installation, fire, flood acts of God or damage caused by the shipping of the product by the buyer to NQP.
- Corrective work necessitated by repairs made by anyone other than a NQP authorized service technician / Rust on the interior or exterior of the unit.
- Costs incurred for disposing of the product at locations other than a NQP facility.
- Food loss due to any refrigerator or freezer failure.
- Expenses for making the appliance accessible for servicing, such as removal of trim, cupboards, shelves, etc. which are not a part of the appliance when it is shipped from the factory.
- Damages to the finish of appliance or home incurred during installation, including but not limited to floors, cabinets, walls, etc.
- Damages caused by: services performed by unauthorized service companies; use of parts other than genuine CONTOURE parts or parts obtained from persons other than authorized service companies; or external causes such as abuse, misuse, inadequate power supply, accidents, fires or acts of God.
- Labor costs after ninety (90) days from your original date of purchase incurred for product repair or replacement as provided herein for carry-in appliances.
This Warranty Only Applies in the USA and Canada:
In the United States and Canada, your appliance is warranted by NQP/CONTOURE. NQP/CONTOURE authorizes no person to change or add any obligations under this warranty. Obligations for service and parts under this warranty must be performed by NQP/CONTOURE or an authorized service company.
California Residents Only:
California law provides that for In-Warranty Service, California residents have the option of returning a nonconforming product.
(1) to the store where it was purchased or (2) to another retail store which sells CONTOURE products of the same type. The retail store shall then, at its discretion, either repair the product, refer the consumer to an independent repair facility, replace the product, or refund the purchase price less the amount directly attributable to the consumer’s prior usage of the product. If the above two options do not result in the appropriate relief to the consumer, the consumer may then take the product to an independent repair facility if service or repair can be economically accomplished.
NQP/CONTOURE and not the consumer will be responsible for the reasonable cost of such service, repair, replacement, or refund for nonconforming products under warranty.
California residents may also, according to their preference, return nonconforming products directly to NQP for repair, or if necessary, replacement, by calling our Consumer Service Center toll-free at 1-888-656-9317 or sending us an email, [email protected].
NQP/CONTOURE will be responsible for the cost of the repair, replacement, and return shipping and handling for such products under warranty.
Copyright:
CONTOURE is a trademark of National Quality Products, LLC and its affiliated companies.
Registered in some countries.
Distributed by National Quality Products, LLC.
©2020 National Quality Products, LLC. All rights reserved.


References
[xyz-ips snippet=”download-snippet”]

