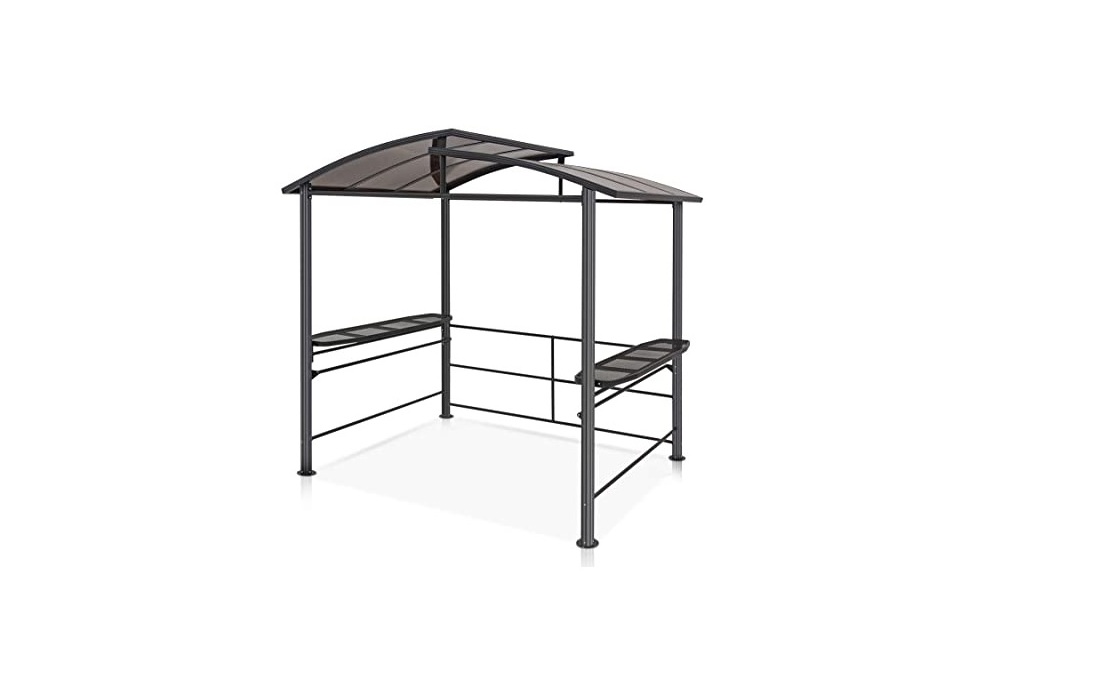
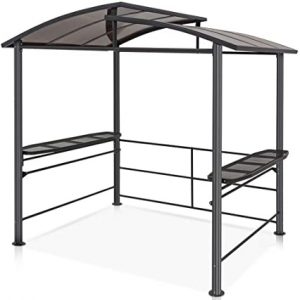
COOL Spot BBQ Grill Gazebo 8ft x 5ft with Hard Top Instruction Manual
WARRANTY
Please read and save these instructions before attempting to set up this gazebo. 1 year limited warranty Pleaseemail [email protected] before returning the product to our shop. Cool Spot Shelters warrants for a period of 1 year from the original date of purchase, this product against any defects in materials or workmanship. At its discretion, Cool Spot Shelters may provide replacement parts to original purchaser. Original receipt or proof of purchase as well as proof of defect is required. Cool Spot Shelters will not be responsible for shipping costs incurred outside the continental USA. Warranty is valid for the original purchaser for 1 year from the date of purchase and is not transferable. This warranty does not cover any product purchased through non authorized dealers and/or on-line auction websites.This Warranty Does Not CoverThis 1 Year Limited Warranty does not cover normal wear and tear, abuse or misuse of this product including damage from inclement weather conditions, such as wind, rain, or hail. Under no circumstances will Cool Spot Shelters be liable or responsible for any incidental or consequential damages. All replacement products or parts will assume the remaining warranty of the original product. This warranty gives you specific legal rights. You may also have other rights, which vary from state to state. It is your responsibility to read and save these instructions before attempting to set up your gazebo. We would also like to suggest that you follow these safety precautions, care and maintenance tips when using your gazebo.
- Never set up or continue to use in any rain, wind or storm conditions, especially lightning storms. Damage can occur to your gazebo and put you and others in potential danger.
- We suggest that you take your time in order to avoid bending the frame or pinching your fingers or hands while opening and closing the frame.
- Avoid setting up your gazebo on steep inclines.
- Do not use your gazebo for permanent shelter. It is designed for temporary use only.
- Keep your gazebo away from heat and flames at all time. Do not barbecue or build fires under your gazebo.
- Never leave your gazebo unattended.
- Never store your gazebo when it is wet or damp. Let it dry completely to avoid mildew.
- The frame MUST be staked or properly weighted down at all times.
- When assembling and using this product, basic safety precautions should always be followed to reduce the risk of personal injury or damage to equipment. Please read all instructions before assembly and use.
- Some parts may contain sharp edges. Wear protective gloves if necessary. Three or more people are recommended for safe assembly.
- Keep all children and pets away from assembly area.
- Begin assembly at least 9 feet from any obstruction such as fences garage house overhanging branches laundry lines or electrical wires.
- Please sweep or keep this unit out of snow deeper than 10 inches.
PACKING INCLUDES
Parts List
| NO. | Parts. | QTY. |
| A |  |
1 |
| A1 | |
1 |
| B | |
1 |
| B1 | |
1 |
| C |  |
2 |
| D |  |
1 |
| D1 |  |
1 |
| E |  |
1 |
| E1 |  |
1 |
| F |  |
2 |
| F1 |  |
1 |
| G | 4 | |
| H |  |
2 |
| H1 |  |
2 |
| I | 2 | |
| I1 |  |
1 |
| J |  |
2 |
| J1 |  |
2 |
| K |  |
3 |
| K1 |  |
3 |
| L |  |
8 |
| M |  |
2 |
| O |  |
2 |
| P |  |
4 |
| Q |  |
4 |
| R |  |
1 |
| S |
M6x85 |
10 |
| T |
M6x85 |
2 |
| U |
M6x35 |
6 |
| V |
M6x35 |
2 |
| W |
M6x30 |
8 |
| X |
M6x20 |
22 |
| Y |
M6x12 |
8 |
| Z |
M6x8 |
32 |
| Z2 |
M5x12 |
16 |
| Z3 |  |
4 |


SET UP THE GAZEBO
Step 1Put the leg (A) on the foot pad (P)and fix it with 4 pcs screws (Z2), Repeat the above steps for the leg(A1). Insert the tubes (O) into the cross connector (I1). Connect the two tubes (F) into both ends of the cross connector (I1), fix them with 2pcs screws (V). Connect tube assembly between the leg A and leg A1 with screws (S).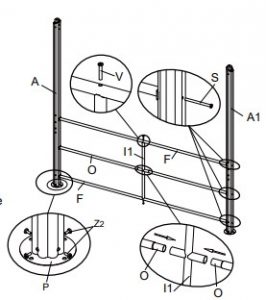 Step 2Fix the tube (C) with screws (X) at the top of the leg(A),leg(A1); Connect the cross bars (J1) on each leg with screw (W); Use screws(X) to connect the steel triangle plate Q to legs (A), (A1)
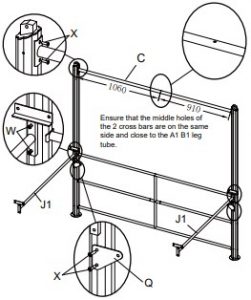 Step 3Put the leg (B) on the foot pad (P) and fix it with 4 pcs screws (Z2), Repeat the above steps for the leg(B1). Fix the tube (C) with screws (X) at the top of the leg(B),leg(B1); Use screws(X) to connect the steel triangle plate Q to legs (B),(B1).
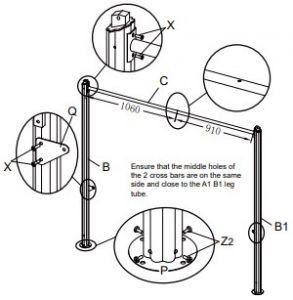 Step 4Place the leg(B) and legcB1 in place to connect the cross bars (J1) with screws(W)
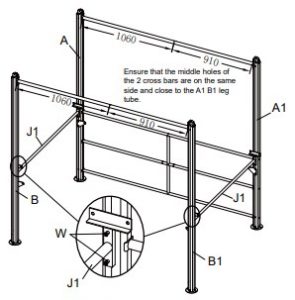
Step 5
The hole faces inward Fix the tube (F1) at the bottom of the leg with screw (S) Position tube (I) between the two steel triangle plates on leg(A) ,leg(B), and connect with 2 screws Place the mesh bar (J) above the crossbar (J1) and secure with screw (Y). F1 Repeat the above steps for the other legs. Install M on cross bars (C), fix it with screw (T), pay attention to the hole faces inward and the gap faces outward.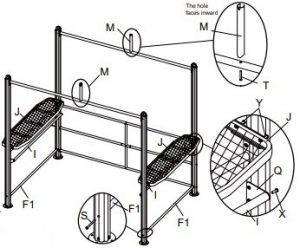
Step 6The tube (G) and D1 is connected with the L-shaped connector (L) and fixed with the screws (Z). Repeat the above steps for the other tubes.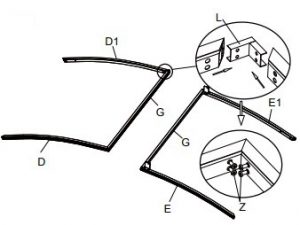
Step 7Put the PC board (K) into the tube(D1) and (G),install each of the other PC board and tube in turn. Repeat the above steps to the PC board assembly.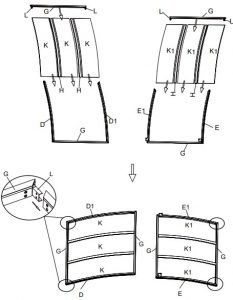
Step 8Place the assembled PC board assembly on the tube as pictured. Use the screw (U) to connect the tube E/E1 with the leg. Connect with the M bracket with the screws (U). Step 9Place the other assembled PC board assembly on the top as U pictured. Use the screw(U) to connect the tube D/D1 with the leg, then connect D and E ,D1 and E1 with the screw (X).
Step 10 Insert a stake(Z3) into the foot of each gazebo leg.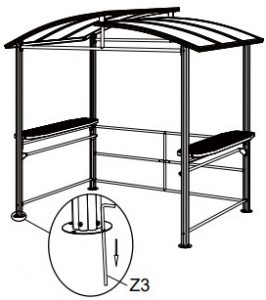
Do not return your canopy to the place of purchase. For warranty service, repair parts, or product questions pleaseemail: [email protected] Thank you for choosing Coolspot !
References
[xyz-ips snippet=”download-snippet”]