Coopers VICTOR TOOLS Power Edger & Trencher H061 Instruction Manual
Technical Data
Dimensions
65.5x 27 x25cm handle height adjusts from 89- 98cm
| Rated voltage | AC 230-240V, 50Hz |
| Rated input power | 1400W |
| No load speed | 3200/min |
| Max. operating depth | 15mm,25mm,35mm |
| Declaration of the noise emission values
A-weighted sound pressure level LpA |
85.7dB(A) |
| Uncertainty KpA | 3dB |
| A- weighted sound power level LWA | 92.5dB(A) |
| Declaration of the vibration emission | |
| ah | Front handle: 2.83m/s2
Rear handle: 2.67m/s2 |
Recommended user age: 18+
Assembling
BEFORE ASSEMBLING YOUR EDGER. CHECK THAT YOU HAVE RECEIVED THE FOLLOWING IN THE SHIPPING CARTON.
SEE FIGURE 1
- A. 1400 Edger
- B. Edge hog blade with nut, conical washer and spacer system(assembled to unit)
- C. Handle tube bolt and knob (assembled to handle tube)
- D. Auxiliary handle, with bolt and knob
Symbols explained
Before use
- a) Read the instructions carefully. Familiarise yourself with the controls and the proper use of the equipment.
- b) Never allow children or people unfamiliar with these instructions to use the edger. Local regulations may restrict the age of the operator. Recommended user age is 18+.
- c) Never edge while people, especially children, or pets are nearby.
- d) Keep in mind that the operator or user is responsible for accidents or hazards occurring to other people or their property.
- e) If the supply cord is damaged, it must be replaced by the manufacture or its service agent or a qualified technician in order to avoid a hazard.
- f) This appliance is not intended for use by persons (including children) with reduced physical, sensory or mental capabilities, or lack of experience and knowledge, unless they have been given supervision or instruction concerning use of the appliance by a person responsible for their safety.
- g) Children should be supervised to ensure that they do not play with the appliance.
Preparation
- a) While edging, always wear eye and ear protection, substantial foot wear, and long trousers.
- b) Thoroughly inspect the surface where the equipment is to be used and remove all stones, sticks, wires, bones and other foreign objects.
- c) Before using, always visually inspect to see the blades, blade bolts and cutter assembly are not worn or damaged. Replace worn or damaged blades and bolts in sets to preserve balance.
- d) Use only manufacturer-recommended replacement parts and accessories.
Operation
- a) Edge only in daylight or in good artificial light.
- b) Always be sure of your footing on slopes.
- c) Walk, never run.
- d) Use extreme caution when reversing or pulling the edger toward you.
- e) Make sure the blade has stopped before crossing surface other than grass and when transporting the edger to and from the area to be edged.
- f) Never operate the edge with defective, missing or incorrectly fitted guards.
- g) Start the engine or switch on the motor carefully according to instructions and with feet well away from the blade(s)
- h) Do not tilt when starting the engine or switching on the motor.
- i) Do not start the engine or switch when a bystander is standing in front of blades(s).
- j) Do not put handles or feet near or under rotating parts.
- k) Always switch off the electric motor and disconnect from the mains.
Maintenance and storage
- a) Keep all nuts, bolts and screws tight to be sure the equipment is in safe working conditions.
- b) Allow the engine to cool before storing in any enclosure.
- c) To reduce the fire hazard, keep the engine storage area free of grass, leaves or excessive grease.
- d) Replace worn or damaged parts.
- e) Do not attempt to repair the machine unless you are competent to do so.
- f) Use only manufacturer-recommended replacement parts and accessories.
Assembling
BEFORE ASSEMBLING YOUR EDGER, CHECK THAT YOU HAVE RECEIVED THE FOLLOWING IN THE SHIPPINGCARTON. SEE FIGURE1.
- A. 1400 Edger
- B. Edge hog blade with nut, conical washer and spacer system(assembled to unit)
- C. Handle tube bolt and knob(assembled to handle tube)
- D. Auxiliary handle, with bolt and knobCAUTION: never use a sharp object to move jacket wires out of the way
Position Auxiliary Handle (Figure 2)

- Undo the knob from the bolt in the auxiliary handle and push/pull the bolt out of the handle.
- Slide the auxiliary handle onto the main handle. The auxiliary handle can be positioned for either left or right-hand operation whichever is more comfortable. The auxiliary handle is not adjustable forward/back.
- Insert the bolt back into the auxiliary handle hole on the hex recess, attach the knob and fully tighten.
Cut Depth Adjustment (Figure 3)
The front wheel can be adjusted to allow a deeper or shallower cut and to increase the life of the blade.
Change the cut depth from the shipping position to your desired depth by:
- UNPLUG PLUG! WAIT FOR BLADE TO COME TO COMPLETE STOP!
- Loosen the Cut Depth Knob.
- Adjust wheel depth, using the depth indicator on the wheel bracket andthe marking on the front housing.Note: Recommend 1 depth for edging.
- Tighten Knob firmly.Tip Thick overgrowth may drag on the guard. Reduce cut depth to minimum to help reduce this effect.
Pull-up Edge Guide (Figure 4 & 5)
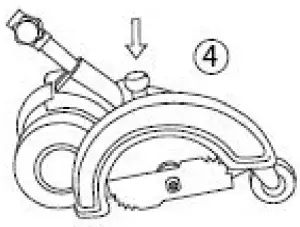
The edge guide is use for cutting a straight path along sidewalks. For Landscaping or trenching in the yard the edge guide can interfere with moving the edger through hard soil or sod,The edge guide can be adjusted so that tool will also perform TRENCHING and LANDSCAPING operations.
To Change Position Of The Edge Guide
- UNPLUG plug! WAIT FOR BLADE TO COME TO COMPLETE STOP!
- Pull Edge Guide Knob sideway to unlock from the guard tab. (See Figure 4 detail) in direction of small arrow. Lift the knob up until the lower square notch in the lever lines up with the tab on the guard, In this position the edge guide is lifted up( Figure5) so the tool can easily cut along the edges of flower and shrubbery beds, and around trees in preparation for trenching or sod removal.
- To return edge guide to lower position, pull lever sideways and push down until guard tab fits in upper lever hole.
Attaching Extension Cord to Edger (Figure 6)
Do not modify the appliance plug or extension cord in any way. Read IMPORTANT SAFETY INSTRUCTIONS at beginning of manual. Note: Check the extension cord safety instructions provided earlier.
- To prevent disconnection of edger, secure extension cord by tying the power plug as shown.
- Insert plug into cord socket
- An extension cord retainer is built into the switch handle to reduce strain on the power cord. To use this feature simply double the extension cord as shown, about a foot from the end, and insert it into the end of the handle. Hook the loop formed by doubling the cord over the tab. Gently tug on the cord to ensure that it is firmly retained in the handle.
- Keep extension cord clear of operator.
Switch
To turn tool ON, squeeze the trigger switch. The trigger has been designed so that it is very easy to hold in the ON position. To turn tool OFF, release the trigger.
Operating Instructions
NOTE: The edger is a major appliance and should not be operated simultaneously with other major appliances on the same household circuit
Warning: Make sure that other persons and pets are at least 100 feet away.
- Set cut depth at 1 and set edge guide to the down position, refer to Assembly instructions.
- Note the Cut Line (Figure8) that helps indicate the blade cut path.

- Before starting the edger, line up the tool so the edge guide rests against the edge of the paved surface. Both rear wheels should be on the paved surface when edging.Tip: When there is heavy overgrowth of grass over the paved surface it may drag on the guard. An initial cut may be required with the edger on the grass side. This will require lifting up the edge guide and may require reducing the depth of cut (see Edge Guide and Depth Adjustment instructions).
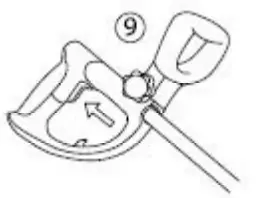
- To avoid kickback of edger, tilt the handle down so the blades is above the ground (Figure 9).
- Turn switch ON and allow blade to spin without moving tool.
- Slowly lift the handle to lower the blade, finding the edge of the paved surface and start edging. Move tool forward slowly along edge of paved surface, Keeping the edge guide pressed lightly against the pavement edge.
For the first edging each season, it is best to move forward slowly because grass is thickest then. Subsequent edging will be completed more rapidly. If the tool slows down, back it up an inch or two until the blade comes up to normal speed.
During edging some sparks may be generated from hitting stones. This is normal.
Do not attempt to edge when the grass or soil is wet or moist for electrical safety and to prevent clogging of the blade chamber. If you must edge under conditions that cause the blade chamber to become clogged material with a stick.
To continue to operate the tool in a clogged condition will seriously overload the motor.
CAUTION: Do not attempt to unclog the blade chamber by dropping or tapping the tool on the ground.
This can damage the unit. Keep hands clear of edge guide and blade when cleaning as these wear to a very sharp point during edging.
LANDSCAPING/TRENCHING
Warning: Before Landscaping or Trenching, inspect and ensure there are no exposed or buried cables, pipes or other objects that may create a hazard or interfere with operation of the edger. Set depth to only that required for the job. Do not overload. If tool slow, pull back slightly and wait until blade comes up to normal speed.
Storage
Warning! Be sure the tool is unplugged
Remove and clean any debris from the outside of the edger and inside of guard before storage. See MAINTENANCE Section. If necessary, the edger may be stored by hanging on a hook by its handles.
CAUTION: DO NOT HANG EDGER ON THE SWITCH TRIGGER OR POWER CORD!
Note: Do not store the tool on or adjacent to fertilizers or chemicals. Such storage can cause rapid corrosion.
Preventing Corrosion
Fertilizers and other garden chemicals contain agents that greatly accelerate the corrosion of metals. If you use the tool in areas where fertilizers or chemicals have been used, the tool should be cleaned immediately afterwards.
Wipe all exposed parts with a damp cloth. You may lubricate only metal parts with a light petroleum based oil
When cleaning, DO NOT immerse tool in water or squirt with a hose.
DISPOSAL
- Coopers of Stortford use recyclable or recycled packaging where possible.
- Please dispose of all packaging, paper, cartons, packaging in accordance with your local recycling regulations.
- Plastics, polybags – Contains the following recyclable plastic.
| Type of Plastic | Polyethylene Terephthalate | High-Density Polyethylene | Polyvinyl Chloride | Low Density Polyethylene | Polypropylene | Polystyrene | Please Specify (includes ABS,
Nylon) |
| Commonly used for | Soft drink and juice bottles, shampoo bottles, meat trays, fruit punnets | Milk bottles, cleaning product bottles, yoghurt pots, butter tubs and other food
containers |
Pipes, construction material, flooring, windows, guttering, blister packs | Shopping bags, bread bags, squeezy bottles, stretch/pallet wrap, bubble wrap, multi- pack can holders | Microwaveable food containers, yoghurt pots, butter tubs, disposable plates and cups | Insulation boxes, water cups, protective packaging inserts, take away containers | CD’s, crisp packets, various flexible packaging
, baby bottles, sunglass lenses |
| Notes | Commonly recycled and collected from household recycling bins.
Check with your local authority |
Commonly recycled and collected from household recycling bins. Check with your local authority | Not usually collected from household recycling bins, Sometimes recycled at local waste management centres. | Usually recyclable supermarket deposit points. Check other plastic films as any non- polythene film e.g. cling film, crisp packets film
lids |
Commonly recycled and collected from household recycling bins (packaging tape itself not recyclable but does not interfere with cardboard) | Not commonly recycled but waste management centres will recycle it. | Not often or widely recycled |
Aluminium – the handle is made from AluminiumAt the end of the product’s lifespan please check with your local council authorised household waste recycling centre for disposal.
EC DECLARATION OF CONFORMITY
Coopers of Stortford that the Power Edger & Trencher – H061, (Model No.TP1604038)
Conforms to the following European Directives and standards
2006/42/EC, 2014/30/EU, 2011/65/EU (EU)/2015/863 (EU)2017/2102 and are manufactured in accordance with the following standards or standardized documents:
EN 60335-1:2012/A2:2019EN ISO 12100:2010EN ISO 11789:1999EN 62233:2008EN 55014-1: 2017,EN 55014-2: 2015,EN 61000-3-2:2019,EN 61000-3-3: 2013/A1:2019
Additionally confirmed by the Directive 2000/14/EC & 2005/88/EC Noise emission:Sound power level:Measured: 92.5 dB (A)Guaranteed: 96 dB (A)
The Technical file in accordance with 2006/42/EC is available from:Coopers of Stortford, 11 Bridge Street, Bishop’s Stortford, Hertfordshire, CM23 2JU
report this adTel: 08444824400Fax: 01279756595
[xyz-ips snippet=”download-snippet”]