
CORSAIR High Performance RGB Liquid CPU Cooler User Manual
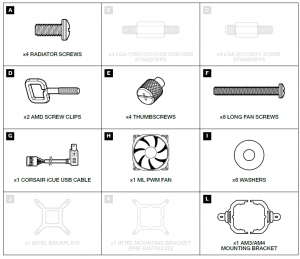
INCLUDED HARDWARE
Highlighted parts for Intel installation only / Les sections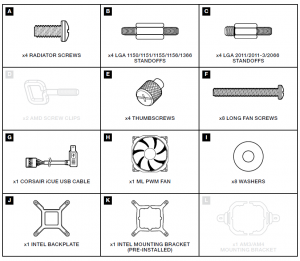
NOTE: Most newer PC cases include a CPU cutout to allow access to the underside of the motherboard. If your case does not include a cutout, you will need to remove your motherboard from the case before installation. The iCUE RGB PRO XT coolers come with the Intel mounting bracket pre-installed on the pump for quick installation.
1. INSTALLING THE INTEL BACKPLATE
Installation de la plaque arrière Intel / Installation der Intel
NOTE: Intel LGA 2011/2011-3/2066 do not require backplate installation. Proceed to step 2.
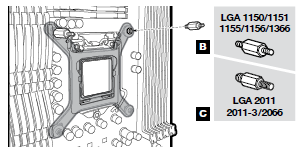
2. INSTALLING THE INTEL STANDOFF SCREWS
Attach the provided Intel standoffs.> Use B for LGA 1150/1151/1155/1156/1366 and attach to mounting posts in backplate.> Use C for LGA 2011/2011-3/2066 and attach to mounting posts in processor socket.> Tighten all four screws until firmly secured
3. INSTALL THE FANS AND RADIATOR

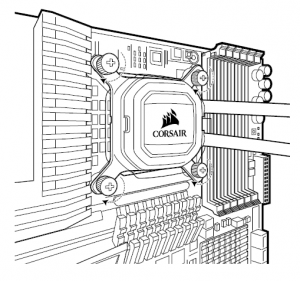
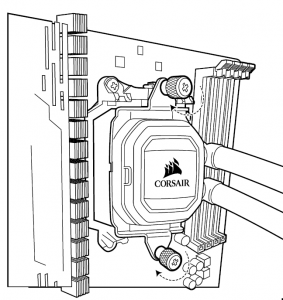
4. INSTALLING THE PUMP UNIT
Align the bracket and pump over the standoff screws as shown.> Attach the thumbscrews (E) to the standoff screws as shown.> Tighten the thumbscrews until all four corners are firmly secured.
5. CONNECT POWER TO THE FANS AND PUMP

6. CONNECT PUMP TO USB 2.0 HEADER
Using the included CORSAIR iCUE USB cable, connect the pump unit to a motherboard USB 2.0 header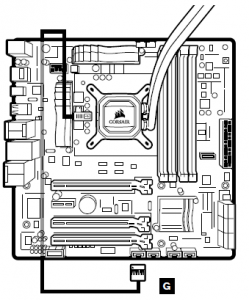
INCLUDED HARDWARE
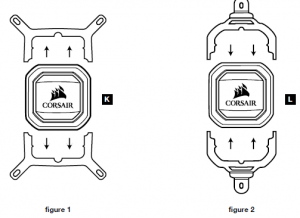
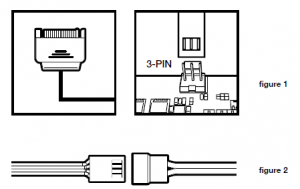
1. INSTALLING THE AMD (AM3/AM4) MOUNTING BRACKET
Remove the integrated Intel mounting bracket (figure 1).> Install the AMD bracket by pushing both sides into the slot on the pump until secure (figure 2).NOTE: It is important that the AMD retention bracket be evenly secured on all sides before installation
2. INSTALL THE FANS AND RADIATOR
Attach the radiator and the fans as shown. For the best cooling performance, we recommendmounting the fans as an air-intake to your PC case.
Insert the AMD screw clips and secure with the thumbscrews as shown. Do not tighten thethumbscrews all the way.
4. INSTALL THE PUMP UNIT
Align the bracket with the stock AMD mounting clips as shown.Tighten the thumb screws until secure.
5. CONNECT POWER TO THE FANS AND PUMP
Connect pump power cable to an available SATA power plug (figure 1).> Connect pump tach cable to the CPU_FAN header on your motherboard (figure 1).> Connect each fan to the shrouded 4 pin connectors on the pump (figure 2).
6. CONNECT PUMP TO USB 2.0 HEADER
Using the included CORSAIR iCUE USB cable, connect the pump unit to a motherboard USB 2.0 header.
- How do I know the direction of the air flow of the fan? An arrow located on the side of the fan indicates the direction of air flow.
- Can I reuse the pre-applied thermal paste on the cooler for re-installation? Re-installation of the cooler will require you to clean off the pre-applied thermal paste and applyan aftermarket paste.
 CORSAIR MEMORY, Inc. encourages customers to recycle used electronic hard ware and rechargeablebatteries in accordance with local laws and regulations.
NOTE ON ENVIRONMENTAL PROTECTIONAfter the implementation of the European Directive 2012/19/EU in the national legal system, the following applies:> Electrical and electronic devices may not be disposed of with domestic waste.> Consumers are obliged by law to return electrical and electronic devices at the end of their service lives to the public collecting points set up for this purposeor point of sale. Details to this are defined by the national law of the respective country. This symbol on the product, the instruction manual or the package indicates that a product is subject to these regulations. By recycling, reusing the materials or other forms of utilising old devices, you are making an important contribution to protecting our environment
FEDERAL COMMUNICATION COMMISSION INTERFERENCE STATEMENT
 FEDERAL COMMUNICATION COMMISSION INTERFERENCE STATEMENT
This equipment has been tested and found to comply with the limits for a Class B digital device, pursuant to part 15 of the FCC Rules. These limits are designed to provide reasonable protection against harmful interference in a residential installation. This equipment generates, uses and can radiate radio frequency energy and, if notinstalled and used in accordance with the instructions, may cause harmful interference to radio communications. However, there is no guarantee that interference will not occur in a particular installation. If this equipment does cause harmful interference to radio or television reception, which can be determined by turning the equipment off and on, the user is encouraged to try to correct the interference by one or more of the followingmeasures:> Reorient or relocate the receiving antenna.> Increase the separation between the equipment and the receiver.> Connect the equipment into an outlet that is on a circuit different from that to which the receiver is connected.> Consult the dealer or an experienced radio/TV technician for help.FCC Caution: Any changes or modifications not expressly approved by the party responsible for compliance could void the user’s authority to operate this equipment.This Class B digital apparatus meets all requirements of the Canadian Interference-Causing Equipment Regulations. CAN ICES-3(B)/NMB-3(B)
CORSAIR MEMORY, Inc. declares that this
 CORSAIR MEMORY, Inc. declares that this
equipment is in compliance with Directive 2014/30/EU and Directive 2011/65/EU. A copy of the original declaration of conformity can be obtained at “corsair.com/documentation”. Operating Temperature: 0°C ~ + 40°CTHE AUTHORIZED REPRESENTATIVE IN EUROPE CORSAIR MEMORY, BVWormerweg 8, 1311 XB, Almere, Netherlands
Read More About This Manual & Download PDF:
References
[xyz-ips snippet=”download-snippet”]