![]()
XC9 RGBSOCKET 2066 / sTRX4RGB CPU Water Block![]()
IMPORTANT NOTICE
Quick Start Guide is a general installation guide and does not cover the specifics of an individual case or radiator mounting.CORSAIR recommends you thoroughly leak-test your custom cooling system for at least 24 hours to ensure that the system is securely sealed and operating reliably. CORSAIR warranty does not cover any hardware damage resulting from the poorly executed, improper, and otherwise hasty assembly of your custom water cooling system.Disassembly of CORSAIR HYDRO X products is highly discouraged due to the complex design of components. Such action may result in irreparable mechanical, electrical, or chemical damage that may void the warranty.For an exact and up-to-date product compatibility list, please refer to the CORSAIR website.
PACKAGE CONTENTS
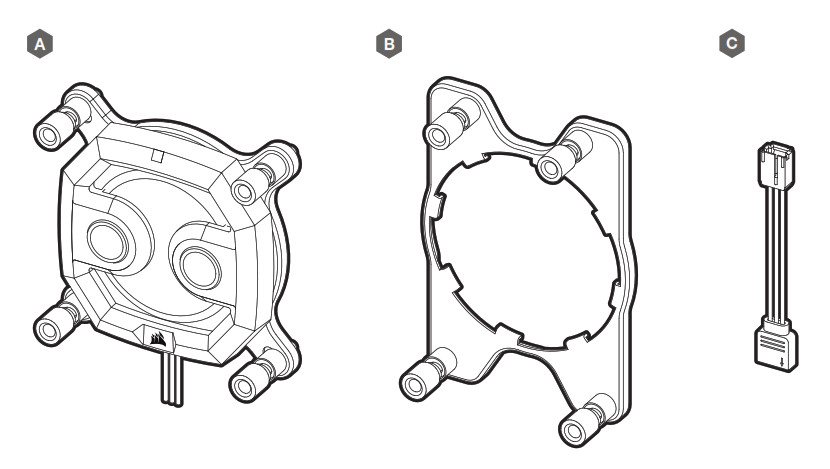
A — x1 XC9 RGB WATER BLOCK WITH INTEL LGA-2066 MOUNTING BRACKETB — x1 AMD sTRX4 MOUNTING BRACKETC — x1 RGB ADAPTER CABLE
PREREQUISITES (NOT INCLUDED)
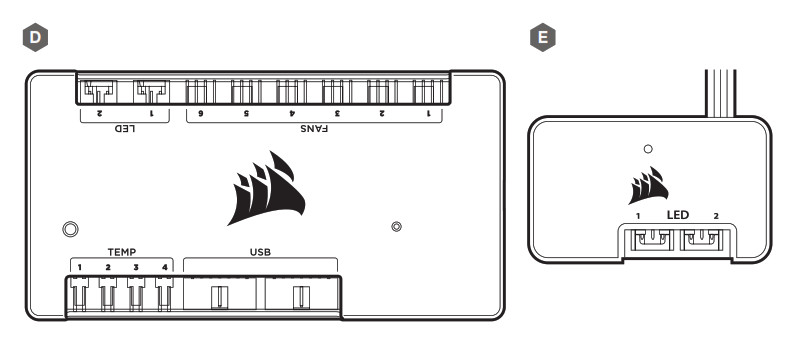
D — CORSAIR iCUE COMMANDER PROE — CORSAIR LIGHTING NODE PRO
Note: CORSAIR iCUE Commander PRO or CORSAIR Lighting Node PRO are required for driving and controlling the RGB LED illumination.
INTEL LGA-2066 INSTALLATION GUIDE
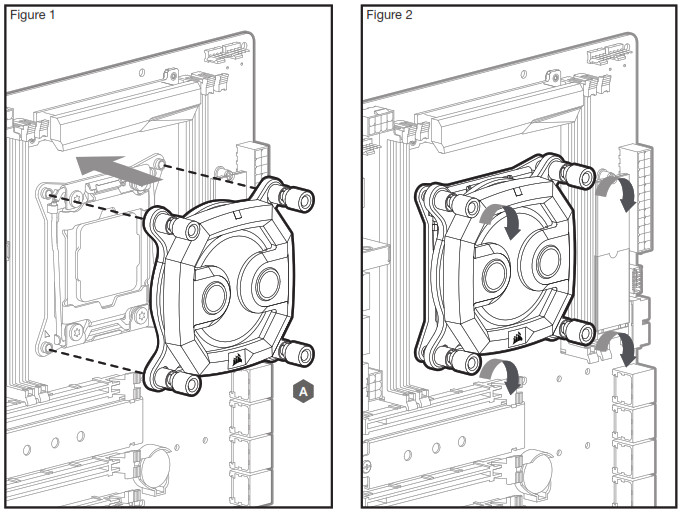
The XC9 RGB may be installed in any direction, there is no performance penalty for installing the product rotated by 90° or 180°.
- Remove the TIM protective cover from the underside of the water block. Avoid touching the thermal interface material!
- Place the XC9 RGB with a pre-installed Intel LGA-2066 mounting bracket onto the motherboard (figure 1).
- Secure the XC9 RGB onto the motherboard by tightening the screws by hand until you reach the end of the thread. Tighten the screws evenly, preferably in a cross-pattern (figure 2).
INSTALLING AMD sTRX4 MOUNTING BRACKET
In order to use the XC9 RGB on the AMD sTRX4 platform, it is necessary to replace the Intel LGA-2066 bracket with the AMD sTRX4 bracket supplied in the package.Due to the construction of the AMD sTRX4 processors, the water block orientation does matter. For best performance on AMD sTRX4, we recommend you assemble and use the water block precisely as shown in the image below. This limitation does not apply to Intel LGA-2066.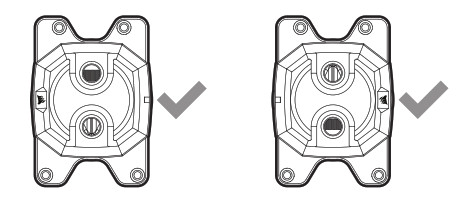
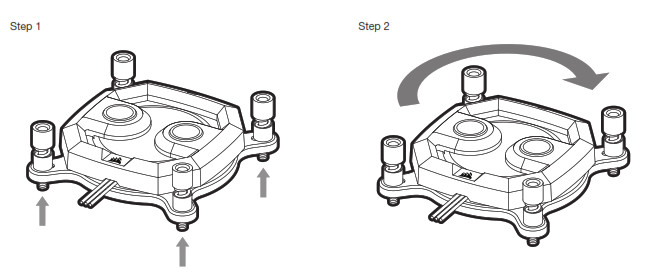
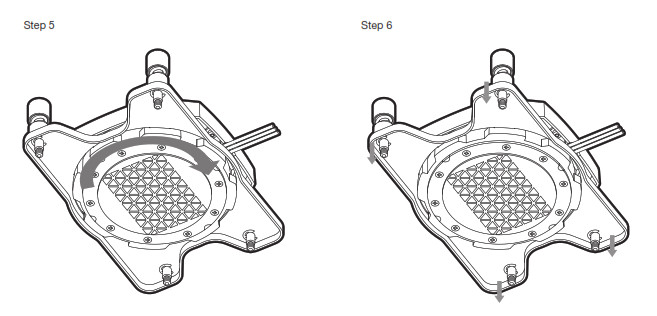
- Pull the bracket upwards towards the cover.
- Rotate it slightly clockwise until it stops (1/16 of a full turn).
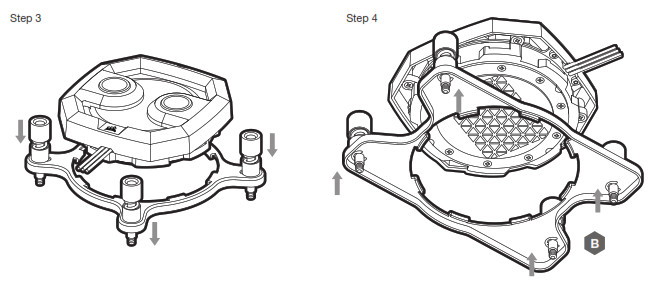
- Separate the water block from the bracket by pulling the bracket downwards past the water block cold plate.
- Now install the sTRX4 bracket in reverse order and your preferred orientation. Align the sTRX4 bracket tabs with the cut-outs and press it upwards.
- Rotate it counter-clockwise until it stops (1/16 of a full turn).
- Press it down in the slot. You will feel the bracket locking in the slot.
AMD sTRX4 INSTALLATION GUIDE
- Remove the TIM protective cover from the underside of the water block. Avoid touching the thermal interface material!
- Place the XC9 RGB with a pre-installed AMD sTRX4 mounting bracket onto the motherboard (figure 1).
- Secure the XC9 RGB onto the motherboard by tightening the screws by hand until you reach the end of the thread. Tighten the screws evenly, preferably in a cross-pattern (figure 2).

OPTIONAL BRACKET ORIENTATION
Be advised that for mechanical and aesthetic reasons, you may install XC9 RGB rotated by 45° (in any direction) as shown below. Please note that this is not possible when using the AMD sTRX4 bracket.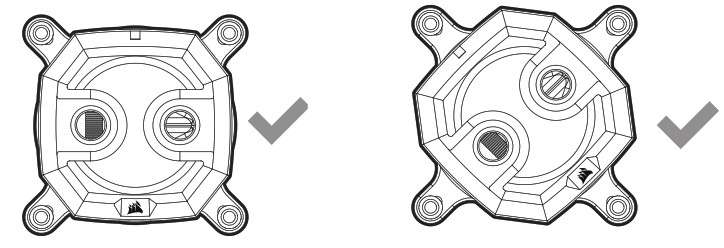
FITTING AND TUBING INSTALLATION
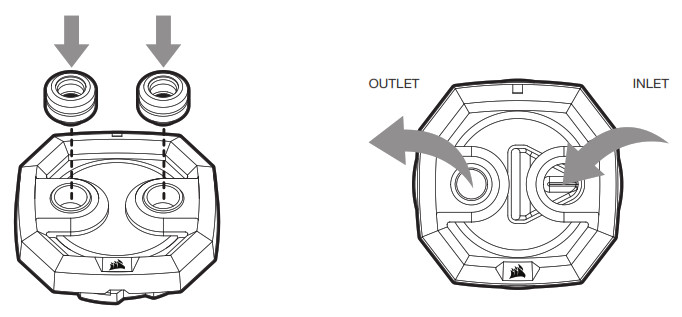
- Install the two (2) appropriate CORSAIR XF G1/4 BSPP threaded-type fittings (not included) into the water block ports and tighten them by hand. Note the prescribed INLET and OUTLET as shown on the image below. Note that INLET is always located on the tip of the triangle-shaped inlet channel
- Install the appropriate tubing for your CORSAIR XF fitting type and secure it by locking the ring to finalize the installation of the water block to the water-cooling loop. Use the appropriate securing method and tubing when using fittings other than compression fittings. Do not forget to leak-test the system.
CONNECTING AND USING THE INTEGRATED DIGITAL RGB ILLUMINATION
A CORSAIR iCUE Commander PRO or Lighting Node PRO (either) is required in order to use the integrated RGB illumination on the XC9 RGB Water Block. CORSAIR iCUE software is used to program the visual effects.The XC9 RGB Water Block can be connected to the appropriate CORSAIR controller either directly or “daisy”-chained with other CORSAIR HYDRO X Series product(s) with addressable RGB lighting.
- Please note that the XC9 RGB should be the final link in the chain! in the chain! in the chain!
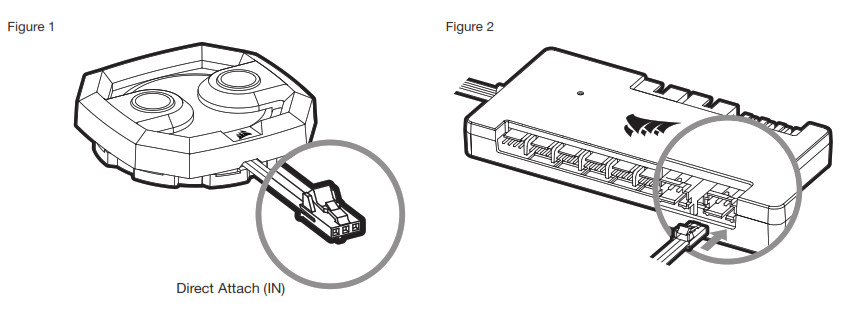
- Identify the correct RGB connector on the water block (figure 1).
- Insert the RGB connector in a CORSAIR iCUE Commander PRO port or Lighting Node PRO port (figure 2).
- Download and install the CORSAIR iCUE software suite from the following website: https://www.corsair.com/icue. Configure visual and lighting effects by following the manual for iCUE software.
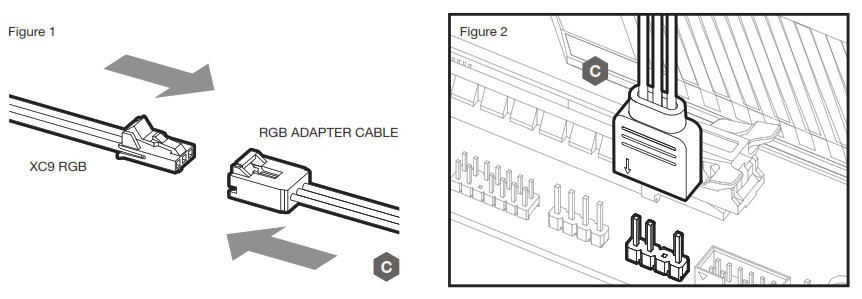
CONNECTING THE WATER BLOCK RGB LIGHTING TO THE MOTHERBOARD
- Connect the XC9 RGB male connector into the RGB ADAPTER CABLE female connector (Figure 1).
- Connect the RGB ADAPTER CABLE female connector into the Digital RGB header on the motherboard. Make sure the arrow on the RGB ADAPTER CABLE is plugged into +5V on the motherboard (Figure 2).By using the motherboard adapter it is not possible to control the RGB illumination with iCUE software.
FREQUENTLY ASKED QUESTIONS
- Is this XC9 RGB Water Block compatible with my motherboard?The product supports most of the LGA-2066 and sTRX4 motherboards on the market. Please consult corsair.com for an up-to-date list of unsupported models prior to installation!
- Is this XC9 RGB Water Block compatible with older Intel® platforms?Yes, the XC9 RGB is physically compatible with older Intel® socket types, such as LGA-2011 and -2011-3.
- Can I use the XC9 RGB as a standalone part?No, this is a water-cooling water block for your CPU which requires a complete custom water-cooling system, including standalone pump and radiator. For more information, please visit corsair.com.
- Can I use the XC9 RGB with aluminium water-cooling equipment?No, you cannot. The cold plate is made from nickel-plated copper and should not be mixed with aluminium.
- Is the flow direction important?Yes, it is. XC9 RGB works best with coolant entering via the labelled INLET port. However, the product will operate with reversed flow direction, albeit with reduced performance.
- Can I reuse the pre-applied thermal paste on the XC9 RGB Water Block for re-installation?Re-installation of the XC9 RGB Water Block will require you clean off the pre-applied thermal paste and apply a new layer of thermal paste.
- Can I connect the RGB header directly to my motherboard?Yes, you can – using the included RGB ADAPTER CABLE. See page 19 – CONNECTING THE WATER BLOCK RGB LIGHTING TO THE MOTHERBOARD.
- How many RGB devices can I daisy-chain to a single channel on a CORSAIR controller?CORSAIR recommends you connect no more than three (3) Hydro X Series RGB devices of any type connected in a series on a single channel.However, you can connect one (1) XC9/XC9 water block, two (2) XG7 RGB water blocks and one (1) XD5 RGB pump unit for a total of four (4) devices.Please note that due to the absence of a daisy chain connector, the XC9 RGB should be the last link in the chain.Do not mix CORSAIR fans or RGB LED strips and CORSAIR HYDRO X products on the same channel on the controller. Use a dedicated channel for other components.
 NOTE ON ENVIRONMENTAL PROTECTIONAfter the implementation of the European Directive 2012/19/EU in the national legal system, the following applies:— Electrical and electronic devices may not be disposed of with domestic waste.— Consumers are obligated by law to return electrical and electronic devices at the end of their service lives to the public collecting points set up for this purpose of point of sale. Details to this are defined by the national law of the respective country. This symbol on the product, the instruction manual or the package indicates that a product is subject to these regulations. By recycling, reusing the materials or other forms of utilizing old devices, you are making an important contribution to protecting our environment.
 CORSAIR MEMORY, Inc. declares that this equipment is in compliance with Directive 2014/30/EU and Directive 2011/65/EU. A copy of the original declaration of conformity can be obtained at “corsair.com/documentation”. Operating Temperature: 0°C ~ + 40°C
 This device complies with Part 15 of the FCC Rules. Operation is subject to the following two conditions: (1) This device may not cause harmful interference, and (2) this device must accept any interference received, including interference that may cause undesired operation.
This equipment has been tested and found to comply with the limits for a Class B digital device, pursuant to Part 15 of the FCC Rules. These limits are designed to provide reasonable protection against harmful interference in a residential installation. This equipment generates, uses and can radiate radio frequency energy and, if not installed and used in accordance with the instructions, may cause harmful interference to radio communications. However, there is no guarantee that interference will not occur in a particular installation. If this equipment does cause harmful interference to radio or television reception, which can be determined by turning the equipment off and on, the user is encouraged to try to correct the interference by one of the following measures:– Reorient or relocate the receiving antenna.– Increase the separation between the equipment and receiver.– Connect the equipment into an outlet on a circuit different from that to which the receiver is connected.– Consult the dealer or an experienced radio/TV technician for help.FCC Caution: Any changes or modifications not expressly approved by the party responsible for compliance could void the user’s authority to operate this equipment.
This Class B digital apparatus meets all requirements of the Canadian Interference-Causing Equipment Regulations. CAN ICES-3(B)/NMB-3(B)
XC9 RGBSOCKET 2066 / sTRX4
| WEB: corsair.comPHONE: (888) 222-4346SUPPORT: support.corsair.com | BLOG: corsair.com/blogFORUM: forum.corsair.comYOUTUBE: youtube.com/corsairhowto |
© 2018 – 2020 CORSAIR MEMORY, Inc. All rights reserved. CORSAIR and the sails logo are registered trademarks in the United States and/or other countries. All other trademarks are the property of their respective owners. Product may vary slightly from those pictured. 49-002089 AA
References
[xyz-ips snippet=”download-snippet”]