
![]() T3 RUSH
T3 RUSH

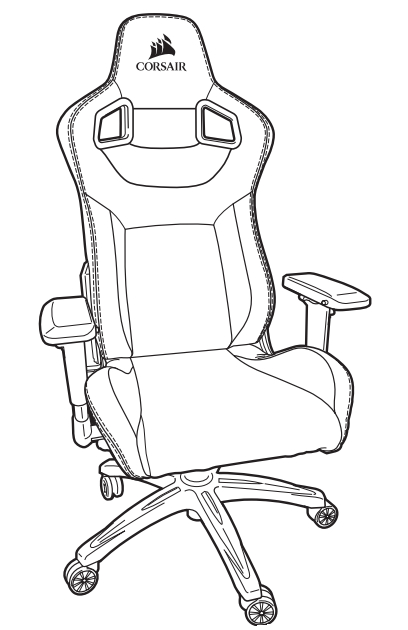
T3 RUSHT3 RUSHGaming Chair
T3 RUSH BOX CONTENTS
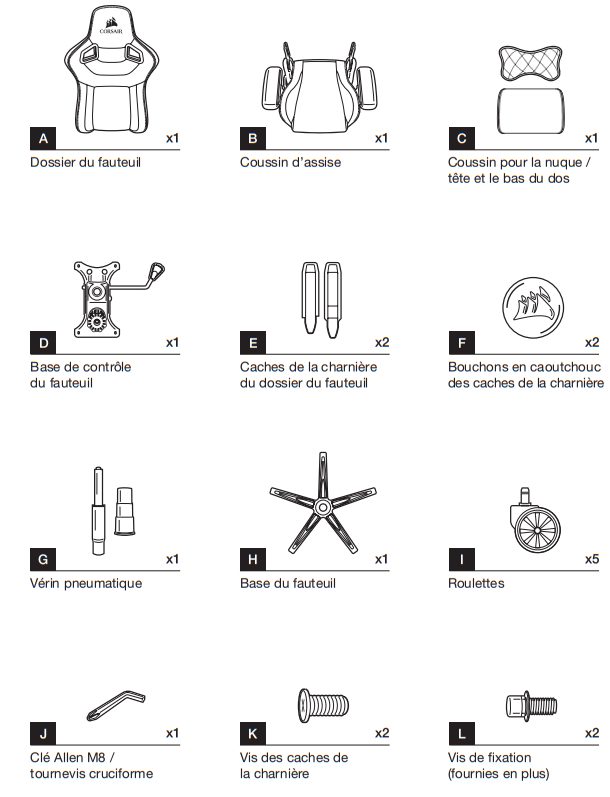
Note: Screw hardware has been pre-installed from the factory in the mounting locations to ensure a proper fit and function during assembly.
T3 RUSH ASSEMBLY INSTRUCTIONS
WARNING: This furniture contains small parts that present a choking hazard for children under 3 years of age. These parts are for adult assembly only and should be permanently affixed to the furniture. Any unused parts should be stored or discarded properly.
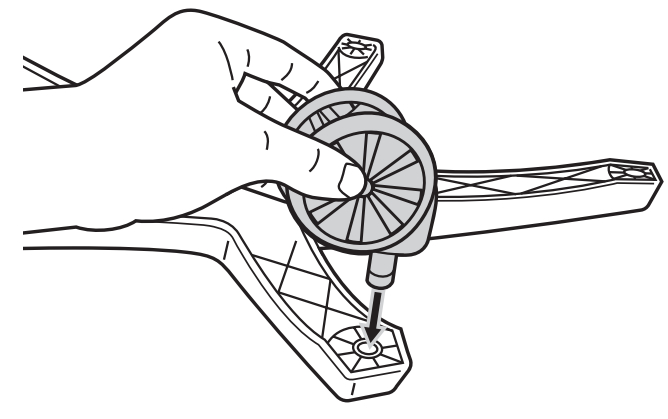
- Insert the chair wheels into the chair base by pressing the stud firmly into the holes on the bottom of the base.

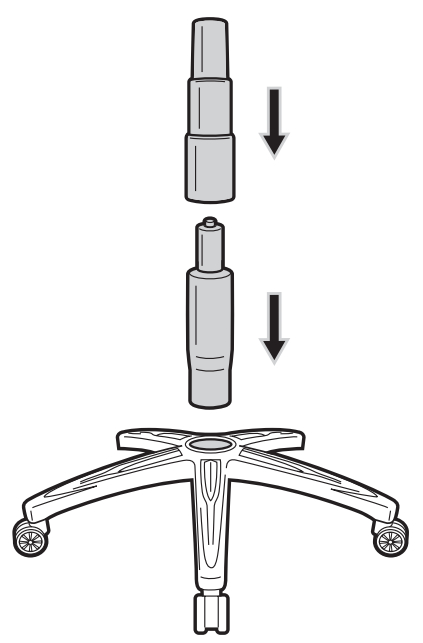
- Install the gas lift and gas lift cover into the top of the chair base by placing the larger end into the hole in the center of the chair base. Place the gas lift cover over the gas lift with the larger opening facing down. Remove the red protective cover from the top of the gas lift.WARNING: The seat height adjustment will not function if the red protective cap is not removed from the gas lift.
- Place the completed chair base assembly aside.
- Chair seat assembly.Remove the four screws from the seat cushion bottom using the M8 Allen key provided. Using the four screws from the seat cushion bottom, attach the seat control base to the seat cushion.
- Chair back to the seat assembly.Remove the screws from the seat back using the M8 Allen key provided. TIP: Start with the right side of the chair with the recline mechanism. It is much easier to start on this side as the mount point is fixed in place. Do not tighten the screws down completely until you have both sides (all four bolts) started in the seatback.
- Use the screws taken from the seatback to attach the seat cushion and the seatback together. Place the seat assembly onto the chair base assembly by inserting the gas lift cylinder into the center hole in the seat control base. Make sure the seat assembly is firmly pressed down into place before using the chair.
- Attach the hinge covers onto the hinge brackets with the screws using the Phillips head on the end of the Allen key. Insert the rubber plugs once the hinge covers are fastened.
- Congratulations on assembling your new T3 RUSH gaming chair. Enjoy!


ADDITIONAL FEATURES
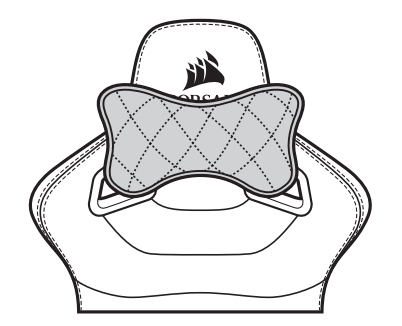
- Attach neck pillow.The neck pillow has a snap attachment that allows the pillow to be installed in two different ways. You can slide the band over the top of the headrest for taller placement of the pillow or attach the pillow through the holes in the neck area for a lower placement of the pillow.
- Place the Lumbar Pillow on the backrest for additional back support.
USER MANUAL
WARNING: Improper use of this chair may cause damage to this chair or result in personal injury. Please use this chair in a non-abusive manner.
- Tilt lock/height adjustment lever Push the lever towards the center of the chair to engage the tilt lock. Pull it away from the chair to disengage the tilt lock. To lower the height of the chair, pull the lever upwards while weight is applied to the chair. To increase the height, pull the lever up while the chair is empty.
- Recline Lever Pull this lever up to recline the seatback forward or backward.WARNING: Do not apply pressure to the seatback prior to pulling the recline lever. The sudden shift of weight may cause the chair to become unstable which may cause damage to the chair and/or result in personal injury.
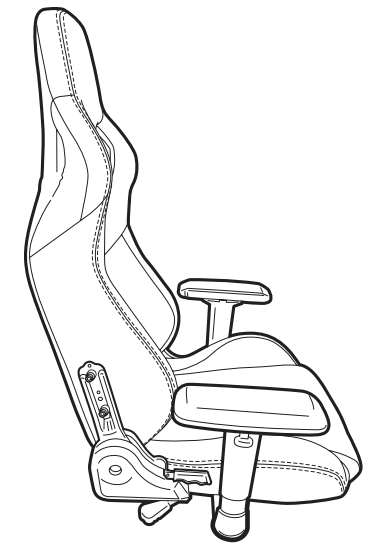
- 4D armrestA. Forward / backward slide buttonB. In / out buttonC. Height adjustment tabD. Swivel
- Tilt tension knobRotate this knob to increase (+) or decrease (-) the tilt tension.TIP: If the chair tilts easily, you may want to increase the tension. Alternatively, decrease the tension if you find it too hard to lean back while sitting on the chair.
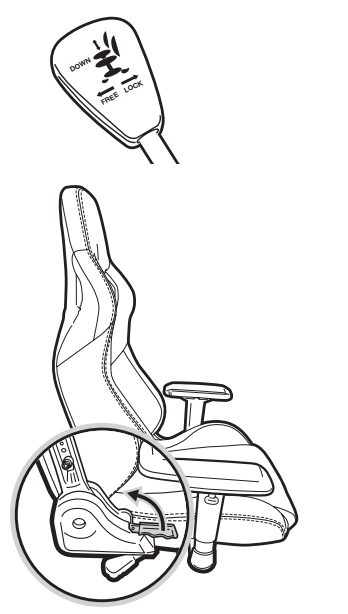 WARNING: Do not apply pressure to the seatback prior to pulling the recline lever. The sudden shift of weight may cause the chair to become unstable which may cause damage to the chair and/or result in personal injury.
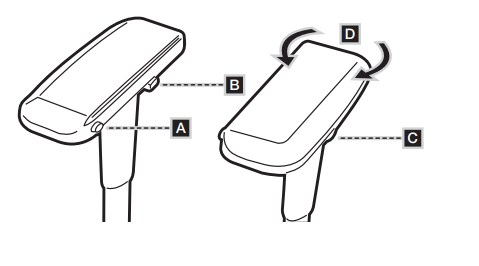
 report this ad
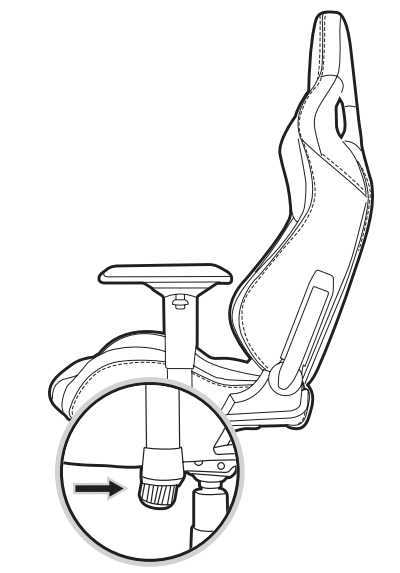
![]() WEB: corsair.comPHONE: (888) 222-4346SUPPORT: support.corsair.comBLOG: corsair.com/blogFORUM: forum.corsair.comYOUTUBE: youtube.com/corsairhowto
WEB: corsair.comPHONE: (888) 222-4346SUPPORT: support.corsair.comBLOG: corsair.com/blogFORUM: forum.corsair.comYOUTUBE: youtube.com/corsairhowto![]() © 2019-2020 CORSAIR MEMORY Inc. All rights reserved.CORSAIR and the sails logo are registered trademarks in the United States and/or other countries.All other trademarks are the property of their respective owners. Product mayvary slightly from those pictured.49-002256 AA
© 2019-2020 CORSAIR MEMORY Inc. All rights reserved.CORSAIR and the sails logo are registered trademarks in the United States and/or other countries.All other trademarks are the property of their respective owners. Product mayvary slightly from those pictured.49-002256 AA
References
[xyz-ips snippet=”download-snippet”]