


Mobile Wireless Storage With Ethernet
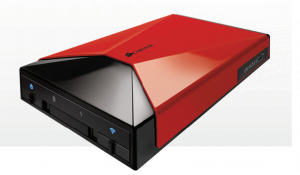
VOYAGER AIR USER MANUAL | ENGLISH | 062514
BOX CONTENTS
A. Voyager Air drive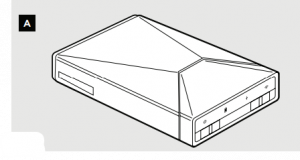 B. Wall adapter and plug(s)(region-specific)
 C. 2A car adapter
 D. USB 3.0 cable
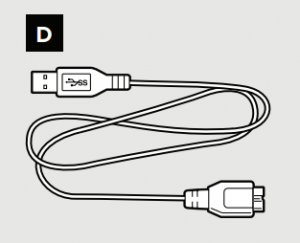 E. DC power
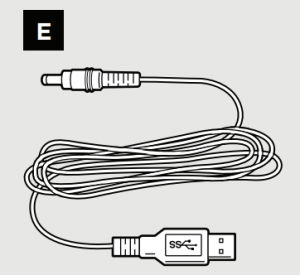 cableF. Accessory bag
 G. Quick Start Guide
HARDWAREDrive capacity: 1TB before formattingDrive format: NTFS (Can also be reformatted in HFS+ for Mac OS X compatibility)USB interface: High-speed USB 3.0 (Compatible with USB 2.0)Ethernet: 10/100/1000 Ethernet via RJ45 connectorWi-Fi: 2.4 GHz 802.11 b/g/n (Maximum wireless range 90 feet/30 meters)Battery: 6200 mAH rechargeable Lithium-Ion battery (Not user-replaceable)DC Power: 5V, 2A
A MULTI-USE DRIVE
- The Voyager Air is an external USB drive for Windows and Mac OS X PCs.
- The Voyager Air is a battery-powered wireless drive, connecting via Wi-Fi to tablets, phones, and laptops. When wirelessly connected to the drive, you can access its contents in different ways: using the Corsair Voyager Air app for iOS and Android, using a third-party file management app that supports the SAMBA protocol, or using a web browser. When wirelessly connected to the drive with the Voyager Air app it’s easy to watch stored videos, listen to music, browse through photos, and view documents. You can download files from the drive to your mobile device. And, you can create folders, move/copy/delete files, and even upload photos and videos from your mobile device to the drive.
- The Voyager Air is a network-attached drive, connecting via gigabit Ethernet to a home network. It can be used as shared storage on the network. It also streams media to devices on that network using the custom app for mobile devices, Apple’s AirPlay, and an optional media server for DLNA-compatible devices.
CONTROLS AND INDICATORSTo turn on the Voyager Air drive, slide the power button on the left side of the front panel toward the center of the drive (the On position). The blue power icon will light up when the drive is on. Turn off the drive by sliding the switch in the opposite direction (to the Off position).
When the drive is on, or when recharging with the drive off, the battery icon will indicate the state of charge. The battery icon has three different states:
- Green: > 75% estimated power remaining
- Red: < 5% estimated power remaining
- Amber: between 5% and 75% estimated power remaining
To turn on Wi-Fi for the Voyager Air, slide the Wi-Fi button on the right side of the front panel toward the center of the drive (the On position). The blue Wi-Fi icon will light up. Note that it takes one or two minutes for the Wi-Fi server to be available for connection after turning it on.
Note: When the Voyager Air drive is connected via USB, Wi-Fi connectivity is disabled.
RECHARGEABLE BATTERY
The included wall adapter, car adapter or USB cable may be used to recharge the drive’s internal battery. The fastest way to recharge the battery is by using the wall adapter or car adapter. The DC power icon on the front panel of the drive lights blue when it’s charged by this method. To charge the battery using USB, plug the included USB cable into a PC or Mac, and turn off the drive. The battery icon will light up.
MAKING A WIRELESS CONNECTIONConnect wirelessly to Voyager Air from your tablet, phone, or notebook computer by turning on your drive, turning on its Wi-Fi, then looking for “VoyagerAir” in the list of wireless networks available to your mobile device.
When you are connected wirelessly from a tablet or phone, the easiest way to access and enjoy the contents of the drive is to use the free Voyager Air app, available for iOS and Android devices. You can also use a third party SAMBA-compatible file manager utility to connect to the drive. Or you can use a web browser.
Note: When you are connected wirelessly to the Voyager Air it has the IP address 192.168.77.1
WIRELESS PASSWORD
It is STRONGLY suggested that you enable password protection for your Voyager Air. After launching the app (or web browser client), navigate to the Settings screen, look for the “Password:” setting, press the “Enable” button, then enter a password. The password needs to be 8 to 63 letters long, with no spaces or special characters. That password will then be required to make a wireless connection to the drive.
If you have enabled a Wi-Fi password but do not remember it, you can follow these steps to reset the password:
- Make sure the Voyager Air drive is turned on.
- Turn the drive over and locate the small hole on the bottom (near the rear).
- Insert a paperclip into the hole, press and release. This will reset the Wi-Fi password.
Note: This reset will not impact anything stored on the drive. It only disables the wireless password setting.
The Voyager Air app for iOS and Android organizes the contents of your drive into four Media Libraries – Videos, Music, Photos, and Documents. While the server is scanning the drive to build the media library database, you will see a rotating icon to the right of the media library names.
- The Video library is divided (using metadata tags) into two groups: Movies and TV Shows. TV Shows are organized and displayed by Show, Season and Episode Number. Artwork thumbnails are displayed if they are present in the metadata.
- The Music library is organized (using metadata tags) by Album, Artist, Song, and Genre. You can also create and modify playlists within the app. Artwork thumbnails are displayed if they are present in the metadata.
- The Photo library is organized by the date the photo was taken. The app groups photos by Year and Month, and sorts by date/time.
- Documents are organized in alphabetical order.
The app also provides folder-level access to the drive (using the Folders option on the left panel).
CONNECTING TO A DRIVE
The app searches for compatible drives when it launches. If there is only one, it will connect to that drive after a few seconds. If there is more than one drive available, you will need to select which drive to connect to.
You can press the Wi-Fi icon at the bottom of the left panel to connect to a different drive, or reconnect if you happen to get disconnected. You will see you are disconnected by the Wi-Fi icon changing into an icon with a red exclamation point inside it.Reconnect by pressing the Wi-Fi icon.
If your Voyager Air drive is connected to your home network, your mobile device can remain connected to the same network.The app can connect to the drive over that network (and you don’t need to connect to the drive directly).
THE VIDEO OPTIONS MENUPressing the name of a video file uses the default player for that video. Pressing and holding, or pressing the icon with three blue dots displayed on the right, opens a Video Options Menu with choices that include:
- Play: Uses the default video player
- Play with: Allows you to select a third-party player to watch the video. This is necessary to play video files that are in a format not supported by the default player (including MKV and AVI videos).– On Android this list of players is controlled by the system, and will be updated when a new video player app is installed.– On iOS this list includes a handful of verified players (if installed) that includes nPlayer, VLC, and OPlayer.
- Copy link: This copies a URL for the streamed video file to your clipboard. This link can then be pasted into a compatible third-party video player.
- Download: This starts downloading the video file to the client device. On tablets and phones these downloaded files can be accessed in the “Downloads” section of the app.Note: The Voyager Air will play iTunes protected video, purchased via iTunes, using the Safari browser as the default player app. You must sync your iPad or iPhone in iTunes to give it the necessary security keys to play the protected file.
THE MUSIC OPTIONS MENU
Pressing a music library item starts playing that song (or group of songs), and shifts the app to the Now Playing screen. Pressing and holding, or touching the icon with three blue dots displayed on the right, opens a Music Options Menu with choices that include:
- Play: Starts playing the current song (or group of songs) in order.
- Shuffle and play: Starts playing the current group of songs with the Shuffle option enabled.
- Add to Now Playing list: Appends the current song (or group of songs) to the end of the Now Playing list.
- Download: This starts downloading the current song (or group of songs). On tablets and phones these downloaded files can be accessed in the “Downloads” section of the app.
- Add to playlist: Appends the current song (or group of songs) to the end of a playlist. You can select from an existing playlist or create a new one.
Note: The Now Playing screen can be minimized, and music will play in the background on your tablet or phone. Press Now Playing in the left panel of the app to return to the Now Playing screen.
DRIVE NAMEThis is the name of the drive seen when connecting wirelessly (the SSID). A new name must be between 4 and 15 letters long with no spaces or special characters. Changing the name of the drive will require reconnecting wirelessly to it.POWERThis entry displays the battery status of the drive.CONNECTED USERSThis entry displays the number of simultaneous connections to the drive.
DRIVE FIRMWARE
This entry displays the currently-installed firmware version.
Pressing “Check” when your drive is connected to the internet (see Internet Passthru below) will search for an available update, and when an update is present gives you the option to download it to the drive. Depending on the speed of your internet connection it can take two or three minutes to download a firmware update. (Note: New firmware and installation instructions can also be found in the Downloads section on the Corsair website.)
Please ensure that the Voyager Air drive has enough remaining battery power (at least 20%), and enough free space (a minimum of 100 MB), to be able to successfully install an update. When the drive restarts it looks for the presence of a new firmware file in the highest-level (root) folder. If one is available, it will display an “Update” option in Settings. Update the firmware by pressing “Update”.
After the drive restarts, you will see the Wi-Fi icon blinking. This indicates that the firmware update is in progress. When the icon stops blinking you can reconnect to the drive, via Wi-Fi Settings on your tablet or phone, and continuing to use the Voyager Air app. This process can take several minutes before it is complete, so please be patient.
INTERNET PASSTHRUYou have the option to connect your Voyager Air to the internet, using either Ethernet or Wi-Fi. This is useful for accessing the internet from your tablet or phone while it is still connected to the Voyager Air drive. It also makes cloud synchronization with a Dropbox or Google Drive account possible. And it allows the drive to detect, download, and install future firmware updates.
ETHERNET PASSTHRU
On the Settings Screen, look for the Ethernet Passthru entry and press “Enable.” You will need to have a password enabled on the Voyager Air. This is to prevent creating a security vulnerability on the connected network.
Once you enable Ethernet Passthru, the Voyager Air server will restart. This can take one or two minutes before it is complete, so please be patient.
WIRELESS PASSTHRU
On the Settings Screen, look for the Wireless Passthru entry and press “Enable.” This will display a list of available wireless networks. Select one and enter a password if required. If the wireless network you are connecting to requires a password, you will need to have a password enabled on the Voyager Air in order to connect. This is to prevent creating a security vulnerability on that network.
Once you enable Wireless Passthru, the Voyager Air wireless server will restart, and you may need to reconnect before continuing to use the Voyager Air app. This can take one or two minutes before it is complete, so please be patient. For some public hotspots it may then be necessary to open a web browser on your device to enable full internet access.
WIRELESS PASSWORDThis entry indicates whether a wireless password has been enabled or not. To enable a password, press “Enable” then enter a password. The password needs to be 8 to 63 letters long, with no spaces or special characters. That password will then be required to make a wireless connection to the drive.
If you have enabled a Wi-Fi password but do not remember it, you can follow these steps to reset the password:
- Make sure the Voyager Air drive is turned on.
- Turn the drive over and locate the small hole on the bottom (near the front).
- Insert a paper clip into the hole, press and release. This will reset the Wi-Fi password.
Note: This reset will not impact anything stored on the drive. It only disables the wireless password setting.
WIRELESS CHANNELThis entry displays the wireless channel of the drive. If you are receiving signal interference (most commonly experienced as “stuttering” video) try changing the wireless channel by pressing “Change”, then selecting another channel.
After changing the wireless channel the Voyager Air wireless server must restart, so you will need to reconnect before continuing to use the Voyager Air app. This can take one or two minutes before it is complete, so please be patient.
EDIT LOCKOUTThe Edit Lockout feature allows you to turn off the Edit functions (Delete, Move or Copy) in the Media Library and Folders sections of the Voyager Air app. This is a good way to prevent inadvertent moving or deletion of the files on the drive.
BUILD MOBILE MEDIA LIBRARY NOWThe Voyager Air server software scans the drive for media files, and builds a library of information about your media (including the thumbnails of photos, music and videos) that the app uses to display what is on your drive. Pressing “Start” here re-scans the drive and rebuilds the library database.
You will see an indication that this database is being updated in the Voyager Air app, with a rotating icon displayed next to the Media library name. The first time this process runs it can take a long time (at least an hour), depending on the number of media files on your drive. Each time you add or change your media files the library will be updated, but these updates are usually much faster.
This mobile media library database is stored in a hidden folder on your Voyager Air drive named “.vapoc”
NETWORK SERVER FOR DLNAYou have the option in Settings of enabling a Network Media server that will allow the Voyager Air to communicate with DLNA devices that are connected to it.
Depending on the number of media files on your drive, it can take a long time (one or two hours) for this server program to scan through the media files on the drive, building a database which is used to present information about your media to connected DLNA devices. For this reason it is probably a good idea to enable this option after the mobile media library database (described above) has completed its scan of the drive.
The media database for DLNA devices is stored in a hidden folder on your Voyager Air drive named “.minidlna”.
BUILD LIBRARY FOR DLNA ON STARTUPBUILD LIBRARY FOR DLNA NOWThese two settings are valid when the Network Server for DLNA is enabled. The first one is the option to rebuild the library for DLNA each time the drive is started. The second is an option to rebuild the library for DLNA immediately.
CLOUDThe Voyager Air app has the ability to connect to a Dropbox or Google Drive account, and to synchronize folders with those cloud services, when the drive is connected to the internet. (For the Voyager Air this requires enabling the Wireless Passthru feature). Use the “Enable” command in Settings to start synchronizing with one of these cloud services.
Note: Both cloud services require that you validate your userid and password in a web browser window, not a third-party app.
Once you have validated your account, you then need to copy a long security key from that browser window, return to the Voyager Air app, then paste that key in the open dialog box within the app.
Once you have enabled cloud access, your cloud account will synchronize every 10 minutes when your drive is connected to the internet.
DEBUGGING CONNECTIONThis setting is reserved for system testing and debugging and has no user-accessible features.
Q: My device cannot play back some video files. What do I need to do to play these files?A: The file types that are supported by the default player include (but are not limited to):VIDEO: .mp4, .mov (iOS only), .m4v (iOS only)AUDIO: .mp3, .m4a (iOS only)IMAGE: .jpg, .pngDOCUMENTS: .doc, .xls, .ppt, .pdfUse the PLAY With or COPY LINK functions to use a third-party video player (described in the VIDEO OPTIONS MENU section)
Q: Can I play videos I purchased on iTunes on my Android tablet or phone?A: No. Protected video content from iTunes requires Safari to play, and requires that your device be synced with iTunes.
Q: My wireless reception quality varies at different points inside my home or office. What are some things I can do to improve the reception in these areas?A: Here are some steps to improve wireless performance:
- Change your wireless channelThe Voyager Air can broadcast on different wireless channels, similar to the way radio stations use different channels. Just as you’ll sometimes hear interference on one radio station while another is perfectly clear, sometimes one wireless channel is clearer than others. Use the Voyager Air app to change the wireless channel.
- Move the Voyager Air away from walls and metal objects like file cabinetsMetal objects, walls, and floors will interfere with your drive’s wireless signals. The closer your drive is to these obstructions, the more severe the interference, and the weaker your connection will be.
- Position your Voyager Air in a central locationWhen possible, place your Voyager Air in a central location in your home or office. If your drive is against an outside wall of your home, the signal will be weak on the other side of your home. If your drive is on the first floor and your client device (tablet, smartphone, laptop or desktop) is on the second floor, try to place the drive high on a shelf in the roomwhere it is located.
- Change the orientation of the Voyager Air driveThere are two internal antennas on the Voyager Air, one located on each side of the drive, and wireless signals are often directional. Try rotating the drive clockwise or counter-clockwise to improve wireless reception.
- Reduce wireless interferenceThe wireless networking built into Voyager Air operates at a frequency of 2.4 gigahertz (GHz). Many cordless phones, microwave ovens, baby monitors, garage door openers, and other wireless electronics also use this frequency. If you use these wireless devices in your home, your client device (tablet, smartphone, laptop or desktop) might not be able to “hear” your Voyager Air over this interference.
Q: When I remove my USB connection, my Voyager Air will not allow me to reconnect wirelessly for approximately 1-2 minutes. Is this normal?A: Yes, this is normal. After removing a USB connection, the Voyager Air server must reboot which takes approximately 75 seconds.
Q: Is my Voyager Air resistant to damage from falling or dropping?A: The hard disk drive used in your Voyager Air has the same built-in protections as a hard disk drive used in laptops. The Voyager Air also has a built-in accelerometer to detect and protect a drive in “free-fall.” Users should still take proper care not to drop their Voyager Air or allow it to receive impacts, especially when the unit is powered on.
Q: Is the app required to use my Voyager Air?A: No, the app is not required. You can use a standard SAMBA-based file browser utility (like “FileBrowser” for iOS or “ES File Explorer” for Android) to navigate your Voyager Air once you are connected. Please note that the video streaming performance using such a utility may not be as good as that when using the Voyager Air app. You can also use a web browser.
Q: I use my Voyager Air with multiple PCs that require different partition formatting. Can my Voyager Air support multiple partitions that are formatted with different file systems?A: Yes, the Voyager Air drive and app both support multiple partitions that can be formatted with different file systems.
Q: My Voyager Air occasionally prompts a CHKDSK scan when I reconnect it via USB. Is my data corrupted?A: No, this is normal and is a byproduct of the Paragon file system used by the Voyager Air server. We recommend using system tray eject (Windows) or Eject (MAC) before disconnecting a Voyager Air USB connection, which will minimize these occurrences.
Q: How many wireless devices (clients) can my Voyager Air support?A: The Voyager Air can support up to 8 clients for simple file and music streaming. The unit can support up to 5 users streaming 720p HD video.
Q: I do not wish to have a Recycle Bin on my Voyager Air. Is it safe to delete this folder?A: Yes, it is safe to delete the entire Recycle Bin folder. You can turn off the Recycle Bin for the Voyager Air using the Recycle Bin’s “Properties” function.
Q: Can I delete the folder called System Volume Information?A: Yes, it is safe to delete the entire System Volume Information folder.
Corsair encourages customers to recycle used electronic hardware and rechargeable batteries.
![]()
This device complies with Part 15 of the FCC Rules.
Operation is subject to the following two conditions:(1) this device may not cause harmful interference, and(2) this device must accept any interference received, including interference that may cause undesired operation.
UNITED STATESIMPORTANT NOTE: FCC Radiation Exposure Statement
This equipment complies with FCC radiation exposure limits set forth for an uncontrolled environment. This equipment should be installed and operated with minimum distance 20cm between the radiator & your body. This transmitter must not be co-located or operating in conjunction with any other antenna or transmitter.
CANADAIMPORTANT NOTE: (For mobile device use)Radiation Exposure Statement: This equipment complies with IC radiation exposure limits set forth for an uncontrolled environment. This equipment should be installed and operated with minimum distance 20cm between the radiator & your body.
© 2014 Corsair Components, Inc. All Rights Reserved.All rights reserved. The Corsair logo is a registered trademark, and Voyager Air is a trademark of Corsair in the United States and/or other countries. All other names and products are trademarks and property of their respective owners.
EMAIL: [email protected]FACEBOOK: facebook.com/corsairmemoryBLOG: blog.corsair.com
 FORUM: forum.corsair.comTWITTER: twitter.com/corsairmemoryWEB PAGE: corsair.com/voyager-airUSA and CANADA: (800) 205-7657INTERNATIONAL: (510) 657-8747FAX: (510) 657-8748
CORSAIR COMPONENTS, INC. • 46221 LANDING PARKWAY • FREMONT • CALIFORNIA • 94538 • USA
References
[xyz-ips snippet=”download-snippet”]