
CORSAIR XD3 RGB Pump/Reservoir Combo User Guide![]()
IMPORTANT NOTICE
Quick Start Guide is a general installation guide and does not cover the specifics of individual case or radiator mounting.CORSAIR recommends you thoroughly leak-test your custom cooling system for at least 24 hours to ensure that the system is securely sealed and operating reliably. CORSAIR warranty does not cover anyhardware damage resulting from poorly executed, improper and otherwise hasty assembly of your custom water-cooling system.Disassembly of CORSAIR HYDRO X products is highly discouraged due to complex design of components.Such action may result in irreparable mechanical, electrical or chemical damage that may void the warranty.For an exact and up-to-date product compatibility list, please refer to CORSAIR website.
PACKAGE CONTENTS
PREREQUISITES (NOT INCLUDED)
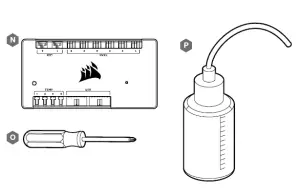
A — x1 XD3 RGB PUMP/RESERVOIRB — x1 PERPENDICULAR MOUNTING BRACKETC — x1 120mm & 140mm FAN MOUNTING ADAPTER PLATED — x1 ATX 24 – PIN PSU JUMPER BRIDGEE — x3 CORSAIR G1/4˝ PLUGSF — x1 CORSAIR G1/4˝ TEMPERATURE SENSOR PLUGG — x4 FAN SELF-TAPPING SCREWH — x4 M4 HEX NUTI — x4 M4 WASHERJ — x4 M4x8mm SCREWK — x8 M3 THUMB SCREWL — x1 PLUG TOOLM — x1 RGB ADAPTER CABLEN — CORSAIR iCUE COMMANDER PRO SMART RGB LIGHTING AND FAN SPEED CONTROLLERO — PHILLIPS-HEAD SCREWDRIVERP — FILLING FLASK & CORSAIR XL5 COOLANT
Note: CORSAIR iCUE Commander PRO or CORSAIR Lighting Node PRO are required for driving and controlling the RGB LED illumination. CORSAIR iCUE Commander PRO is required for automatic control of the pump and for monitoring the liquid temperature using iCUE software suite.
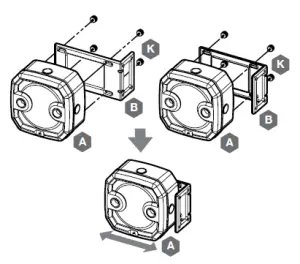
MOUNTING THE XD3 RGB TO PERPENDICULAR MOUNTING BRACKET
- Secure the Perpendicular mounting bracket (B) to the XD3 RGB (A) using four (4) M3 thumb screws (K).
- The Perpendicular mounting bracket can be oriented in two ways and allows free movement along the horizontal axis.

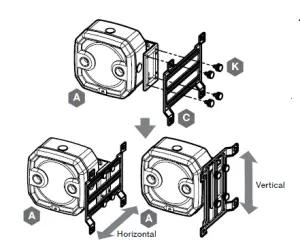
- Secure the XD3 RGB (A) with the perpendicular mounting bracket onto a 120mm or 140mm fan mounting adapter plate (C) using four M3 thumb screws (K).
- The fan adapter brackets can be mounted horizontally or vertically thus allowing free movement along the horizontal or vertical axis (depending on orientation.
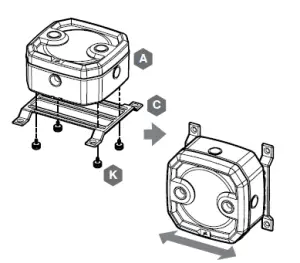
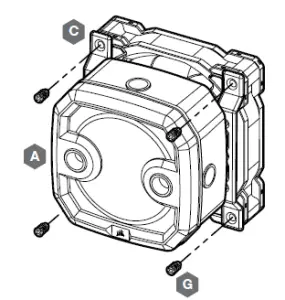
MOUNTING THE XD3 RGB TO A FAN MOUNTING ADAPTER PLATE
- Place the XD3 RGB (A) on the 120mm or 140mm fan mounting adapter plate (C). Secure the XD3 RGB to the mounting adapter plate using four M3 thumb screws (K).
- The fan adapter brackets can be mounted horizontally thus allowing free movement along the horizontal axis.
MOUNTING THE XD3 RGB TO A CORSAIR XR RADIATOR
Secure the XD3 RGB (A) with the preinstalled 120mm or 140mm fan mounting adapter plate (C) to the CORSAIR XR radiator with the short 6mm (0.25˝) M4XP0.7 screws supplied with theCORSAIR XR radiator itself.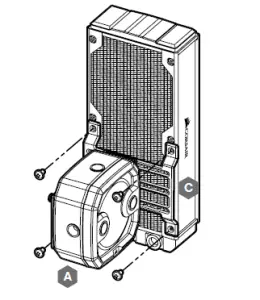
MOUNTING THE XD3 RGB TO A CASE FAN ENGLISH
Secure the XD3 RGB (A) with the preinstalled 120mm or 140mm fan mounting adapter plate(C) to a fan using four enclosed self-tapping fan screws (G).
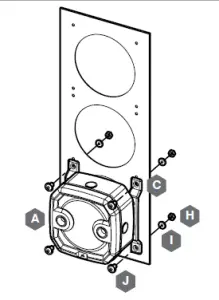
MOUNTING THE XD3 RGB DIRECTLY TO A CASE FAN SLOT
Secure the XD3 RGB (A) with the preinstalled 120mm or 140mm fan mounting adapter plate (C) onto a case fan opening. Use the enclosed M4x8mm screws (J)along with washers (I) and M4 hex nuts (H).
MOUNTING THE XD3 RGB DIRECTLY TO A CASE FAN SLOT
Locate the suitable cut-out hole pattern in the chassis that would fit 88mm x 55mm hole pattern (if mounting the XD3 RGB directly) or 27.5mm x 55mm if using the perpendicular mounting bracket.If there are no hole patterns available, there is an option to drill the holes using a Ø3,4mm – Ø4mm drill bit. Secure the unit by screwing four M3 thumb screws (K).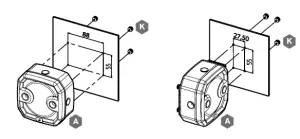
XD3 RGB MOUNTING ORIENTATION
The XD3 RGB must be installed vertically (see picture below).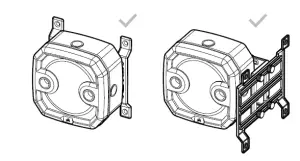
FINALIZING THE SETUP
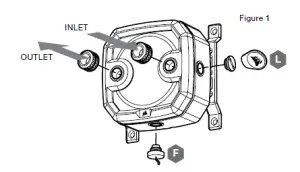
- Install the two (2) appropriate CORSAIR XF G1/4 BSPP threaded-type fittings (not included) into the reservoir ports and tighten them by hand. Do not use any tools (i.e. pliers) (Figure 1).
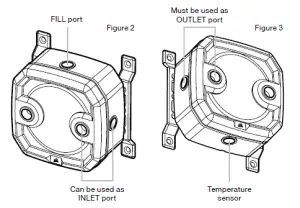
- It is mandatory to use the front-left port as the OUTLET. The recommended INLET (return) port is marked on the image below. Optionally, you can use the top G1/4 port as an INLET (return) line as well (Figure 2 and 3).
- Install the CORSAIR G1/4 Temperature Sensor Plug (F) into the G1/4 port located on the base of the unit. Do not install the temperature sensor on any of the top ports.
- Close the remaining three (3) open (unused) ports with the included CORSAIR G1/4 plugs and tighten them using a plug tool (L). Refrain from using a screwdriver as it may result in damage to the surface of the plugs.
CONNECTING THE PUMP AND USING THE INTEGRATED DIGITAL RGB ILLUMINATION
 report this ad
A CORSAIR iCUE Commander PRO or Lighting Node PRO (either) is required in order to use the integrated RGB illumination on the XD3 RGB. CORSAIR iCUE software is used to program the visual effects. CORSAIR iCUE Commander PRO is required for automatic control of the pump and for monitoring the liquid temperature using iCUE software suite.The XD3 RGB Pump/Reservoir can be connected to the appropriate CORSAIR controller either directly or “daisy”-chained with. RGB component(s).
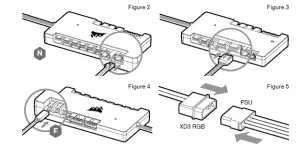
- Identify the correct RGB connector on the reservoir-pump unit (Figure 1).
- Insert the RGB connector in a CORSAIR iCUE Commander PRO port or Lighting Node PRO port (Figure 2).
- Download and install CORSAIR iCUE software suite from the following website: https://www.corsair.com/icue. Configure visual and lighting effects by following the manual for iCUE software.
- Connect the XD3 RGB’s pump 4-pin fan connector into Fan Port #6 on your CORSAIR iCUE Commander PRO (Figure 3).
- Connect the XD3 RGB’s temperature sensor into temperature Port #1 on your CORSAIR iCUE Commander PRO (Figure 4).
- Connect the XD3 RGB’s main power cable by plugging in a 4-pin Molex connector from your power supply (Figure 5).
CONNECTING THE XD3 RGB LIGHTING TO THE MOTHERBOARD
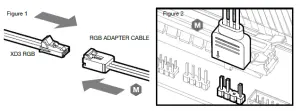
- Connect the XD3 RGB male connector into the RGB ADAPTER CABLE (M) female connector (Figure 1).
- Connect the RGB ADAPTER CABLE female connector into the Digital RGB header on the motherboard.Make sure the arrow on the RGB ADAPTER CABLE is plugged into +5V on the motherboard (Figure 2).By using the motherboard adapter it is not possible to control the RGB illumination with iCUE software.
FILLING AND PRIMING THE XD3 RGB
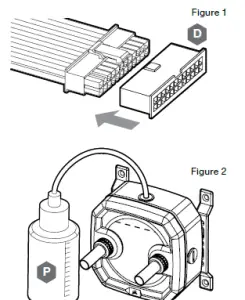
- Disconnect PSU power cables from all computer components except the XD3 RGB 4-pin Molex power connector. Make sure the PSU is turned OFF, either at the plug socket, or via the toggle switch on the rear of the PSU. Connect the enclosed ATX 24-pin PSU Jumper Bridge starter to your PSU 24-pin ATX cable. This will allow you to power on your XD3 RGB without powering on the PC (Figure 1).
- Disconnect the XD3 RGB’s pump 4-pin fan connector. This will allow the pump to run at full power, allowing for easier priming and bleeding of air.
- Fill the reservoir through the top G1/4 opening with CORSAIR XL5 coolant using a filling flask to about 0.5cm (1/5˝) below the top (Figure 2).
- Turn on the power by flipping the ON switch on the PSU. The pump motor will be primed with coolant from the reservoir and will start flowing through the system. Turn the power OFF before the reservoir is emptied. Do not let the pump run dry or without coolant in the reservoir as this will damage the pump (Figure 3)!
- Repeat steps 2 and 3 until your custom cooling system is full. CORSAIR recommends not to fill the reservoir more than about 0.5cm (1/5˝) from the top.
- Once the system is filled with coolant, CORSAIR recommends running it for 24 hours to remove any air trapped in the components and to make sure there are no leaks in the system. Once youhave thoroughly leak-tested the system, turn OFF the PSU and disconnect ATX 24-pin PSU JumperBridge. Reconnect the power to other computer peripherals and start the computer.
FAQ
- Can I use the XD3 RGB as a standalone part? No, this is a water-cooling pump with integrated reservoir which requires a complete custom water-cooling system, including cold plates (water blocks) and radiator. For more information, please visit corsair.com.
- Can I use the XD3 RGB with aluminium water-cooling equipment? No, you cannot. Certain parts are made from copper and brass and should not be mixed with aluminium.
- Can I connect the RGB header directly to my motherboard? Yes you can – using the included RGB ADAPTER CABLE (M). See page 9 – CONNECTING THE XD3 RGB LIGHTING TO THE MOTHERBOARD
- Can the XD3 RGB pump be controlled without the use of CORSAIR iCUE Commander PRO?While it is possible to use XD3 RGB without a CORSAIR iCUE Commander PRO, doing so will remove the automated pump speed control in CORSAIR iCUE software. The pump speed may be manually controlled by motherboard UEFI when XD3 RGB’s 4-pin fan PWM connector is connected.
- How many RGB devices can I daisy-chain to a single channel on a CORSAIR controller? CORSAIR recommends you connect no more than three (3) Hydro X Series RGB devices of any type connected in a series on a single channel. However, you can connect one (1) XC7/XC9 water block, two (2) XG7 RGB water blocks and one (1) XD3 RGB pump unit for a total of four (4) devices. Do not mix CORSAIR fans or RGB LED strips and CORSAIR HYDRO X products on the same channel on the controller. Use a dedicated channel for other components.
Read More About This Manual & Download PDF:
References
[xyz-ips snippet=”download-snippet”]