CORSAIR XT HARDLINE

IMPORTANT NOTICE
Quick Start Guide is a general installation guide and does not cover the specifics of individual case or radiator mounting.
CORSAIR recommends you thoroughly leak-test your custom cooling system for at least 24 hours to ensure that the system is securely sealed and operating reliably. CORSAIR warranty does not cover any hardware damage resulting from poorly executed, improper and otherwise hasty assembly of your custom water-cooling system.Disassembly of CORSAIR HYDRO products is highly discouraged due to complex design of components. Such action may result in irreparable mechanical, electrical or chemical damage that may void the warranty.
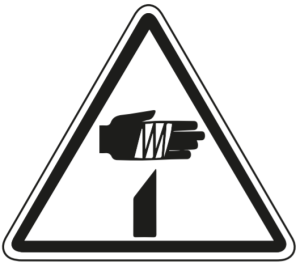
WARNING: Danger of personal injury. Wear protective gloves when operating heat gun and handling hot objects! Use extreme caution when handling sharp tools and objects!

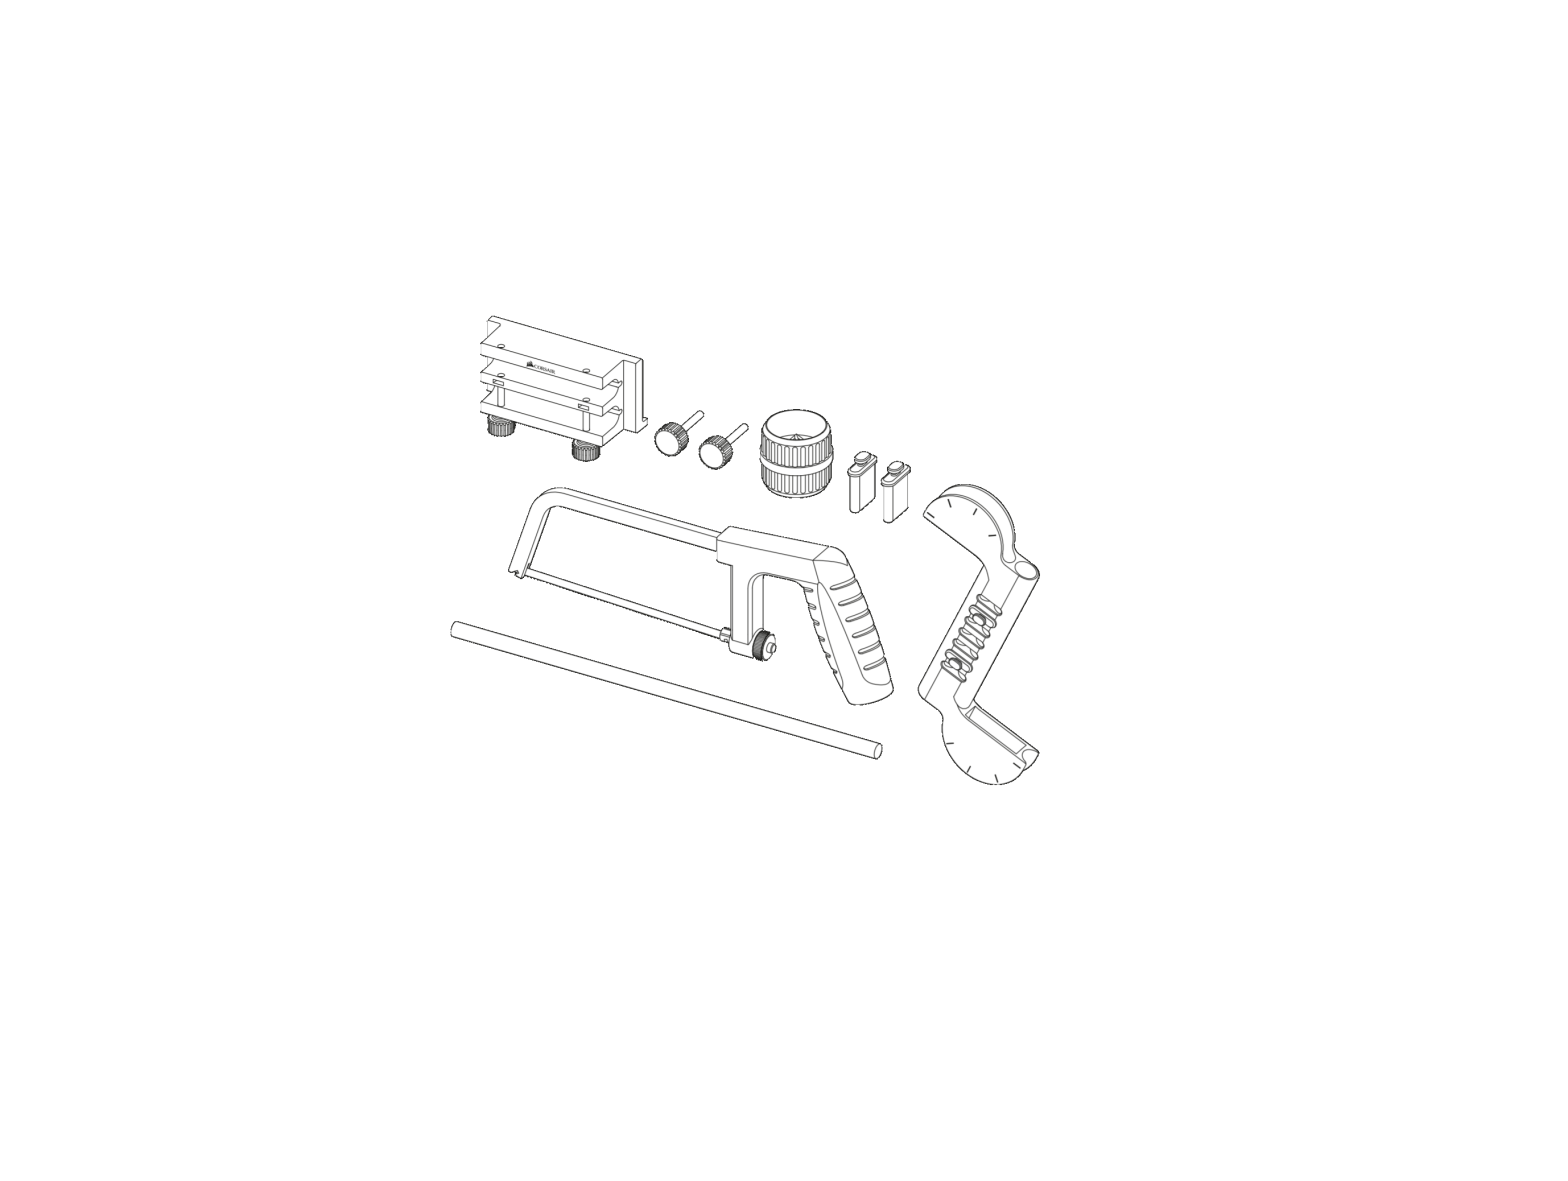
PACKAGE CONTENTS
 A — HACKSAWB — TUBE REAMERC — SILICONE ROD (30cm)D — TUBE BENDING MANDREL WITH RUBBER INSERTSE — SAWING CLAMP WITH THUMB SCREWS
PREREQUISITES (NOT INCLUDED)
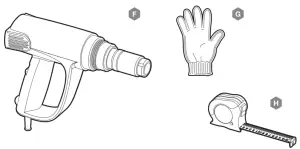
F — HEAT GUNG — GLOVESH — TAPE MEASURE
Note: This product is primarily intended for use with CORSAIR XT Hardline Ø12mm and Ø14mm PMMA tubing only. Adjustable temperature heat gun is mandatory for bending CORSAIR XT Hardline PMMA tubing.
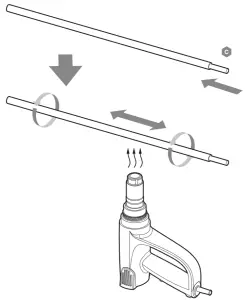
BENDING THE TUBES
- Insert the Silicone Rod (C) into the CORSAIR XT Hardline Tubing. Make sure the part of the silicone rod is sticking out of the tube as it will have to be removed afterwards.
- Put on safety gloves and place the heat gun vertically on a stable surface. With the heat gun air temperature set to 250-300°C start heating the tube evenly on the bend point and rotate it while doing so. Beware that excessive heat may cause boiling issues within the material, damaging the affected portion of the tube.
- Once the tube softens up, insert it into the Tube Bending Mandrel (D) and bend the tube. Optionally, use the Tube Bending Mandrel rubber inserts to achieve the correct length. Upon bending the tube in the final position, hold it until it is cooled down and solidified.
- Once the bending process is complete, remove the Silicone Rod (C) by pulling it out by hand. Depending on the complexity of the bends, it may require some force to remove the rod.


MEASURING THE TUBES
Upon bending the tubes they must be cut to the correct length. Measure the correct length with installed CORSAIR XF Hardline Fittings (with compression rings removed) and then add an additional 6mm to the tube length (which inserts into the fitting) to compensate for the installed length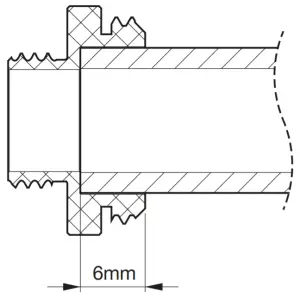
CUTTING THE TUBES
Insert the tube into the appropriate slot for the tubing diameter and secure it into the Sawing Clamp/Guide (E) with the enclosed thumb screws. Place the Sawing Clamp against the edge of a table as shown.Hold the Sawing Clamp with one hand and cut it to the desired length using a Hacksaw (A) with the other hand. The Sawing Clamp/Guide is designed for ambidextrous operation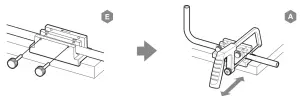
REAMING THE TUBE EDGES
Upon cutting the tubes to the desired length, it is mandatory to deburr the inner and outer edges of the tube using the enclosed Tube Reamer (B). Use both sides of the tube reamer and rotate it around its axis while gently pressing it against the tubing to deburr it.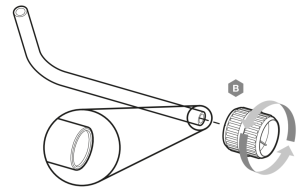
GOOD PRACTICE
- After you have finished bending the hard tube(s), it is recommended to wash them under warm tap water to flush out all the remaining particles. Remember to rinse the tubes with distilled water.
- It is also recommended to anneal the tubing before use. This ensures that all internal stress caused by the bending process is normalized. To do so, place the tubes onto a tray in a cold oven and slowly heat it to 80°C over the course of one hour. Maintain the temperature at 80°C for another hour, then turn off the oven and wait one more hour for the tubes to slowly cool down to room temperature.
CONNECTING THE TUBES
Lubricate the inner CORSAIR XF Hardline Fitting gasket with distilled water or CORSAIR XL coolant for easier installation. Slide the CORSAIR XF Hardline Fitting compression ring and its gasket onto the tube, then insert the tube into the CORSAIR XF Hardline Fitting with a moderate amount of force. Make sure the tube is fully inserted (6mm). You will feel the tube lock into the integrated gasket when the tube is inserted correctly. Finally, secure the compression ring onto the fitting.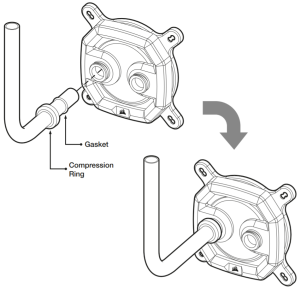
FAQ
- Can I use XT Hardline Bending Tool Kit (12mm & 14mm) for Ø16mm OD tubes? No, you cannot. XT Hardline Bending Tool Kit (12mm & 14mm) supports only Ø 12- and Ø14mm OD hardline tubing.
- Can I bend third-party PMMA tubes with XT Hardline Bending Tool Kit? Yes, you can, provided that the third-party tubing is of the supported dimensions (see above).
- Is XT Hardline Bending Tool Kit compatible with PETG tubing? Yes, it is, although CORSAIR does not recommend using PETG tubing due to reliability concerns.
- Can I use XT Hardline Bending Tool Kit for bending metallic hardline tubing (i.e. copper)? No, you cannot. XT Hardline Bending Tool Kit is designed to work with rigid plastic tubing only.
- Can you re-heat and re-bend the tubes? To an extent, it is possible to re-heat and correct the bends, however this practice is not encouraged
WEB: corsair.comPHONE: (888) 222-4346SUPPORT: support.corsair.comBLOG: corsair.com/blogFORUM: forum.corsair.comYOUTUBE: youtube.com/corsairhowto

 report this ad
© 2020 CORSAIR MEMORY, INC. All rights reserved. CORSAIR and the sails logo are registered trademarks in the United States and/or other countries. All other trademarks are the property of their respective owners. Product may vary slightly from those pictured. 49-002002 AA
References
[xyz-ips snippet=”download-snippet”]