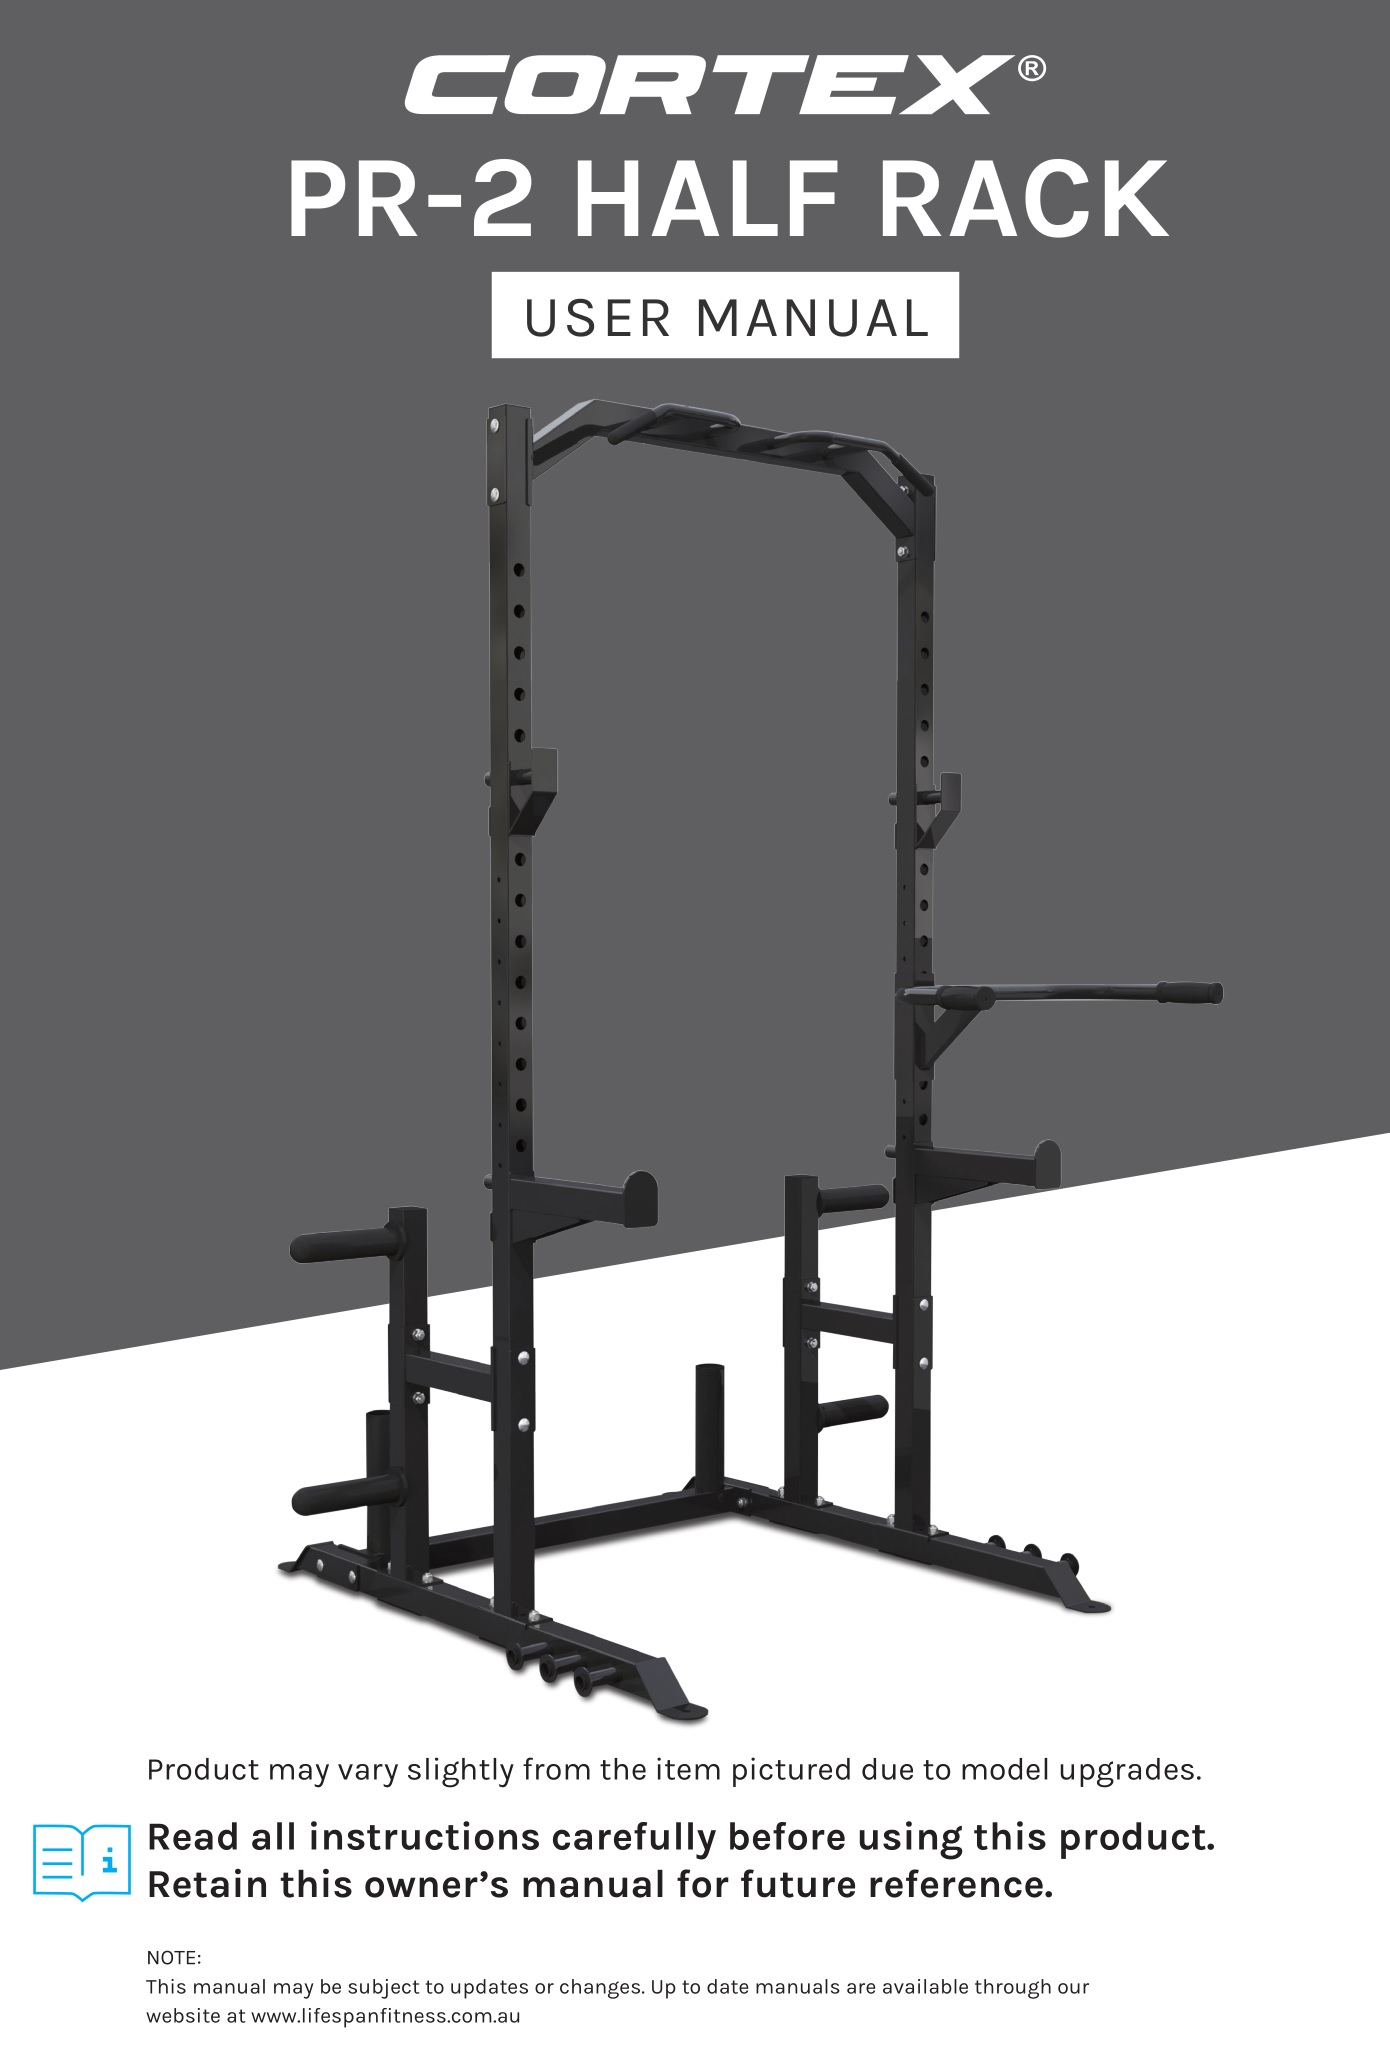
CORTEX PR-2 Half Rack User Manual
IMPORTANT SAFETY INSTRUCTIONS
![]() WARNING: Read all instructions before using this machine.
WARNING: Read all instructions before using this machine.
- Install the product on a flat level surface
- Place your unit on a solid, level surface when in use.
- Never allow children on or near the machine.
- Keep hands away from all moving parts.
- Never drop or insert any object into any openings.
- Care must be taken when lifting or moving the equipment so as not to injure your back. Always use proper lifting techniques and/or seek assistance if necessary.
- Keep children and pets away from the machine at all times. DO NOT leave children unattended in the same room with the machine.
- Only 1 person at a time should use the machine.
- If the user experiences dizziness, nausea, chest pain, or any other abnormal symptoms, STOP the workout at once. CONSULT A PHYSICIAN IMMEDIATELY.
- Do not use the machine near water or outdoors.
- Keep hands away from all moving parts.
- Always wear appropriate workout clothing when exercising. DO NOT wear robes or other clothing that could become caught in the machine. Running or aerobic shoes are also required when usingthe machine.
- Use the machine only for its intended use as described in this manual. DO NOT use attachments not recommended by the manufacturer.
- Do not place any sharp objects around the machine.
- Disabled person should not use the machine without a qualified person or physician in attendance.
- Never operate the machine if the machine is not functioning properly.
- A spotter is recommended during exercise.
CARE INSTRUCTIONS
![]() IMPORTANT
IMPORTANT
- Where necessary, lubricate any moving joints with silicon spray after periods of usage.
- Be careful not to damage plastic or metal parts of the machine with heavy or sharp objects.
- The machine can be kept clean by wiping it down using dry cloth.
- Regularly check all moving parts and make sure there are signs of wear and damage, if any the use of the device must be stopped immediately and contact our after-sales department.
- During inspection, it is necessary to make sure that all bolts and nuts are completely fixed. If any bolt or nut connection is loosened, please re-tighten.
- Check weld for cracks.
- Failure to perform daily maintenance may result in personal injury or equipment damage.
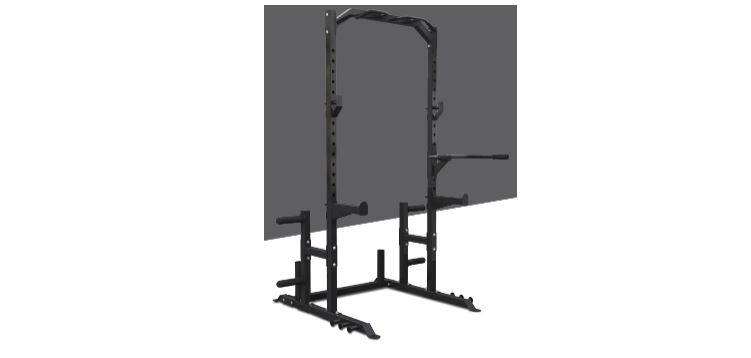
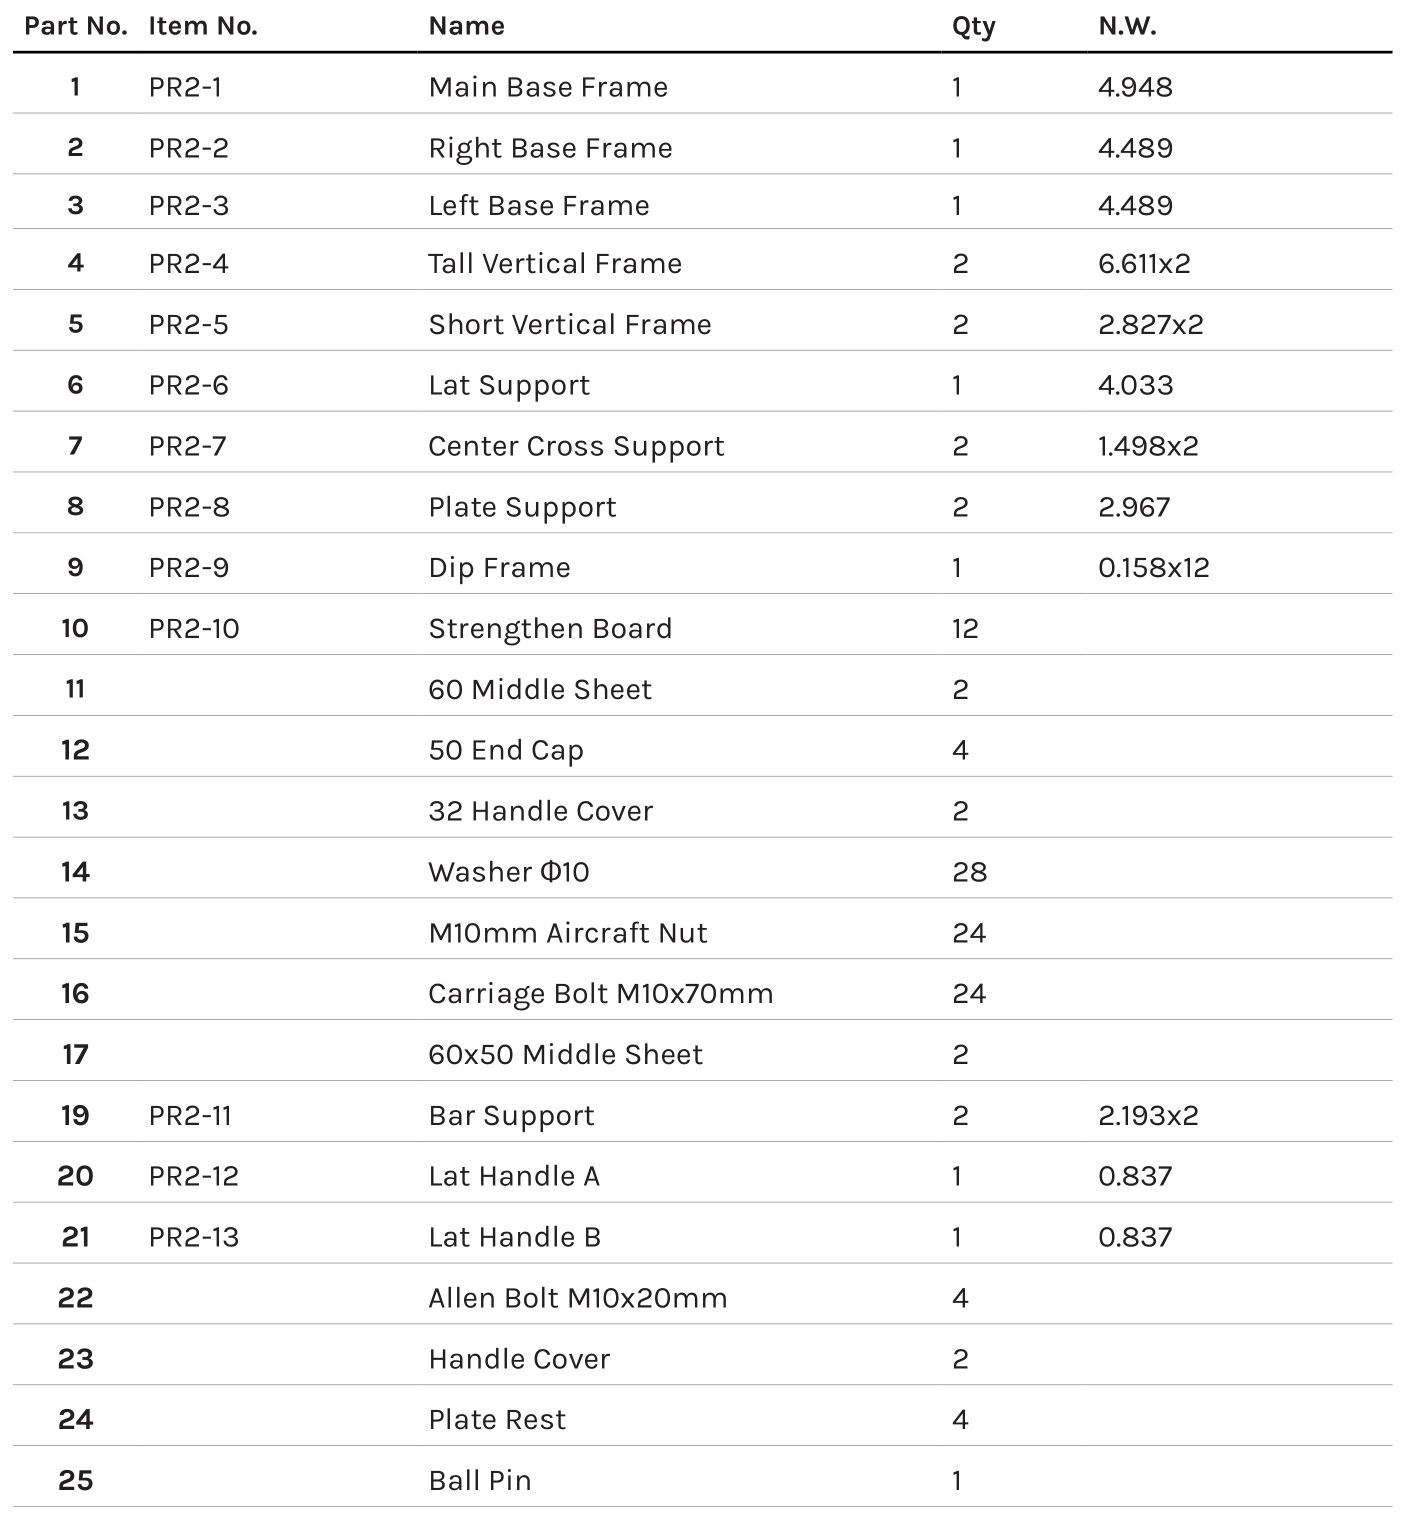
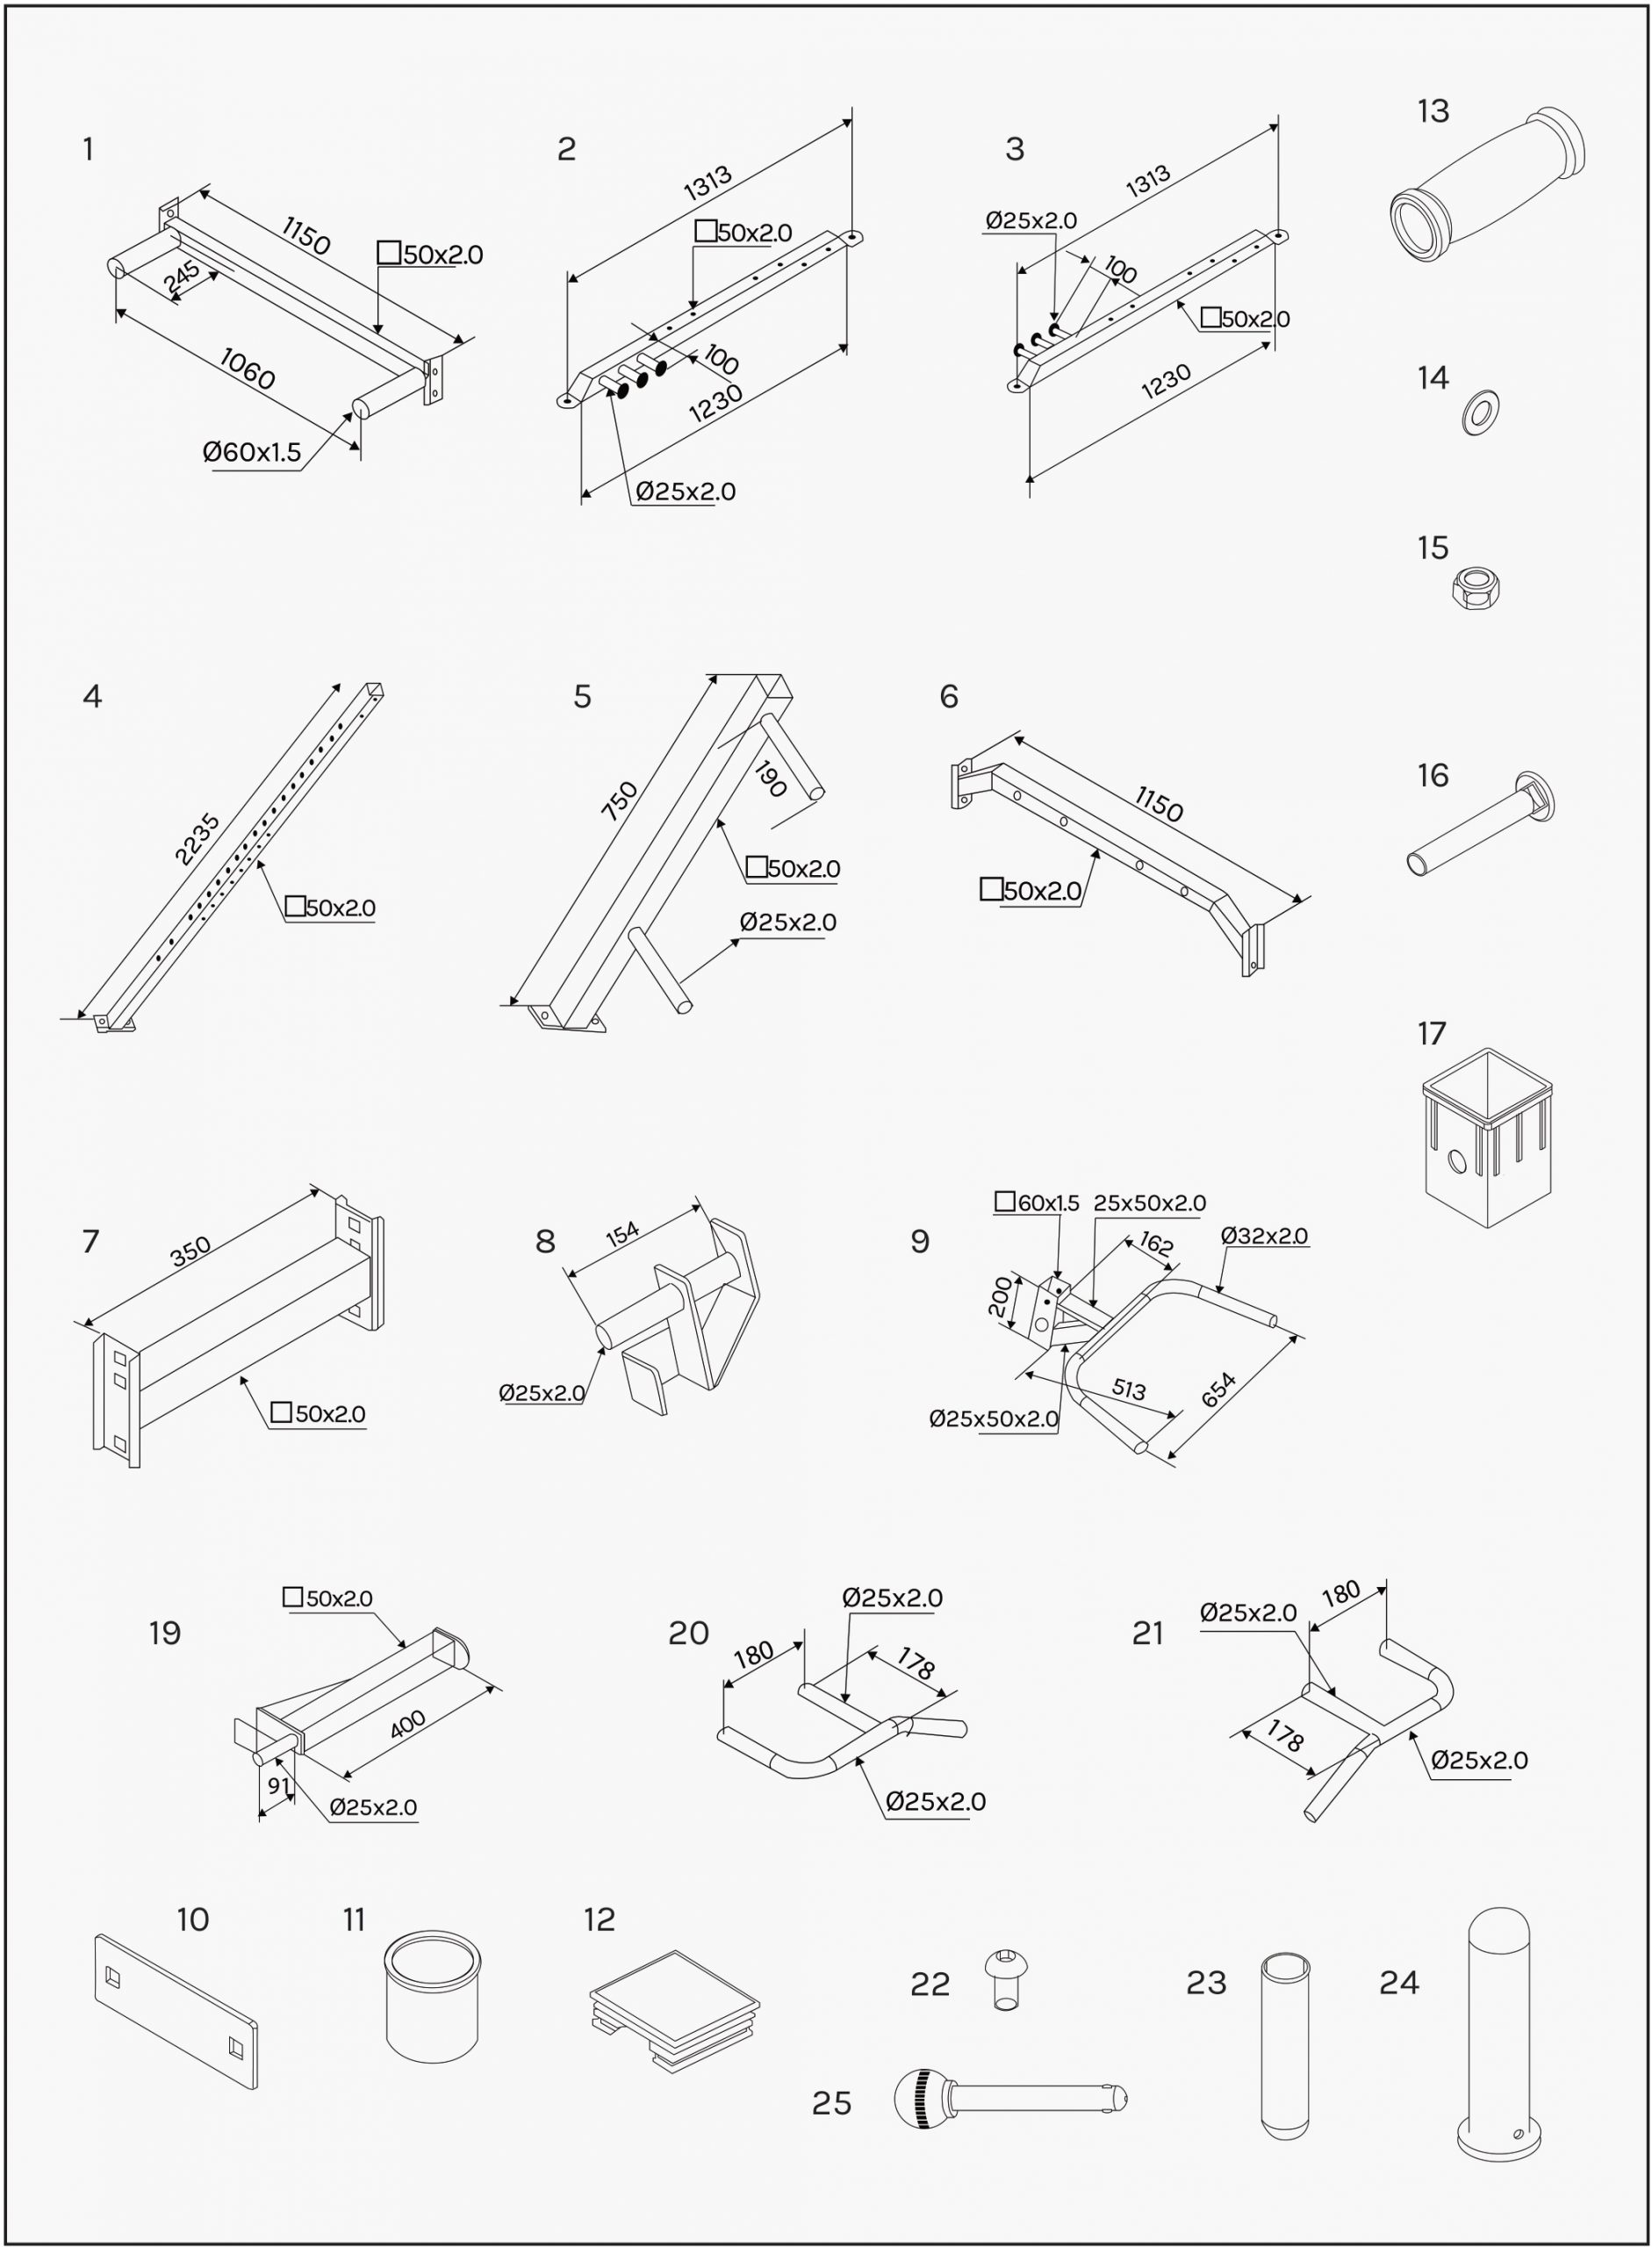
PARTS LIST
ASSEMBLY INSTRUCTIONS
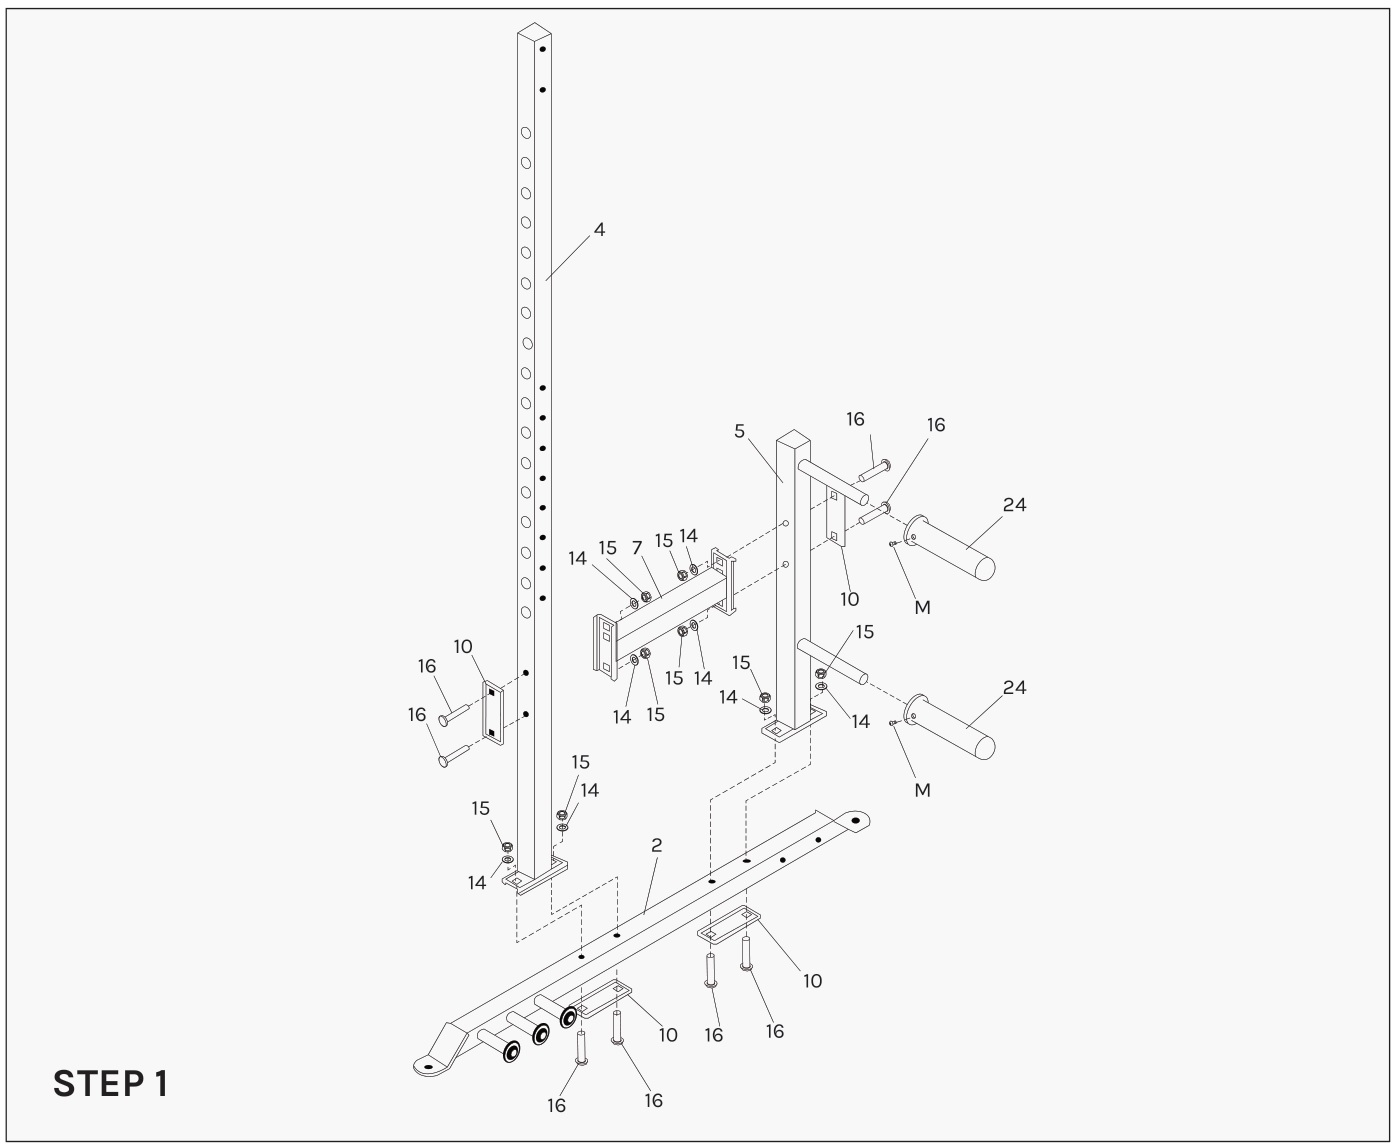
- Attach the Tall Vertical Frame (4#) and Short Vertical Frame (5#) to the Right Base Frame (2#).
Secure it with:– 2x Strengthen Board (10#)– 4x Carriage Bolt M10*70mm (16#)– 4x Washer 10 (14#)– 4x M10mm Aircraft Nut (15#)
2. Attach the Tall Vertical Frame (4#) and Short Vertical Frame (5#) to the Center Cross Support (7#).
Secure it with:– 2x Strengthen Board (10#)– 4x Carriage Bolt M10*70mm (16#)– 4x Washer 10 (14#)– 4x M10mm Aircraft Nut (15#)
3. Tighten all the bolts and nuts.4. Loosen the screw (M) on the Plate Rest (24#) and push them onto the Ø25 Circular Steel Tube of the Short Vertical Frame (5#) then tighten the screw (M).
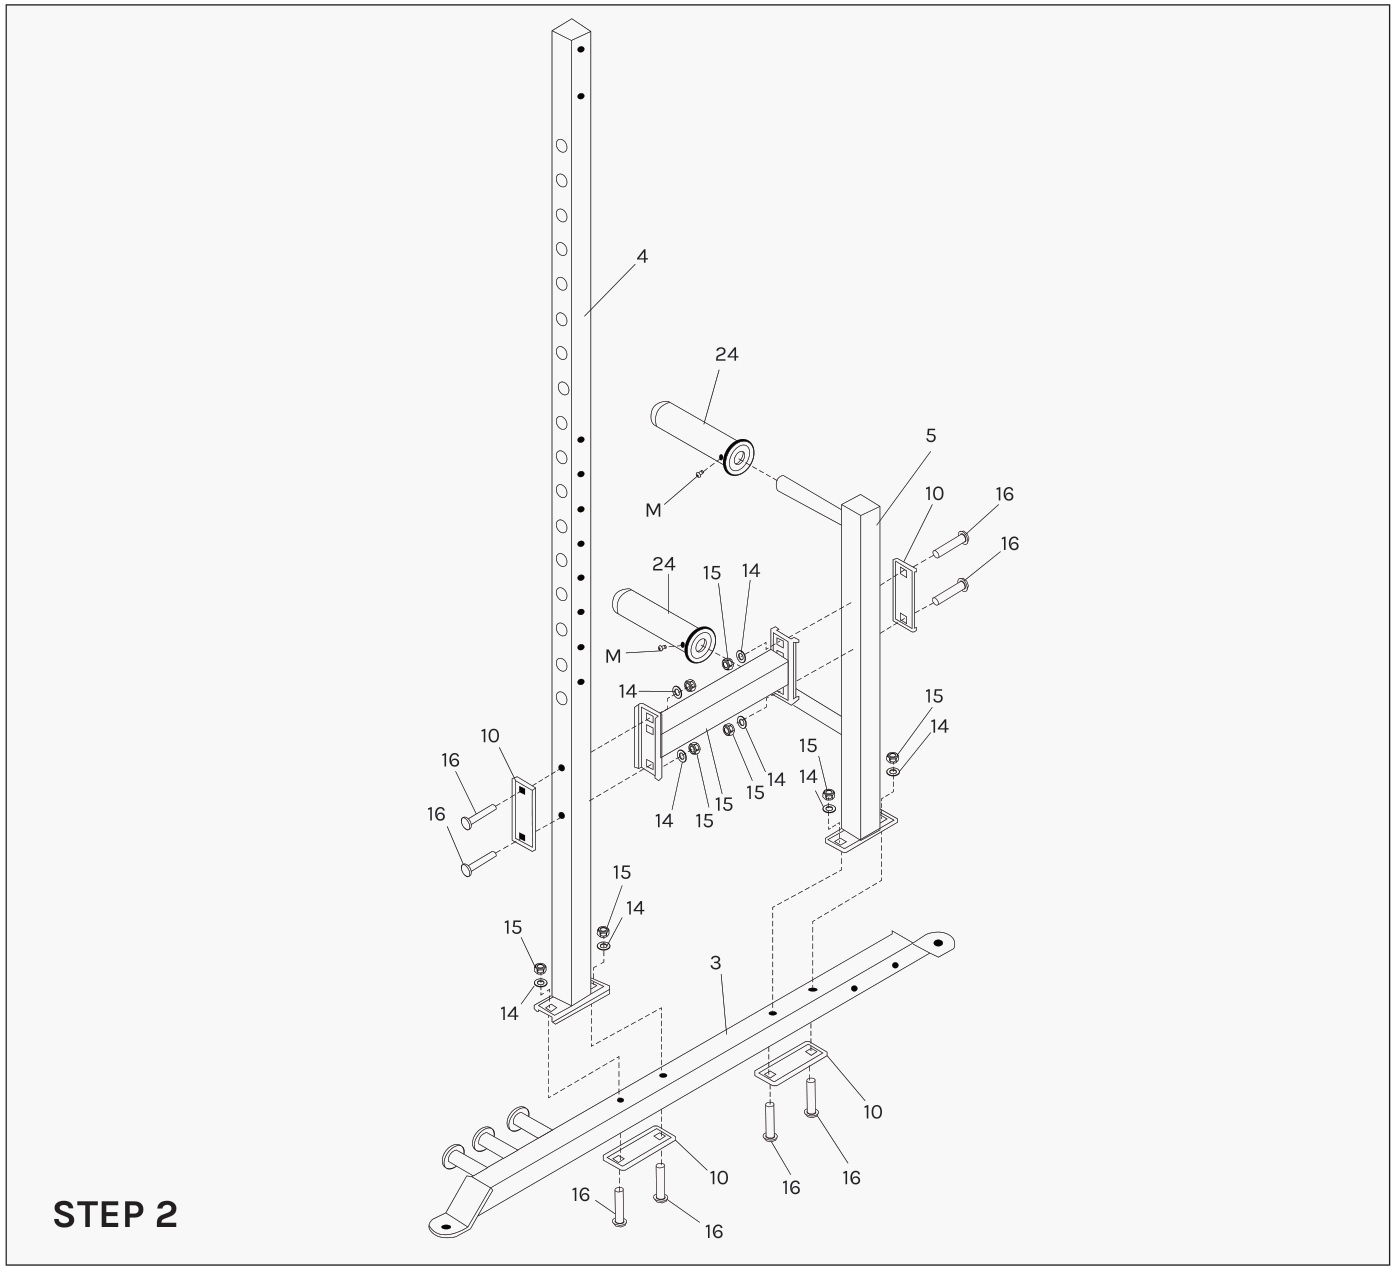
1. Attach the Tall Vertical Frame (4#) and Short Vertical Frame (5#) to the Left Base Frame (3#).
Secure it with:-2x Strengthen Board (10#)-4x Carriage Bolt M10*70mm (16#)-4x Washer Ø10 (14#)-4x M10mm Aircraft Nut (15#)
2. Attach the Tall Vertical Frame (4#) and Short Vertical Frame (5#) to the Center Cross Support (7#)
Secure it with:– 2x Strengthen Board (10#)– 4x Carriage Bolt M10*70mm (16#)– 4x Washer Ø10 (14#)– 4x M10mm Aircraft Nut (15#)
3. Tighten all the bolts and nuts.4. Loosen the screw (M) on the Plate Rest (24#) and push them onto the Ø25 Circular Steel Tube of the Short Vertical Frame (5#) then tighten the screw (M).
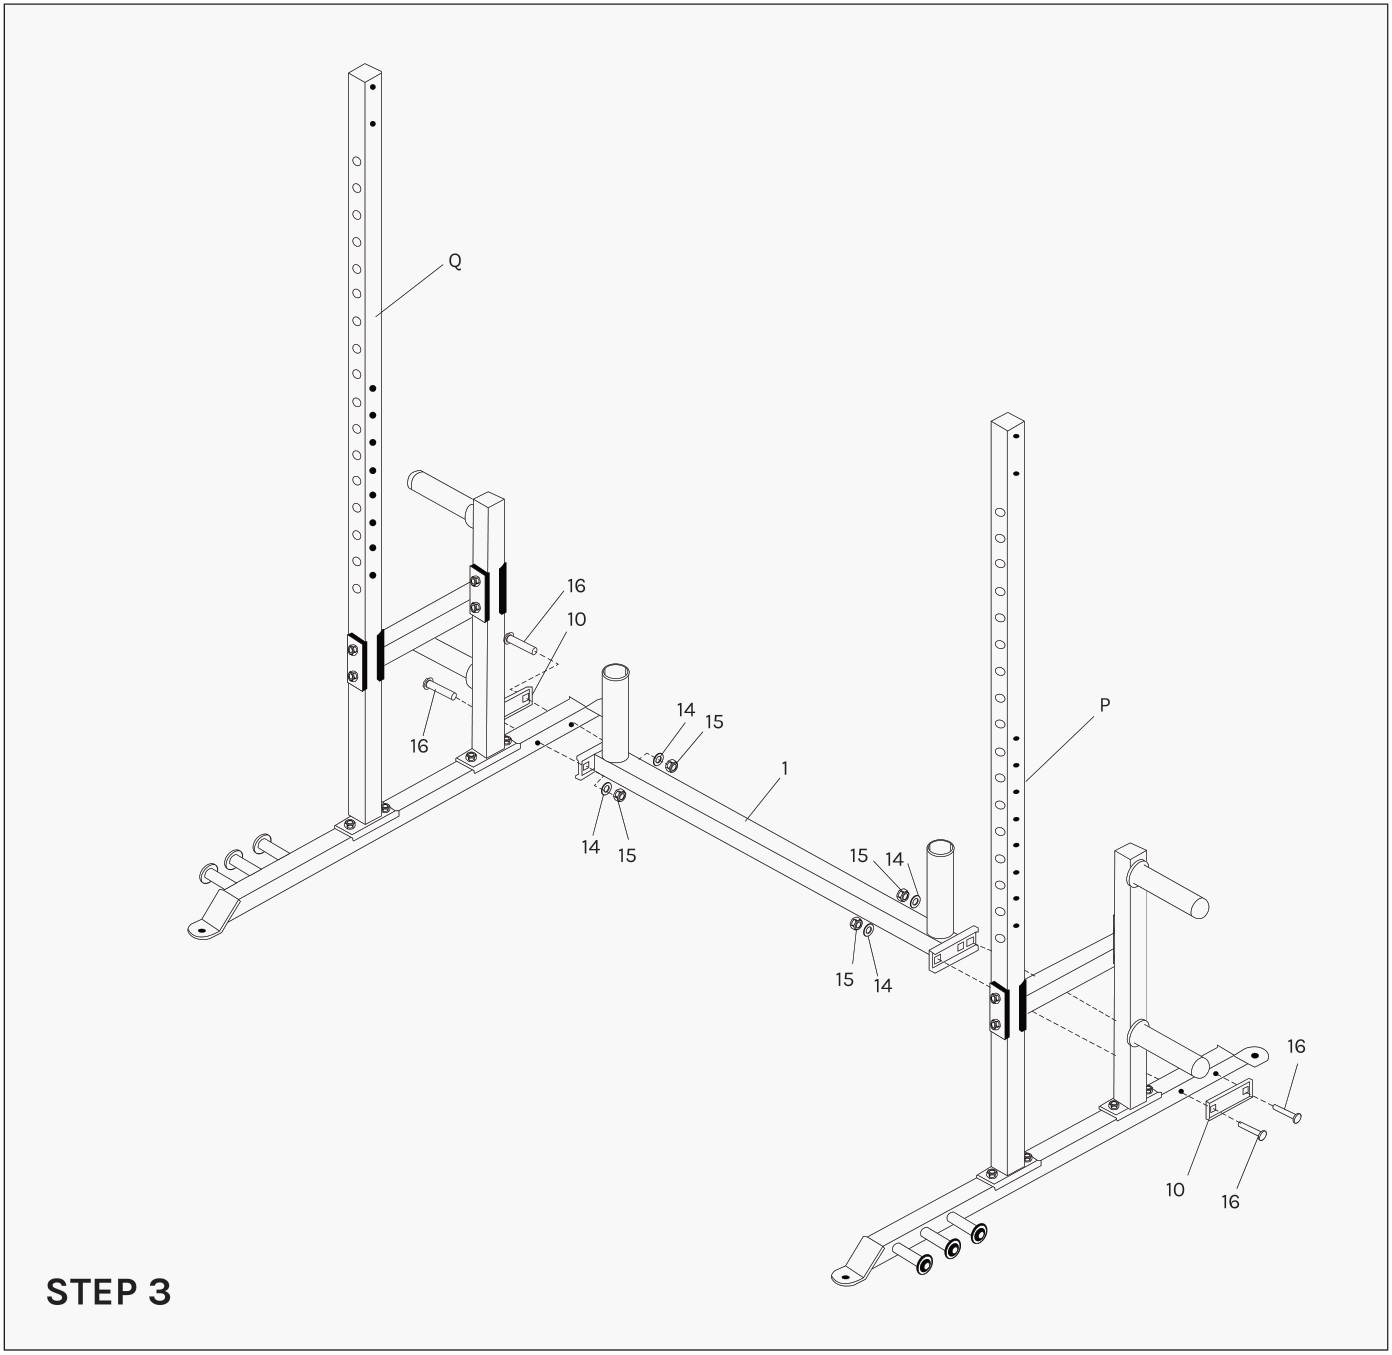
1. Attach P and Q to the Main Base Frame (1#).
Secure it with:– 2x Strengthen Board (10#)– 4x Carriage Bolt M10*70mm (16#) – 4x Washer Ø10 (14#)– 4x M10mm Aircraft Nut (15#)
2. Tighten all the bolts and nuts.
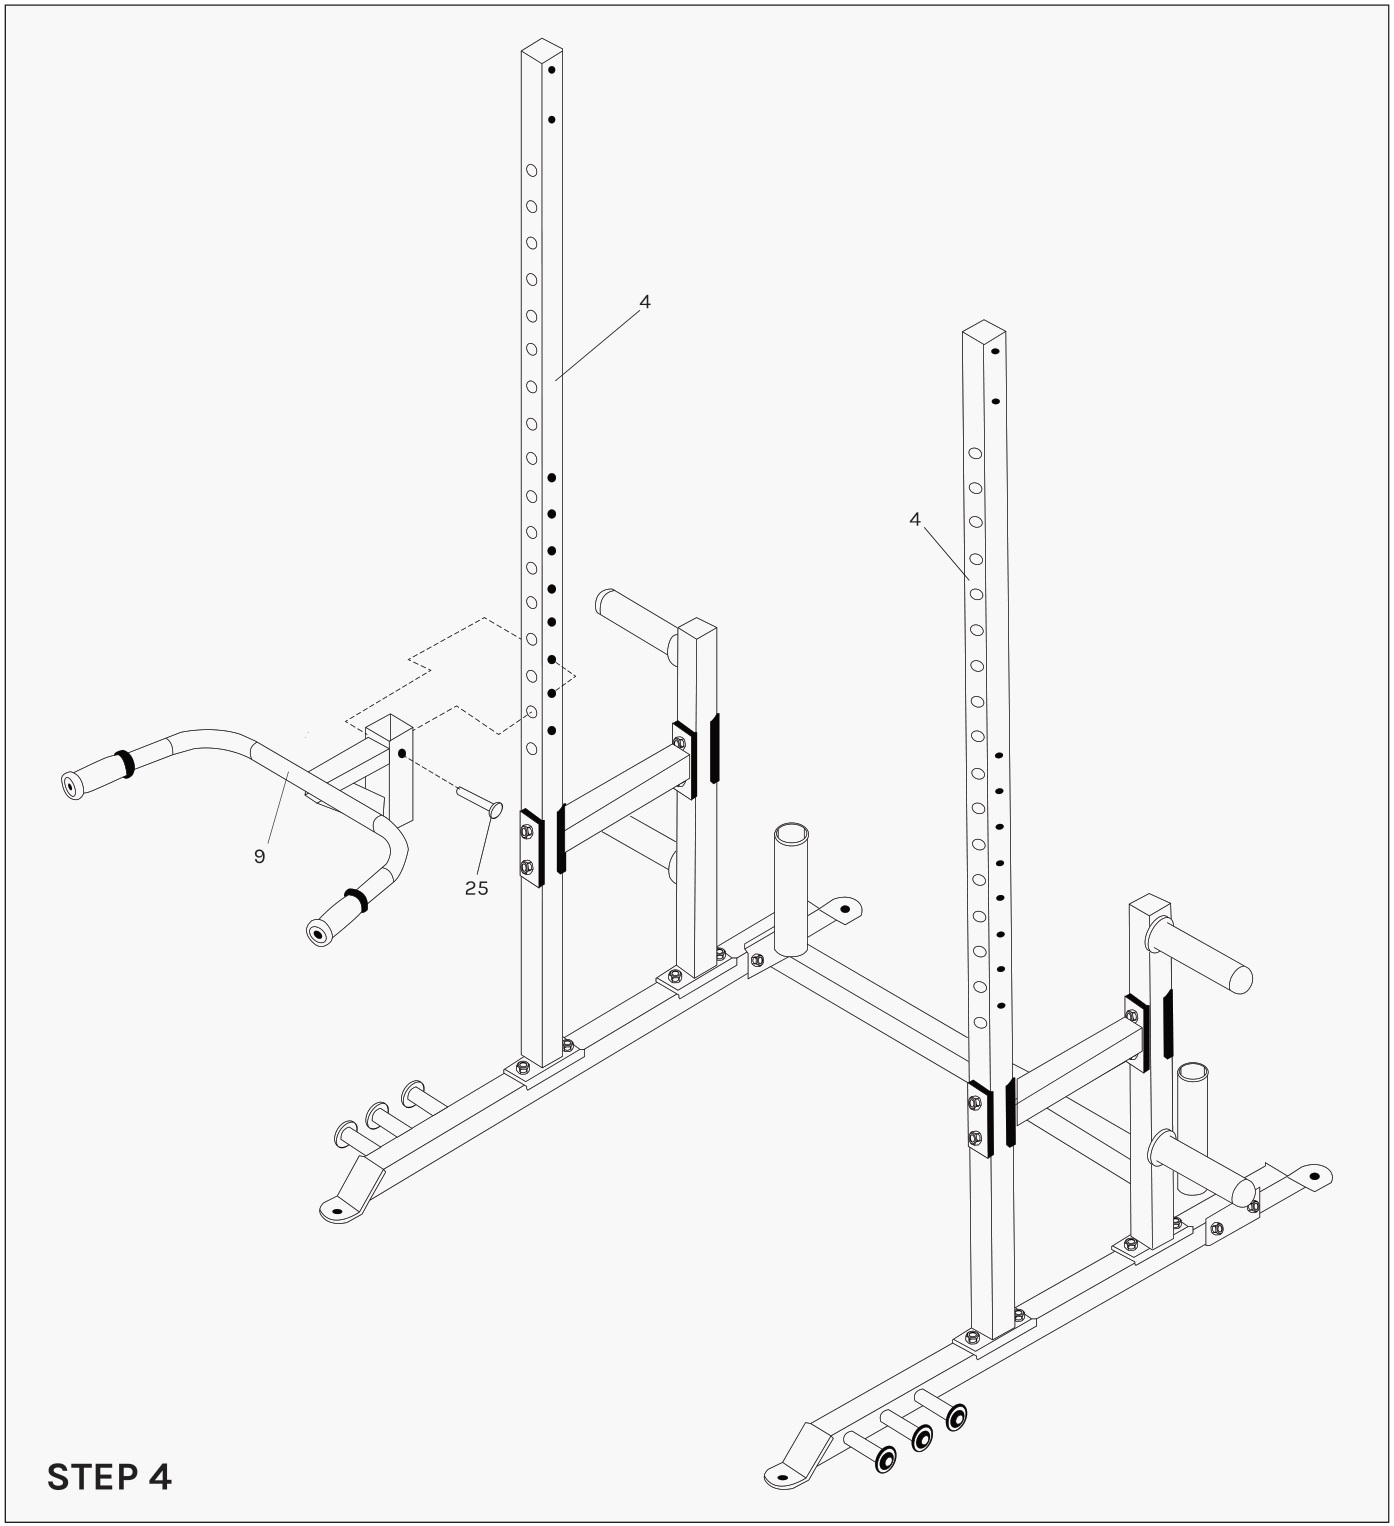
1. Plug the Dip Frame (9#) into the Tall Vertical Frame (4#). You can choose the left side or right side. Push the Ball Pin (25#) into the holes on Tall Vertical Frame (4#).
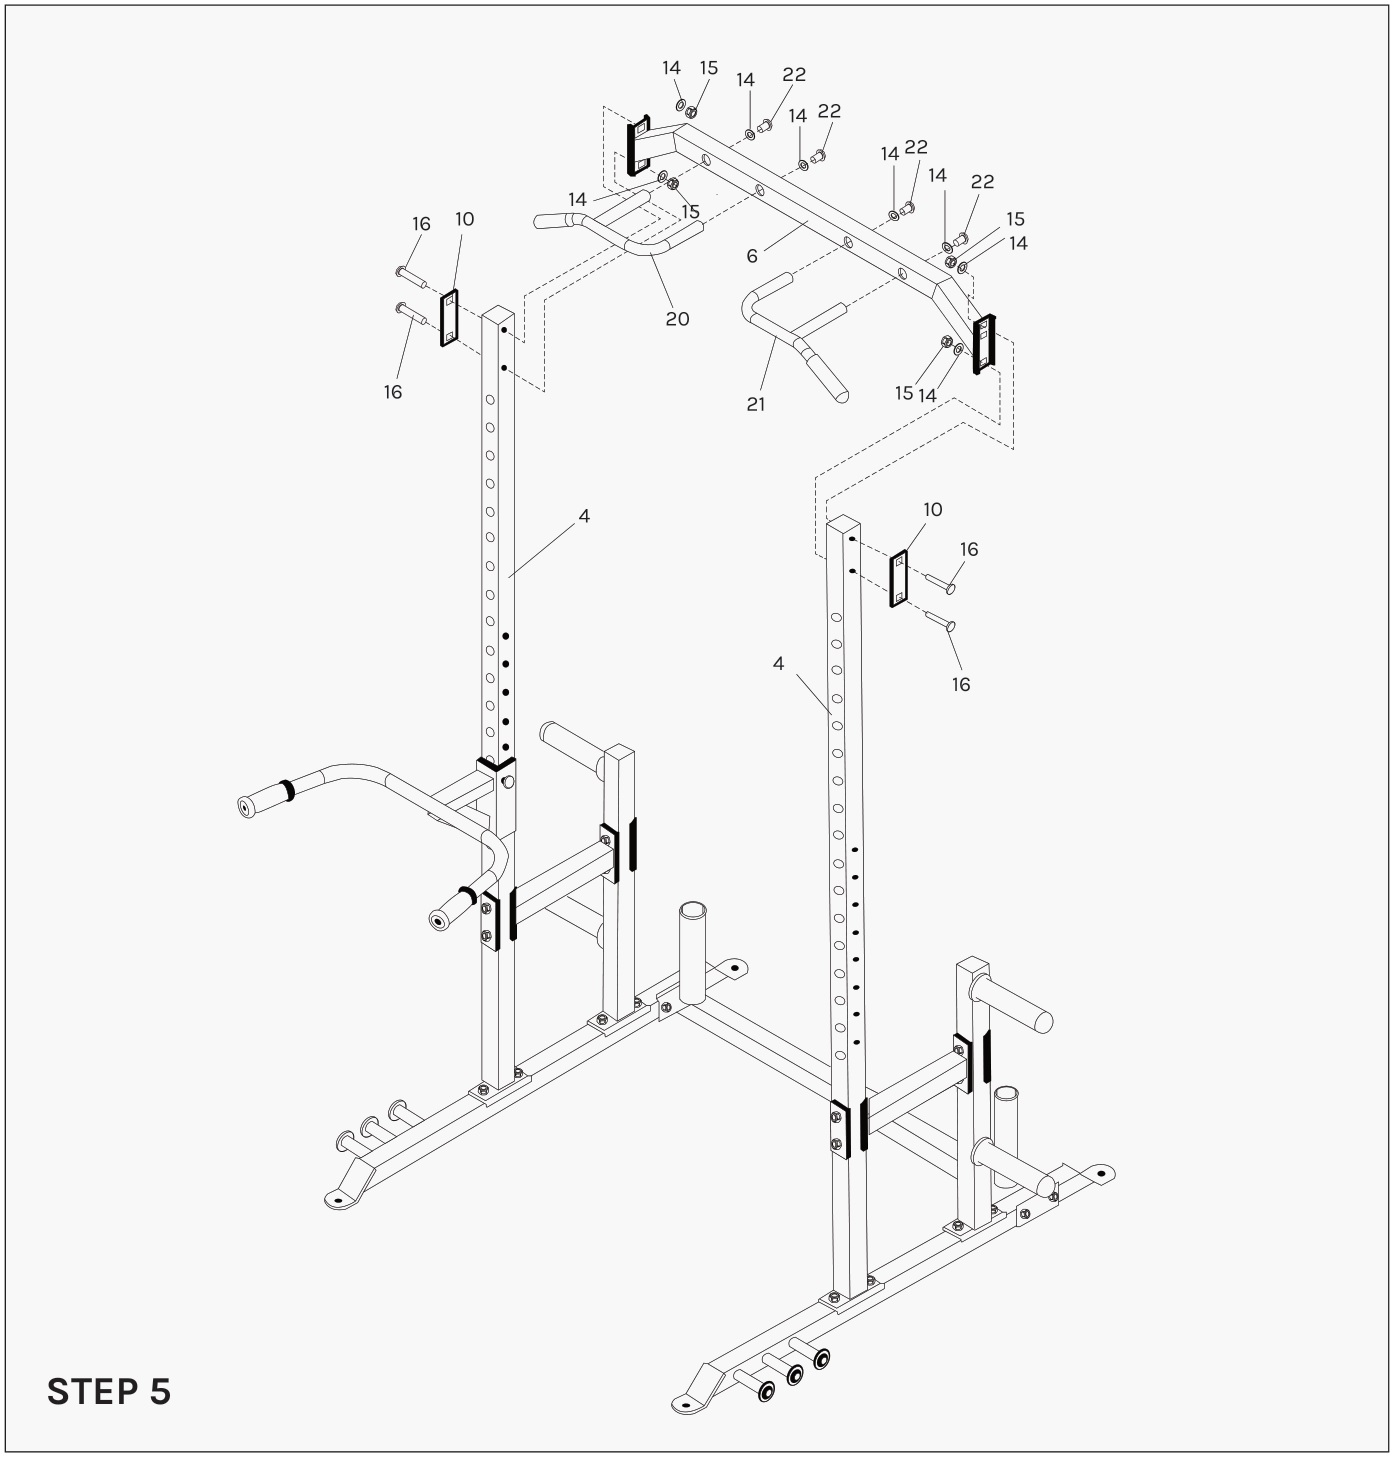 1. Attach the Lat Support (6#) to the left and right Tall Vertical Frame (4#).
Secure it with:– 2x Strengthen Board (10#)– 4x Carriage Bolt M10*70mm (16#)– 4x Washer Ø10 (14#)– 4x M10mm Aircraft Nut
2. Tighten all the bolts and nuts.
3. Attach the Lat Handle A, B (20#, 21#) to the Lat Support (6#).
Secure it with:– 4x Allen Bolt M10*20mm (22#)– 4x Washer Ø10 (14#)
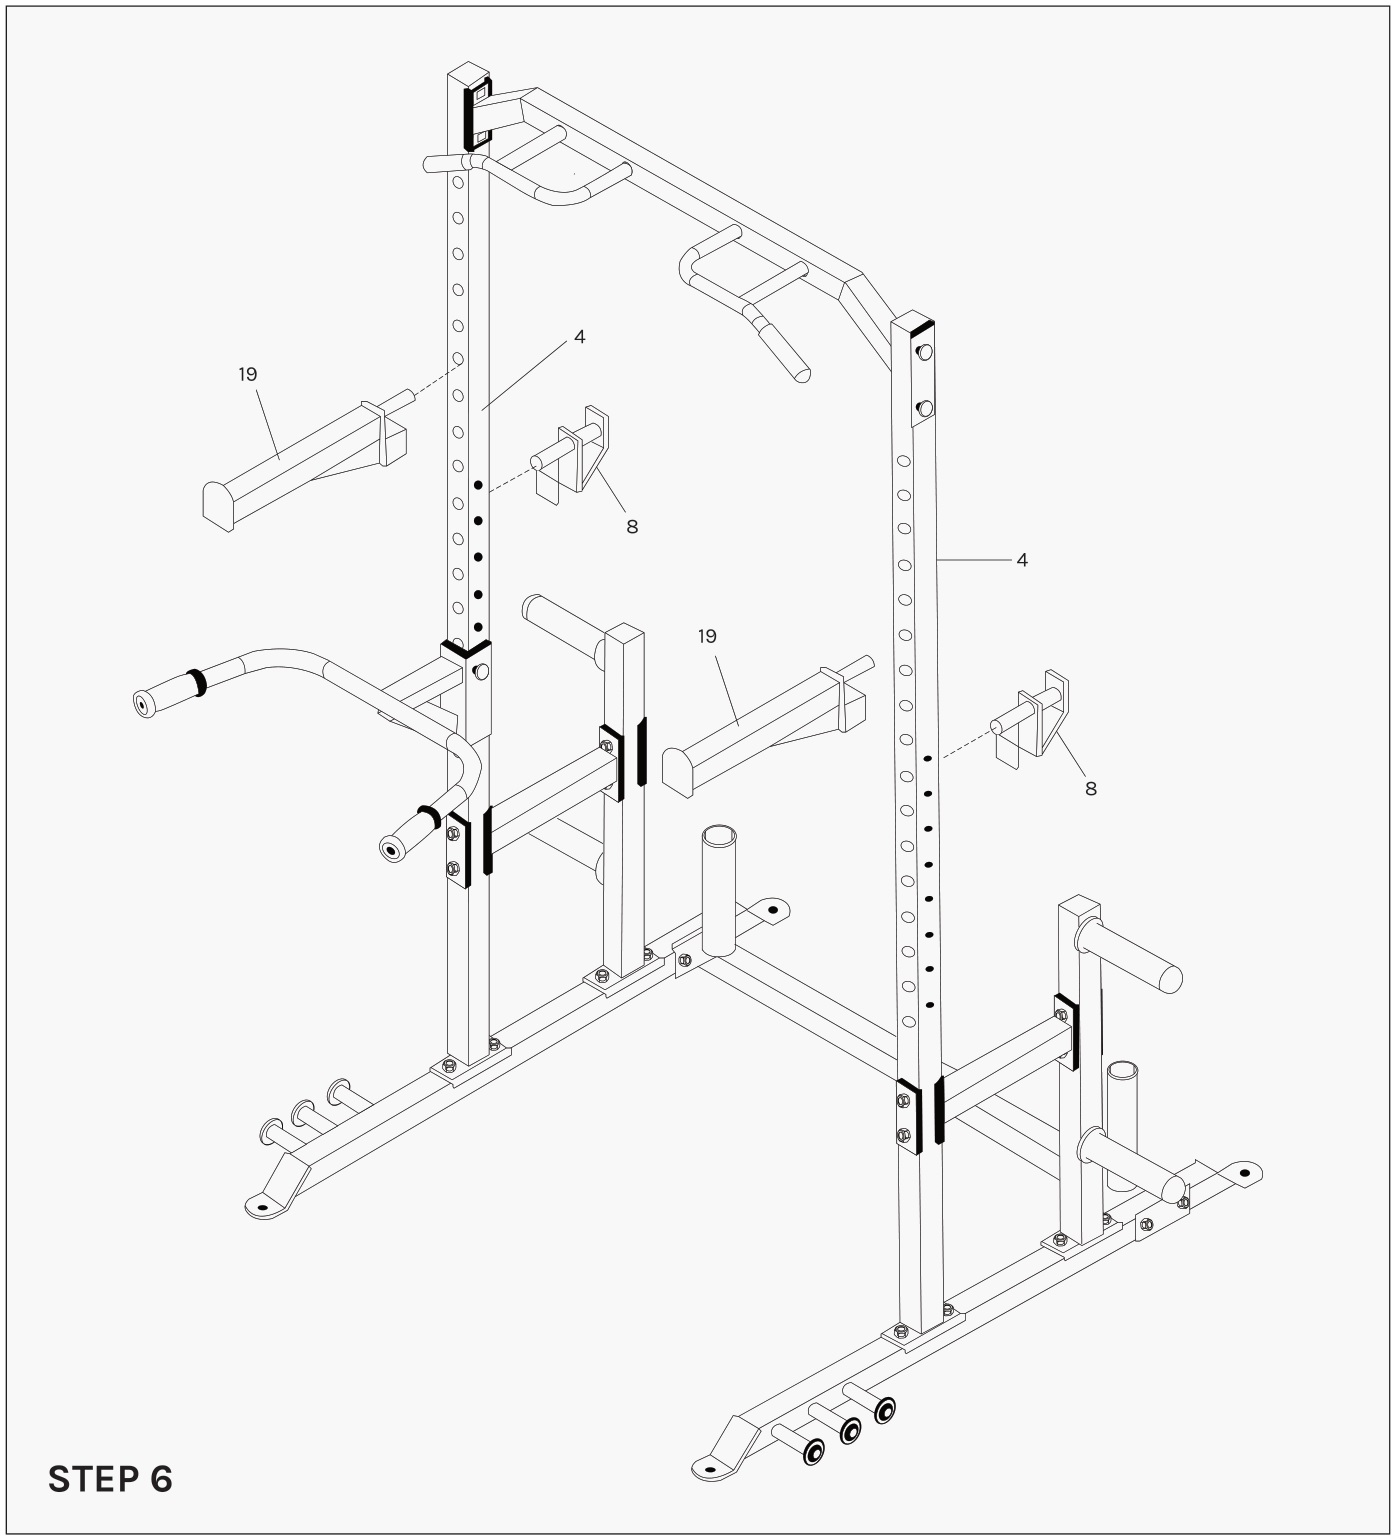
- Plug the 2x Bar Support (8#) into the Left and Right Tall Vertical Frame (4#).
- Plug the 2x Bar Rest (19#) into the Left and Right Tall Vertical Frame (4#).
WARRANTY
AUSTRALIAN CONSUMER LAW
Many of our products come with a guarantee or warranty from the manufacturer. In addition, they come with guarantees that cannot be excluded under the Australian Consumer Law. You are entitled to a replacement or refund for a major failure and compensation for any other reasonably foreseeable loss or damage.You are entitled to have the goods repaired or replaced if the goods fail to be of acceptable quality and the failure does not amount to a major failure. Full details of your consumer rights may be found atwww.consumerlaw.gov.au.
Please visit our website to view our full warranty terms and conditions:http://www.lifespanfitness.com.au/warranty-repairs
WARRANTY AND SUPPORT
Any claim against this warranty must be made through your original place of purchase. Proof of purchase is required before a warranty claim may be processed.If you have purchased this product from the Official Lifespan Fitness website, please visithttps://lifespanfitness.com.au/warranty-form
For support outside of warranty, if you wish to purchase replacement parts or request a repair or service, please visit https://lifespanfitness.com.au/warranty-form and fill in our Repair/Service Request Form or Parts Purchase Form.
Scan this QR code with your device to go to lifespanfitness.com.au/warranty-form

![]()
References
[xyz-ips snippet=”download-snippet”]