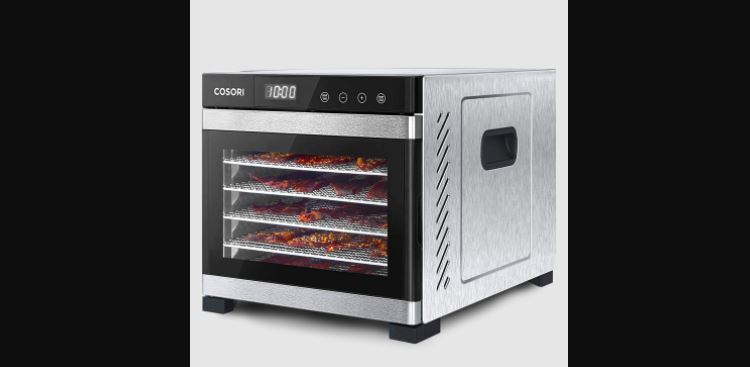
COSORI Premium Stainless Steel
Food Dehydrator User Manual
 Questions or Concerns?[email protected]
Package Contents
1 × Stainless Steel Food Dehydrator6 × Trays1 × Fruit Roll Sheet1 × Mesh Screen1 × Recipe Book1 × User Manual
Specifications
Power Supply — AC 120V, 60HzRated Power — 600WTemperature Range — 35°73°C (95°165°F)Dimensions — 340 × 450 × 311 mm / 13.4 × 17.8 × 12.4 in
Thank you for your purchase!(We hope you love your new food dehydrator as much as we do.)
Join the Cosori Cooks Community on Facebookfacebook.com/groups/cosoricooks
Explore our recipe gallery www.cosori.com/recipes
Enjoy weekly, featured recipes made exclusively by our in-house chefs
CONTACT OUR CHEFS
Our helpful, in-house chefs are ready to assist you with any questions you might have! Email: [email protected]
On behalf of all of us at Cosori,Happy cooking!
READ AND SAVE THESE INSTRUCTIONS
IMPORTANT SAFEGUARDS
Follow basic safety precautions when using the dehydrator. Read all instructions.
General Safety
- Do not touch hot surfaces. Use handles.
- Be cautious when handling the back of the dehydrator. This area will be hotter than the rest of the dehydrator.
- Do not immerse cord, plug, or housing in water or other liquids.
- Closely supervise children near the dehydrator.
- Unplug when not in use, and before cleaning. Allow to cool completely before putting on or taking off parts.
- Do not use the dehydrator if it is damaged, not working, or if the cord or plug is damaged. Contact Customer Support (see page 13).
- Using third-party parts or accessories may cause injuries.
- Do not use outdoors.
- Do not place on a stove, near gas or electric burners, or in a heated oven.
- Be extremely cautious when moving the dehydrator or removing trays if they contain hot liquid.
- To disconnect, turn off the dehydrator, then remove the plug from the wall outlet.
- Keep the dehydrator away from flammable materials (curtains, tablecloths, etc). Use on a flat, stable, heat-resistant surface away from heat sources and liquids.
- Do not store anything on top of the dehydrator while in use.
- Do not clean housing with metal scouring pads. Metal fragments can break off the pad and touch electrical parts, creating a risk of electric shock.
- Do not use where aerosol (spray) products are being used.
- Do not run the dehydrator for more than 48 hours at a time. After 48 hours, unplug and allow to cool for 2 hours before using again.
- Avoid contact with moving parts. Never place any object into the openings in the screen protecting the dehydrator fan.
- Only use the dehydrator as directed in this manual.
- Not for commercial use. Household use only.
Plug & Cord
- Do not let cord (or any extension cord) hang over the edge of a table or counter, or touch hot surfaces.
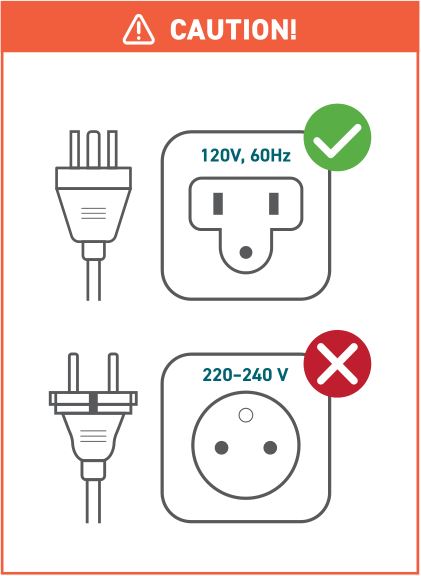
- This dehydrator has a 3-prong grounding plug, and should only be used with 120V, 60Hz electrical systems in North America. Always plug in to a grounded electrical outlet. Do not modify the plug in any way.
- Do not use with a 220240V outlet.
- Any extension cord must also be a grounding-type 3-wire cord.
- This dehydrator uses a short power-supply cord to reduce the risk of entangling or tripping. Use extension cords with care.
- The marked electrical rating of an extension cord should be at least as high as the rating of the dehydrator (see page 2).
GETTING TO KNOW YOUR DEHYDRATOR
Your Cosori Dehydrator features an automatic fan, which circulates warm air horizontally to evenly and quickly dry food. Dried foods are a great treat to snack on, because they keep most of their nutritional value and flavor. Dehydrating is the perfect way to preserve snacks, fruit, vegetables, bread, and even flowers.
Food Dehydrator Diagram

DISPLAY

Controls
- Press START/STOP to start or stop the dehydrator.
- Press TEMP/TIME once and use the + and buttons to change the temperature.
- Press TEMP/TIME a second time and use the + and buttons to change the time.
BEFORE FIRST USE
Setting Up
- Remove all packaging from the dehydrator and its accessories. Make sure all package contents are included (see page 2).
- Clean the housing, trays, and tray liners with a moistened cloth.Note: The trays are dishwasher safe. Do not wash the mesh screen or fruit roll sheet in a dishwasher.
- Place the dehydrator on a solid, level surface. Plug in. Place the trays inside the dehydrator.
- Run the dehydrator for 30 minutes at any temperature, without adding any food. Makesure that the room has sufficient ventilation in case the dehydrator produces any smoke or smells. This is normal.
- Rinse the trays with water. Dry all parts.Note: You only need to do this the first time you use the dehydrator.
USING YOUR DEHYDRATOR
Operation
Note:
- Use the dehydrator in a warm, dry room, and place on a stable, level, heat-resistant surface.
- Depending on humidity in the air and moisture in the food, dehydration times may vary.
- Place food on trays. Rearrange the trays to fit thicker food items. The trays can safely hold 3.5 kg / 7.7 lb of food. Avoid overloading the trays or overlapping food. Close the dehydrator door.Note: To avoid scratching the inside of your dehydrator, insert the mesh screen with the smooth side of the frame facing down [Figure 1.1].
- Plug in. The dehydrator will beep, and the display will show “88:88”. The dehydrator will switch to standby mode after 3 seconds, and the display will show “00:00”.
- Press TEMP/TIME to choose temperature. The temperature will blink on the display, and the + or buttons will light up. Use + or to change the temperature (35°73°C / 95°165°F).Note: Temperature changes in 1°C increments. Press and hold + or to change the temperature rapidly.
- Press TEMP/TIME again to choose time. The time will blink on the display, and the + and buttons will light up. Use + or to change the time (0:3048:00).Note: Time changes in 30-minute increments. Press and hold + or to change the time rapidly.
- Press START/STOP to start dehydrating. The dehydrator will start heating. START/ STOP will stay lit, and the other buttons will turn off. Temperature and time will cycle on the display every 3 seconds.Note: If you press START/STOP again to stop dehydration, the timer countdown will reset and the dehydrator will go into standby mode.
- Optionally, you can change the time and temperature at any time by pressing TEMP/TIME.
- When the timer finishes, the display will show “End” and heat will turn off. The dehydrator will beep 5 times, and the fan will stop.
- Use a kitchen towel, heat-resistant glove, or oven mitt to handle the trays.Note: The dehydrator will always remember your previous temperature and time settings.

Tray Liners
The dehydrator comes with 2 tray liners: a fruit roll sheet and a mesh screen.
- Place a tray liner on a dehydrator tray. Place food on the liner.
- Once the food is dehydrated, remove the tray and lift the tray liner out of the tray.
- Remove food. Bending the screen is helpful for removing sticky foods.
Fruit Roll Sheet
- Use for making fruit rolls and strips from fresh, frozen, or canned fruit. You can also use this liner for pouring purée onto a tray.Note: This liner can also be placed on the bottom of the dehydrator to catch any dripping liquids, to make cleaning easier.
Mesh Screen
- Use for foods that shrink when dried. This liner will prevent them from falling through tray grates.
Sounds
- To turn sounds on/off, wait for the display to show “00:00” and press and hold + for 5 seconds until it beeps 1 time.
Overheat Protection
- Overheating is rare. If the dehydrator overheats, it will automatically shut down as a safety feature, and the dehydrator can no longer be used. Contact Customer Support (see page 13).
Tips
- Fruit and vegetables dried in the food dehydrator will look different from those sold in stores. This is because homemade dried foods do not use preservatives, artificial colouring, or artificial additives.
- Check out the Recipe Book for more tips on dehydrating foods.
CARE & MAINTENANCE
Note: Do not clean any part of the dehydrator with abrasive chemicals, as this will damage the surface.
1. Unplug the dehydrator and allow it to cool before cleaning.2. Soak trays in hot, soapy water for easy removal of food residue.3. If needed, use a soft brush to clean.4. Clean the dehydrator housing with a damp cloth.5. Dry all parts before storing or using the dehydrator.
Note: The trays are dishwasher safe. Do not wash the mesh screen or fruit roll sheet in a dishwasher.
TROUBLESHOOTING
 If your problem is not listed, please contact Customer Support (see page 13).
WARRANTY INFORMATION
 TERMS & POLICY
 TERMS & POLICY
Arovast Corporation (“Arovast”) warrants this product to the original purchaser to be free from defects in material and workmanship, under normal use and conditions, for a period of 2 years from the date of original purchase.
Arovast agrees, at our option during the warranty period, to repair any defect in material or workmanship or furnish an equal product in exchange without charge, subject to verification of the defect or malfunction and proof of the date of purchase.
There is no other express warranty. This warranty does not apply:
- If the product has been modified from its original condition;
- If the product has not been used in accordance with directions and instructions in the user manual;
- To damages or defects caused by accident, abuse, misuse or improper or inadequate maintenance;
- To damages or defects caused by service or repair of the product performed by an unauthorized service provider or by anyone other than Arovast;
- To damages or defects occurring during commercial use, rental use, or any use for which the product is not intended;
- To damages or defects exceeding the cost of the product.
Arovast will not be liable for indirect, incidental, or consequential damages in connection with the use of the product covered by this warranty.
This warranty extends only to the original consumer purchaser of the product and is not transferable to any subsequent owner of the product regardless of whether the product is transferred during the specified term of the warranty.This warranty does not extend to products purchased from unauthorized sellers. Arovast’s warranty extends only to products purchased from authorized sellers that are subject to Arovast’s quality controls and have agreed to follow its quality controls.
All implied warranties are limited to the period of this limited warranty.
This warranty gives you specific legal rights and you may also have other rights which vary from state to state. Some states do not allow the exclusion or limitation of incidental or consequential damages, so the above limitation or exclusion may not apply to you.
If you discover that your product is defective within the specified warranty period, please contact Customer Support via [email protected]. DO NOT dispose of your product before contacting us. Once our Customer Support Team has approved your request, please return the product with a copy of the invoice and order ID.
This warranty is made by:Arovast Corporation1202 N. Miller St., Suite AAnaheim, CA 92806USA
CUSTOMER SUPPORT
If you have any questions or concerns about your new product, please contact our helpful Customer Support Team.
Arovast Corporation1202 N. Miller St., Suite AAnaheim, CA 92806USAEmail: [email protected]Toll-Free: (888) 402-1684
Support Hours Mon-Fri, 9:00 am5:00 pm PST/PDT
*Please have your order invoice and order ID ready before contacting Customer Support.
SHOW US WHAT YOU’RE MAKING
We hope this has been helpful to you. We can’t wait to see your beautiful results, and we think you’ll want to share glam shots! Our community awaits your uploads–just pick your platform of choice below. Snap, tag, and hashtag away, Cosori chef!

Considering what to cook? Many recipe ideas are available, both from us and the Cosori community.
MORE COSORI PRODUCTS
If you’re happy with this air fryer, the line doesn’t stop here. Check out www.cosori.com for a line of all our beautiful and thoughtfully designed cookware. They might be right at home in your kitchen, too!
NOTES
_____________________________________________________________
_____________________________________________________________
_____________________________________________________________
_____________________________________________________________
_____________________________________________________________
References
[xyz-ips snippet=”download-snippet”]