
COSTWAY Motorized Treadmill User Manual
Please give us a chance to make it right and do betterContact our friendly customer service department for help first.Replacements for missing or damaged parts will be shipped ASAP!
Follow CostwayVisit us: www.costway.com
![]()
![]()
![]()
![]()
![]()
Contact Us!
Do NOT return this item.Contact our friendly customer service department for help first.
E-mailUS: [email protected]UK: [email protected]
Before You Start
![]() Please read all instructions carefully.
Please read all instructions carefully.![]() Retain instructions for future reference.
Retain instructions for future reference.![]() Separate and count all parts and hardware.
Separate and count all parts and hardware.![]() Read through each step carefully and follow the proper order.
Read through each step carefully and follow the proper order.![]() We recommend that, where possible, all items are assembled near to the area in which they will be placed in use, to avoid moving the product unnecessarily once assembled.
We recommend that, where possible, all items are assembled near to the area in which they will be placed in use, to avoid moving the product unnecessarily once assembled.![]() Always place the product on a flat, steady, and stable surface.
Always place the product on a flat, steady, and stable surface.![]() Keep all small parts and packaging materials for this product away from babies and children as they potentially pose a serious choking hazard.
Keep all small parts and packaging materials for this product away from babies and children as they potentially pose a serious choking hazard.
CAUTION
To avoid any hurts, please read this manual carefully before using.

■ For safety purpose do not stand on running belt while start.■ Please stop immediately for any feeling of vomit, jerky during using.■ Please increase speed slowly if needed.■ Adjustment of belt is prohibited during using.■ It is suggested to wear sports shoes when using the machine.■ Children, elder, pregnant women, patients are prohibited to use the machine.■ Please clip the safety key on your clothing during using.■ Please firmly hold the hard bars during using.
SAFETY NOTIICE
- Please put the machine on flat ground. It is unsuitable to put the machine at following places:
- Outdoors.(The machine is specially designed for indoor use only)
- Slant ground or slant places on balcony.
- Sunlight area or near heater.
- Big noisy places.
- Error may be appeared if the power is not stable. Please do not use the same socket together with computer, air conditioner etc.
- It is suggested to wear sports shoes and gym suit when use the machine.
- Please increase or decrease speed slowly.
- Be careful of children or other objects while fold and unfold the machine.
- Do not put the machine near to wet object. Error maybe caused by waterdrop.
CAUTION DURING USE
■ If you do not feel well before using, please consult with your doctor or coach.■ It is not our company’s responsibility for any improper use by user to cause body injured.■ Please pull up plug after using.■ Please pull out plug for any movement or change parts for the machine.■ Children , elder and pregnant women are prohibited to use the machine. Patients need doctor’s consultant before using.■ Please place the machine on flat places. Do not locate any objects 2M behind the machine.■ Do not start the machine when it is folded.■ Waterdrop is prohibited to run into the machine , especially to motor, power line and plug.■ Danger may cause if wearing long dress or other unsuitable dresses during use.■ Encloser spaces, air uncirculated places and with flammability places are prohibited to use the machine.■ Do not put any objects on the machine.■ Put away the plug from heated place or fire seat.■ Please switch off all functions and pull out plug after using.■ Please do not stand directly on the belt while starting the machine.■ Do not disassemble the machine without conduct of professional person.■ Please make sure the running belt is fastened before using.
Technical Specification
Product Name TreadmillVoltage 110VFrequency 60HzPower 800WSpeed 0. 5M-6. 5M/hUser Capacity 220LBS
Assemble Instruction
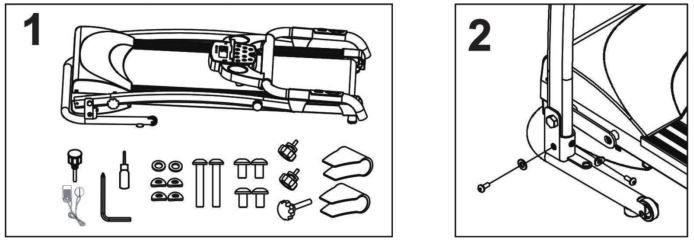
- Open the package and take out the treadmill. Make sure there are no missing parts:
- one main treadmill frame
- one accessory bag set
- Take out 4 short screws and pads from spare bag, fix left and right upright tubes with base frame by the screws. Please do not fasten the screws before finish assembling.
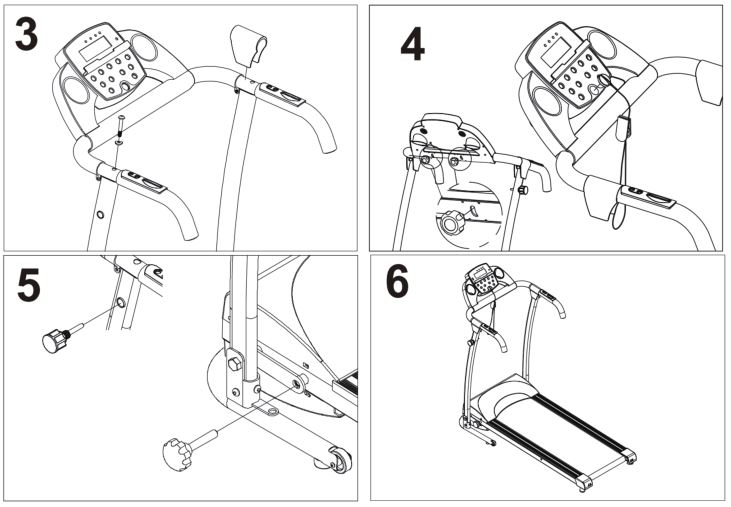
- Take out 2 long screws and pads, fix panel with upright tubes with the screws. Then fasten the screws of above point 2 mentioned. Then put the cover to armrest. Before fasten screws, please make sure the cables in the upright tube will not pressed by screws.
- Fix the panel at a suitable angle with MG knob and plastic gasket, then put the safety key on the panel.
- Fix M16 knob to left upright tube, fix running frame with base tube by M12 knob.
- Finished.
Control Panel

- Press on/off key, the machine will start by 0.5M/H after 3 seconds.
- Press”+” key for speed up and”-” key for low down. The fastest speed is 6.5M/H and lowest is 0.5M/H.
- Press “mode” key, the screen will show Speed, Time, Calorie. And the scan light will be lighted from speed, time, calorie every 5 seconds.
- Insert have 12 programs from PROG. When by stand, press “PROG” can set the programs then press “START” to start the machine.
- During the machine worked and use auto program the+ -key can not available. If need select auto program please select it first when the machine stand by.
- For emergency stop, please pull out safety key. The machine will stop very slowly. Pull out safety key the screen will show “Err”, put on it will show “OFF”
- Press “STOP” key for stop the machine after using.
Fold and Unfold
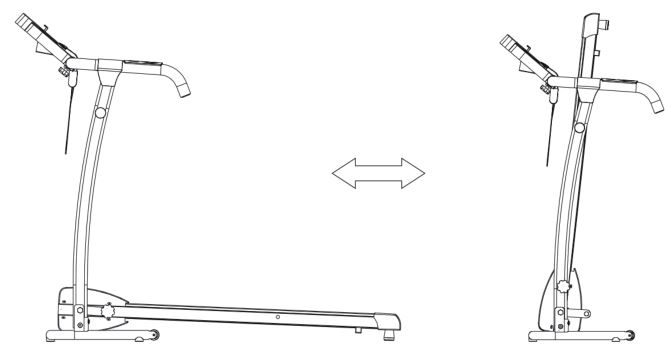
Fold:Turn on the fixed knob then lift the running board to assemble the machine. Pull out the tension knob, aimed at the platform then release the knob to fix the machine. Move the machine.
Unfold :Pull out the tension knob then fall down the running board and fix the machine with the fixed knob then use the machine after electrify.
USAGE OF SILICONE OIL
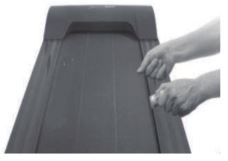
Pull up tightly of the running belt. Then put the silicone oil to running board. Then start the machine to running 3 minutes without loading. It is better to maintain like this every 30 hours working of the machine. This can save lifetime of parts properly.
Runbelt Adjustion
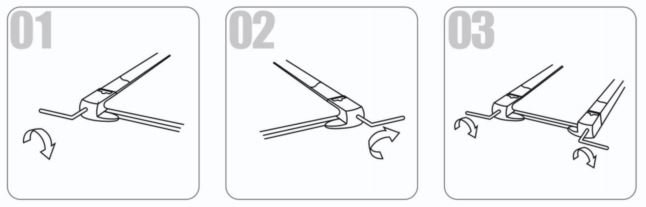
(1) Running belt deviate to leftStart the machine by speed at 1.2-1.8M/h without loading, use die nut to make the screw go 1/4 circle(see fig1). Then make the machine running without loading 1-2 minutes. Please adjust like this to make the belt till to mid place.
(2) Running belt deviate to rightStart the machine by speed at 1.2-1.8M/h without loading, use die nut to make the screw go 1/4 circle(see fig2). Then make the machine running without loading 1-2 minutes. Please adjust like this to make the belt till to mid place.
(3) Running belt logjamIf the running belt is in dead condition, use die nut to make the screw 1/2 circle both left and right till this logjam solved.
DAILY MAINTAINANCE
1. Please disconnect power before checking the machine or cleaning.2. Clear belt and dial plate after use, at least once a week.3. Check and tighten screws and spines at fixing point.4. Do not hang clothes or other objects on the machine.
Welcome to visit our website and purchase our quality products!
Your suggestions and comments for COSTWAY are really important to us! We sincerely solicit you to go back to our shop and leave a good rating in just a simple click. It would be quite encouraging if you could kindly do so like below:

With your inspiring rating, COSTWAY will be more consistent to offer youEASY SHOPPING EXPERIENCE, GOOD PRODUCTS and EFFICIENT SERVICE!
US office: Fontana, CaliforniaUK office: Ipswich

- Reward Points
- Exclusive Customer Service
- Personalized Recommendations
- Permanent Shopping Cart
- Order History

We would like to extend our heartfelt thanks to all of our customers for taking time to assemble this product and giving us valuable feedbacks.

![]()
http://www.costway.com/hysalesrule/qr
References
[xyz-ips snippet=”download-snippet”]