Cox Business UC App
Mac Desktop Quick Reference Guide
This guide will help you access and use the Cox Business UC App for Mac Desktop. It includes instructions on how to download, sign on, set up and utilize the most common features and functionalities.
Overview
The Cox Business UC App gives you in-office connectivity while working from home or traveling. There are six types of UC App for smartphones, tablets and desktop computers. You can make click-to-dial calls, start an instant messaging session, view a contact’s availability, make a conference call and manage your calls.
Note: To use the UC App features with your IP Centrex Professional Seat, you must first activate UC App through the MyAccount Portal. Refer to the UC App for Mac Desktop User Guide for detailed instructions.
Downloading the Application
- Log in to MyAccount (http://coxbusiness.com/myaccount) with your User ID and password.
- In the upper right corner of the Welcome screen, click Voice Settings and then click VoiceManager Tools from the dropdown menu.
- When the VoiceManager Dashboard opens, click the Applications tab.
- Click the Download for Desktop link, and then click Download the Mac Desktop app to download the application.
- In your desktop finder window, select Downloads to display items in the Downloads folder.
- Locate and open the installation file (UC App.bc-uc.osx-21.6.4.61-COX.dmg) to install the application.
Signing In
- Open the application on your desktop.
- Enter your MyAccount user name and password.
- Click the Sign in button.Optional: Tap the Remember password box to bypass having to enter it during subsequent launches of the app.Optional: If you choose Sign in automatically, you are signed in immediately and taken to the Contacts list on subsequent app launches. Otherwise, you are presented with the Sign in screen.
Adding a Contact
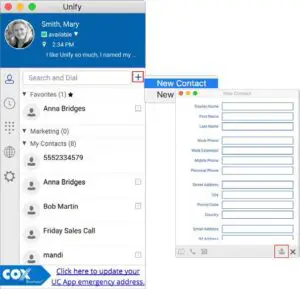
- Log in to the UC App.
- Select the Add Contact icon from the main window, and then select New Contact.
- In the New Contact dialog box, enter the contact’s information. To create a contact for a weekly conference, add a conference bridge number and PIN, and then click the Add Contact icon .
- Note: By default, your presence information is always shared with a new contact if an Extensible Messaging and Presence Protocol (XMPP) address is provided.To add a new group, click the same button as you did for Add Contact and choose the New Group menu option.Enter the name of the group in the New Group dialog box, and click the OK button to add the group to the Contacts list.
You can also add contacts to your list by utilizing the company directory.

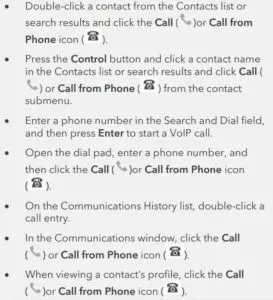
Making a Call
Use any of the options below to place a call.
Transferring a Call
The UC App supports transferring VoIP calls to another party. There are two ways to transfer a call:
- Attended (Warm) Transfer: Announce the caller to the intended recipient before you complete the transfer.
- Unattended (Blind) Transfer: Transfer the caller without an announcement.
![]()
![]()
4. Click the Attended Audio button for an attended transfer or click the Transfer Now button for an unattended transfer.
Conferencing a Call
Use the steps below to start a conference call.
![]()
Repeat steps 2-5 to add up to 14 other participants for a total of 15, including yourself.
![]()
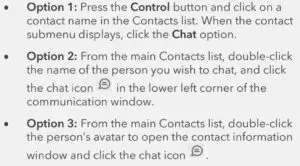
Starting a Chat Session
Use any of the options below to begin a chat session.
National e911
The Cox Business e911 service allows you to conveniently update your physical location so local emergency services can find you. When placing an emergency call to 911 using your UC App, emergency services will be provided with the physical location you have entered.
Note: It is important that whenever you change the location of your laptop you update the physical location on the Cox Business Manage e911 Address page.
Click the link at the bottom of the UC App Main window. Result: The Manage e911 Address page opens in a browser window, where you can log in to MyAccount and update your emergency location information.
Setting Up Voice Mail
- From your desk phone or UC App, dial your business number or *86.
- Enter the temporary PIN, “269266” and press #.
- Select your default language.
- Set a new PIN (4-8 digits) for your account and press #.
- Record your name.
- Record a greeting or select the default system greeting.
Checking Voice Mail
From your desk phone or UC App, dial your business number, enter your PIN, and press #.Refer to the Voice Mail User Guide for more information.
Configuring Anywhere
Anywhere simplifies communications for on-the-go users and remote users by extending the features of a desk phone to any other fixed or mobile device, regardless of the network or handset manufacturer. Callers dial one number and can reach you on any phone you choose. A desk phone, cell phone and/or a soft phone may ring simultaneously. Experience voice call continuity with the ability to move live calls from one device to another without hanging up.
- The text field (displayed directly under the number) allows you to enter a descriptive label for that number (location).
- The Do not Divert Calls checkbox prevents a call from ending up as a voice mail, which can be problematic in, for example, conference call situations.
- Select the Answer Confirmation checkbox to receive a separate audio prompt when answering a call from that number (location). It may be useful in cases where, for example, mobile numbers are being used to prevent incoming calls going to mobile voice mail since the call will be ended without going to voice mail if the answer confirmation is not provided.
- Select the Call Control checkbox to enable the server platform to provide mid-call services such as Call Transfer and Conferencing for that number (location).
6. Click the checkbox to the left of a location to enable that location.
Signing Out or Quitting UC App
Click the UC App menu in the Main window, and tap Sign out or Quit UC App.
Other Call Management Features
UC App for Mac Desktop gives you many features that help manage your calls. Some of the more commonly used are described below. For additional details, click the link to see the UC App for Mac Desktop User Guide.
PresenceThe Presence feature alerts users of your availability. Green means you are available to chat. Yellow means that you are online, but are idle or have been away from your computer for 10 minutes. Red means that you are unavailable/busy. Gray means you are offline.
The UC App for Mac Desktop can automatically update your presence to the following statuses:
- Busy In Call
- Busy In Meeting
- Available (desk phone)
- Available (mobile)
Call ForwardingUse the Call Forwarding feature to redirect incoming calls based on your availability or location.
- Call Forward Always reroutes all incoming calls to another number that you select.
- Call Forward When Busy is useful for when you do not want to be interrupted. Enter the phone number of where you want the calls to be routed, such as your voice mail.
- Call Forward When No Answer redirects your incoming calls when you are unable to answer the phone within a predetermined number of rings.
- Call Forward When Not Reachable redirects all your incoming calls to another number that you define when the phone system is not operational (e.g., due to a power outage, cable cut or device connection issue).
Do Not DisturbThe Do Not Disturb feature allows you to set your station as unavailable so that incoming calls receive a busy response or go to your voice mail, if equipped.
Call ParkCall Park is particularly suited for shared environments where one person can answer the call, park it, do something else for a while and continue the call from another device or let somebody else continue the call.
Call PullCall Pull allows you to retrieve an ongoing call from one of your devices to another one where the Call Pull feature is used.
Remote OfficeThis feature allows any phone, such as one in a hotel while you’re away on business, to act as your office phone from a charging and numbering perspective.
Services not available in all areas. Other restrictions apply. ©2018 Cox Communications, Inc. All rights reserved. 0418
Read More About This Manual & Download PDF:
 report this ad
Cox Business UC App for Mac – Usage Guide – Cox Business UC App for Mac – Usage Guide –
Questions about your Manual? Post in the comments!
[xyz-ips snippet=”download-snippet”]