
![]()
HD CameraIndoor Installation Instructions
With the HD Camera from Homelife, you can now view live video of your home remotely as well as record brief video clips from anywhere, anytime. 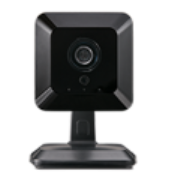
Expected Installation Time: 20 minutes
IMPORTANT: You will need to access your Homelife Security Router and Touchscreen Control Panel to complete the installation. You may connect up to a maximum of 6 cameras to your Homelife system.
1 Watch Installation Video
Before you begin, watch the HD Camera installation video at cox.com/diyhomelife on your mobile device, tablet or computer.
START HEREcox.com/diyhomelife
2 Connect Camera to Router
Before you begin, you will need your Camera, Homelife Security Router, Pairing Y Cable, Ethernet Cable and PowerCord. Please note that if you have ordered more than one camera, you may only pair one camera at a time.
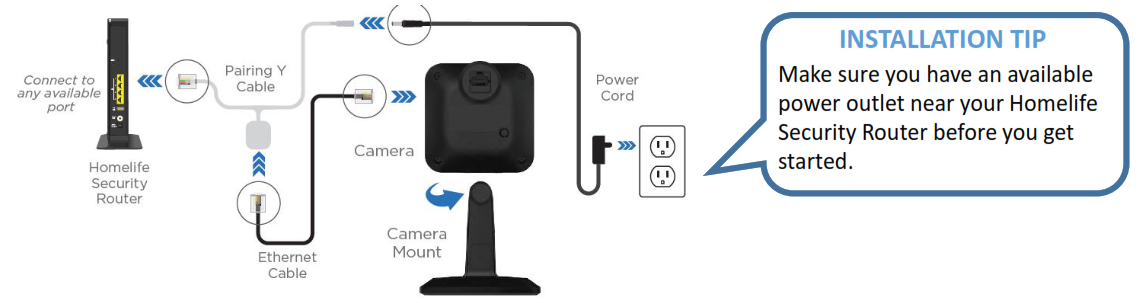
- Attach the camera to the camera mount.
- Connect the camera to the Homelife Router utilizing the white Y Pairing Cable,Ethernet Cable, and Power Cord as shown above.
- Plug the Power Cord into a nearby power outlet.Expected Result: Two green lights will appear on the front of the camera, indicating it is ready to pair with the Touchscreen.
3 Configure the Touchscreen
In this step, you will need to access your Touchscreen Control Panel and have your 4-digit Master Keypad Code ready.
- On your Touchscreen Control Panel, press the Settings
 app and enter your 4-digit master keypad code, then select Home Devices > Cameras > Add a Camera.
 - Follow the prompts to conduct a network test.Expected result: A green checkmark will appear with the upload speed, which is used to set the default video quality for the camera.
- Press Next. The Hardware Setup screen appears. Press Next to continue.
- On the Locating Camera screen, the connected camera will appear. Press Accept to begin the pairing process. If necessary, the firmware will begin to update automatically, and camera configuration will begin. When complete, press Next.
![]() TROUBLESHOOTING TIPIf you see a red X and Abort button, press the Back button on the bottom of the screen. Press and hold the small round black button on the back of the camera for 30 seconds to reset it. When 2 green lights appear, press Next on the Touchscreen to continue.
TROUBLESHOOTING TIPIf you see a red X and Abort button, press the Back button on the bottom of the screen. Press and hold the small round black button on the back of the camera for 30 seconds to reset it. When 2 green lights appear, press Next on the Touchscreen to continue.
4 Customize Camera Settings
Now that the camera is paired, customize the name of your device on the Edit New Camera screen.
- Tap the Camera Name field to configure the name of the camera and press Done.
- Select the desired image quality (recommend ‘High’) and motion sensitivity (recommend ‘Med’) levels.
- Press Next to continue. You can now disconnect everything from the Y Cable and set it aside.
5 Relocate Camera
- Now, take the Camera’s Ethernet Cable and the Power Cord and connect them to the Ethernet Power Adapter Cable as shown in the diagram below.
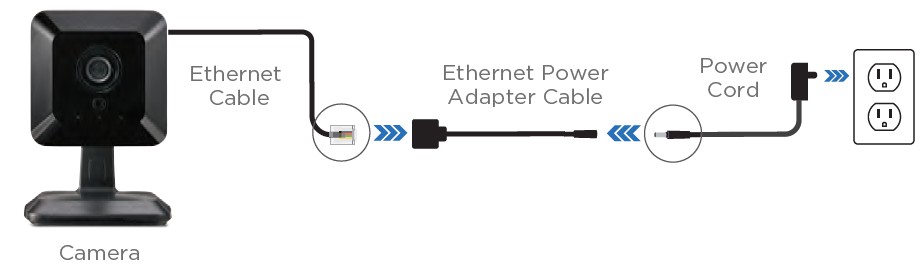
2. Relocate the camera to your desired location and plug it in. Wait at least a minute for the camera to fully restore connectivity, as indicated by the two green lights.
6 Verify Camera Connectivity
- Return to the Touchscreen and press the Verify Camera button to test the Wi-Fi connection to the camera. Press Next and Next again. Press the Touchscreen’s Home button to return to the home screen.
Congratulations, the installation and setup process is now complete!You can now view live video and record 15-second video clips via your Touchscreen, mobile app, or online Subscriber Portal.
To record video 24/7 and keep recordings for 10 days, click or call to learn more about ourContinuous Video Recording service.
To learn how to set up Rules and find other helpful information, visit us online at cox.com/diyhomelifeFor Homelife technical support, call 1-877-404-2568
Cox Homelife HD Camera Installation Manual – Cox Homelife HD Camera Installation Manual –