Smart LED Light Bulb
Installation & Pairing Instructions
With the Smart LED Light Bulb from Homelife, you can easily switch out old bulbs, for new efficient, dimmable LED bulbs that have a life expectancy of up to 22 years! Plus, you can control your lights remotely using the Cox Homelife mobile app or online Subscriber Portal, and set up Rules that automate when they turn on or off. Follow these steps to install and pair your new Smart Bulb with the Homelife system.
Expected Installation Time: 5 minutes
1. Watch Installation Video
Before you begin, watch the Smart LED Light Bulb installation video at cox.com/diyhomelife on your mobile device, tablet or computer.
2. Install Smart Bulb
You may install your Smart Bulb in any indoor light fixture, such a lamp or ceiling light, with an E26 standard (medium) base socket.INSTALLATION TIP: Pair the bulb using a lamp located near your Touchscreen. You can move the bulb to any location after pairing is complete.
- Start with the light turned off
- Replace the old light bulb with the new Smart Bulb
- Turn on the light
The light bulb will begin to pulse, indicating it is ready to pair with your Homelife system. You will have 3 minutes to complete the pairing process.
![]() TROUBLESHOOTING TIP
TROUBLESHOOTING TIP
If the bulb does not pulse immediately, or if it has timed out, you can reset it by pressing and holding the bulb’s power button located on the side of the bulb, while installed and the light turned on. Press the button for 20 seconds, then release. The bulb will blink five times and then begin to pulse, indicating it is ready to pair.
3. Pair Smart Bulb with Touchscreen
- On your Touchscreen Control Panel, press the Settings
app.
- Enter your 4-digit master keypad code.
- From the Settings menu, select Home Devices > Lighting > Add Lights.
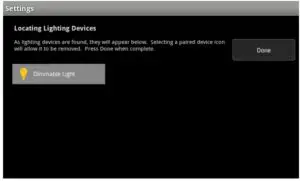
- The Locating Lighting Devices screen will appear. Press Next to begin the pairing process. Once the Smart Bulb is found by the Touchscreen, the light will become solid.(Note: Do not press Done during the pairing process.)
- When the “Dimmable Light”
icon appears, pairing is complete. Press Done. Then press Next to configure your Smart Bulb.
4. Configure Smart Bulb
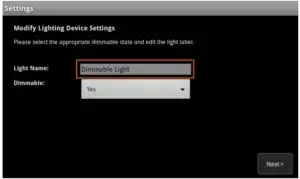
- On the Configure Lighting Devices screen, press the “Dimmable Light”
icon to configure it.
- Tap the ‘Dimmable Light Name’ field to display a keyboard.Delete the default name and enter the desired name for your Smart Bulb or light fixture (example: Living Room Lamp). Press Done to close the keyboard.
- Toggle the ‘Dimmable’ field to Yes to allow the bulb’s brightness to be controlled by the Homelife system.
- Press Next to complete configuration. Press the Touchscreen’s home button
to return to the home screen.
Congratulations, the installation and pairing process is now complete!
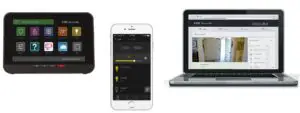
You can now control your Smart LED Light Bulb using the Lights app on your Touchscreen, Homelife mobile app or online Subscriber Portal.
IMPORTANT: The light switch for your light fixture must remain in the ON position in order to control the bulb remotely.
To learn how to set up Rules and find other helpful information, visitus online at cox.com/diyhomelifeFor Homelife technical support, call 1-877-404-2568
Cox Sengled Smart LED Light Bulb Setup Manual – Cox Sengled Smart LED Light Bulb Setup Manual –
[xyz-ips snippet=”download-snippet”]