
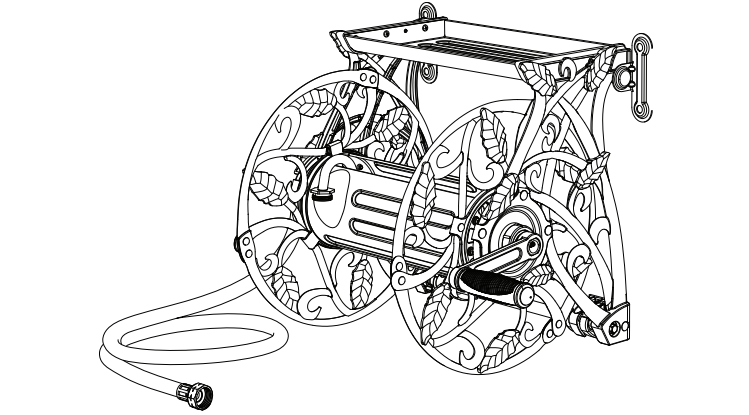
CPE DETACHABLE HOSE REEL OWNER’S MANUAL
MODEL NUMBER100361
SAVE THESE INSTRUCTIONSImportant safety instructions are included in this manual.
MADE IN CHINAREV 100361-20200525
12039 Smith Ave.Santa Fe Springs, CA 90670 USA1-877-338-0999www.championpowerequipment.com
Have questions or need assistance?Do not return this product to the store!WE ARE HERE TO HELP!Visit our website:www.championpowerequipment.comfor more info:
- Product Info and Updates
- Tech Bulletins
- Frequently Asked Questions
- Product Registration
– or –Call our Customer Care Team Toll-Free at:1-877-338-0999
*We are always working to improve our products. Therefore, the enclosed product may differ slightly from the image on the cover.
INTRODUCTION
Before You Begin
This product has been packaged to ensure it arrives in best possible condition. Please be careful when unpacking. Read instructions prior to assembly. This kit contains parts that can be damaged if incorrectly assembled. Please follow instructions. Champion Power Equipment is not responsible for replacing parts damaged due to incorrect assembly.
Record the model and serial numbers as well as date and place of purchase for future reference. Have this information available when ordering parts and when making technical or warranty inquiries.
Champion Power Equipment Support1-877-338-0999
Model Number100361
Serial Number
Date of Purchase
Purchase Location
MANUAL CONVENTIONS
This manual uses the following symbols to help differentiate between different kinds of information. The safety symbol is used with a key word to alert you to potential hazards in operating and owning power equipment.
Follow all safety messages to avoid or reduce the risk of serious injury or death.
![]() WARNING
WARNING
WARNING indicates a hazardous situation which, if not avoided, could result in death or serious injury.
NOTICE
NOTICE is used to address practices not related to physical injury.
![]() CAUTION
CAUTION
CAUTION indicates a hazardous situation which, if not avoided, could result in minor or moderate injury.
SAFETY RULES
![]() CAUTION
CAUTION
Read the entire guide before installation or use.
![]() WARNING
WARNING
Connect only to water below 100 psi.
![]() CAUTION
CAUTION
Release pressure when not in use.
![]() WARNING
WARNING
The coupling contains lead, a chemical known to the state of California to cause cancer and birth defects or other reproductive harm.
WASH HANDS after handling.
This hose is not for drinking water use.
![]() CAUTION
CAUTION
Please consider carefully the appropriate method to be used in mounting this hose reel. Hardware is included for your convenience, but may not be suitable for all mounting conditions. Some surfaces like vinyl siding or stucco may require special considerations or additional hardware. Improper mounting can cause personal injury or property damage. If you are unsure, contact a home improvement professional.
![]() WARNING
WARNING
Water hose reel is not intended for use as a potable water source.
NOTICE
If you have questions regarding your hose reel, we can help. Please call our help line at 1-877-338-0999
PARTS
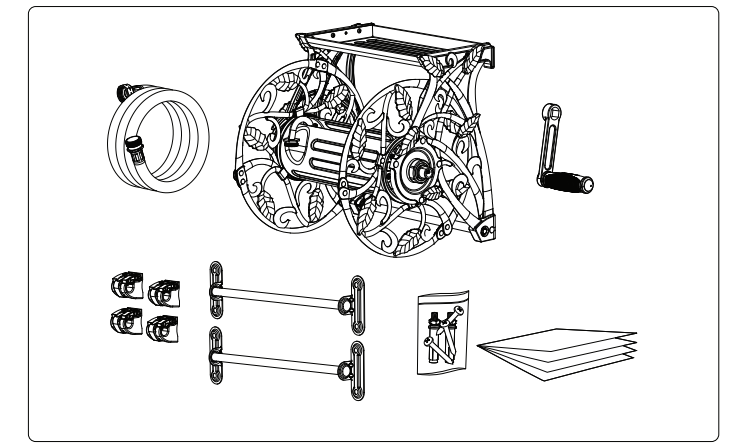
Parts Included
- 2 m (6.5 ft.) leader hose x 1
- Decorative aluminum hose reel x 1
- Crank handle x 1
- Mounting clips x 4
- Mounting rails x 2
- Hardware pack x 1
- Owner’s manual x 1
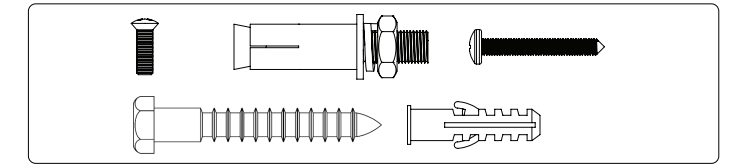
Hardware Included
- Crank screw x 1
- Masonry anchors x 8
- Lag screws x 8
- Phillips wood screws x 8
- Plastic anchors x 8

Recommended Tools (not included)
- Bubble level
- Pen or pencil
- Phillips-head screwdriver
- Stud finder
- Tape measure
- Drill
- Ø13 mm (1/2 in.) masonry drill bit
- Ø6 mm (¼ in.) drill bit
- Ø10 mm (3/8 in.) drill bit
- Adjustable wrench
- Hammer
Replacement Parts
For replacement parts, contact:
AddressChampion Power Equipment, Inc.Customer Service12039 Smith Ave.Santa Fe Springs, CA 90670 USAwww.championpowerequipment.com
Customer ServiceMon – Fri 8:30 AM – 5:00 PM (PST/PDT)Toll Free: 1-877-338-0999[email protected]Fax no.: 1-562-236-9429
Technical ServiceMon – Fri 8:30 AM – 5:00 PM (PST/PDT)Toll Free: 1-877-338-0999[email protected]24/7 Tech Support: 1-562-204-1188
ASSEMBLY
NOTICECarefully remove all parts from the packing box. Locate all hardware and components before installation.
NOTICEDo not completely tighten bolts until assembly is completed. For easier assembly, we recommend that two people assemble this product.
![]() WARNING
WARNING
Ensure there are no live electric wires or plumbing in the wall where you mount the hose reel.
![]() WARNING
WARNING
Always use eye-protection when using power tools.
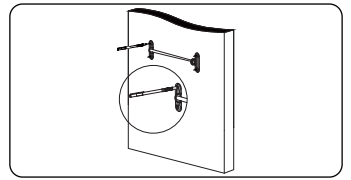
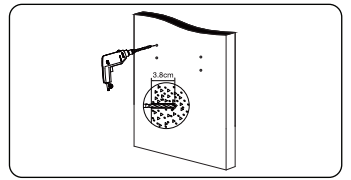
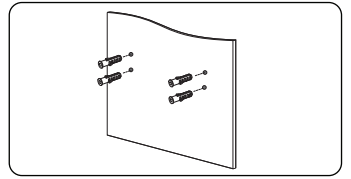
Install Mounting Rail to Masonry Wall
- Position the mounting rail on the wall at a convenient height.
- Use a bubble level to ensure the mounting rail is horizontal.
- Mark hole centre locations on the wall.

- Using a 13mm (½ in.) masonry drill bit, drill approximately 3.8cm (1.5 in.) deep centered on the marks you made in step 3.
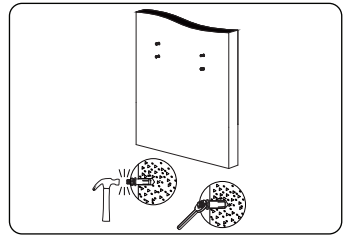
- Using a hammer, lightly tap the masonry anchors into the holes, being careful not to damage them, until fully seated. Remove the nuts and washers.
- Hang the mounting rail onto the exposed anchors.
- Replace the nuts and washers, tightening them with a wrench.
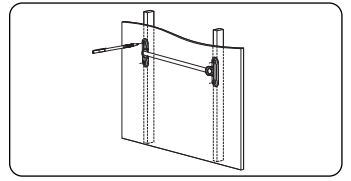
Install Mounting Rail to a Stud Wall
- Locate the studs using a stud finder.
- Position the mounting rail on the wall at a convenient height.
- Use a bubble level to ensure the mounting rail is horizontal.
- Mark hole centre locations on the wall.
- Using a 6mm (¼ in.) drill bit, drill pilot holes approximately 6.4cm (2.5 in.) deep centered on the marks you made in step 4.
- Hang the mounting rail with the lag screws.


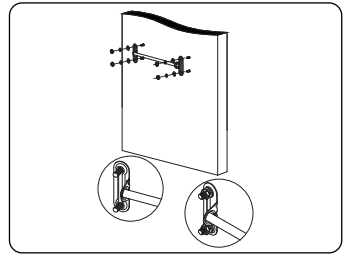
Install Mounting Clips
- Hang the hose reel on the mounting rail.
- Attach 2 mounting clips to the bottom rail, one at the far left and one at the far right.
- Mark the hole centre locations on the wall.
- Remove hose reel.
- Using a 10mm (3/8 in.) drill bit, drill pilot holes approximately 4.1cm (1 5/8 in.) deep centered on the marks you made in step 3.
- Push plastic anchors into the holes.
- Rehang hose reel.
- Drive screws into plastic anchors tightly with a screwdriver.


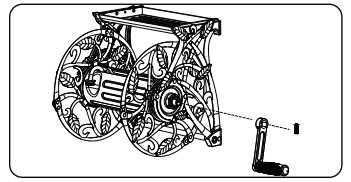
Crank Assembly
- Assemble the crank on to the hose reel as shown.
- Secure with the crank screw.
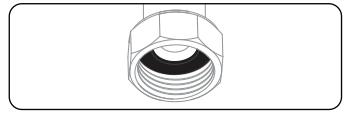
Attach the Leader Hose
- Inspect threaded female connector on hose reel, confirm that rubber O-ring is properly seated.
- Connect threaded male connector end of leader hose to threaded female fitting on hose reel spool.
- Tighten by hand until snug (clockwise).
- With adjustable pliers or wrench tighten fully.
Moving or Storing the Hose Reel
NOTICEFreezing temperatures can damage your hose and watering accessories. Always disconnect the connector hose and drain the water from the hose prior to freezing conditions.
NOTICEPrior to removing the hose reel for winter or moving the hose reel to a new location, always disconnect the connector hose and drain the water from the hoses before storing or moving.
To remove hose reel from wall cradle:
- Turn off water at house water spicket.
- Unscrew leader hose from water spicket (leader hose connects the hose reel to the house spicket).
- Unwind hose from hose reel.
- Unscrew garden hose from hose reel.
- Unlatch two lower clips.
- Lift hose reel upward and out to remove from cradle system.
For re-installation, follow instructions in reverse.
SPECIFICATIONS
Parts Diagram
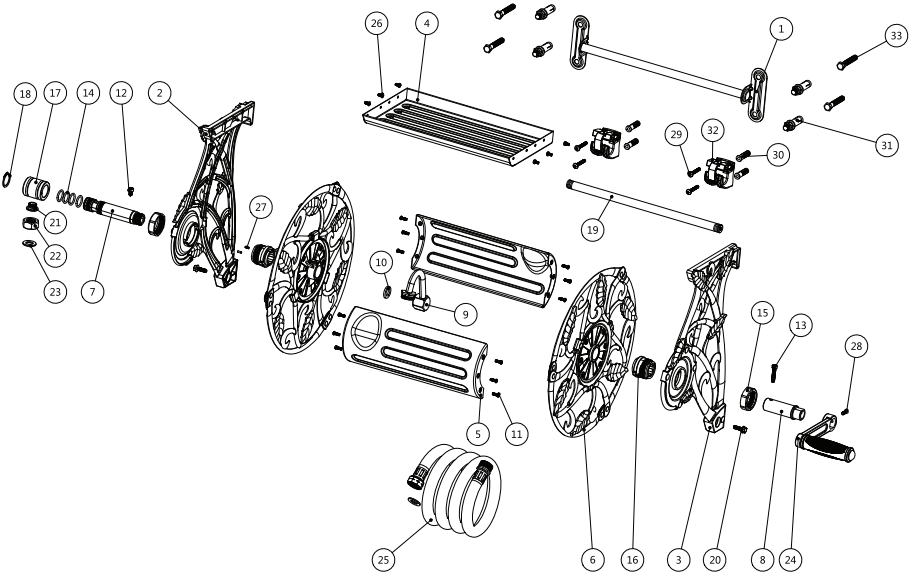
Parts List
| # | Part Number | Description | Qty |
| 1 | 09001019 | Mounting Rail Subassy | 2 |
| 2 | 09002120 | Left Frame | 1 |
| 3 | 09002121 | Right Frame | 1 |
| 4 | 09002122 | Accessory Shelf | 1 |
| 5 | 09001023 | Hub Half Subassy | 2 |
| 6 | 09002123 | Right/Left Plate | 2 |
| 7 | 09002127 | Long Axle | 1 |
| 8 | 09002128 | Short Axle | 1 |
| 9 | 90072635 | Outlet Fitting | 1 |
| 10 | 09003004 | Outlet Seal, Water System | 1 |
| 11 | 90022204 | Screw, M4 × 12, Pan, Cross | 12 |
| 12 | 90022605 | Set Screw, M6 × 12 | 1 |
| 13 | 90022301 | Screw, M6 × 30, Allen | 1 |
| 14 | 90052026 | O-Ring, 19 × 2 .65 | 4 |
| 15 | 09003001 | Swivel Cover | 2 |
| 16 | 09003002 | Right Plastic Bearing | 2 |
| 17 | 09002104 | Sleeve | 1 |
| 18 | 90032300 | Retainer Clip, 25 mm | 1 |
| 19 | 09001005 | Support Tube Subassy | 1 |
| # | Part Number | Description | Qty |
| 20 | 90022601 | Screw, M6 × 20, Hex Flange | 2 |
| 21 | 90072637 | Inlet Brass Screw | 1 |
| 22 | 90072636 | Inlet Brass Nut | 1 |
| 23 | 09003003 | Seal Washer | 3 |
| 24 | 09001021 | Crank Handle Subassy | 1 |
| 25 | 09001013 | Leader Hose Subassy | 1 |
| 26 | 90022202 | Screw, M4 × 8, Pan, Cross | 6 |
| 27 | 90102504 | Locating Pin | 2 |
| 28 | 90022504 | Screw, M5 × 15, Oval
Recess, Cross |
1 |
| 29 | 90022031 | Screw, Wood, St 4 .8 × 38 | 8 |
| 30 | 95024074 | Plastic Anchor | 8 |
| 31 | 95024046 | Masonry Anchor, 10 × 60 | 8 |
| 32 | 09001022 | Mounting Clip Subassy | 4 |
| 33 | 95024050 | Screw, Lag, St 9 .5 × 64, Hex | 8 |
References
[xyz-ips snippet=”download-snippet”]