
![]() TSR-310Handheld Touch Screen RemoteUser Guide
TSR-310Handheld Touch Screen RemoteUser Guide
The Crestron® TSR-310 handheld touch screen remote is a durable handheld remote with a 3 in. (76 mm) color touch screen, backlit buttons, voice control capability, and enhanced Wi-Fi® network wireless communications. Movement sensing wakes the remote when it is handled so that it is always ready to be used. The TSR-310 may be paired with a Crestron Home™ OS system and other Crestron control solutions for complete control over audio, video, lighting, shades, and other amenities.NOTE: The keypad backlight on the TSR-310 illuminates when the remote is handled, regardless of the ambient light level in the room.
Check the Box
| Item | Qty |
| TSR-310 | 1 |
| Power Pack, 5 Vdc 2.6 A, 100-240 Vac, PW-0526WU(P/N 2051024) | 1 |
| Tool, T-Pin (P/N 2050937) | 1 |
Charge the Battery
The TSR-310 ships in low power mode to conserve the battery charge.CAUTION: Do not attempt to remove the TSR-310 battery. If the TSR-310 battery must be replaced, refer to the TSR-310-BTP Installation Guide (Doc. 8227) at www.crestron.com/manuals.To charge the TSR-310 battery:
- Apply power to the charging dock using the power supply.
- Place the TSR-310 on the charging dock as shown in the illustration below.
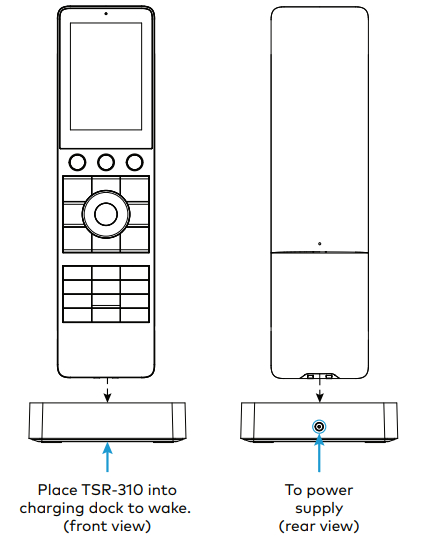
NOTE: Prior to operation, allow the remote to remain in its charging dock for up to three hours until fully charged.To check the battery level, access the setup screens as described in the “Configure Device Settings” section. The battery level is displayed in the top right corner of the main setup screen.
Configure Device Settings
Once the TSR-310 wakes from lower power mode, the following screen is displayed.

Tap SETUP to enter the built-in setup screens. The TSR-310 main setup screen is displayed.
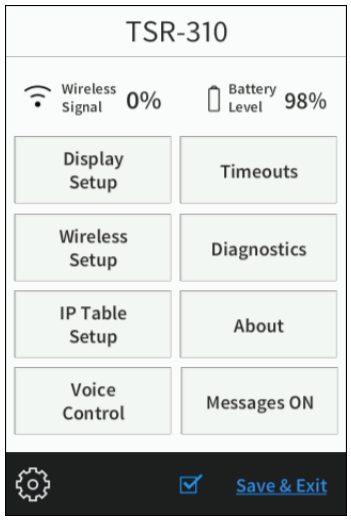
Configure device settings for the TSR-310 using the built-in setup screens or using the web configuration interface. For more information on configuring the device, refer to the TSR-310 Supplemental Guide (Doc. 8226) at www.crestron.com/manuals.
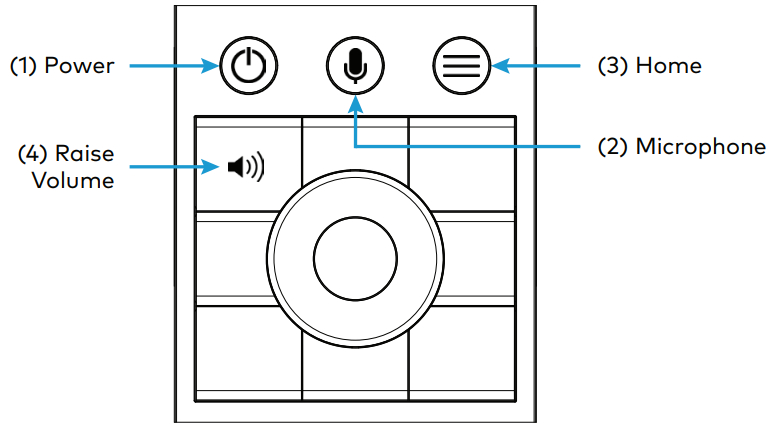
Access the Setup ScreensTo access the setup screens during normal operation, press the power (1), microphone (2), home (3), and raise volume (4) buttons twice, in this sequence, within five seconds.Refer to the illustration below for button locations on the TSR-310.
Access the Web Configuration InterfaceTo access the web configuration interface:
- Connect to a Wi-Fi network.
- Use the Device Discovery tool in Crestron Toolbox™ software to discover the device and its IP address on the network.
- Enter the device’s IP address into a web browser.
Set Up a Wi-Fi Connection
To configure the wireless access point (WAP) for optimal performance with the TSR-310, refer to the TSR-310 Wireless Access Points Configuration Guide (Doc. 8309) at www.crestron.com/manuals.
Select an Access PointTo set up a Wi-Fi network connection via the built-in setup screens:
- Tap Wireless Setup on the main setup screen to display the Wireless Setup screen.
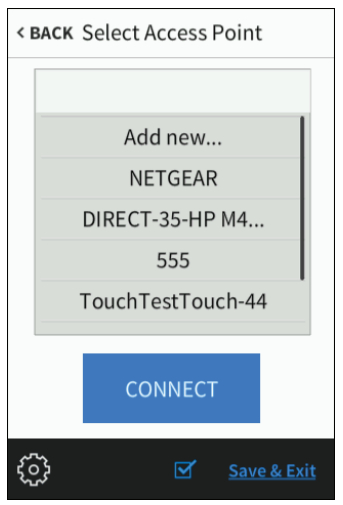
- Tap Connect to WAP on the Wireless Setup screen to display the Select Access Point screen.

- If the desired WAP is already listed, tap the access point, tap Connect, and then proceed to step 9. Otherwise, continue to add and connect to a new WAP.NOTE: The TSR-310 notifies the user if the desired WAP is not included in Crestron’s recommended WAP brands. For a complete list of recommended WAP brands, refer to the TSR-310 Supplemental Guide (Doc. 8226).
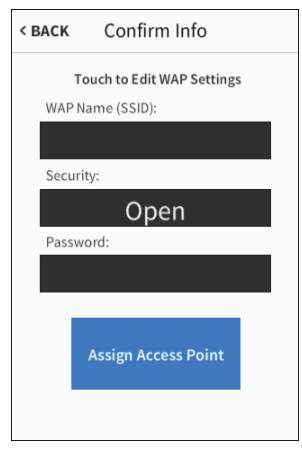
- Tap Add New in the list of access points, and then tap Connect. The Confirm Info screen is displayed.
- Tap the WAP Name (SSID) field on the Confirm Info screen, and enter the name of the access point using the on-screen keyboard.
- Tap SAVE to save the access point name or CANCEL to cancel editing the access point name.
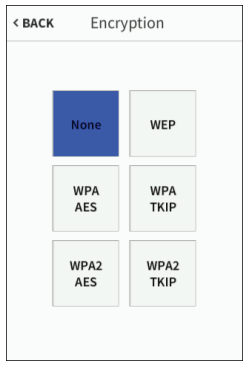
- Tap the Security field on the Confirm Info screen to display the Encryption screen.
- Tap the appropriate type of encryption used by the access point, and then tap < BACK.
- Tap the Password field on the Confirm Info screen, and enter the access point connection password using the on-screen keyboard.
- Tap SAVE to save the password or CANCEL to cancel editing the password.
- Once all fields have been entered, tap Assign Access Point on the Confirm Info screen to assign the access point. The WAPConnect screen is displayed, indicating the status of the wireless connection attempt.If the connection to the access point is successful, the WAP Connect screen indicates that the connection is active.
- Tap < DONE to return to the Wireless Setup screen.
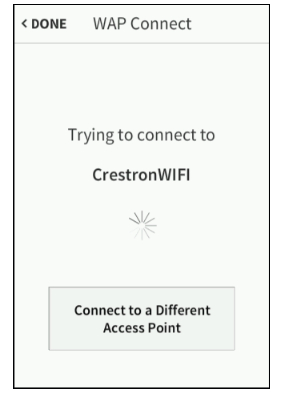 If the connection to the access point is successful, the WAP Connect screen indicates that the connection is active.
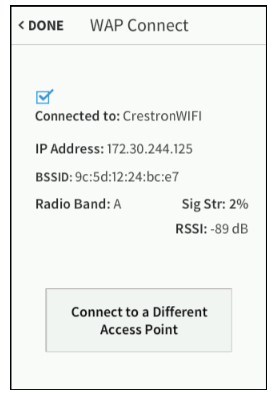
Configure IP SettingsTo configure IP settings for the TSR-310:
- Tap IP Settings on the Wireless Setup screen to display the IP Settings screen.
- Tap On or Off under DHCP Enabled to enable or disable using DHCP (dynamic host configuration protocol).
- If DHCP is enabled, proceed to step 7. If DHCP is disabled, tap Set Static IP Settings to display the Static IP screen.
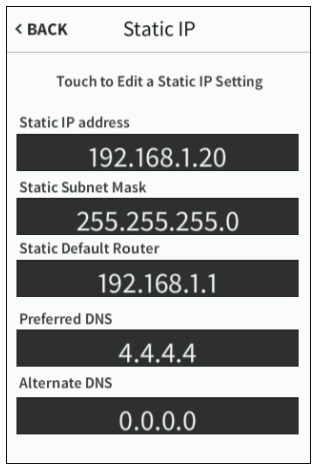
- Tap the fields under Static IP Address, Static Subnet Mask, Static Default Router, Preferred DNS, and Alternate DNS to the required information using the on-screen keypad.
- Tap SAVE to save the new entry or tap CANCEL to discard any changes.
- Tap < BACK on the Static IP screen to return to the IP Settings screen.
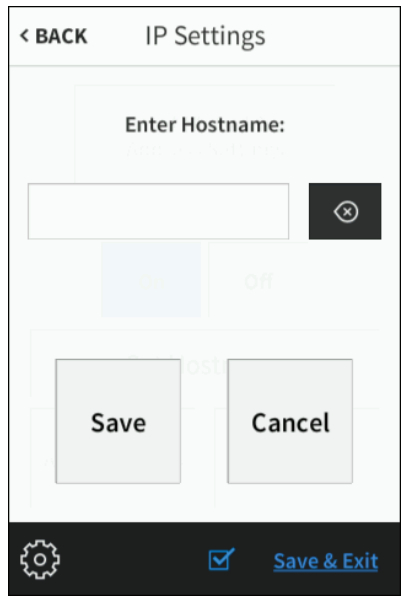
- Tap Set Hostname on the IP Settings screen to display a screen for entering the TSR-310 hostname.
- Tap the Enter Hostname field to enter the TSR-310 hostname using the pop-up keyboard.Tap SAVE to save the hostname or CANCEL to discard any changes.
- Once all IP settings have been configured, tap Apply Changes on the IP Settings screen to apply the new settings and to stay in setup mode.
- Tap Reboot to exit setup mode and to reboot the TSR-310.

Configure IP Table Settings
To set up a connection between the TSR-310 and a control system IP table:NOTE: This feature is not supported if the TSR-310 is in Performance UI mode, as the TSR-310 is paired to the CP4-R or MC4-R via the CrestronHome setup app.
- Tap IP Table Setup on the main setup screen. The IP Table Setup screen is displayed.
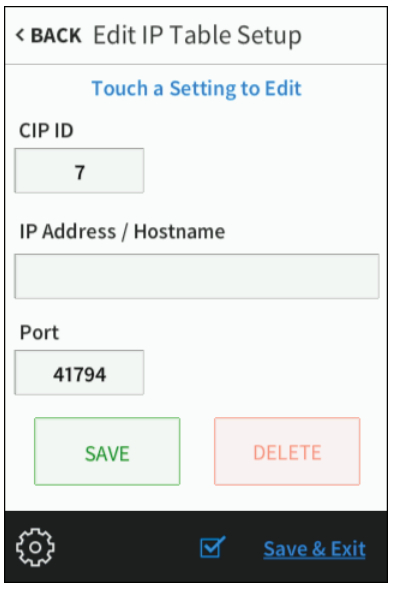
- Tap Add/Edit to add or edit an entry. The Edit IP Table Setup screen is displayed.
- Tap the text field below CIP ID to enter the appropriate CIP ID using the on-screen keypad.
- Tap SAVE to save the new entry or tap CANCEL to discard any changes and to return to the Edit IP Table Setup screen.
- Tap the text field under IP Address / Hostname to enter the control system IP address or hostname.NOTE: Depending on the network configuration, using a static IP address may yield slightly faster connections when the remote wakes.
- Tap SAVE to save the new entry or tap CANCEL to discard any changes and to return to the Edit IP Table Setup screen.
- Tap SAVE to save the current entry or tap DELETE to clear it.
- Tap < BACK to return to the main setup screen.

Update the Device
Firmware updates require a wired or wireless connection to Crestron Toolbox™ software.
- If the TSR-310 battery level is over 40%, firmware updates may be applied while the remote is off of the charging dock(undocked).
- If the TSR-310 battery level is below 40%, the TSR-310 must be placed on the charging dock prior to applying firmware updates.
To apply firmware updates via a wired connection, connect to the micro USB port inside the battery compartment. The USB port is accessible only while the TSR-310 is undocked.For more information on updating the firmware, refer to the TSR-310 Supplemental Guide (Doc. 8226) or the Crestron Toolbox help file.
Reset the Device
To reset the TSR-310, press and hold the power button (1) and the home button (3) simultaneously for eight seconds. Refer to the illustration in “Configure the Device Settings” on the previous page for button locations.If the TSR-310 does not reset after this procedure is performed, place the TSR-310 on the charging dock to initiate the reset.
Set the Operation Mode
Once the TSR-310 is connected to a valid Wi-Fi network, the following screen is displayed.
The TSR-310 may be set up to run the built-in Performance UI software for controlling a Crestron Home OS system or set up to run a custom Smart Graphics® technology project.
- To use the built-in Performance UI software, pair the TSR-310 to an existing Crestron Home OS system via the Crestron Home setup app. For more information, refer to the Performance UI for TSR-310 Operations Guide (Doc. 8410) atwww.crestron.com/manuals.
- To use a custom Smart Graphics project, upload the custom project to the TSR-310 using Crestron Toolbox software. For more information, refer to the Crestron Toolbox help file.
Set Up Voice Services
Voice services for the TSR-310 allow the user to control various device functions using voice commands.
- For instructions on configuring voice services via a connected control system, refer to the TSR-310 Supplemental Guide(Doc. 8226).
- For instructions on configuring voice services via the Performance UI software, refer to the Performance UI for TSR-310 Operations Guide (Doc. 8410).
For Additional Information
Scan or click the QR codes for detailed product information and to view instructional videos showing various setup procedures.

https://www.crestron.com/Products/Control-Surfaces/Remotes/Programmable-Remotes/TSR-310
 https://vimeo.com/album/4939476
Compliance and LegalRegulatory Model: TSR-310As of the date of manufacture, the product has been tested and found to comply with specifications for CE marking.
 Federal Communications Commission (FCC) Compliance StatementThis device complies with part 15 of the FCC Rules. Operation is subject to the following conditions: (1) This device may not cause harmful interference and (2) this device must accept any interference received, including interference that may cause undesired operation. CAUTION: Changes or modifications not expressly approved by the manufacturer responsible for compliance could void the user’s authority to operate the equipment.
NOTE: This equipment has been tested and found to comply with the limits for a Class B digital device, pursuant to part 15 of the FCC Rules. These limits are designed to provide reasonable protection against harmful interference in a residential installation. This equipment generates, uses, and can radiate radio frequency energy and, if not installed and used in accordance with the instructions, may cause harmful interference to radio communications. However, there is no guarantee that interference will not occur in a particular installation. If this equipment does cause harmful interference to radio or television reception, which can be determined by turning the equipment off and on, the user is encouraged to try to correct the interference by one or more of the following measures:
- Reorient or relocate the receiving antenna.
- Increase the separation between the equipment and receiver.
- Connect the equipment into an outlet on a circuit different from that to which the receiver is connected.
- Consult the dealer or an experienced radio/TV technician for help.
Industry Canada (IC) Compliance StatementCAN ICES-3 (B)/NMB-3(B)
Crestron product development software is licensed to Crestron dealers and Crestron Service Providers (CSPs) under a limited non-exclusive, non-transferable Software Development Tools License Agreement. Crestron product operating system software is licensed to Crestron dealers, CSPs, and end-users under a separate End-User License Agreement. Both of these Agreements can be found on the Crestron website atwww.crestron.com/legal/software_license_agreement.The product warranty can be found at www.crestron.com/warranty.
The specific patents that cover Crestron products are listed at www.crestron.com/legal/patents.Certain Crestron products contain open-source software. For specific information, please visit www.crestron.com/opensource.Crestron, the Crestron logo, Crestron Home, Crestron Toolbox, and Smart Graphics are either trademarks or registered trademarks of Crestron Electronics, Inc., in the United States and/or other countries. Wi-Fi is either a trademark or a registered trademark of Wi-Fi Alliance in the United States and/or other countries. Other trademarks, registered trademarks, and trade names may be used in this document to refer to either the entities claiming the marks and names or their products. Crestron disclaims any proprietary interest in the marks and names of others. Crestron is not responsible for errors in typography or photography. ©2020 Crestron Electronics, Inc.
 report this ad
![]()
Crestron Electronics, Inc.15 Volvo Drive, Rockleigh, NJ 07647Tel: 888.CRESTRONFax: 201.767.7576www.crestron.comQuick Start – Doc. 8225E(2053076) 06/01/20Specifications are subject to change without notice.
[xyz-ips snippet=”download-snippet”]