![]()
CB2 SystemQuick Start Guide
Getting Started
This Quick Start Guide is a basic reference for information on setting up your CB2 wireless intercom system with the minimum equipment required for wireless communication. For complete operation instructions, see the CB2 System Operating Manual or the CB2 System Online Help available at plianttechnologies.com.
At a minimum, you will need:
- 1 CB2 BaseStation
- Up to 6 CRP-12 Radio Packs (RPs) with charged batteries
- 2 headsets to test communication
Plan your coverage area.Before installation begins, it is a good idea to plan your coverage area so that equipment is positioned in the best possible location. Here are some tips when planning your coverage area:
- Map out the site and identify the most critical areas where communication is needed.
- Locate antenna(s) in open spaces and avoid obstructions (especially metal).
- If using Omni-directional antennas, position antennas in center of the coverage area and as high as possible.
Position your BaseStation.
A. Place the BaseStation on a flat, dry surface, or in a desired rack-mounted location (rack screws not included). Wherever it is placed, ensure that the air input and output sections on the sides of the BaseStation are not restricted.

B. Connect the BaseStation to a compatible power source using provided power supply but do not turn on power yet.C. Attach the provided Omni-directional antenna to the BaseStation.Note: If using directional antennas (where legal), mount them on the edge of the coverage area and point antennas across the coverage area. Find more antenna positioningrecommendations in the CB2 System Operating Manual and Online Help.Note: Up to two BaseStations, or a BaseStation and a separate CrewCom system can be synchronized to co-exist when collocated. When possible, make a sync connection into both systems prior to powering on those systems. Find more sync connection instructions in the CB2 System Operating Manual or Online Help.
Power on the BaseStation.
A. Power on the BaseStation via its power switch.B. Wait for the BaseStation to power on. It will display a progress bar during the startup process. Once the startup is complete, the home screen will display on the front of the BaseStation.
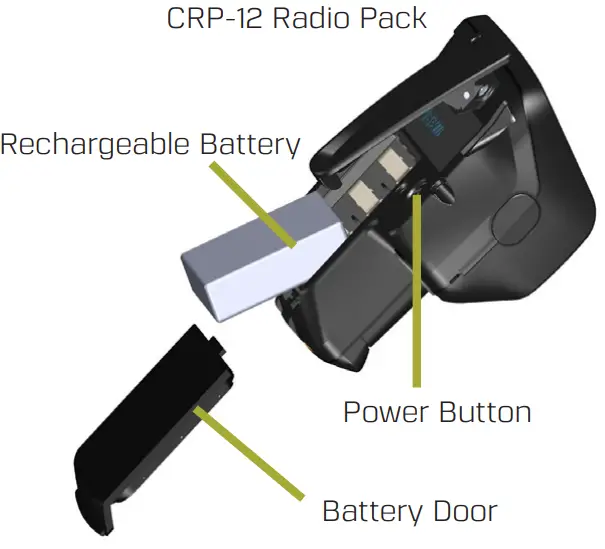
Install Radio Packs’ (RPs’) batteries.
A. Hold the RP at about a 45-degree angle, pointing the bottom end down. Then, depress and hold the RP’s belt clip down.B. Lift opens the battery door and removes it.C. While still holding the RP at a 45-degree angle and depressing the belt clip, install a fully charged Pliant Lithium-Polymer rechargeable battery or three AA batteries.D.Place battery door back on the RP, making sure to align and insert its tab at the top first, and then secure the door by pressing until its magnet engages and door seals shut.Note: RPs are powered with one Lithium-Polymer rechargeable battery for over 9 hours of operation, or they may be powered with three AA alkaline batteries for up to 5 hours of operation.
Pair the RPs.
A. Connect a USB-to-Micro-USB cable from the BaseStation to the RP (the micro end goes into the RP’s USB port beneath its rubber port cover). The RP will power on by itself (if not already on).

B. Follow the prompts that display on the BaseStation LCD.i. Your RP must match the system firmware version. The system will check that the RP firmware version is compatible. (If it is not, disconnect the RP and update its firmware using the Firmware Updater Application and connect to your PC.)ii. If the firmware is compatible, the pairing process will automatically continue.C. Wait for the RP settings to load. The BaseStation LCD will display a “Pairing Complete” message and the RP’s name (e.g., “Pack 01”) when finished. RPs will be named in the order they are paired.D. Disconnect the USB cable from the RP; it will power off automatically after a few seconds.E. Turn the RP back on and wait for it to log in to the system. When an RP is logged in, it will display on the BaseStation’s home screen. The RP is ready for use.F. Repeat steps 4A–4E until every RP is paired. A maximum of six RPs can be paired to each BaseStation.
Connect and configure hardwire ports (optional).
Always confirm that the wired intercom system and the CB2 wireless system are functioning properly separately before connecting them together.
A. Configure the intercom settings for either 2-Wire or 4-Wire connection by opening the BaseStation’s menu and navigating to Wired Settings and then Intercom Settings. Configurable settings include Intercom Type, Mic Kill (2-Wire only), Call (2-Wire Only), Echo Cancellation (ECAN), and audio levels. The 2-Wire and 4-Wire ports on a BaseStation cannot be used simultaneously.Note: If you are not connecting a hardwire system, be sure the 2-Wire Type is set to OFF in this menu. Failure to do so may result in termination-related issues and poor audio.i. If connecting a 2-wire intercom system, connect it to the 2-wire intercom port(s) on the rear of the BaseStation via 3-pin XLR cables/connectors.Initiate auto-null for the appropriate 2-Wire ports via the Wired Settings > Auto Null BaseStation menu option.ii. If connecting a 4-wire intercom system, connect it to the 4-wire intercom port(s) on the rear of the BaseStation via ethernet RJ-45 cables/connectors.B. Adjust in/out levels between the CB2 system and the wired intercom system as needed.Note: In addition to 2-Wire or 4-Wire, connections such as Stage Announce Audio, Stage Announce Relay, Auxiliary In, and Auxiliary Out can be made to the BaseStation.For more information on these features, please refer to the CB2 System Operating Manual or Online Help.

Start communicating.
A. Connect a headset to each RP.B. Adjust the headset listening volume by turning the volume control knob.C. Press the Channel Selection button to switch between enabled channels for the RP.(RPs can be set up to access both Channels A and B (but only one at a time), only Channel A, or only Channel B.)D. Press the Talk button to talk to others on the selected channel.E. Customize the RP’s settings further by pressing and holding the RP menu button AND BaseStation menu button simultaneously for 3 seconds. That RP’s menu mode will beenabled, and you can change its settings from the BaseStation menu.
 report this ad
CRP-12 Radio PackTop View www.plianttechnologies.comPhone: +1.334.321.1160Reference: D0000391_ACopyright ©2020 Pliant Technologies, LLC.
References
[xyz-ips snippet=”download-snippet”]