![]()
Casserole Crock™ Slow Cooker
Owner’s GuideRead and Keep These Instructionswww.crockpot.com
Congratulations on yourCrock-Pot® Casserole Crock™Slow Cooker purchase.
Congratulations on your Crock-Pot® Casserole Crock™ Slow Cooker purchase.
You will be amazed how often you will find yourself using this appliance for so many different dishes. Start the day with a delicious breakfast casserole that you can cook overnight – while you sleep! Or prep ingredients in the morning and come home to a hot, home-cooked, one-dish meal you can serve your family at the end of the day.And, it’s not just for casseroles! Make a pasta dish for a pot-luck party or a tailgate dessert for the game. There are so many different recipes available for slow cooker casseroles and entertaining dishes! We hope you enjoy the ones we’ve included, and you can find many more by searching online or in slow cooker recipe books.
We’ve hand-picked some great recipes and added some helpful tips to get you started with cooking in your Casserole Crock™. Find them in the back of this manual.
IMPORTANT SAFEGUARDS
When using electrical appliances, basic safety precautions should always be followed to reduce the risk of fire, electric shock, and/or injury to persons including the following:
- Read all instructions before using this product.
- his appliance generates heat during use. Do not touch hot surfaces. Use handles or knobs.
- To protect against electric shock, do not place or immerse cord, plugs, or appliance in water or other liquid.
- This appliance is not to be used by children or by persons with reduced physical, sensory or mental capabilities.
- Close supervision is necessary when any appliance is used near children. Children should not play with the appliance.
- Unplug from outlet when not in use, before putting on or taking off parts, and before cleaning. Allow cooling before putting on or taking off parts, and before cleaning. To disconnect, turn any control to OFF, then unplug power cord from outlet. Do not disconnect by pulling on cord.
- Do not operate any appliance with a damaged cord or plug or after the appliance malfunctions, or has been damaged in any manner. Do not attempt to replace or splice a damaged cord. Return appliance to the manufacturer (see warranty) for examination, repair or adjustment.
- The use of accessory attachments not recommended by the appliance manufacturer may cause injuries.
- Do not use outdoors or for commercial purposes.
- Do not let cord hang over edge of table or counter, or touch hot surfaces.
- Do not place on or near wet surfaces, or heat sources such as a hot gas or electric burner, or in a heated oven.
- Extreme caution must be used when moving an appliance containing hot oil or other hot liquids.
- The heating base is subject to residual heat from cooking cycle. Do not touch heating base immediately after removing stoneware. Allow to cool before handling.
- Use caution when opening the lid during or after a cooking cycle. Escaping steam can cause burns.
- Do not use appliance for other than intended use. Misuse can cause injuries.
- Intended for household countertop use only. Keep 6 inches (152 mm) clear from the wall and on all sides. Always use appliance on a dry, stable, level surface.
- Avoid sudden temperature changes, such as adding refrigerated foods or cold liquids into a heated pot.
- The slow cooker lid is made of tempered glass. Always inspect the lid for chips, cracks or any other damage. Do not use the glass lid if it is damaged, as it may shatter during use.
- CAUTION: To protect again electrical shock and product damage, do not cook directly in the heating base. Cook only in the stoneware provided.
- WARNING: Spilled food can cause serious burns. Keep appliance and cord away from children. Never drape cord over edge of counter, never use outlet below counter, and never use with an extension cord. For appliances with locking lids:
- Never attempt to lift or carry this appliance by the lid handle. Always use the handles located at each side on the base of the appliance.
- Do not lock the lid while cooking. Locking the glass lid while cooking may lead to glass breakage, which can cause injuries.
SAVE THESE INSTRUCTIONS HOUSEHOLD USE ONLY
NORTH AMERICAN MODELS WITH POLARIZED PLUGS: POLARIZED PLUGThis appliance has a polarized plug (one blade is wider than the other). To reduce the risk of electric shock, this plug is intended to fit into a polarized outlet only one way. If the plug does not fit fully into the outlet, reverse the plug. If it still does not fit, contact a qualified electrician. Do not attempt to modify the plugin anyway. If the plug fits loosely into the AC outlet or if the AC outlet feels warm do not use that outlet.
POWER CORD INSTRUCTIONS:A short power-supply cord is used to reduce the risk resulting fromit being grabbed by children, becoming entangled in, or trippingover a longer cord.
NOTICES:
- Some countertop and table surfaces are not designed to withstand the prolonged heat generated by certain appliances. Do not set the heated unit on a finished wood table. We recommend placing a hot pad or trivet under your slow cooker to prevent possible damage to the surface.
- During initial use of this appliance, some slight smoke and/or odor may be detected. This is normal with many heating appliances and will not recur after a few uses.
- Please use caution when placing your stoneware on a ceramic or smooth glass cooktop stove, countertop, table, or another surface. Due to the nature of the stoneware, its rough bottom may scratch some surfaces if caution is not used. Always place heat-resistant protective padding under the stoneware before setting it on a table, countertop, or another surface.
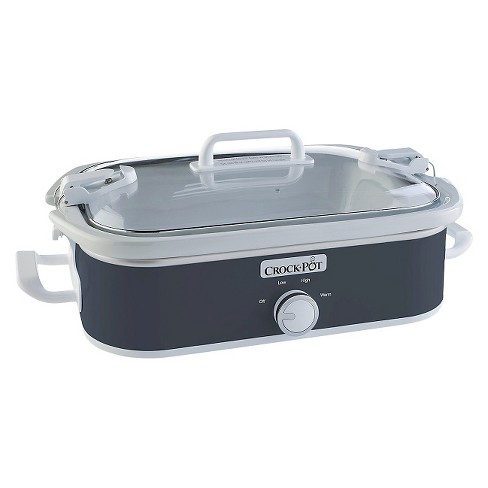
Change the way you ‘role.Enjoy delicious casseroles, lasagnas, desserts and more.The Crock-Pot® Casserole Crock™ Slow Cooker will cook all day while you’re away. And can be easily be taken on the go to parties and potlucks.YOUR CROCK-POT® CASSEROLE CROCK™ SLOW COOKER COMPONENTS

HOW TO USE YOUR CROCK-POT® CASSEROLE CROCK™ SLOW COOKER
NOTE: This unit is designed to cook recipes low and slow. We recommend using casserole, lasagna, dessert and other recipes that are meant to be slow cooked over a longer period of time.
- Place the stoneware into the heating base, add your ingredients into the stoneware and cover with the lid.NOTE: Unit should not be in the locked position while cooking.
- Plug in your Crock-Pot® Casserole Crock™ Slow Cooker and select the temperature setting. Refer to your specific recipe for precise cook time.NOTE: WARM is ONLY for keeping already cooked food warm.DO NOT cook on the WARM setting. We do not recommend using the WARM setting for more than 4 hours.
- When cooking is done, unplug your Casserole Crock™ and allow it to cool before cleaning.
USAGE NOTES:
- If you suspect that the power has gone out, the food may be unsafe to eat. If you are unaware of how long the power was out, we suggest you discard the food inside.
- For recipes that require a range of times, select the time closest to the setting on your slow cooker. For example, to cook a recipe calling for a cooking time of 7 to 9 hours on LOW, cook for 8 hours.
- To avoid over or under-cooking, always fill the stoneware ½ to ¾ full and conform to recommended cook times.
- Do not overfill stoneware. To prevent spillover, do not fill stoneware higher than ¾ full.
- Always cook with the lid on for the recommended time. Do not remove the lid during the first two hours of cooking to allow the heat to build up efficiently.
- Always wear oven mitts when handling the lid or stoneware.
- Unplug when cooking is done and before cleaning.
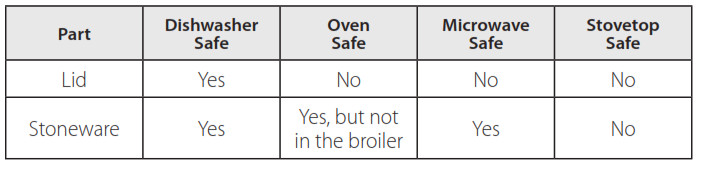
- Removable stoneware is ovenproof and microwave safe. Do not use removable stoneware on gas or electric burner or under broiler. Refer to chart on following page.
- The Casserole Crock™ stoneware was designed to use for cooking inside the heating base, and then be removed and transferred directly to the table for serving. Use a trivet to protect your countertop or table when serving from the stoneware.
- The removable stoneware is also oven-safe. If desired, you can cook your recipe in the oven, and then transfer it to the heating base to take on the go or to keep warm while serving.
HOW TO USE YOUR CROCK-POT®CASSEROLE CROCK™ SLOW COOKER
HOW TO CLEAN YOURCROCK-POT® CASSEROLE CROCK™ SLOW COOKER
- ALWAYS turn your slow cooker off, unplug it from the electrical outlet, and allow it to cool before cleaning.
- The lid and stoneware can be washed in the dishwasher or with hot, soapy water. Do not use abrasive cleaning compounds or scouring pads. A cloth, sponge, or rubber spatula will usually remove residue. To remove water spots and other stains, use a non-abrasive cleaner or vinegar.
- As with any fine ceramic, the stoneware and lid will not withstand sudden temperature changes. Do not wash the stoneware or lid with cold water when they are hot.
- The outside of the heating base may be cleaned with a soft cloth and warm, soapy water. Wipe dry. Do not use abrasive cleaners.CAUTION: Never immerse the heating base in water or other liquid.
- No other servicing should be performed.
- This appliance has no user-serviceable parts. Any servicing beyond that described in the Cleaning Section should be performed by an Authorized Service Representative only. See Warranty Section.
PREPARING YOUR CROCK-POT®CASSEROLE CROCK™ SLOW COOKER FOR USE
Before you use your Casserole Crock™, remove all packaging components and wash the lid and stoneware in warm, soapy water and dry thoroughly.
LOCKING THE LID1. Place Lid on Stoneware. Hook Wire Clip onto Clip Hook (Figure 1). Flip Latch around to top (Figure 2) and push Latch down to securely lock (Figure 3). Repeat steps on another side of the lid.

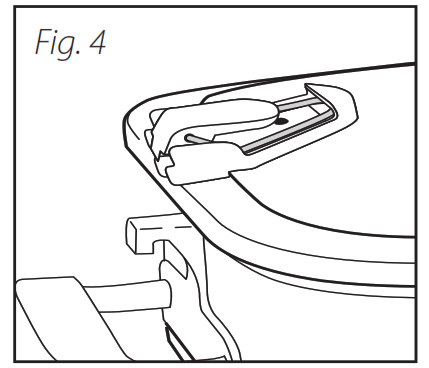
UNLOCKING THE LID1. Flip the latch up and around to loosen the Wire Clip. Clear the Wire Clip from the Clip Hook. Repeat steps on other side of the lid.2. Remove the Lid.3. Wire should remain in Latch base when unit is unlocked (Figure 4).
CAUTION: NEVER attempt to lift or carry your Crock-Pot® Casserole Crock™ slow cooker by the lid handle. Always use the handles located at each side on the base of the unit.
SERVICE INSTRUCTIONS
- Do NOT attempt to repair or adjust any electrical or mechanical functions on this unit. Doing so will void the Warranty.
- If you need to exchange the unit, please return it in its original carton, with a sales receipt, to the store where you purchased it. If you are returning the unit more than 30 days after the date of purchase, please see the enclosed Warranty.
- If you have any questions or comments regarding this unit’s operation or believe any repair is necessary, please call our Consumer Service Department at 1-800-323-9519 or visit our website at www.crock-pot.ca.
1 YEAR LIMITED WARRANTY
Sunbeam Products, Inc. doing business as Jarden Consumer Solutions or if in Canada, Sunbeam Corporation (Canada) Limited, doing business as Jarden Consumer Solutions (collectively “JCS”) warrants that for a period of one year from the date of purchase, this product will be free from defects in material and workmanship. JCS, at its option, will repair or replace this product or any component of the product found to be defective during the warranty period. Replacement will be made with a new or remanufactured product or component. If the product is no longer available, replacement may be made with a similar product of equal or greater value. This is your exclusive warranty. Do NOT attempt to repair or adjust any electrical or mechanical functions on this product. Doing so will void this warranty. This warranty is valid for the original retail purchaser from the date of initial retail purchase and is not transferable. Keep the original sales receipt. Proof of purchase is required to obtain warranty performance. JCS dealers, service centers, or retail stores selling JCS products do not have the right to alter, modify or any way change the terms and conditions of this warranty.
This warranty does not cover normal wear of parts or damage resulting from any of the following: negligent use or misuse of the product, use on improper voltage or current, use contrary to the operating instructions, disassembly, repair or alteration by anyone other than JCS or an authorized JCS service center. Further, the warranty does not cover: Acts of God, such as fire, flood, hurricanes and tornadoes.
What are the limits on JCS’s Liability?JCS shall not be liable for any incidental or consequential damages caused by the breach of any express, implied or statutory warranty or condition.
Except to the extent prohibited by applicable law, any implied warranty or condition of merchantability or fitness for aparticular purpose is limited in duration to the duration of the above warranty.JCS disclaims all other warranties, conditions or representations, express, implied, statutory or otherwise.JCS shall not be liable for any damages of any kind resulting from the purchase, use or misuse of, or inability to use the product including incidental, special, consequential or similar damages or loss of profits, or for any breach of contract, fundamental or otherwise, or for any claim brought against purchaser by any other party.Some provinces, states or jurisdictions do not allow the exclusion or limitation of incidental or consequential damages or limitations on how long an implied warranty lasts, so the above limitations or exclusion may not apply to you. This warranty gives you specific legal rights, and you may also have other rights that vary from province to province, state to state or jurisdiction to jurisdiction.How to Obtain Warranty ServiceIn the U.S.A.If you have any questions regarding this warranty or would like to obtain warranty service, please call 1-800-323-9519 and a convenient service center address will be provided to you.In CanadaIf you have any questions regarding this warranty or would like to obtain warranty service, please call 1-800-323-9519 and a convenient service center address will be provided to you.In the U.S.A., this warranty is offered by Sunbeam Products, Inc. doing business as Jarden Consumer Solutions located at 2381 Executive Center Drive, Boca Raton, Florida 33431. In Canada, this warranty is offered by Sunbeam Corporation (Canada) Limited, doing business as Jarden Consumer Solutions, located at 20 B Hereford Street, Brampton, Ontario L6Y 0M1. If you have any other problem or claim in connection with this product, please call our Consumer Service Department.PLEASE DO NOT RETURN THIS PRODUCT TO ANY OF THESE ADDRESSES OR TO THE PLACE OF PURCHASE.To register your product, please visit us online at www.crock-pot.ca.
TIPS
- When cooking dishes like bread pudding, strata and pasta, push pieces of bread and pasta into liquid mixture to moisten before cooking.
- Unless the recipe instructs to do so, do not lift the lid during cooking. Significant heat can be lost and the cooking will be delayed.
- For a crisper or more browned top, turn off slow cooker when cooking is complete and remove casserole from the base. Transfer to a preheated oven (350 to 400°F) and bake for 10 to 15 minutes.
- Allow casserole dishes to stand for 10 to 15 minutes before serving, allowing the food to set up before cutting or scooping.
- Coat sides and bottom of casserole dish with cooking spray or butter before cooking to make clean-up easier.
RECIPES
BBQ Baby Back Ribs(Serves 6)Ingredients:2 racks pork back ribs (2-1/2 to 3 pounds each), cut into 3 to 4 rib portions Favorite barbecue sauce, warmed Spice Rub:3 tablespoons packed brown sugar1 tablespoon each salt, ground cumin, paprika, and chili powder2 teaspoons each onion powder and black pepper1 teaspoon granulated garlic1/2 teaspoon cayenne pepperDirections:1. Mix spice rub ingredients. Sprinkle on all surfaces of ribs.2. Place ribs in the removable stoneware of the Casserole Crock™, arranging them so the lid will be able to close completely. (Note that it is not necessary to add water or sauce. The ribs will still turn out tender and delicious).3. Cover; cook on LOW for 7 to 8 hours or on HIGH for 5 to 6 hours, or until ribs are tender. Serve or brush ribs with barbecue sauce.
Bread Pudding with Warm Butterscotch Sauce(Serves 12)
Ingredients:1 pound challah or other egg bread, cut into 1-in. cubes (about 11 cups)Butter for greasing casserole7 large egg yolks2 whole large eggs3 cups whole milk1-1/2 cups heavy whipping cream3/4 cup granulated sugar2 teaspoons vanilla extract1 teaspoon ground cinnamon1/4 teaspoon ground nutmegButterscotch Sauce (recipe below)
Directions:
- Preheat oven to 350°F. To toast bread cubes, arrange evenly in a large shallow baking pan. Bake 10 to 12 minutes or until lightly browned. Cool slightly.
- Generously spray the removable stoneware of the Casserole Crock™ with cooking spray or butter. Fill with bread cubes.
- Whisk the remaining ingredients in a large bowl. Pour over bread; press bread into egg mixture to moisten.
- Cover; cook on LOW for 3 to 4 hours or on HIGH for 2-1/2 to 3 hours, or until a thermometer reads 170°F. Turn off the casserole slow cooker and remove the stoneware from base.
- Preheat oven to 400°F. Bake bread pudding 10 to 15 minutes or until top is lightly toasted. Cool slightly. Serve with warm Butterscotch Sauce.
Butterscotch Sauce:Combine 1 cup packed brown sugar, 1 cup heavy whipping cream and 6 tablespoons butter (cubed) in a small saucepan.Bring to a boil, stirring frequently.Reduce heat to medium; cook 5 minutes, stirring occasionally.Remove from heat; stir in 1-1/2 teaspoons vanilla extract.(Makes 1-2/3 cups)
Hash Brown Breakfast Casserole(Serves 12)Ingredients:1 package (30 ounces) frozen shredded hash brown potatoes1 package (9.6 ounces) fully cooked breakfast sausage links, sliced 1/2 inch thick1 cup chopped onion (about 1 medium)1 cup chopped red bell pepper (about 1 medium)2 cups (8 ounces) shredded American and Cheddar cheese blend12 large eggs1 cup heavy whipping cream or half-and-half1 teaspoon salt1/2 teaspoon pepper1/2 cup thinly sliced green onions
Directions:1. Generously spray the removable stoneware of the Casserole Crock™ with cooking spray or butter.2. Layer half of each of the first five ingredients in the removable stoneware; repeat layers.3. Whisk eggs, cream, salt and pepper in a large bowl. Pour over top.4. Cover; cook on LOW for 4-1/2 to 5-1/2 hours or on for HIGH 3-1/2 to 4-1/2 hours, or until a thermometer reads 160°F.5. Sprinkle casserole with green onions. Let stand 5 minutes before serving.Tip: One pound bulk pork sausage, cooked and drained, may be used in place of fully-cooked sausage links.
Penne Mac & Cheese(Serves 8-10)Ingredients:2 jars (15 to 16 ounces each) Alfredo pasta sauce2 cups milk1 package (16 ounces) uncooked penne pasta3 cups (12 ounces) shredded cheddar cheese, divided Garlic Crumb Topping (recipe below) , optional
Directions:
- Mix Alfredo sauce and milk in a large bowl. Stir in uncooked pasta and 2 cups cheese.
- Generously spray the removable stoneware of the Casserole Crock™ with cooking spray or butter and transfer the ingredients in.
- Cover; cook on LOW for 3 to 4 hours or on HIGH for 2-1/2 to 3 hours.
- Sprinkle top with remaining cheese. Let stand, covered, 5 minutes before serving.
- If topping with crumbs, turn off slow cooker; remove the stoneware from base. Preheat oven to 400°F. Sprinkle Mac & Cheese with Garlic Crumb Topping. Bake 10 to 15 minutes or until topping is lightly toasted.
Garlic Crumb Topping:Toss 1 cup panko crumbs with 2 tablespoons melted butter and 1 clove minced garlic in a bowl. (Makes 1 cup)
Sausage & Cheese Lasagna(Serves 12)Ingredients:1 container (15 ounces) ricotta cheese3 cups (12 ounces) shredded mozzarella cheese, divided1/2 cup grated Parmesan cheese, divided1/4 cup chopped parsley1 large egg, lightly beaten1 teaspoon salt1/4 teaspoon pepper2 jars (24 ounces each) tomato and basil pasta sauce12 uncooked regular lasagna noodles1 pound bulk spicy Italian sausage, cooked and drainedDirections:
- Mix ricotta, 2 cups mozzarella, 1/4 cup Parmesan, parsley, egg, salt, and pepper in a medium bowl.
- Reserve 1 cup pasta sauce for serving; cover and refrigerate.
- Spread 1 cup pasta sauce onto bottom of removable stoneware. Layer with 1/3 of the noodles (breaking noodles to fit), half of the ricotta cheese mixture, half of the sausage, and 1 cup pasta sauce; repeat layers. Top with remaining noodles and remaining sauce, being sure to completely cover noodles with sauce.
- Cover; cook on LOW for 4 to 5 hours or on HIGH for 2-1/2 to 3 hours.
- Sprinkle lasagna with remaining cheeses. Let stand, covered, 5 minutes before serving. The warm reserved sauce in a microwave; serve with lasagna.
![]()
Casserole Crock™ Slow Cooker
© 2016 Sunbeam Products, Inc. doing business as Jarden Consumer Solutions. All rights reserved. Imported and distributed by Sunbeam Corporation (Canada) Limited, doing business as Jarden Consumer Solutions, 20B Hereford St., Brampton, Ontario L6Y 0M1. Sunbeam Products, Inc. is a subsidiary of Newell Brands Inc. (NYSE: NWL).
Crock Pot Casserole Crock Slow Cooker Manual – Crock Pot Casserole Crock Slow Cooker Manual –
[xyz-ips snippet=”download-snippet”]