
![]()
AIR PRO COOK & FRYINSTRUCTION MANUAL
MUSA
IMPORTANT SAFEGUARDS
When using electrical appliances, basic safety precautions should always be followed, including the following:
- READ ALL INSTRUCTIONS.
- Do not touch hot surfaces. Use handles or knobs.
- To protect against electrical shock, do not immerse the cord, plugs, or appliances in water or other liquid.
- This appliance is not intended for use by persons (including children) with reduced physical, sensory or mental capabilities, or lack of experienceand knowledge, unless they have been given supervision or instruction concerning use of the appliance by a person responsible for their safety.
- Close supervision is necessary when any appliance is used by or near children.
- Unplug from outlet when not in use and before cleaning. Allow cooling before putting on or taking off parts.
- Do not operate any appliance with a damaged cord or plug or after the appliance malfunctions or has been damaged in any manner. Bring it to a qualified technician for examination, repair, or electrical or mechanical» adjustment.
- The use of accessory attachments not recommended by the appliance manufacturer may cause injuries.
- Do not use outdoors.
- Do not let the cord hang over the edge of the table or counter, or touch hot surfaces.
- Do not place on or near a hot gas or electric burner, or in a heated oven.
- Extreme caution must be used when moving an appliance containing hot oil or other hot liquids.CAUTION: TO PROTECT AGAINST DAMAGE OR ELECTRIC SHOCK, DO NOT COOK IN THE BASE UNIT. COOK ONLY IN THE COOKING POT PROVIDED.
- Use extreme caution when removing the tray or disposing of hot grease.
- Do not clean with metal scouring pads. Pieces can break off the pad and touch electrical parts, creating a risk of electric shock.
- Plug the cord into the wall outlet.
- To disconnect, press the power button (
 ), then remove the plug from the wall outlet.
 - Do not use appliances other than intended use.
- Do not use a pressure plate, air fry grate, or cooking pot if dented or worn.WARNING: NEVER DEEP-FRY OR PRESSURE-FRY IN THE AIRPRO, REGARDLESS OF WHETHER THE LID IS ON OR OFF. THIS IS DANGEROUS, AND CAN CAUSE A FIRE AND SERIOUS DAMAGE.
- Intended for countertop use only.
- WARNING: SPILLED FOOD CAN CAUSE SERIOUS BURNS. KEEP APPLIANCES AND CORDS AWAY FROM CHILDREN. NEVER DRAPE CORD OVER EDGE OF COUNTER, NEVER USE OUTLET BELOW COUNTER, AND NEVER USE WITH AN EXTENSION CORD.
- ALWAYS USE A DETACHABLE HANDLE TO INSERT OR REMOVE AIR FRY GRATE OR PRESSURE PLATE INSERT
- Ensure filter and pressure release valve are free of food residue or debris.
- Never fill the cooking pot over the max fill line.
- Before placing the cooking pot into the base, ensure both pot and base are dry by wiping with a soft cloth.
- Always ensure the appliance is properly assembled before use.
- This appliance cooks under pressure. Improper use may result in scalding injury.Make certain the unit is properly closed before operating.
- When using the pressure plate, always ensure the pressure plate is installed and the lid is properly closed before operating.
- Do not cover the pressure release valve.
- Care should be taken when lifting the cooking pot from the base.
- When the removable cooking pot is empty do not heat it for more than 10 minutes, this may damage the cooking surface.
- When using the Sear/Sauté function always leave the lid in the open position.
- To avoid possible damage from steam, place the unit away from walls and cabinets during use.
- Never lift the unit by the lid side tabs.
- Never touch the exposed heating elements.
FOR HOUSEHOLD USE ONLY SAVE THESE INSTRUCTIONS
ADDITIONAL IMPORTANT SAFEGUARDS
CAUTION, HOT SURFACES: THIS APPLIANCE GENERATES HEAT AND ESCAPING STEAM DURING USE. PROPER PRECAUTIONS MUST BE TAKEN TO PREVENT THE RISK OF BURNS, FIRES OR OTHER INJURY TO PERSONS OR DAMAGE TO PROPERTY.
- A person who has not read and understood all operating and safety instructions is not qualified to operate this appliance. All users of this appliance must read and understand this instruction manual before operating or cleaning this appliance.
- If this appliance falls or accidentally becomes immersed in water, unplug it from the wall outlet immediately. DO NOT REACH INTO THE WATER!
- When using this appliance, provide adequate air space above and on all sides for air circulation. Do not operate this appliance while it is touching or near curtains, wall coverings, clothing, dish towels, or other flammable materials.
- Do not leave this appliance unattended during use.
- If this appliance begins to malfunction during use, immediately unplug the cord. Do not use or attempt to repair a malfunctioning appliance!
- The cord to this appliance should be plugged into a grounded 3-prong 120V electrical wall outlet.
- Do not use this appliance in an unstable position.
- Never use the cooking pot on a gas or electric cooktop or on an open flame.
- Always keep your hands and face away from the pressure release valve, when releasing the pressure.
- Never attempt to open the lid while cooking, or before the pressure has dropped. Do not attempt to bypass this safety feature by forcing the lid to open.
- Do not cover or block the valves.
- Do not touch the pot or lid except for the handle immediately after use. Whenever the product is in use, only touch the handle, do not touch the pot or lid.
- To avoid burns, allow the food to cool before tasting. The temperature of the food gets considerably hotter than with conventional cooking.
- Do not touch hot surfaces. Use oven gloves or a cloth when opening the lid or handling hot containers as hot steam will escape.
- Do not move the appliance while in use.
- Remove the plug from the electrical outlet when the appliance is not in use or before cleaning.
- Allow the appliance to cool down completely before undertaking any cleaning task.
- Do not touch the power cord, plug or any part of the appliance with wet hands.
- Do not place this appliance directly under kitchen wall cupboards when in use, as it produces steam. Avoid reaching over the appliance when it is in use.
- Do not use the appliance near or below combustible materials, e.g: curtains.
- To open rotate the knob on the lid counterclockwise to the ‘unlock’ position.
- Never use sharp objects inside the cooking pot as this will damage the non-stick coating.
- Do not use the unit for deep frying.
NOTES ON THE PLUGThis appliance has a grounded 3-prong plug. Connect to a properly grounded outlet only. Do not attempt to modify the plugin any way.
NOTES ON THE CORDA short power-supply cord (or detachable power-supply cord) is to be provided to reduce risks resulting from becoming entangled in or tripping over a longer cord. Never use an extension cord.
PLASTICIZER WARNINGCAUTION: To prevent Plasticizers from migrating from the finish of the countertop or tabletop or other furniture, place NON-PLASTIC coasters or placemats between the appliance and the finish of the countertop or tabletop. Failure to do so may cause the finish to darken; permanent blemishes may occur or stains can appear.
ELECTRIC POWERIf the electrical circuit is overloaded with other appliances, your appliance may not operate properly. It should be operated on a separate electrical circuit from other appliances.
NOTES ON PRESSURE RELEASE VALVE
- The pressure release valve is used to regulate pressure inside the unit while cooking. Small amounts of steam may escape during cooking, this is normal.
- Never operate the unit under cabinets. When releasing steam, make sure the area several feet above the pressure release valve is clear from all lighting fixtures, furniture, or cabinetry.
- Always use the Steam Release button on the control panel to release pressure.
NOTE: ONLY USE PRESSURE RELEASE BUTTON ON TOP LID IF CONTROL PANEL STEAM RELEASE BUTTON IS NON-FUNCTIONINGCAUTION: AVOID REACHING OVER THE PRESSURE RELEASE VALVE WHEN IN USE.CAUTION: KEEP HANDS AND FACE CLEAR OF THE PRESSURE RELEASE VALVE AND SAFETY VALVE WHEN THE APPLIANCE IS IN OPERATION. HOT STEAM AND WATER MAY BE EMITTED DURING USE AND WHEN STEAM IS BEING RELEASED.
NOTES ON THE SAFETY LOCKING LIDCAUTION: WHEN COOKING UNDER PRESSURE, THE LID IS LOCKED AND CANNOT BE OPENED ONCE PRESSURE IS REACHED. DO NOT TRY TO FORCE THE LID OPEN.
• Always keep the lid in a locked position during cooking.CAUTION: NEVER PLACE YOUR FACE OR HANDS OVER THE UNIT WHEN OPENING THE LID.
GETTING TO KNOW YOUR AIRPRO COOK & FRY
Product may vary slightly from illustration
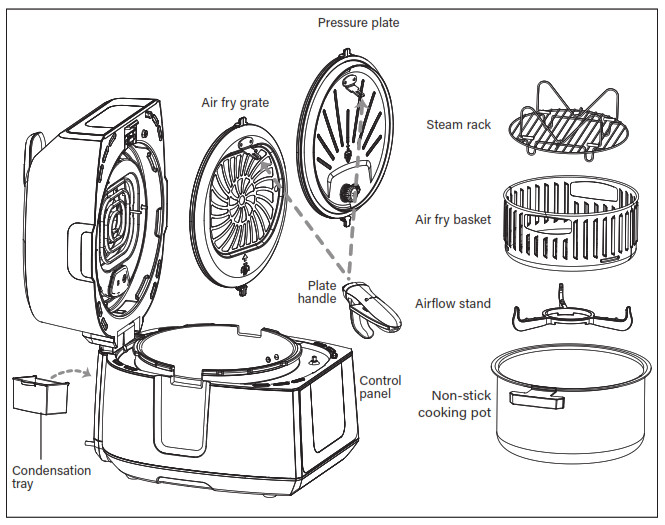
LID INSERTS
The AirPro unit comes with two different lid inserts, the Pressure Plate and the Air Fry Grate. The two inserts allow users to pressure cook, air fry, and more in the same unit by interchanging the plates.
Air Fry Grate (A)The Air Fry Grate will need to be installed for access to these cooking functions:
- Air Fry
- Bake
- Broil
- Dehydrate
Pressure Plate (B)The Pressure Plate will need to be installed for access to these cooking functions:
- Pressure Cook
- Slow Cook
- Steam
- Rice
- Proof
- Sear
NOTE: COOKING FUNCTIONS WILL BE ABLE TO BE SELECTED, ONLY ONCE THE CORRECT COOKING INSERT HAS BEEN INSTALLED.

CONTROL PANEL
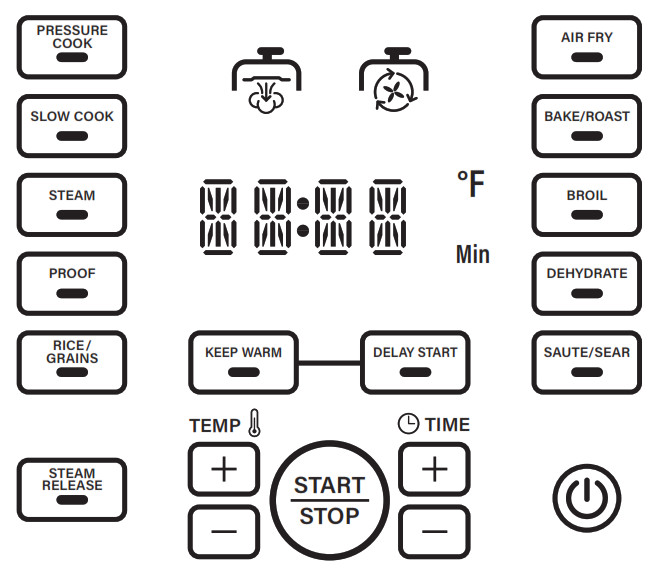
![]() POWER ON/OFF BUTTONPress this button to power the unit on and off. Once plugged in, the power button will illuminate in red. Once the button is pressed, the light will switch to white.
POWER ON/OFF BUTTONPress this button to power the unit on and off. Once plugged in, the power button will illuminate in red. Once the button is pressed, the light will switch to white.
![]() PRESSURE COOKER ICONThis icon will illuminate automatically once the pressure plate is securely inserted and the unit is ready for pressure cooking functions.
PRESSURE COOKER ICONThis icon will illuminate automatically once the pressure plate is securely inserted and the unit is ready for pressure cooking functions.
NOTE: THE FOLLOWING FUNCTIONS ARE BASED ON THE PRESSURE PLATE FUNCTION: PRESSURE COOK, SLOW COOK, STEAM, RICE SEAR FUNCTION WILL STILL WORK WHEN THE LID IS OPENED.
![]() AIR FRYER ICONThis icon will illuminate automatically once the air fry grate is securely inserted and the unit is ready for air frying functions.
AIR FRYER ICONThis icon will illuminate automatically once the air fry grate is securely inserted and the unit is ready for air frying functions.
NOTE: THE FOLLOWING FUNCTIONS ARE BASED ON THE AIR FRY GRATE: AIR FRY, BAKE/ROAST, BROIL AND DEHYDRATE. ONLY WHEN THE AIR FRY GRATE IS INSERTED WILL THESE FUNCTIONS BE ILLUMINATED AND READY TO SELECT.
![]() Temperature Icon – Displays temperature, will alternatively light up with the
Temperature Icon – Displays temperature, will alternatively light up with the
Min Timer icon.– Displays time, will alternatively light up with the Temperature icon.
 Start/Stop Button – Touch this once to start or stop the cooking process.
![]() Plus Button – Touch to increase the Temperature or Time.
Plus Button – Touch to increase the Temperature or Time.
![]() Minus Button – Touch to decrease the Temperature or Time.
Minus Button – Touch to decrease the Temperature or Time.
![]() Steam Release Button – When pressure cooking is complete, press the Steam Release button to release the pressure. The steam release cycle is 3 minutes long. Once all the steam is released, the lid can safely be opened.
Steam Release Button – When pressure cooking is complete, press the Steam Release button to release the pressure. The steam release cycle is 3 minutes long. Once all the steam is released, the lid can safely be opened.
NOTE: IN ORDER TO STOP A COOKING PROGRAM BEFORE IT HAS BEEN COMPLETED, PRESS THE START/STOP BUTTON TO END COOKING, THEN PRESS STEAM RELEASE.
![]() Keep Warm Function – once cooking is complete, the unit will automatically turn to Keep Warm.
Keep Warm Function – once cooking is complete, the unit will automatically turn to Keep Warm.
![]() Delay Start Function – Press this button to delay cooking until your desired start time (range: 30mins – 12hrs). Press desired cook function first, then press the delay timer button, the light will flicker, once this happens adjust to the desired delayed cook and press START to set. To cancel the delay timer setting, press the delay timer button again (before pressing start).
Delay Start Function – Press this button to delay cooking until your desired start time (range: 30mins – 12hrs). Press desired cook function first, then press the delay timer button, the light will flicker, once this happens adjust to the desired delayed cook and press START to set. To cancel the delay timer setting, press the delay timer button again (before pressing start).
AIR FRYER FUNCTION DEFAULT SETTINGS:
| FUNCTION | DEFAULT TEMP | TEMP. RANGE | DEFAULT TIME |
TIME RANGE |
| Air fry | 400°F | 180 ~ 400°F | 20 Min | 1 ~ 60 Min |
| Bake/roast | 375°F | 250 ~ 400°F | 15 Min | 1 Min ~ 4 Hrs |
| Broil | 450°F | 450°F | 10 Min | 1 ~ 30 Min |
| Dehydrate | 90°F | 90 ~ 180°F | 2 Hrs | 2 ~ 24 Hrs |
PRESSURE COOKER FUNCTION DEFAULT SETTINGS:
|
FUNCTION |
DESCRIPTION | DEFAULT TIME (MIN) |
ADJUST RANGE (MIN) |
| Pressure cook | When cooking has finished the timer will go to “0” then will automatically switch to the Keep Warm function. | 30 Min | 0 ~ 4 Hrs |
| Slow cook (HI, LO) | 4 Hrs | 30 mins – 12 Hrs | |
| Steam | 10 Min | 1 ~ 60 Min | |
| Proof | 30 Min | 30 ~ 40 Min | |
| Rice/grains | 20 Min | 3 ~ 60 Min | |
| Sauté/sear (HI, MD, LO) | Default temp is HI (HI, MD, LO), when using this function lid can be opened | 10 Min | 1 ~ 30 Min |
BEFORE USING FOR THE FIRST TIME
- Remove the unit and all accessories from their packaging. Place the unit and the accessories on a sturdy flat surface.
- Remove all promotional stickers from the unit and accessories.
- Wash all of the removable parts (cooking pot, air fry basket, airflow stand, steam rack, pressure plate, air fry grate, plate handle, and condensation tray) in warm soapy water with a soft cloth.
- Dry each piece thoroughly.
- Never submerge the body of the unit in water.
- Be sure to fully and completely read this instruction manual and all warning and safety information before going further.
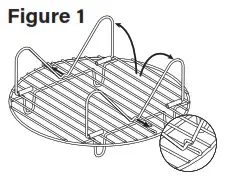
SETTING UP THE STEAM RACK
- To set up the steam rack, unfold the legs and carefully secure the middle “V” part to hook located near the edge. (Figure 1)
- Based on recipe and cooking preference, food can be placed on either side of the reversible steam rack to achieve the desired result. (Figure 2)
- The legs of the steam rack can be folded down for storage. Carefully push the middle “V” part outward to unlock, then fold the legs inwards.

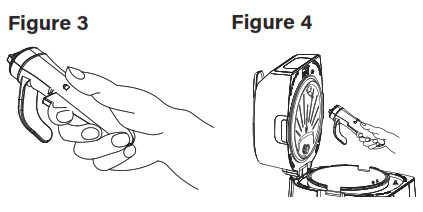
REMOVING THE PRESSURE PLATE INSERT OR AIR FRY GRATE
Where possible, leave the hot pressure plate insert or air fry grate in place until the unit has completely cooled. For recipes where switching the plate or insert is needed during the cooking process, always use the included plate handle. This handle is designed to conveniently allow you to insert and remove the plates even when they are hot.
- Firmly grasp the plate handle with the extended knuckle guard facing down. (Figure 3)
- Connect the end of the handle to the protruding metal tab on the plate. Once secure, press the button on the left to lock. (Figure 4)
- When the handle is securely locked to the plate, press the release tab at the top of the plate. (Figure 5)
- With the handle, carefully lift the plate out of the unit and place it on a sturdy, flat, heat-resistant surface.
- To remove the handle from the plate, press the button on the right side of the handle and pull the handle out. (Figure 6)
- Allow the plate to fully cool before moving or cleaning.
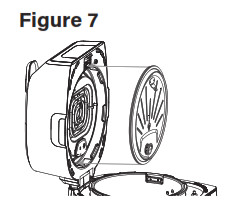
- See Figure 7 for where plates clip into the unit lid.
 Firmly grasp the plate handle with the extended knuckle guard facing down. (Figure 3)
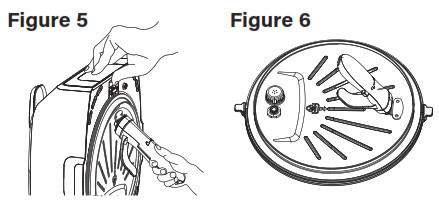
PRESSURE COOK FUNCTIONS
HOW TO PRESSURE COOK
- Open the top lid by turning the knob counterclockwise.
- Ensure the air fry grate has been removed. Always use the plate handle. Insert the pressure plate.
- Place the non-stick cooking pot inside the unit and place food inside the cooking pot.
- Close the lid and lock by turning clockwise.
- Press the power button and then select PRESSURE COOK. The pressure icon will illuminate. Using the + and – buttons, adjust to the desired cook time.
- Once the correct pressure has been reached, the display will switch from the cycling dashes to the timer count down.
- When cooking is complete an audible tone will sound. The unit will automatically go to ‘keep warm’ mode once cooking is complete.
- When pressure cooking is complete, press the STEAM RELEASE button to release the pressure. The steam release cycle is 3 minutes long. Once all the steam is released, the lid can safely be opened.
- To Stop a cooking program before cooking has been completed, press the START/ STOP button to end cooking, then press STEAM RELEASE. NEVER place your face or hands over the unit during steam release, or when opening the lid. ALWAYS use potholders during Steam Release or when opening the lid.
NOTE: PRESS DELAY TIMER AND ADJUST TIME TO SET THE DELAY START FEATURE. IF YOU WOULD LIKE COOKING TO START IMMEDIATELY, PRESS THE START/STOP BUTTON TO BEGIN COOKING. DASH LINES WILL CYCLE ACROSS THE CONTROL PANEL TO INDICATE THE UNIT IS COMING TO PRESSURE.
HOW TO SLOW COOK
- Open the top lid by turning the knob counterclockwise.
- Ensure the air fry grate has been removed. Always use the plate handle. Insert the pressure plate.
- Place the non-stick cooking pot inside the unit and place food inside the cooking pot.
- Close the lid and lock by turning clockwise.
- Press the power button and then select SLOW COOK. The pressure icon will illuminate. Using the + and – buttons, adjust the time to the desired cook time.
- Once the correct temperature has been reached, the display will switch from the cycling dashes to the timer count down.
- When cooking is complete an audible tone will sound. The unit will automatically go to KEEP WARM mode once cooking is complete.
NOTE: PRESS DELAY TIMER AND ADJUST TIME TO SET THE DELAY START FEATURE. IF YOU WOULD LIKE COOKING TO START IMMEDIATELY, PRESS THE START/STOP BUTTON TO BEGIN COOKING. DASH LINES WILL CYCLE ACROSS THE CONTROL PANEL TO INDICATE THE UNIT IS COMING TO TEMPERATURE.
HOW TO STEAM
- Open the top lid by turning the knob counterclockwise.
- Ensure the air fry grate has been removed. Always use the plate handle. Insert the pressure plate.
- Place the non-stick cooking pot inside the unit. Arrange the food on the steam rack provided. Never fill the cooking pot more than 2/3 full.
- Add 1.5 cups of water or steaming liquid into the cooking pot.
- Close the lid and lock by turning clockwise.
- Press the power button and then select STEAM. The pressure icon will illuminate. Using the + and – buttons, adjust to the desired cook time.
- Press the START/STOP button to begin cooking. Dash lines will cycle across the control panel to indicate the unit is coming to temperature.
- Once the correct pressure/temperature has been reached, the display will switch from the cycling dashes to the timer count down.
- When cooking is complete an audible tone will sound. Once cooking is complete and you are ready to remove your food, press the STEAM RELEASE button.
HOW TO USE THE PROOF FUNCTION
- Open the top lid by turning the knob counterclockwise.
- Ensure the air fry grate has been removed. Always use the plate handle. Insert the pressure plate.
- Place the non-stick cooking pot inside the unit and place the dough inside the cooking pot.
- Close the lid and lock by turning clockwise.
- Press the power button and then select PROOF. The pressure icon will illuminate. Using the + and – buttons, adjust to the desired cook time.
- Once pressure has been reached, the display will switch from the cycling dashes to the timer count down.
- When cooking is complete an audible tone will sound.
NOTE: PRESS DELAY TIMER AND ADJUST TIME TO SET THE DELAY START FEATURE. IF YOU WOULD LIKE COOKING TO START IMMEDIATELY, PRESS THE START/STOP BUTTON TO BEGIN COOKING. DASH LINES WILL CYCLE ACROSS THE CONTROL PANEL TO INDICATE THE UNIT IS COMING TO PRESSURE.
NOTE: IF THE TEMPERATURE OF YOUR HOME IS HIGHER THAN THE TEMPERATURE SET FOR PROOF, THE AIR FRYER COOK & FRY WILL NOT OPERATE EFFECTIVELY.
HOW TO COOK RICE
- Open the top lid by turning the knob counterclockwise.
- Ensure the air fry grate has been removed. Always use the plate handle. Insert the pressure plate.
- Place the non-stick cooking pot inside the unit. Place uncooked rice and liquid inside the cooking pot.
- Close the lid and lock by turning clockwise.
- Press the power button and then select RICE/GRAINS. The pressure icon will illuminate. Using the + and – buttons, adjust to the desired cook time.
- Once pressure has been reached, the display will switch from the cycling dashes to the timer count down.
- When cooking is complete an audible tone will sound. The unit will automatically go to KEEP WARM mode once cooking is complete.
- When pressure cooking is complete, press the STEAM RELEASE button to release the pressure. The steam release cycle is 3 minutes long. Once all the steam is released, the lid can safely be opened.
- To Stop a cooking program before cooking has been completed, press the START/ STOP button to end cooking, then press STEAM RELEASE. NEVER place your face or hands over the unit during steam release, or when opening the lid. ALWAYS use potholders during STEAM RELEASE or when opening the lid.
NOTE: WHEN COOKING FOODS THAT EXPAND, DO NOT FILL THE COOKING POT MORE THAN HALFWAY.
NOTE: PRESS DELAY TIMER AND ADJUST TIME TO SET THE DELAY START FEATURE. IF YOU WOULD LIKE COOKING TO START IMMEDIATELY, PRESS THE START/STOP BUTTON TO BEGIN COOKING. DASH LINES WILL CYCLE ACROSS THE CONTROL PANEL TO INDICATE THE UNIT IS COMING TO PRESSURE.
HOW TO SEAR
- Open the top lid by turning the knob counterclockwise.
- Ensure the air fry grate has been removed. Always use the plate handle if the plates are hot. Insert the pressure plate.
- Place the non-stick cooking pot inside the unit.
- The lid can remain in the open position when using the Sear/Sauté function
- Press the power button and then select SEAR/SAUTÉ. The pressure icon will illuminate. Using the + and – buttons, adjust the temperature to the desired cooking temperature (High, Medium, or Low).
- Press the START/STOP button to begin cooking.
- When cooking is complete press the START/STOP button.
NOTE: NEVER USE METAL UTENSILS WITH YOUR AIRPRO AS THESE MAY SCRATCH THE NON-STICK COOKING POT OR PRESSURE GRATE.
AIR FRY FUNCTIONS
HOW TO AIR FRY
- Open the top lid by turning the lid knob counterclockwise.
- Ensure the pressure plate insert is removed. Always use the plate handle if the plates are hot. Insert the air fry grate.
- Place the non-stick cooking pot inside the unit. Place the air fry basket inside the cooking pot. Place food inside the air fry basket.
- Close the lid and lock by turning clockwise
- Press the power button and then select AIR FRY. The air fry icon will illuminate. Using the + and – buttons, adjust the temperature and time to the desired cooking settings. Press the START/STOP button to begin cooking. The count-down timer and selected temperature will be displayed alternately on the screen.
- When cooking is complete audible tone will sound.
NOTE: THE AIR FRY CYCLE CAN BE ‘PAUSED’ BY EITHER LIFTING THE LID OR PRESSING THE START/STOP BUTTON. ONCE THE LID IS CLOSED, OR THE START/STOP BUTTON IS PRESSED, COOKING WILL RESUME.
HOW TO BAKE
- Open the top lid by turning the lid knob counterclockwise.
- Ensure the pressure plate insert is removed. Always use the plate handle if the plates are hot. Insert the air fry grate.
- Place the non-stick cooking pot inside the unit. If needed, add the steam rack inside the cooking pot, and arrange food on top of the steam rack.
- Close the lid and lock by turning clockwise.
- Press the power button and then select BAKE/ROAST. The air fry icon will illuminate. Using the + and – buttons, adjust the temperature and time to the desired cooking settings. Press the START/STOP button to begin cooking. The count-down timer and selected temperature will be displayed alternately on the screen. BAKE/ROAST cycle can be ‘paused’ by either lifting the lid or pressing the START/STOP button. Once the lid is closed, or the START/STOP button is pressed, cooking will resume.
- When cooking is complete audible tone will sound and the unit will go to keep warm mode.
HOW TO BROIL
- Open the top lid by turning the lid knob counterclockwise.
- Ensure the pressure plate insert is removed. Always use the plate handle if the plates are hot. Insert the air fry grate.
- Place the non-stick cooking pot inside the unit. If needed, add the steam rack inside the cooking pot, and arrange food on top of the steam rack.
- Close the lid and lock by turning clockwise.
- Press the power button and then select BROIL. The air fry icon will illuminate. Using the + and – buttons, adjust the temperature and time to the desired cooking settings. Press the START/STOP button to begin cooking. The count-down timer and selected temperature will be displayed alternately on the screen. The broil cycle can be ‘paused’ by either lifting the lid or pressing the START/STOP button. Once the lid is closed, or the START/STOP button is pressed, cooking will resume.
- When cooking is complete audible tone will sound and the unit will go to keep warm mode.
HOW TO DEHYDRATE
- Open the top lid by turning the lid knob counterclockwise.
- Ensure the pressure plate insert is removed. Always use the plate handle if the plates are hot. Insert the air fry grate.
- Place the non-stick cooking pot inside the unit. Place the air fry basket inside the cooking pot. Lay food inside the air fry basket. For an additional layer, add the steam rack to the air fry basket and add food on top of the steam rack.
- Close the lid and lock by turning clockwise.
- Press the power button and then select DEHYDRATE. The air fry icon will illuminate. Using the + and – buttons, adjust the temperature and time to the desired cooking settings. Press the START/STOP button to begin cooking. The count-down timer and selected temperature will be displayed alternately on the screen. Dehydrate cycle can be ‘paused’ by either lifting the lid or pressing the START/STOP button. Once the lid is closed, or the START/STOP button is pressed, cooking will resume.
- When cooking is complete audible tone will sound.
USDA COOKING GUIDELINES
PLEASE NOTE: COOK ALL FOOD TO THESE MINIMUM INTERNAL TEMPERATURES AS MEASURED WITH A FOOD THERMOMETER BEFORE REMOVING FOOD FROM THE HEAT SOURCE. FOR REASONS OF PERSONAL PREFERENCE, CONSUMERS MAY CHOOSE TO COOK FOOD TO HIGHER TEMPERATURES. THIS CHART IS INTENDED AS A GENERAL GUIDEBY THE USDA.
|
PRODUCT |
MINIMUM INTERNAL TEMPERATURE & REST TIME |
| BEEF, PORK, VEAL & LAMB STEAKS, CHOPS, ROASTS | 145 °F (62.8 °C) and allow to rest for at least 3 minutes |
| GROUND MEATS | 160 °F (71.1 °C) |
| HAM, fresh or smoked (uncooked) | 145 °F (62.8 °C) and allow to rest for at least 3 minutes |
| FULLY COOKED HAM (to reheat) | Reheat cooked hams packaged in USDA-inspected plants to 140 °F (60 °C) and all others to 165 °F (73.9 °C). |
| PRODUCT | MINIMUM INTERNAL TEMPERATURE |
| ALL POULTRY (breasts, whole bird, legs, thighs, and wings, ground poultry, and stuffing) | 165 °F (73.9 °C) |
| EGGS | 160 °F (71.1 °C) |
| FISH & SHELLFISH | 145 °F (62.8 °C) |
| LEFTOVERS | 165 °F (73.9 °C) |
| CASSEROLES | 165 °F (73.9 °C) |
USER MAINTENANCE INSTRUCTIONS
This appliance requires little maintenance. It contains no user-serviceable parts. Any servicing requiring disassembly other than cleaning must be performed by a qualified appliance repair technician.
CARE & CLEANING INSTRUCTIONS
- Use a soft damp cloth to wipe clean the base and lid of the unit after every use. Use a small brush or cotton swab if necessary. Never pour any liquid into the base of the unit.
- Wash the removable parts (cooking pot, air fry basket, airflow stand, steam rack, pressure plate, air fry grate, plate handle, and condensation tray) in warm soapy water with a soft cloth or sponge.
- Before washing the lid inserts, please always follow the steps for safe and proper plate removal on page 19.
- Dry each piece thoroughly.
- Note that the cooking pot, air fry basket, and steam rack are dishwasher safe.
- When cleaning or cooking with the cooking pot or air fry basket, never use metal utensils or scouring pads in order to avoid damage to the non-stick coating.
- Never use harsh chemical detergents, scouring pads, or powders on any of the parts or accessories.
STORING INSTRUCTIONS
- Unplug allow the unit to cool completely.
- Store the cooking pot, and plate handle inside the unit.
- Store the unit in its original box or covered in a cool, dry place.
TROUBLESHOOTING
The unit is equipped with safety features that will shut the unit down if an abnormal condition is encountered during cooking. An error signal will be displayed on the control panel. Depending on the error, audible beeping may be heard. Once the problem has been identified and corrected, plug in the unit and resumes pressure cooking.
| ERROR DISPLAY: NOT-LOCK | |
| DESCRIPTION | SOLUTION |
| Top lid is in the open position. | Close the lid and turn the lid knob clockwise to securely close. |
| ERROR: UNIT IS NOT WORKING UNDER PRESSURE COOK MODE | |
| Pressure plate is not properly inserted. | • Insert pressure plate as per instructions on page 19.• Ensure the air fry grate has been removed. |
| ERROR: UNIT IS NOT WORKING UNDER AIR FRY MODE | |
| Air fry grate is not properly inserted. | • Insert air fry grate as per instructions on page 19.• Ensure pressure plate has been removed. |
| ERROR: NO-POT | |
| The cooking pot is not inserted correctly. | Gently push the pressure pot down into the unit until the pot touches the heating plate on the bottom of the unit. |
COOKING CHARTS
DEHYDRATE
• Turn food several times during DEHYDRATE for even drying.
| HERB | TEMP | TIME | HERB | TEMP |
TIME |
| Oregano | 135°F | 2 – 3 hrs | Parsley | 135°F | 2 – 3 hrs |
| Thyme | 135°F | 3 – 4 hrs | Rosemary | 135°F | 2 – 3 hrs |
| Tarragon | 135°F | 3 – 4 hrs | Sage | 135°F | 3 – 4 hrs |
| Kale Chips stems removed | 135°F | 2 – 3 hrs |
FRUIT / VEGETABLES
- Wash all fruit skins well.
- Slice fruit into 1/4 inch thick slices and arrange with space between each slice to ensure even drying.
- Rotate foods halfway through DEHYDRATE time for even drying.
|
DEHYDRATE |
TEMP | TIME | |
| Apple rounds | 135°F | 8 – 9 hrs | Core/slice into 1/4 inch slices |
| Mango/Papaya pieces | 135°F | 8 – 10 hrs | Peel/slice into 1/4 inch slices |
| Kiwi | 135°F | 6 hrs | 1/4 inch rounds |
| Orange Slices fully dried | 135°F | 10 hrs | Citrus is crisp when fully dried |
| Tomatoes, Roma | 150°F | 8 – 9 hrs | Skin side down |
| Tomatoes, Cherry/Grape | 150°F | 5 – 9 hrs | Skin side down |
|
DEHYDRATE |
TEMP | TIME | |
| Beef Jerky | 150°F | 5 – 6 hrs | 1/2 lb London Broil or Flank |
| Chickpeas seasoned | 160°F | 10 – 12 hrs | Canned / Rinsed |
STEAM
• Add 2 cups of water to the cooking pot.• Use a steaming rack.
|
VEGETABLES |
TIME | VEGETABLES |
TIME |
| Asparagus 1 bunch, thin spears | 5 – 7 min | Broccoli Florets 2 cups | 5 – 7 min |
| Asparagus 1 bunch, thick spears | 7 – 15 min | Brussels Sprouts 4 cups, whole | 8 – 15 min |
| Butternut Squash 2 cups, 1-inch cubes | 10 – 15 min | Corn on the Cob 4 ears | 6 – 8 min |
| Cauliflower Florets 2 cups | 5 – 9 min | Green Beans 2 cups, whole, trimmed | 6 – 12 min |
| Cauliflower 1 head | 7 – 9 min | Potatoes, White 1 lb, 1-inch cubes | 10 – 15 min |
| Carrots 2 1/2 cups, 1-inch pieces | 7 – 12 min | Potatoes, White halved, 6 – 8 oz, pierced with a fork | 20 min |
| Zucchini 2 cups, 1/4 inch slices | 5 – 10 min | Potatoes, Sweet 1 lb, 1-inch cubes | 10 – 14 min |
AIR FRY
|
VEGETABLES |
TEMP | TIME | VEGETABLES | TEMP |
TIME |
| Asparagus 1 bunch, thin spears | 400°F | 5 – 7 min | Broccoli Florets 3 – 4 cups | 400°F | 15 – 20 min |
| Asparagus 1 bunch, thick spears | 400°F | 7 – 9 min | Brussels Sprouts 1 lb | 375°F | 12 – 15 min |
| Cauliflower Florets 3 – 4 cups | 400°F | 13 – 18 min | Corn on the Cob 4 ears | 390°F | 6 – 8 min |
| Eggplant 1 1/2-inch cubes (roasted) | 400°F | 15 min | Carrots 2 1/2 cups, 1/2 in pieces | 400°F | 10 – 12 min |
| Kale 3 cups, stems removed | 375°F | 9 min | Mushrooms 3 cups, sliced | 400°F | 10 – 12 min |
| Peppers, bell 1 inch chunks | 375°F | 10 min | Peppers, jalapeno, poblano (roasted) | 375°F | 10 min |
| Pickles breaded | 400°F | 5 – 7 min | Zucchini 1/4 inch discs | 400°F | 12 – 17 min |
| Potatoes, White French Fries, (fresh, soaked, 1/4 to 1/3 inch thick) | 400°F | 16 – 20 min | Root Vegetables 1/2 inch chunks (roasted) | 400°F | 15 – 20 min |
| Potatoes, White 1 inch cubes | 400°F | 12 – 14 min | Potatoes, White
whole, 6 – 8 oz, pierced with a fork |
400°F | 40 min |
| Potatoes, White wedges | 390°F | 20 – 25 min | Potatoes, Sweet whole, 6 – 8 oz, pierced with a fork | 375°F | 30 – 35 min |
|
BEEF |
TEMP | TIME | BEEF | TEMP |
TIME |
| Hamburgers 1/4 lb (up to 4) | 360°F | 12 – 16 min | Steaks
2 (8 oz) steaks |
360°F | 8 – 12 min |
| Hot Dogs / Sausages | 360°F | 10 – 15 min | Beef Tenderloin 1 lb, rare | 360°F | 16 min |
| Meatloaf 1 lb | 360°F | 35 – 40 min | Beef Tenderloin 1 lb, medium | 360°F | 18 min |
|
CHICKEN |
TEMP | TIME | CHICKEN | TEMP |
TIME |
| Chicken Breast Boneless, skinless | 360°F | 18 – 20 min | Chicken Tenders/ Fingers battered | 360°F | 13 – 15 min |
| Chicken Thighs 6 – 8 oz ea., boneless | 360°F | 20 – 25 min | Chicken Wings 2 lbs | 400°F | 22 – 27 min |
|
PORK AND LAMB |
TEMP | TIME | PORK AND LAMB | TEMP |
TIME |
| Bacon thick-cut, up to 1 lb | 400°F | 8 – 10 min | Pork Chops 1 inch thick | 375°F | 10 – 14 min |
| Ham precooked, boneless, 3 lbs | 300°F | 1 hour | Pork Chops 2 inch thick (10 – 12 oz) | 375°F | 15 – 19 min |
| Lamb Loin Chops 1 inch thick | 400°F | 8 – 12 min |
|
FISH AND SEAFOOD |
TEMP | TIME | FISH AND SEAFOOD | TEMP |
TIME |
| Shrimp thawed, battered | 325°F | 12 min | Shrimp thawed, sauced | 325°F | 5 – 8 min |
| Catfish Fingers thawed, battered | 400°F | 10 – 15 min | Salmon filets thawed, 2 | 400°F | 9 – 12 min |
|
FROZEN FOODS* |
TEMP | TIME | FROZEN FOODS* | TEMP |
TIME |
| Cheese Sticks | 350°F | 6 – 9 min | Chicken Nuggets 12 oz box | 360°F | 10 – 15 min |
| French Fries thick 2 cups | 400°F | 17 – 21 min | Fish Sticks | 400°F | 12 – 18 min |
| French Fries thin 2 cups | 400°F | 15 – 17 min | Meatballs 1 inch, pre-cooked | 375°F | 7 – 9 min |
| Onion Rings | 360°F | 12 – 16 min | Pizza 7-inch x 8 inch | 360°F | 12 – 15 min |
* All items are to be air fried from frozen (do not thaw).
|
DESSERTS |
TEMP | TIME | DESSERTS | TEMP |
TIME |
| Apple Turnovers | 400°F | 10 min | Donuts | 350°F | 8 min |
| Cake | 350°F | 25 – 35 min |
PRESSURE COOK
|
POULTRY |
WEIGHT | WATER | PRESSURE TIME |
RELEASE |
| Chicken Breasts bone-in | 2 lbs | 1 cup | 15 – 20 min | Steam release |
| Chicken Breasts boneless | 6 small/4 large 2 lbs | 1 cup | 8 – 13 min | Steam release |
| Chicken Breasts boneless, frozen | 4 large, 2 lbs | 1 cup | 20 – 25 min | Steam release |
| Chicken Thighs bone-in/skin on | 8 thighs, 4 lbs | 1 cup | 17 – 22 min | Steam release |
| Chicken Thighs boneless | 8 thighs, 2 lbs | 1 cup | 12 – 17 min | Steam release |
| Chicken, Whole bone-in/legs tied | 4 – 5 lbs | 1 cup | 22 min + AIR FRY 400°F 8 min | Steam release |
| Turkey Breast 1 breast, bone-in | 6 – 8 lbs | 1 cup | 45 – 55 min | Steam release |
|
GROUND MEAT |
WEIGHT | WATER | PRESSURE TIME |
RELEASE |
| Beef, Pork, Turkey ground, no patties | 1 – 2 lbs | 1/2 cup | 5 min | Steam release |
| Beef, Pork, or Turkey ground, no patties (frozen) | 1 – 2 lbs | 1/2 cup | 20 – 25 min | Steam release |
|
HARD BOILED EGGS |
QUANTITY | WATER | PRESSURE TIME |
RELEASE |
| Eggs, Large cold from refrigerator | 1 – 12 eggs | 1 cup | 5 – 8 min + immediate ice bath | Steam release |
|
ROASTS |
WEIGHT | WATER | PRESSURE TIME |
RELEASE |
| Beef Brisket whole | 2 – 3 lbs | 1 cup | 50 min – 1 1/4 hrs | Steam release |
| Boneless Beef Chuck-Eye Roast whole | 3 – 4 lbs | 1 cup | 1 – 1 1/2 hrs | Steam release |
| Pork Tenderloin 2 seasoned tenderloins | 1 – 1 1/2 lb ea. | 1 cup | 3 – 4 min | Steam release |
| Boneless Pork Butt seasoned | 6 lbs | 1 cup | 60 min | Steam release |
|
RIBS |
WEIGHT | WATER | PRESSURE TIME |
RELEASE |
| Pork Baby Back cut into thirds | 2 1/2 – 3 1/2 lbs | 1 cup | 18 min AIR FRY 400°F 15min | Steam release |
| Beef Ribs | 1 1/2 lbs | 1 cup | 8 – 10 min BROIL 10 min | Steam release |
|
STEW MEAT |
WEIGHT | WATER | PRESSURE TIME |
RELEASE |
| Boneless Beef Short Ribs whole | 6 ribs (3 lbs) | 1 cup | 20 min | Steam release |
| Boneless Leg of Lamb cut in 1-inch pieces | 3 lbs | 1 cup | 12 – 15 min | Steam release |
| Boneless Pork Butt cut into 1-inch pieces | 3 lbs | 1 cup | 15 min | Steam release |
| Chuck Roast for stew, cut in 1-inch pieces | 2 lbs | 1 cup | 20 – 25 min | Steam release |
LEGUMES
- All beans, except lentils, should be soaked 8 – 24 hours before
- All beans and legumes use Natural Release for 10 min. then Steam Release
|
LEGUMES |
WEIGHT | SOAK TIME | WATER | PRESSURE TIME |
RELEASE |
| Black Beans | 1 lb | 8 – 24 hrs | 6 cups | 3 – 6 min | Natural 10 min + Steam release |
| Black-Eyed Peas | 1 lb | 8 – 24 hrs | 6 cups | 2 – 5 min | Natural 10 min + Steam release |
| Cannellini Beans | 1 lb | 8 – 24 hrs | 6 cups | 6 – 8 min | Natural 10 min + Steam release |
| Cranberry Beans | 1 lb | 8 – 24 hrs | 6 cups | 5 – 8 min | Natural 10 min + Steam release |
| Garbanzo Beans / Chickpeas | 1 lb | 8 – 24 hrs | 6 cups | 9 – 14 min | Natural 10 min + Steam release |
| Great Northern Bean | 1 lb | 8 – 24 hrs | 6 cups | 4 – 8 min | Natural 10 min + Steam release |
| Lentils (Green Or Brown) | 1 cup dry | – | 2 cups | 8 – 10 min | Natural 10 min + Steam release |
| Lima Beans | 1 lb | 8 – 24 hrs | 6 cups | 2 – 5 min | Natural 10 min + Steam release |
| Navy Beans | 1 lb | 8 – 24 hrs | 6 cups | 3 – 5 min | Natural 10 min + Steam release |
| Pinto Beans | 1 lb | 8 – 24 hrs | 6 cups | 3 – 4 min | Natural 10 min + Steam release |
| Red Kidney Beans | 1 lb | 8 – 24 hrs | 6 cups | 5 – 8 min | Natural 10 min + Steam release |
LIMITED TWO-YEAR WARRANTY
SENSIO Inc. hereby warrants that for a period of TWO YEARS from the date of purchase, this product will be free from mechanical defects in material and workmanship, and for 90 days in respect to non-mechanical parts. At its sole discretion, SENSIO Inc. will either repair or replace the product found to be defective, or issue a refund on the product during the warranty period.
The warranty is only valid for the original retail purchaser from the date of initial retail purchase and is not transferable. Keep the original sales receipt, as proof of purchase, is required to obtain warranty validation. Retail stores selling this product do not have the right to alter, modify, or in any way revise the terms and conditions of the warranty.
Exclusions:
The warranty does not cover normal wear of parts or damage resulting from any of the following: negligent use of the product, use of improper voltage or current, improper routine maintenance, use contrary to the operating instructions, disassembly, repair, or alteration by anyone other than qualified SENSIO Inc. personnel. Also, the warranty does not cover Acts of God such as fire, floods, hurricanes, or tornadoes. SENSIO Inc. shall not be liable for any incidental or consequential damages caused by the breach of any express or implied warranty. Apart from the extent prohibited by applicable law, any implied warranty of merchantability or fitness for a particular purpose is limited in time to the duration of the warranty. Some states, provinces, or jurisdictions do not allow the exclusion or limitation of incidental or consequential damages or limitations on how long an implied warranty lasts, and therefore, the above exclusions or limitations may not apply to you. The warranty cov ers specific legal rights which may vary by state, province, and/or jurisdiction.
How To Obtain Warranty Service:
You must contact Customer Service at our toll-free number: 1-866-832-4843. A Customer Service Representative will attempt to resolve warranty issues over the phone. If the Customer Service Representative is unable to resolve the problem, you will be provided with a case number and asked to return the product to SENSIO Inc. Attach a tag to the product that includes: your name, address, daytime contact telephone number, case number,and description of the problem.
Also, include a copy of the original sales receipt. Carefully package the tagged product with the sales receipt, and send it (with shipping and insurance prepaid) to SENSIO Inc.’s address. SENSIO Inc. shall bear no responsibility or liability for the returned product while in transit to SENSIO Inc.’s Customer Service Center.
 report this ad
For customer service, call 1-866-832-4843or email [email protected]For recipes, visit www.cruxgg.comSENSIO Inc.New York, NY 10016/USA14980 Rev. 9
References
[xyz-ips snippet=”download-snippet”]