
![]()
DIGITAL MEDIA RECEIVERBLUETOOTH / USB / AUX
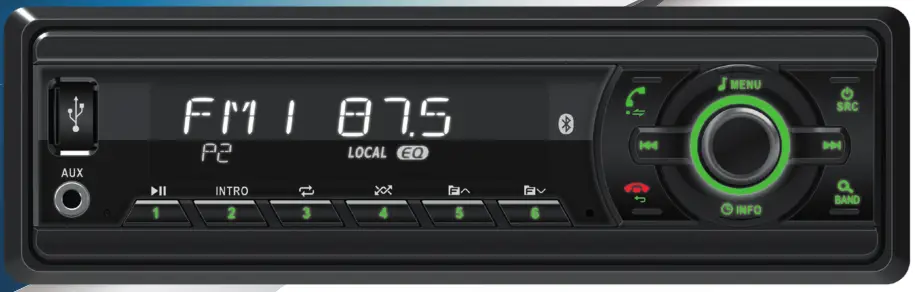
CR1801 User Manual

Supplier Reference Model Number: RM1801

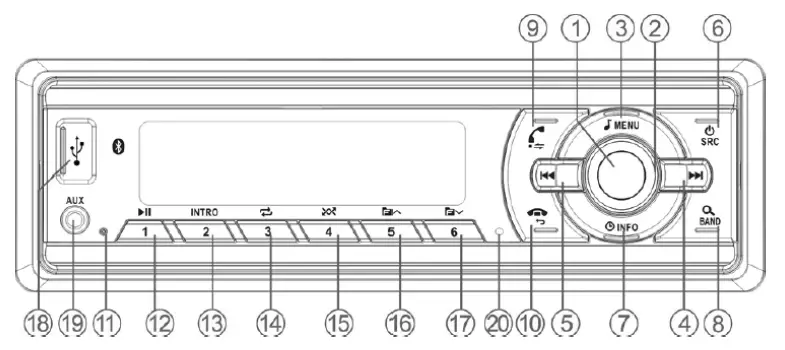
Front Panel Layout
|
Item |
Button Name |
Comments |
| 1 | Mute / Select (Centre switch) | |
| 2 | Volume Control / Rotary browse | |
| 3 | Menu | Audio and System Menus |
| 4 | Up >> I Next | |
| 5 | Down >> I Previous | |
| 6 | Source / Power | Radio / BT / USB / AUX / |
| 7 | INFO (information) / Clock | Select info to view or display clock |
| 8 | Band / Browse | FM & AM(MW/LW) band select or Browse function |
| 9 | Call Pick Up | Transfer or last number re-dial |
| 10 | Call Hang Up | Return from menu or selection |
| 11 | Reset | |
| 12 | Preset 1 (Play / Pause) | Play / Pause Media Control |
| 13 | Preset 2 (Intro) | |
| 14 | Preset 3 (RPT – Repeat) | |
| 15 | Preset 4 (RDM – Random Play) | |
| 16 | Preset 5 (Folder – Next) | |
| 17 | Preset 6 (Folder – Previous) | |
| 18 | USB | |
| 19 | Aux-In | 3.5mm Stereo Socket |
| 20 | Built-in Mic |
General Operation
Buttons to navigate through MenusIn the menu system, certain controls have some common functions to help you move through the menus:1) Volume control centre switch = select2) Volume control rotary = “choose”3) Hang-Up = return or move back up a menu level
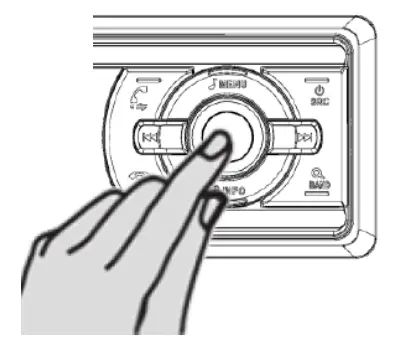
 TURN for Volume adjustment / PRESS to MUTE
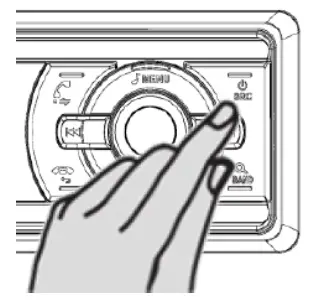
Powering On/OffTo switch the unit on press the power button, To turn the unit off, press and hold the power button for 2 seconds. In a similar manner many of the buttons on the front panel have two modes of activation: Short press” and Long press” to directly select different functions.
The ‘Volume’ KnobAudio volume is adjusted when the rotary knob is turned, and MUTE is toggled on/off when the knob is pressed briefly – short press. In the SYSTEM or AUDIO menus volume adjustment is temporarily disabled, and the rotation of the knob adjusts the value of the menu item, In this mode pressing the volume knob will select the item you have chosen, The menu list may also be cycled through with the >>]and ]«< buttons.
Example: short press (push and let go) the MENU button to access the AUDIO menu – EO, loudness, bass, treble, balance, and fader.
TURN to choose PRESS to select
REGIONS AVAILABLEEUROPE / ASIA / MID-EAST AUST /USA / LATIN (America) JAPAN / RUSSIA
Radio Operating RegionWhen the radio is first powered up or after a reset, it will ask you to select the geographical radio operating region, use the rotary control to choose your region and press the knob to select. This can also be set using the Radio Mode menu – all menus are context-sensitive i.e. Radio Only functions can only be accessed in radio mode.
Button FunctionsThe function of some controls depends on context. For example, the 1 button is used to recall (short press)or store (long press) radio station preset 1, However, when playing media (USB or BT), pressing this button will toggle play/pause.

Bluetooth Operation
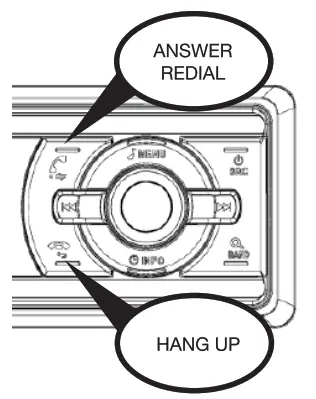
General OperationWhen paired to a mobile phone Bluetooth-enabled radio models, allow the user to perform hands-free calling via the radio. The radio has Answered” and “Hang-Up” buttons to accept or reject an incoming call.
When no call is active the Answer” button can be used to re-dial the last number – pressing once asks if you want to re-dial, pressing again dials the number, pressing the Hang-Up” button cancels the request.
Bluetooth ProfilesBluetooth enabled units can wirelessly link to Bluetooth devices such as mobile phonesThe modes of Bluetooth connection are referred to as profiles” Tis radio supports the following profiles:
1)A2pp; Advanced Audio Distribution Profile – Playing (Streaming) music using Bluetooth. Devices that have A2DP functionality can stream music into the radio to be played through the vehicles loudspeaker system.2) AVRCP: In addition, if supported by the device, the AVRCP profile (Remote Control Profile), allowing functions like ‘next track’ and ‘previous track to be controlled from the radio.3) HFP; Handsfree Profile – Making or receiving telephone calls using Bluetooth.4) SSP: Secure Simple Pairing – this method is based on a random number generator and the user does not need to enter g PIN number on the phone
PairingTo use the Bluetooth hands-free function a mobile phone needs to be paired” to the radio. To “pair the mobilephone with the radio ensure that the radio is turned on. On the mobile phone search for Bluetooth devices and select the supplier’s reference model number RM1801. Check for a successful pairing notification on the mobile phone.Once paired it is the mobile phone that determines automatic reconnection to the radio. (e.g. on re-entry to the vehicle with the ignition on). To disconnect a Bluetooth device temporarily use the DISCONN” (disconnect) menu function. To permanently
Radio FM & AM(MW/LW)
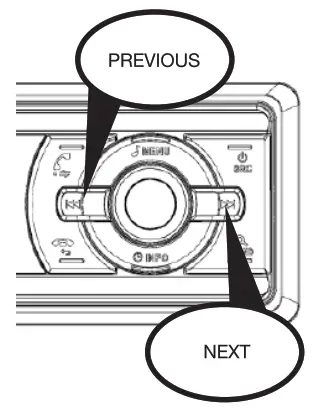
Searching for Radio StationsUse the >>] and [<< buttons to search for radio stations: short press to automatically seek the next availablefrequency (ump to the next to seek to stop).
Manual TuningLong-press either the >>] or ]<< button to change to manual-seek mode. In this mode, a short press of one of these seek buttons changes frequency one step at a time whereas a long press will scroll until the button isreleased. The radio will revert to auto-seek mode if either button is not operated for 3 seconds.
AutoStore Radio StationsLong press the BAND button will start an “auto store” sequence to scan the whole band and store the strongest stations found.
Searching for Radio StationsWhen listening to a radio station a long press on one of the radio preset buttons will store it permanently. The current station will be saved. A stored radio station can be recalled by a short press of one of these buttons. The stored radio station can be updated by tuning to a different station and performing a long press.

Long press: Store your favourite radio stations using radio station presets.Short press: Recall the stored station.
FM RadioRadio Data System (RDS) is available in many countries. If an RDS broadcast is present, RDS functions such as AF and TA can be enabled or disabled. RDS is only available in the FM bands.
Radio RDS NotesWhen RDS (Radio Data System) is operating the radio will show the station name e.g. “BBC R1” rather than the frequency. RDS is only available on the FM band. If RDS service is not available, the radio operates in conventional FM radio mode.
AFAlternative Frequencies. When this feature is enabled, the radio can stay tuned to BBC R1 by automatically returning the reception frequency when the first signal becomes weak such as when the vehicle has moved out of range, providing that a stronger signal on the alternative frequency is available. Channel switching to the same radio station is performed automatically. In infringing the reception areas the user may switch off AF if silent frequency seek is experienced frequently. Choose the AF menu item and select OFF.
TATraffic Announcement. When switched on, if a traffic announcement is available the radio will automatically switch to the station broadcasting the announcement until it is complete. The TA menu item toggles between TA ON and TA OFF.
TPTraffic Program — An indicator is displayed if the currently tuned station is a traffic announcement capable station.
PTYProgram type. RDS broadcasting services categorize the type of programs for the listener. Examples are NEWS, AFFAIRS, INFO, SPORT, EDUCATION, DRAMA, CULTURE, SCIENCE, POP M, ROCK.
Radio Preset NotesFM has 3 bands, FM1, FM2, and FM3 bands each band has 6 radio presets. In total there are 18 FM radio presets for the user to store pre-tuned radio stations. MW has one band with 6 radio presets, as does LW. There are 12 AM (MW & LW) radio pre-sets. In total there are 5 x 6 = 30 radio presets. The radio stores these permanently on an EEPROM memory device, that does not require external power to retain the radio station preset memory.
Media USB
One single media device can easily fit thousands of songs (audio tracks). These tracks are often referred to asMP3 and WMA. Without any specific metadata, the radio uses the track filename as the title. Tracks can be put into folders and sub-folders.For media carriers such as US sticks, the unit can play files inside sub-foldersAvoid having too many levels of depth in the sub-folders.Do not carry too many audio files on a media to avoid difficulty in finding the desired song/track.Media software and hardware are updated at a fast pace, so although the radio is shipped with the latest media compatibility; newer US8 sticks and/or new file formats may not be compatible.Listed below are the alternative functions of various keys on the front panel for media play-back.
| Next track (short press), Fast forward (press and hold down) | |
| Previous Track (short press), rewind (press and hold down) | |
| Play and Pause playback |
Repeat play mode, ppr 1pK repeats the current track when it has reached the end, pT ELD repeats playingof all the tracks in the current folder. PT ALL repeats all the tracks in the entire media library.
INTRO Intro-play INT indicator will be shown on the LCD display. When in this mode the radio will play the first 10 seconds of each track (intro) then skip to the next track. When at the desired track, press the INTO button again to cancel the intro-play and listen to the whole track.
RDM Random-play, RDM ALL randomly plays from all tracks, RDM FLD plays tracks randomly from the current folder. RDM OFF plays tracks in the order they appear in the folder
FLN/FL Previous folder and next folder
There is a BROWSE feature that allows the user to cycle through the available media by folders and files to select a track. Press the BAND button to select this mode. Rotate the volume knob to scroll through the folder/filename/tracklist. Press the volume knob to select

Reset – Software / HardwareSoft Reset – MENU – RESET: If the user is not sure if settings on the radio have been altered inadvertently, restoring the factory default settings may help. On reset factory settings will be reloaded, overwriting the current data selections with their default values. This includes such items as BT pairing, station presets tone settings, etc.
Hard Reset – A hardware reset button is located on the front panel (see “Front Panel Layout”) and can be activated by a paper clip or pen. This is only necessary if the radio refuses to react to any button input.
Power Off Timer
This radio has a power-off-timer enhancement feature. The setting for this is accessed by a long press on theMENU button (system menu), in any mode, and using the >>I or ]<< buttons to select the timer menu. Settings are OFF AUTO, 30 min, 60 min, and 90 min. OFF is the factory default value where the radio powersoff immediately when the ignition key is switched off. This is the same as conventional radios.
AUTO mode will switch off the radio with the ignition, but you can turn the radio back on (or off) for a 30-minute period.
30, 60, or 90 minutes will keep the radio playing for this time after the ignition is switched off. Turning the radio off manually will cancel the timer and the radio will not switch on until the ignition is also turned on. This countdown timer is shown on the display using the small secondary line of characters. In the last 5minutes of the countdown timer, the main display will warn the user that the radio is about to shut down.
This feature extends listening time and allows the ignition key to be removed for safety reasons. It also prevents the battery from being drained if the radio is left turned on for an extended period. The exact availability of this feature depends on the type of the vehicle since both a switched ignition “ACC” wire and a permanent battery “B+” wire are used to control this function and must be connected to the radio.
Menu Reference
| SYSTEM MENU | |
| DIS-CON | Disconnect current BT device |
| UNPAIR | Forget current BT device |
| CLK (SET) | Set – Hours (down) Minutes (up) |
| CLK (12/24H) | Select 12/24 hour display |
| BEEP | Audible feedback (on/off) |
| RESET | Reset radio to default settings |
| MANUAL | Auto-play USB media on/off |
| TIMER | Off timer setting (off / AUTO / 30/60/90min) |
| AUDIO MENU | |
| EQ | Equalisation presets |
| LOUD | Equal loudness contour on/off |
| BASS | Bass tone control |
| TREBLE | Treble tone control |
| BALANCE | Left/Right balance |
| FADER | Front/Rear fader |
Menu Reference – Context Sensitive
| RADIO (context case sensitive items) | |
| LOC | Local or DX seek setting |
| AREA | Operating region |
| RDS | Radio Data System |
| PTY | Select and choose available |
| AF | Alternative Frequencies |
| TA | Traffic Announcement |
| CT | Clock, Time & Date |
| SOFT | Soft mute on/off (*) |
(*) Soft mute is a noise reduction technique used in FM receivers to lower the volume when the signal to noise ratio decreases. If you are in a weak signal area we recommend that you keep this function OFF to get the maximum received signal even if more background noise or “hiss” is heard.
Wiring Notes
Connections are to be made at the rear of the unit during installation.Connector A Pins:
A4 B+ or BATT +12V
When the radio is turned on electrical power is supplied to the internal electronics of the unit through this pin.Main consuming blocks such as audio power amplifiers and backlights draw power from this pin. Ensure theconnecting wire has a minimum AWG14 wire gauge to carry the current.
A5 AUTO ANTENNA OUTPUT +12vThe voltage state on this output pin is a direct indicator of whether this unit is powered on or off. It can be used to control ancillary equipment such as an automatic electric antenna or an audio power amplifier. When connected properly such ancillary equipment will power on and off automatically in sync with the radio.
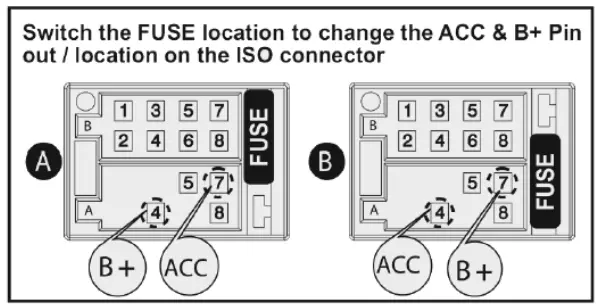
A7 ACCESSORY {ACC) or IGNITION +12V (key position)Normally connects to the ignition or accessory circuit. By sensing the voltage on this pin, the unit is able toautomatically power on and off when the ignition key switch is turned on or off.
A8 CHASSIS GROUND {EARTH)All electrical current from this pin is combined to complete the power supply circuit. Ensure the connecting wire has a minimum AWG14 wire gauge to carry the current. The metal enclosure of this unit is grounded to this pin. The unit is only suitable for “negative earth” vehicles.
PINS A4 and A7 B+ (BATT) and ACC (IGNITION) CAN BE SWAPPED BY CHANGING THEPOSITION OF THE FUSE – (SEE DIAGRAM BELOW)
Connector B pins (loudspeakers pins):
| B1. | EAR RIGHT (+) |
| 82 | REAR RIGHT(-) |
| B3. | FRONT RIGHT () |
| 84 | FRONT RIGHT{-) |
| 85 | FRONT LEFT(+) |
| 86 | FRONT LEFT(-) |
| 87 | REAR LEFT(+) |
| B8. | REAR LEFT(-) |
IMPORTANT NOTE:
Always replace the fuse with the same type and rating.A blown fuse usually indicates a problem in the circuit.
Do not rely completely on replacing the fuse to fix a problem. An over-rated fuse will compromise protectionagainst over-current.
Under-rated fuses can blow even if a fault condition does not exist.
 Mounting Notes
 Mounting Notes
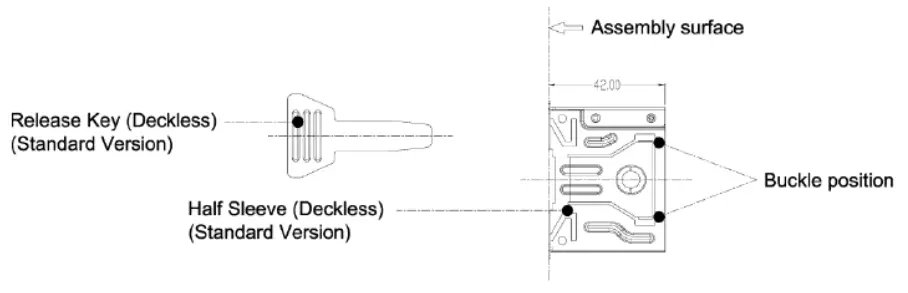
Fitting the RadioFit the mounting cage (sleeve) into the vehicles’ ISO / DIN slot and bend the fixing tangs to lock it in placeConnect the wiring to the rear of the radio.Slide the radio into the cage until it “clicks” into place on the locking clips.Fit the bezel (trim ring) on the front of the radioCheck correct operation of the radio.
Removing the RadioSlide the Release Keys centrally along the two sides of the radio to release the locking clips.Slide the radio out, keeping the Release Keys in place.Once the radio is out disconnect all the wiring and removes the radio completely.If necessary bend the fixing tangs inward to remove the mounting cage as well.
Technical Information
TUNER (FM)
| Frequency rangeChannel stepSensitivityStereo separationSNRAuto Stop Sens. LOC onAuto Stop Sens. LOC off | See World Bands belowSee World Bands below<= 10 dBµV>= 30 dB>= 50 dB38 dBV +/- 6dB (LO)18 dBV +/- 6dB (DX) |
MEDIA (USB)
| Stereo separationSNRMedia Codecs | <= 50dB<= 65dBWAV, FLAG, MP3, WMA |
TUNER (FM)
| Frequency rangeChannel stepSensitivitySNRAuto Stop Sens. LOC onStop Sens. LOC off | See World Bands belowSee World Bands below<= 40 dBµV>= 40 dB55 dBV +/- 6dB (LO) Auto33 dBV +/- 6dB (DX) |
AUDIO
| Audio PowerSpeaker ImpedanceLine Output LevelLine Output SNR | 40W max I Chanel4 10% THO4to 8 Ohm1.7V nominal>=70dB |
GENERAL
| Power SupplyFuse RatingPermanent MemoryMounting | 12V DC (9 to 18V)15AEEPROMDIN / ISO Cage |
|
World Bands |
FM Frequency (MHz) | AM MW Frequency (kHz) | AM LW Frequency (kHz) | ||||||
| Start | End | Step (kHz) | Start | End | Step (kHz) | Start | End | Step (kHz) | |
| EUROPE | 87.5 | 108.0 | 50 | 522 | 1620 | 9 | 144 | 288 | 1 |
| USA | 87.5 | 107.9 | 200 | 530 | 1710 | 10 | — | — | — |
| LATIN | 87.5 | 108.0 | 100 | 530 | 1710 | 10 | — | — | — |
| M-EAST | 87.5 | 108.0 | 100 | 522 | 1620 | 9 | 144 | 288 | 1 |
| AUSTRALIA | 87.5 | 108.0 | 100 | 522 | 1710 | 9 | 144 | 288 | 1 |
| ASIA | 87.5 | 108.0 | 100 | 522 | 1620 | 9 | 144 | 288 | 1 |
| JAPAN | 76.0 | 90.00 | 100 | 522 | 1629 | 9 | — | — | — |
| RUSSIA | 87.5 | 108.0 | 50 | 522 | 1620 | 9 | 144 | 288 | 1 |
FCC Statement
- This device complies with Part 15 of the FCC Rules. Operation is subject to the following two conditions:a) This device may not cause harmful interference, andb) This device must accept any interference received, including interference that may cause undesired operation.
- Any changes or modifications not expressly approved by the party responsible for compliance could void the user’s authority to operate the equipment.
NOTE: This equipment has been tested and found to comply with the limits for a Class B digital device, pursuant to Part 15of the FCC Rules. These limits are designed to provide reasonable protection against harmful interference in a residential installation.
This equipment generates uses and can radiate radio frequency energy and, if not installed and used in accordance with the instructions, may cause harmful interference to radio communications. However, there is no guarantee that interference will not occur in a particular installation, If this equipment does cause harmful interference to radio or television reception, which canbe determined by turning the equipment off and on, the user is encouraged to try to correct the interference by one or more of the following measures
– Reorient or relocate the receiving antenna– Increase the separation between the equipment and receiver.– Connect the equipment into an outlet on a circuit different from that to which the receiver is connected– Consult the dealer or an experienced radio/TV technician for help
Industry Canada (IC) WarningThis device complies with Industry Canada’s license-exemptRSSs. Operation is subject to the following two conditions:This device may not cause interference, andThis device must accept any interference, including interference that may cause undesired operation of the device
FCC Radiation Exposure StatementThis equipment complies with FCC radiation exposure limits set forth for an uncontrolled environment. This equipment should be installed and operated with minimum distance20cm between the radiator & your body
Bluetooth ModelsBluetooth Frequency: 2.402 – 2.480 GHzOutput Power : +4dBm (max.), 0dBm (Ave.), Power Class?
 Instructions on Disposal ad Environmental ProtectionDo not dispose of this product in the usual household garbage at the end of the otitis lifecycle hand#t over at a collection point for the recycling of electrical and electronic appliances. The symbol on the product, the instructions for use or the packing wt inform about the methods for disposal The materials are recyclable as mentioned in this marling. By recycling, material recycling, or other forms of re-utilization of old appliances, you are making an important contribution to protecting our environment le. as inquire at the community administration for the authorized disposal location
Technical Assistance
For Australasian supportIf you need assistance setting-up or using your CrystalM product now or in the future, call CrystalM Support.AustraliaTEL: 03 – 8587 8898FAX: 03 – 8587 8866Mon-Fri 9am – 5pm AESTIf you would like to download a digital copy of this manual, or other CrystalM manual/software, please visit the http://crystalm.com.au website and search for the product model number for more information and products. This manual is considered correct at the time of printing but is subject to change. For the latest manuals and updates refer to the website.
Copyright © 2017 by TDJ AustraliaAll rights reserved. No part of this publication may be reproduced, distributed, or transmitted in any form or by any means, including photocopying, recording, copying, or other electronic or mechanical methods, without the prior written permission of the author.
Please retain this user guide for future reference.
 report this ad
References
[xyz-ips snippet=”download-snippet”]