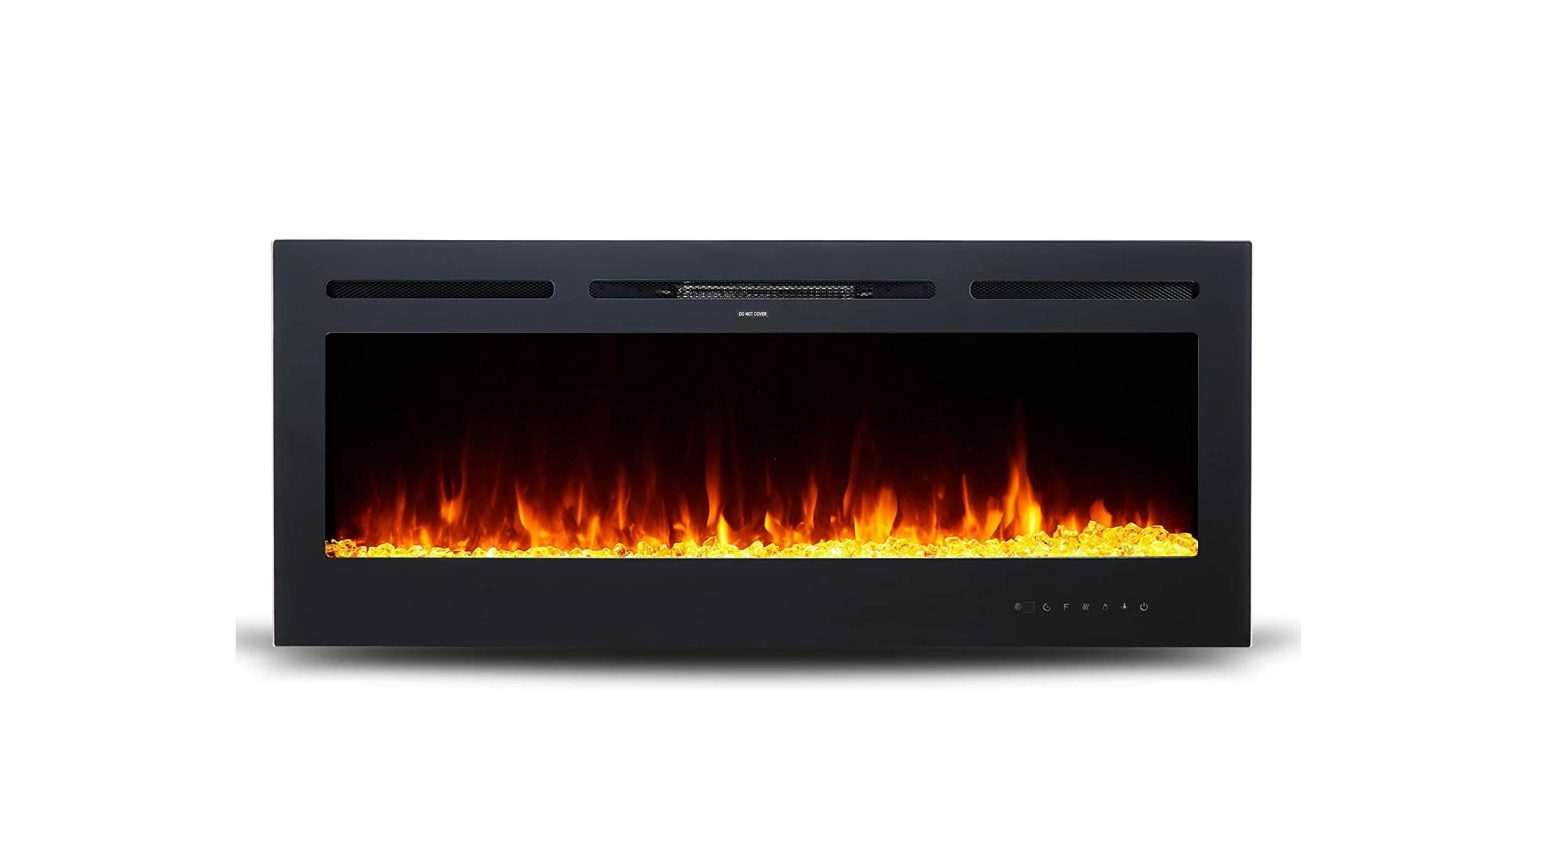
CSAUS 50″ Wall-Mountable Fireplace Inserts Instruction Manual
Suggested tools: Phillip head screw driver, power drill, drill bit, and a tape measure. Unit needs to be hung on wall stud for more security and stability.
- Fireplace assembly

- Steel holder
- Remote Control
- Screw


Care and Cleaning Instructions:
Before using, wipe with a clean, dry cloth. Avoid rubbing or scratching the surface with rough or abrasive objects.
Replace the faux fire log set with glass particles:

Assembly Tool Required: Phillips Screwdriver
Tool List:
- drill bit,
- drill,
- tape measure and
- pencil.
Remote Control Electric Wall-Mount Fireplace Assembly Instructions
Quick Reference Guide
- Prior to plugging your heater into a power outlet, first verify that the circuit breaker for the outlet is on.
- The heater may emit a slight, harmless odour when first used. This odour is normal and it is caused by the initial heating of internal heater parts and will not occur again.
- If the heater does not emit heat, Consult your User’s Guide for further information.
CAUTION
RISK OF ELECTRIC SHOCK
DO NOT OPEN THE UNIT
NO USER-SERVICEABLE PARTS INSIDE
HIGH TEMPERATURE
KEEP ELECTRICAL CORDS, DRAPERY AND OTHER FURNISHINGS AT LEAST 1 METRE FROM
FRONT OF THE HEATER AND KEEP THEM AWAY FROM THE SIDES OF HEATER
WARNING
RISK OF FIRE – KEEP COMBUSTIBLE MATERIAL AWAY FROM TOP OF HEATER. SERVICING SHOULD BE DONE ONLY WHILE THE HEATER IS UNPLUGGED FROM POWER SUPPLY.
The flame effect on the wall hanging fireplace is created by LED surface mountedcomponents that are designed to last the life of the product. Do not remove back cover of heater, no user serviceable parts are contained within.
IMPORTANT SAFETY INSTRUCTIONS
When using electrical appliances, to reduce the risk of fire, electric shock and injury to persons, basic precautions should always be followed, including the following:
- Read all instructions before use.
- This heater is hot when in use. To avoid burns, do not let bare skin touch hot surfaces. If provided use handle when moving this heater.
- Keep combustible materials such as furniture, pillows, bedding, papers, clothes, and curtains at least 4″ / 7cm away from the front of heater and keep them away from the sides of heater.
- Extreme caution is necessary when any heater is used by or near children or invalids and whenever the heater is in operation it must not be left unattended.
- Always unplug the heater when not in use.
- Do not operate any heater with damaged cord or plug or after the heater has malfunctioned or has been dropped or damaged in any manner. Return heater to an authorized service facility for repair.
- Do not use outdoors.
- This heater is not intended for use in bathrooms, laundry areas and similar indoor locations. Never locate heaters where it may fall into a bath tub or other water container.
- Do not run cord under carpeting. Do not cover cord with throw rugs, runners or the like. Arrange cord away from traffic areas and where it will not be tripped over.
- To disconnect heater, turn control to off, then remove plug from outlet.
- Connect to properly grounded outlet only.
- Do not insert or allow foreign objects to enter any ventilation or exhaust opening as this may cause an electric shock or fire, or damage the heater.
- To prevent a possible fire, do not block air intake or exhaust in any manner.
- Do not use on soft surfaces, like a bed, where openings may become blocked.
- A heater has hot and arcing or sparking parts inside. Do not use it in areas where gasoline, paint or flammable liquids are used or stored.
- Use this heater only as described in manual. Any other use not recommended by the manufacturer may cause fire, electric shock, or injury to persons.
- Avoid the use of an extension cord because the extension cord may overheat and there is a risk of fire.
- Do not strike the heater glass.
- Always use properly grounded, it may break fused and polarized outlets.
- Always disconnect power before performing any cleaning or maintenance, or relocation of the heater.
- When transporting or storing the heater keep in a dry place, free from excessive vibration and store so as to avoid damage.
- The flame effect is powered by a motor and it is normal for the motor to make some noise as it slowly rotates and helps to create the beautiful 3D flame effect. Some rooms have more or less furnishings than others resulting in varying noise amplification.
- Whilst every effort is made to ensure packing materials are kept outside of the plastic bag which covers your heater in the box, there is a remote chance that some packing may lodge itself in the heater part of the unit. If you notice this on close inspection, please remove it. When turning your heater on for the first time it is normal for the heater to emit a little ‘new heater’ smell which quickly passes.
- You may notice some light coming from under or from the sides of the unit. This is normal and the holes allow the unit to ‘breathe’. Do not attempt to block these holes.
- This heater is to be used on a 110/120v, 11.2 AMP, grounded circuit. Do not use in an outlet controlled by a switch or dimmer switch The cord supplied with the heater, has a 2 blade plug, the round pin on the plug is for grounding purposes. If a 2 slot receptacle is not available, an adapter must be used, and the adapter must be properly grounded to the outlet box. Avoid plugging other appliances into the same circuit as heater.
LISTING APPROVALS
This heater has been tested in accordance with the CSA Standards.
| Model Number: | Length: | Height: | Depth: |
| X42WMEF1BLK X42WMEF1WHT | 42.0 | 19.8 | 4.7 |
| X50WMEF1BLK X50WMEF1WHT | 50.0 | 19.8 | 4.7 |
| X60WMEF1BLK
X60WMEF1WHT |
60.0 | 19.8 | 4.7 |
| X72WMEF1BLK
X72WMEF1WHT |
72.0 | 19.8 | 4.7 |
| X78WMEF1BLK X78WMEF1WHT | 78.0 | 19.8 | 4.7 |
| Description: | Wall Mount Electric Fireplace | ||
| Voltage: | 120V AC, 60Hz | ||
| Watts: | MAX 1300W |
GLASS PARTICLES INSTALLATION INSTRUCTIONS
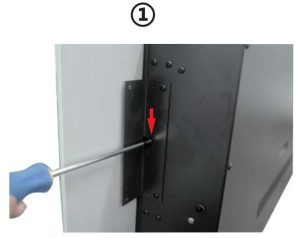
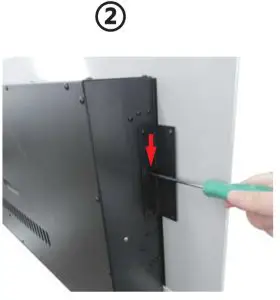

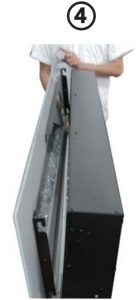
- To remove the outer glass around the bracket, undo the mounting screws (red arrows)(①、②、③)
- Remove the outer glass ( ④ )
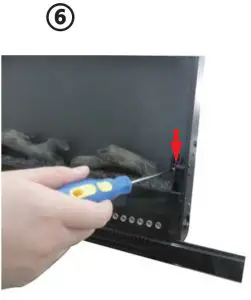
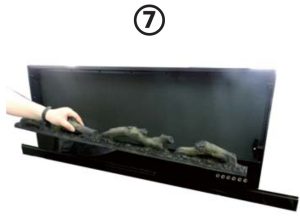
- Carefully take out the log set, adjust the screws (red arrows) (⑤、⑥ ⑦)
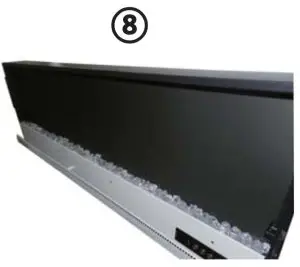
- Gently put the glass crystals into place ( ⑧ )
- Be cautious about the outer glass bracket screws(⑨)
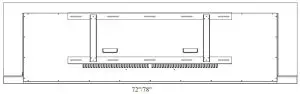
PRODUCT DIMENSIONS
 FRONT VIEW
 BOTTOM VIEW
 Mounting Bar

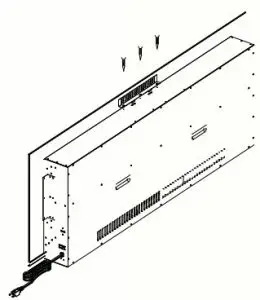
 BACK VIEW
PRODUCT DIMENSIONS
WARNING: Due to high temperatures, this electric fireplace should be located out of traffic. Keep combustible materials such as furniture, pillows, bedding, papers, clothes and curtains at least 36″ from the top of the heater.
WARNING: Never locate this electric fireplace where it may fall into a bathtub or other water container.
CAUTION: Do not expose the electric fireplace to the elements (such as rain, etc)
WARNING: To prevent contact with sagging or loose insulation, the electric fireplace must not be installed against a vapor barrier or exposed insulation. Localized overheating could occur and a fire could result.
UNPACKING AND TESTING FIREPLACE
Carefully remove the unit from the box. Prior to installing the unit, test to make sure the unit operates properly. To do this, plug the unit’s power supply cord into a conveniently located 120 Volt grounded outlet.
INSTALLATION
WARNING: RISK OF FIRE! The power cord must not be pinched or against a sharp edge. Secure cord to avoid tripping or snagging to reduce risk of fire, electric shock or personal injury. Do not run cord under carpeting. Do not cover cord with throw rugs, runners or the like. Arrange cord away from traffic area and where it will not be tripped over.
WARNING: RISK OF FIRE! To prevent a possible fire, do not block air intake or exhaust in any manner. Do not use on soft surfaces where openings may become blocked.
WARNING: RISK OF FIRE! Do not place insulation against the fireplace.
WARNING: This electric fireplace is tested and listed for use only with the approved optional accessories. Use of optional accessories not specifically tested for this electric fireplace could void the heater warranty and / or result in a safety hazard.
WARNING: If the information in these instructions is not followed exactly, a fire or explosion may result causing property damage, personal injury or death. Do not store or use gasoline or other flammable vapors in the vicinity of this or any other heater.
Model 1:


Remove the glass pane first, set the fire box into the wall. Secure the side trim pieces on the wall with screws. Reinstall the glass pane onto the firebox with screws.
OPERATING INSTRUCTIONS
LOCATION
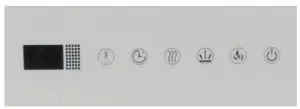
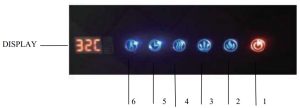
The master power switch is located on the right side of the appliance. The control panel is on the right corner of the glass.
MASTER SWITCH
The master switch controls the power supply to the appliance. Turn the switch to “I” to connect power and turn the switch to “O” to cut the power. There will be a chiming sound when turning to “I”.
- POWER ON/OFFTouch the button once (flame will light up) to turn power on for all functions keep the last flame color once appliance off. Touch the button once more to turn all functions off and flame off.
- FLAME ADJUSTMENTTouch the button to turn flame on. There are 10 colors in total . Press this button to change color. The display will show F1(the orange color), F2(the orange and green color), F3(green color), F4 (green and blue color)F5(blue color), F6(blue and orange color), F7(blue and orange and green color), F8(blue and red color), F9(red color), F0 (all colors loop) to change the different flame color .
- CHARCOAL FIRE COLORTouch the button to turn charcoal fire on. There are 10 colors in total. Press this button to change color. The display will show C1, C2……C0 (all colors loop) to change the different charcoal fire to same as flame color.
- HEAT SETTINGSThis fireplace consists of a fan forced electric heater with two heat settings: 700W (“LO” shown in display) and 1300 W (“HI” shown in display). Touch the button once (the icon will light up) to activate the heater at its low level (700W). Touch the button once more to active the heater at its high level (1300W). When set in high level, touch the button once again to deactivate the heater.Note: The fan will continue to run for a short time and turns off automatically after the heater is turned off.
- TIMERSet the timer using the button (1 to 9 hours), press button once for 1 hour increments.
- Select the temperature display mode of Celcius (C) or Farenheit (F), simply press and hold button for 10 seconds to change.
REMOTE CONTROL FEATURES

- Install the CR2025 3V battery in the remote control.
- Turn the master switch on the e-fireplace to ‘I’ so that it can receive the signal from the remote control.
- Lock the colour for the flame using button 1. Lock the colour for the Log using button 2. Press the button to see and choose the colour.
- CAUTION: Never leave the e-fireplace unattended while heating.
- Refer to Page 11 control buttons/functions for the other buttons on the remote control.
TEMPERATURE LIMITING CONTROL
This heater is equipped with a Temperature Limiting Control. Should the heater reach an unsafe temperature, (115 degrees Celsius) the heater will automatically turn off. To reset: Unplug unit from wall, wait for 5 minutes, plug back in and continue to use.
TROUBLE SHOOTING
Warning: Turn off the fireplace completely and let cool before servicing.
| SYMPTOM | POSSIBLE CAUSES | CORRECTIVE ACTION |
| Fireplace doesn’t work. | Fireplace inner components are overheating or the home circuit breaker has tripped. | Reset switch by turning
master switch off and waiting for 5mins, then turning it back on. |
| Flame is not moving. | Wiring may be loose or the flame motor may be defective. | Call customer service for instructions. |
| Dim or poorly visible flame or glass pebbles aren’t glowing. | LED lights are burnt out or the wiring is loose. | Call customer service for instructions. |
| Flame sputters | Flame motor is defective. | Call customer service for instructions. |
| Remote control does not work. | Low battery.Master switch is in “OFF” position. | Change the battery for remote control. Check to make sure the master switch is turned on. |
| Circuit breaker trips or fuse blows when the unit is on. | Improper circuit current rating. | Call customer service for instructions. |
| Heater does not provide heat when turned on. | Thermal switch has been tripped. Circuit breaker has been tripped. | Turn the unit off and unplug the unit for 5mins. Plug back in and turn on the unit.Turn off circuit breaker that supplies electricity to the unit, wait 5mins, then flip circuit breaker back on. |
| Appliance turns off and will not turn on. | Appliance has overheated and its safety device has caused the thermal switch to disconnect.House circuit breaker has tripped. | Unplug the appliance, allow to cool for 15mins, then plug back in.Reset the house circuit breaker. |
CLEANING
 report this ad
Turn heater OFF and unplug from outlet. Use a vacuum or duster to keep heat and vent area clean from dust and dirt. The exterior should be cleaned with a damp cloth or duster. Do not use abrasive cleaners, liquid sprays, or any other cleaner that may scratch the surface.
[xyz-ips snippet=”download-snippet”]