
Cuisinart DCB-10 Automatic Cold Brew Coffeemaker Instruction Booklet
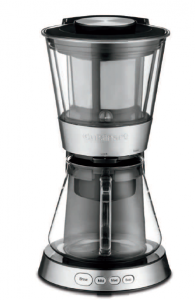
Automatic Cold Brew Coffeemaker
For your safety and continued enjoyment of this product, always read the instruction book carefully before using.
IMPORTANT SAFEGUARDS
When using an electrical appliance, basic safety precautions should always be taken, including the following:
- READ ALL INSTRUCTIONS.
- Unplug from outlet when not in use, before putting on or taking off parts, and before cleaning. To unplug, grasp plug and pull from electrical outlet. Never pullcord.
- To protect against electrical shock, do not put the motor body, cord or electrical plug of this coffeemaker in water or other liquids. Never submerge any other portion of this unit. If the coffeemaker falls into liquid, unplug the unit first, then remove coffeemaker immediately. Do not reach into the liquid without unplugging the unit first.
- This appliance should not be used by children. To avoid possible accidental injury, close supervision is necessary when any appliance is used by ornear children or individuals with certain disabilities.
- Avoid contact with moving parts. Keep hands, hair and clothing, as well as utensils from unit away from unit during operation to reduce the risk of injury and/or damage to the appliance.
- Do not operate any appliance with a damaged cord or plug, or after the appliance has malfunctioned or has been dropped or damaged in any way or dropped into water. Return the appliance to the nearest Cuisinart Repair Center for examination, repair, or mechanical or electrical adjustment.
- The use of attachments or accessories not recommended by Cuisinart may cause fire, electrical shock, or risk of injury.
- Do not use outdoors, or for other than its intended use.
- Do not let any cord hang over the edge of the table or counter. Do not let cord contact hot surfaces, including stovetop.
- Make sure the appliance is off, the motor has stopped completely, and the appliance is unplugged from outlet before putting in or taking out removable parts, and before cleaning.
- Be certain the lid is securely in place before operating appliance.
- Do not operate your appliance in an appliance garage or under a wall cabinet. When storing in an appliance garage, always unplug the unit from theelectrical outlet. Not doing so could create a risk of fire, especially if the appliance touches the walls of the garage or the door touches the unit as it closes.
- Never pour water into the unit unless the removable water tank is securely in place.
- Always fill water tank first,* then plug cord into the wall outlet. To power off, remove plug from wall outlet.
- This appliance is for household use. Any servicing other than cleaning and user maintenance should be done only by authorized Cuisinart Repair Personnel.
- Make sure carafe lid is secure before serving any beverages.
- Do not use a cracked carafe or a carafe having a loose or weakened handle.
- Do not clean carafe or resting plate with harsh cleansers, steel wool pads, or other abrasive materials.
- WARNING: TO REDUCE THE RISK OF FIRE OR ELECTRIC SHOCK, DO NOT REMOVE THE BASE PANEL. NO USER-SERVICEABLE PARTS AREINSIDE. REPAIRS SHOULD BE DONE ONLY BY AUTHORIZED PERSONNEL.
- Use only the included Cuisinart® Stainless Steel Coffee Filter Basket and Stainless Steel Carafe Lid Filter, which are specially designed for this unit.Other filters will not work.
- Do not operate unless all removable parts are securely in place. * Use only cold or room temperature water. Never use hot water.
SAVE THESE INSTRUCTIONS FOR HOUSEHOLD USE ONLY
WARNING: RISK OF FIRE OR ELECTRIC SHOCK
 The lightning flash with arrowhead symbol within an equilateral triangle is intended to alert the user to the presence of uninsulated, dangerous voltagewithin the product’s enclosure that may be of sufficient magnitude to constitute a risk of fire or electric shock to persons.
 The exclamation point within an equilateral triangle is intended to alert the user to the presence of important operating and maintenance (servicing)instructions in the literature accompanying the appliance.
SPECIAL CORD SET INSTRUCTIONS
A short power-supply cord is provided to reduce the risks resulting from becoming entangled in or tripping over a longer cord.Longer extension cords may be used if care is exercised in their use.
NOTICE
This appliance has a polarized plug (one blade is wider than the other). To reduce the risk of electric shock, this plug will fit into a polarized outlet only one way. If theplug does not fit fully into the outlet, reverse the plug. If it still does not fit, contact a qualified electrician. Do not modify the plug in any way.
CAUTION
- Do not immerse base in water.
- To reduce the risk of fire or electric shock, do not disassemble the base.NOTE: The base does not contain any user-serviceable parts.
- Repairs should be made only by authorized personnel.
- Check voltage to be sure that the voltage indicated on the name plate agrees with your voltage.
- Never clean with scouring powders or hard, abrasive implements.
IMPORTANT UNPACKING INSTRUCTIONS
- Place the box on a large, sturdy, flat surface.
- Remove literature.
- Turn the box so that the back side of the coffeemaker is down and slide the coffeemaker from the box.
- After the coffeemaker has been removed, place the box out of the way and lift off the left and right inserts.
- Grasp the carafe by its handle, remove it from the base, and remove the polybag.
- Remove the polybag covering the coffeemaker.
Save all packing materials in case you have to ship the machine in the future.KEEP ALL PLASTIC BAGS AWAY FROM CHILDREN.
COLD BREW COFFEE. THE PERFECT BALANCE.
ELEMENT 1: WATER
Coffee is 98% water. The quality of that water is as important as the quality of your coffee. If water doesn’t taste good from the tap, it won’t taste good in your coffee. It is suggested that filtered water be used to achieve the purest coffee flavor, every time you brew.
ELEMENT 2: TEMPERATURE
The cold brew process never exposes coffee to high temperatures. Instead, coffee is brewed using cool water, which extracts less of the acidic oils that can cause coffee flavor to be a little bitter. The result of cold brewing is a naturally smooth, perfectly balanced cup of coffee.
ELEMENT 3: COFFEE
While coffee is 98% water, all of the flavor comes from the beans. Once the bean is broken, its flavor degrades quickly. To achieve the same great taste you enjoy at a coffee bar,buy only a two-week supply of fresh coffee beans at a time.
ELEMENT 4: PROPORTION
Coffee that is too strong or too weak is always a disappointment. Follow the recommended recipe in the instructions under MAKINGCOFFEE, and later adjust the amount to your taste.
FEATURES AND BENEFITS
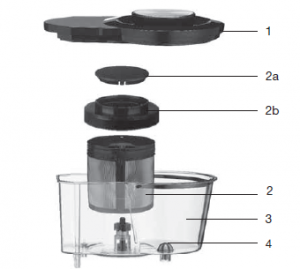
- Coffeemaker Lid Lifts off to access Coffee Filter Basket and Water Tank.
- Coffee Filter Basket Lifts out of Water Tank to fill and clean.2a. Pop-Off Lid2b. Twist-Off Lid
- Removable Water Tank (with water level markings) Removes from unit for easy filling and cleaning.NOTE: NEVER POUR WATER DIRECTLY INTO THE BODY OF THE UNIT UNLESS THE WATER TANK IS SECURELY IN PLACE.

- Removable Water Tank Filter
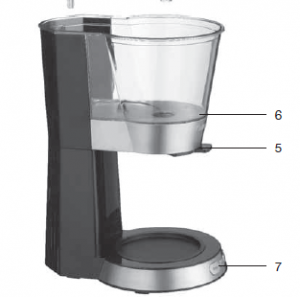
- Coffee Release Lever See detailed illustration, page 6.
- Blue Coffee Release Indicator Light
- Control Panel See detailed illustration, page 6.
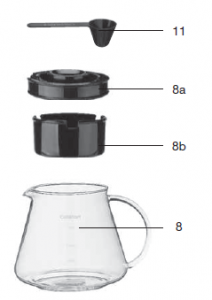
- 7-Cup Glass Carafe The easy-pour carafe has an ergonomic handle and coffee markings for 3 to 7 cups. Can be used to store coffee in the refrigerator.8a. Carafe Lid8b. Carafe FilterRemoves from lid for easy cleaning.
- Ready Tone Alert (not shown) Beeps 3 times when brew cycle is completed and coffee is ready to be released into the carafe. Beeps 5 timeswhen coffee is fully released into carafe and is ready to be served.
- 60-Second Reset (not shown) One-minute protection in case a breaker trips, the unit is unplugged, or the power fails. Retains all programmed information.
- Measuring Scoop
- BPA Free (not shown) All parts that come in contact with coffee or liquids are BPA free.
GETTING TO KNOW YOUR CONTROL PANEL
Detailed programming and use instructions are on pages 7–8.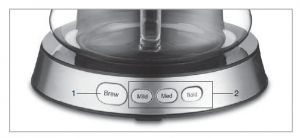
- Brew Button Starts and stops brew cycle.
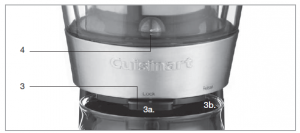
- Strength Buttons Choose Mild, Medium or Bold coffee flavor; white indicator illuminates selected strength.NOTE: The default setting is Medium.3. Coffee Release Lever3a. Lock Position Lever must be in this position to begin brew cycle. Blue indicator light will be off when lever is in this position.3b. Release Position Slide lever to this position for coffee to flow into the carafe after the brew cycle has been completed. Blue indicator lightwill illuminate when lever is in this position.NOTE: Always slide lever back to the Lock position after coffee has been filtered into the carafe, so the coffeemaker is ready for the next brew.
- Blue Coffee Release Indicator Light Illuminates when the Coffee Release Lever is in the Release position. The indicator light will remain on until the lever isreturned to the Lock position.
BEFORE BREWING YOUR FIRST POT OF COFFEE
Rinsing your coffeemaker: During the manufacturing process, dust can get trapped in the unit. We recommend washing all parts of the coffeemaker before the firstuse. See Cleaning and Maintenance on page 9 for detailed instructions.
HELPFUL HINTS
- Always keep Coffee Release Lever in the Lock position when the coffeemaker is not in use.
- Use a dark roast, medium-to-coarse grind for optimal flavor.
- For best results, use filtered cold water to fill the water tank.
MAKING COFFEE

NOTE: Adjust amount according to taste. One level scoop is equal to one tablespoon. Do not fill past the MAX level marking,16 level scoops/16 tablespoons, as it may not fully absorb the water.
- Add the ground coffee Lift off the coffeemaker lid to access the coffee filter basket. The coffee filter basket may be filled one of two ways.a. Leave the coffee filter basket positioned in the water tank and remove the pop-off lid. Use the included measuring scoop to addground coffee. See recommended recipe above. Replace pop-off lid.b. Remove the coffee filter basket from the water tank and unscrew the twistoff lid. Use the included measuring scoop to add ground coffee. Seerecommended recipe. Replace twistoff lid and turn clockwise 1½ times to secure lid. Position the coffee filter basket into the water tank and pushdown until clicked into place. Replace coffeemaker lid.NOTE: If the coffee filter basket is not securely positioned in the water tank, the coffeemaker lid will not fit properly.
- Fill the water tank IMPORTANT NOTICE: ALWAYS MAKE SURE THE RELEASE LEVER IS IN THE LOCK POSITION BEFORE FILLING THEWATER TANK TO PREVENT WATER FROM FLOWING OUT.NEVER FILL USING HOT WATER. Slowly pour the desired amount of cold water into the water tank, using the water level indicators located on the backside ofthe water tank.Use the water level indicator WITH COFFEE BASKET when ground coffee has been added to coffee filter basket and ispositioned in the water tank. Use the water level indicator WITHOUT COFFEE BASKET when coffee filter basket is not positioned in the water tank.NOTE: The water tank may be removed to fill. Use the handle to remove water tank from the unit. Slowly pour the desired amount of cold water into water tankand place securely back into the unit. Replace coffeemaker lid. NEVER POUR WATER DIRECTLY INTO THE BODY OF THE UNIT WITHOUT THE WATER TANK SECURELY IN PLACE.
- Position carafe and plug in unitInsert carafe lid and filter into the carafe and place carafe on the resting plate. Plug coffeemaker into an electrical outlet. If the coffeemaker remains untouched for 30minutes, it will enter standby mode and all lights will be off. Press any button to wake up the unit.
- Set strength preferenceThe default strength setting is Medium. Press Mild or Bold button to change selection. The LED on the selected strength button will illuminate.NOTE: The brew time varies according to the strength selected. See times below:
Strength
Brew Time
Mild 25 Minutes Medium 35 Minutes Bold 45 Minutes - Start brewingPress the Brew button to begin the brew cycle. The Brew LED will illuminate and brewing will begin. The coffee filter basket gently spins and pauses throughout thebrew cycle.To cancel brewing, press Brew button once; the indicator light will go off and brew cycle will stop.
- After brewingWhen the brewing cycle has been completed, 3 beeps will sound and the Brew and selected strength LEDs will start flashing, signaling that the coffee is readyto be released into the carafe.
- Release coffee into the carafe Slide the coffee release lever to the right, to the Release position. Blue coffee release indicator light will illuminate and white indicator lights will go off. Coffee will stream into the carafe for approximately 2 minutes. The coffee filter basket will go through a final spin cycle while coffee is being filtered into the carafe. Once the coffee release cycle is finished, 5 beeps will sound, indicating that coffee is ready to be served.NOTE: Removing the carafe before the release cycle is completed will cause the coffee to flow out onto the counter.
- Slide lever back to the Lock position and enjoy your Cuisinart® Cold Brew Coffee!
 b. Remove the coffee filter basket from the water tank and unscrew the twistoff lid. Use the included measuring scoop to add ground coffee. Seerecommended recipe. Replace twistoff lid and turn clockwise 1½ times to secure lid. Position the coffee filter basket into the water tank and pushdown until clicked into place. Replace coffeemaker lid.
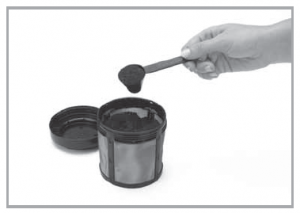 NOTE: If the coffee filter basket is not securely positioned in the water tank, the coffeemaker lid will not fit properly.
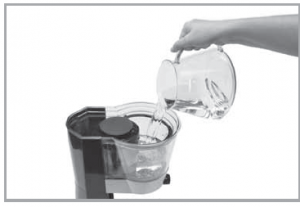 Use the water level indicator WITH COFFEE BASKET when ground coffee has been added to coffee filter basket and ispositioned in the water tank. Use the water level indicator WITHOUT COFFEE BASKET when coffee filter basket is not positioned in the water tank.
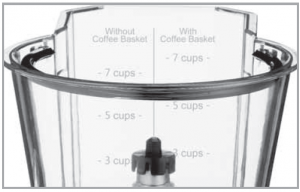 NOTE: The water tank may be removed to fill. Use the handle to remove water tank from the unit. Slowly pour the desired amount of cold water into water tankand place securely back into the unit. Replace coffeemaker lid. NEVER POUR WATER DIRECTLY INTO THE BODY OF THE UNIT WITHOUT THE WATER TANK SECURELY IN PLACE.
 NOTE: Removing the carafe before the release cycle is completed will cause the coffee to flow out onto the counter.
CLEANING AND MAINTENANCE
Always turn coffeemaker off and remove the plug from the electrical outlet before cleaning.
- Lift off the coffeemaker lid.
- Use the handle to remove the water tank from the unit.
- Remove the coffee filter basket from the water tank to discard ground coffee.
- The water tank and coffee filter basket can be washed in warm, soapy water and rinsed thoroughly, or cleaned in the upper rack of the dishwasher.NOTE: The coffee filter basket should be soaked regularly in warm, soapy water for 30 minutes to prevent oil buildup.
- Dry all parts after use.
- Do not put any water in the unit once the water tank has been removed. Wipe the area under the water tank with a damp cloth.
- Remove the carafe from the base. Discard any remaining coffee.
- Remove the carafe lid from the carafe filter by lightly pressing on both sides of the filter while pulling off the lid.
- The carafe lid and filter can be washed in warm, soapy water and rinsed thoroughly, or cleaned in the upper rack of the dishwasher. Do not use any scouring agents or harsh, abrasive cleansers on any part of the coffeemaker. Never immerse base unit in water or other liquids. To clean base, simply wipe with aclean, damp cloth and dry before storing. Fingerprints and other blemishes on the housing can be washed off with soap and water or a nonabrasive cleaning solution.
Maintenance
Any other servicing should be performed by an authorized service representative.
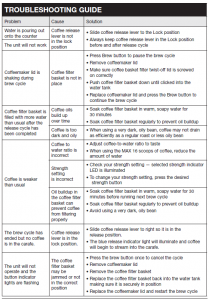
TROUBLESHOOTING GUIDE
WARRANTY Limited Three-Year Warranty (U.S. and Canada only)
This warranty is available to U.S. consumers only. You are a consumer if you own a Cuisinart® Automatic Cold Brew Coffeemaker that was purchased at retail for personal, family or household use. Except as otherwise required under applicable law, this warranty is not available to retailers or other commercial purchasers orowners. We warrant that your Cuisinart® Automatic Cold Brew Coffeemaker will be free of defects in materials and workmanship under normal home use for 3 years from the date of original purchase.
We recommend that you visit our website, www.cuisinart.com for a fast, efficient way to complete your product registration. However, product registration does not eliminate the need for the consumer to maintain the original proof of purchase in order to obtain the warranty benefits. In the event that you do not have proof of purchase date, the purchase date for purposes of this warranty will be the date of manufacture.
CALIFORNIA RESIDENTS ONLY
California law provides that for In-Warranty Service, California residents have the option of returning a nonconforming product (A) to the store where it was purchased or (B) to another retail store that sells Cuisinart products of the same type. The retail store shall then, according to its preference, either repair the product, refer the consumer to an independent repair facility, replace the product, or refund the purchase price less the amount directly attributable to the consumer’s prior usage of the product. If neitherof the above two options results in the appropriate relief to the consumer, the consumer may then take the product to an independent repair facility, if service or repair can beeconomically accomplished. Cuisinart and not the consumer will be responsible for the reasonable cost of such service, repair, replacement, of refund for nonconforming products under warranty. California residents may also, according to their preference, return nonconforming products directly to Cuisinart for repair or, if necessary, replacement by calling our Consumer Service Center toll-free at 1-800-726-0190. Cuisinart will be responsible for the cost of the repair, replacement, and shipping and handling for such nonconforming products under warranty.
BEFORE RETURNING YOUR CUISINART PRODUCT
If your Cuisinart® Automatic Cold Brew Coffeemaker should prove to be defective within the warranty period, we will repair or, if we think necessary, replace it. To obtain warranty service, please call our Consumer Service Center toll-free at 1-800-726-0190 or write to: Cuisinart, 7475 North Glen Harbor Blvd., Glendale, AZ 85307. Tofacilitate the speed and accuracy of your return, please enclose $10.00 for shipping and handling of the product, along with proof of purchase. (California residents need only supply proof of purchase and should call 1-800-726-0190 for shipping instructions.) Be sure to include your return address, phone numbers, description of the product’s defect, product serial number, and any other information pertinent to the return. Please pay by check or money order made payable to Cuisinart. NOTE: For added protection andsecure handling of any Cuisinart product that is being returned, we recommend you use a traceable, insured delivery service. Cuisinart cannot be held responsible for in-transit damage or for packages that are not delivered to us. Lost and/or damaged products are not covered under warranty.
Your Cuisinart® Automatic Cold Brew Coffeemaker has been manufactured to the strictest specifications and has been designed for use only in 120-volt outlets and only with authorized accessories and replacement parts. This warranty expressly excludes any defects or damages caused by attempted use of this unit with a converter, as well as use with accessories, replacement parts or repair service other than those authorized by Cuisinart. This warranty does not cover any damage caused by accident, misuse, shipment or other than ordinary household use. This warranty excludes all incidental or consequential damages. Some states do not allow the exclusion or limitation of these damages, so these exclusions may not apply to you. This warranty gives you specific legal rights and you may also have other rights, which vary from state to state.
Important: If the nonconforming product is to be serviced by someone other than Cuisinart’s Authorized Service Center, please remind the servicer to call our Consumer Service Center at 1-800-726-0190 to ensure that the problem is properly diagnosed, the product is serviced with the correct parts, and to ensure that the product is still under warranty.
Read More About This Manual & Download PDF:
Cuisinart DCB-10 Automatic Cold Brew Coffeemaker Instruction Booklet – Cuisinart DCB-10 Automatic Cold Brew Coffeemaker Instruction Booklet –
[xyz-ips snippet=”download-snippet”]