
QUICK REFERENCE GUIDE
IMPORTANT!Do not throw away these instructions. Read before operating your new Smart Stick®Variable Speed Hand Blender. Keep for future reference. These helpful hints are intendedto be a supplement to the Instruction Booklet. In order to ensure safe operation and optimumperformance, please read the entire Instruction Booklet.
PARTS INCLUDED
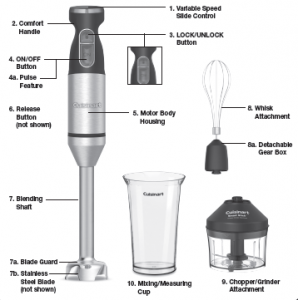
PARTS AND FEATURES
1. Variable Speed Slide Control: Lets you adjust speed from low to high for the ingredients you are blending.2. Comfort Handle: The ergonomic handle allows you to maneuver the hand blender with ease.3. LOCK/UNLOCK Button: Must be pressed to unlock before power handle will operate.4. ON/OFF Button: Simply press and hold down the button to blend. Once the button is released, blending will stop.4a. Pulse Feature: Repeatedly press and release the ON/OFF button to PULSE (while holding down the LOCK/UNLOCK button).5. Motor Body Housing: Powers the blender. Release button in back makes it easy to attach and detach blending shaft and whisk assembly.6. Release Button: (not shown)7. Detachable Blending Shaft: Snaps into the motor body housing.7a. Blade Guard: The fixed-mount stainless blade is partially covered by a stainless guard to keep splatter to a minimum.7b. Stainless Steel Blade8. Whisk Attachment: Whisk attachment snaps into the gearbox which connects to the motor body housing. The whisk is great for whipping cream, egg whites and other delectable treats.8a. Detachable Gear Box: Whisk attaches to it.9. Chopper/Grinder Attachment with Reversible Blade: Chop, mince and grind with the Cuisinart® chopper/grinder attachment. Chopper/grinder attaches to the motor body in place of the blending shaft or whisk attachment. To remove cutting blade from the chopping bowl, twist right or left and release to attach the cutting blade, press down and twist until it locks10. Mixing/Measuring Cup: 3-cup(24 oz.) mixing cup is top-rack dishwasher safe. Use this container to blend drinks, shakes, salad dressings and more. Designed for easy gripping and drip-free pouring
BLENDING ATTACHMENT
1. Align the motor body housing with the blending shaft and push the piecestogether until you hear and feel them click together. It may be helpful to press the release button whenassembling.2. Plug the power cord of the hand blender into an electrical outlet.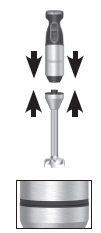
WHISK ATTACHMENT1.Align the motor body housing with the assembled whisk attachment and push the pieces together until you hear and feel them click together. It may be helpful to press the release button when assemblingNOTE: Whisk and whisk gearbox are detachable from one another.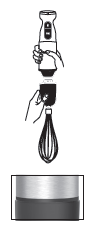
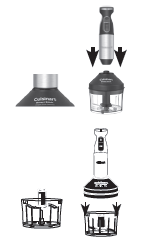
CHOPPER/GRINDER ATTACHMENT
1. Connect the motor body housing to the top of the work bowl cover.2. Align the spine in the chopper/grinder cover’s drive shaft with the ribbed opening on the underside of the motor body housing.3. When aligned properly, slide the two pieces together until you feel and hear a slight click.4. Place the chopping/grinding blade into center of the work bowl over metal blade shaft.5. Place the motor body housing with cover on top of the work bowl and rotate clockwise to lock into place.6. Plug the power cord of the hand blender into an electrical outlet.
Cuisinart Smart Stick Variable Speed Hand Blender Quick Reference Guide – Cuisinart Smart Stick Variable Speed Hand Blender Quick Reference Guide –
[xyz-ips snippet=”download-snippet”]