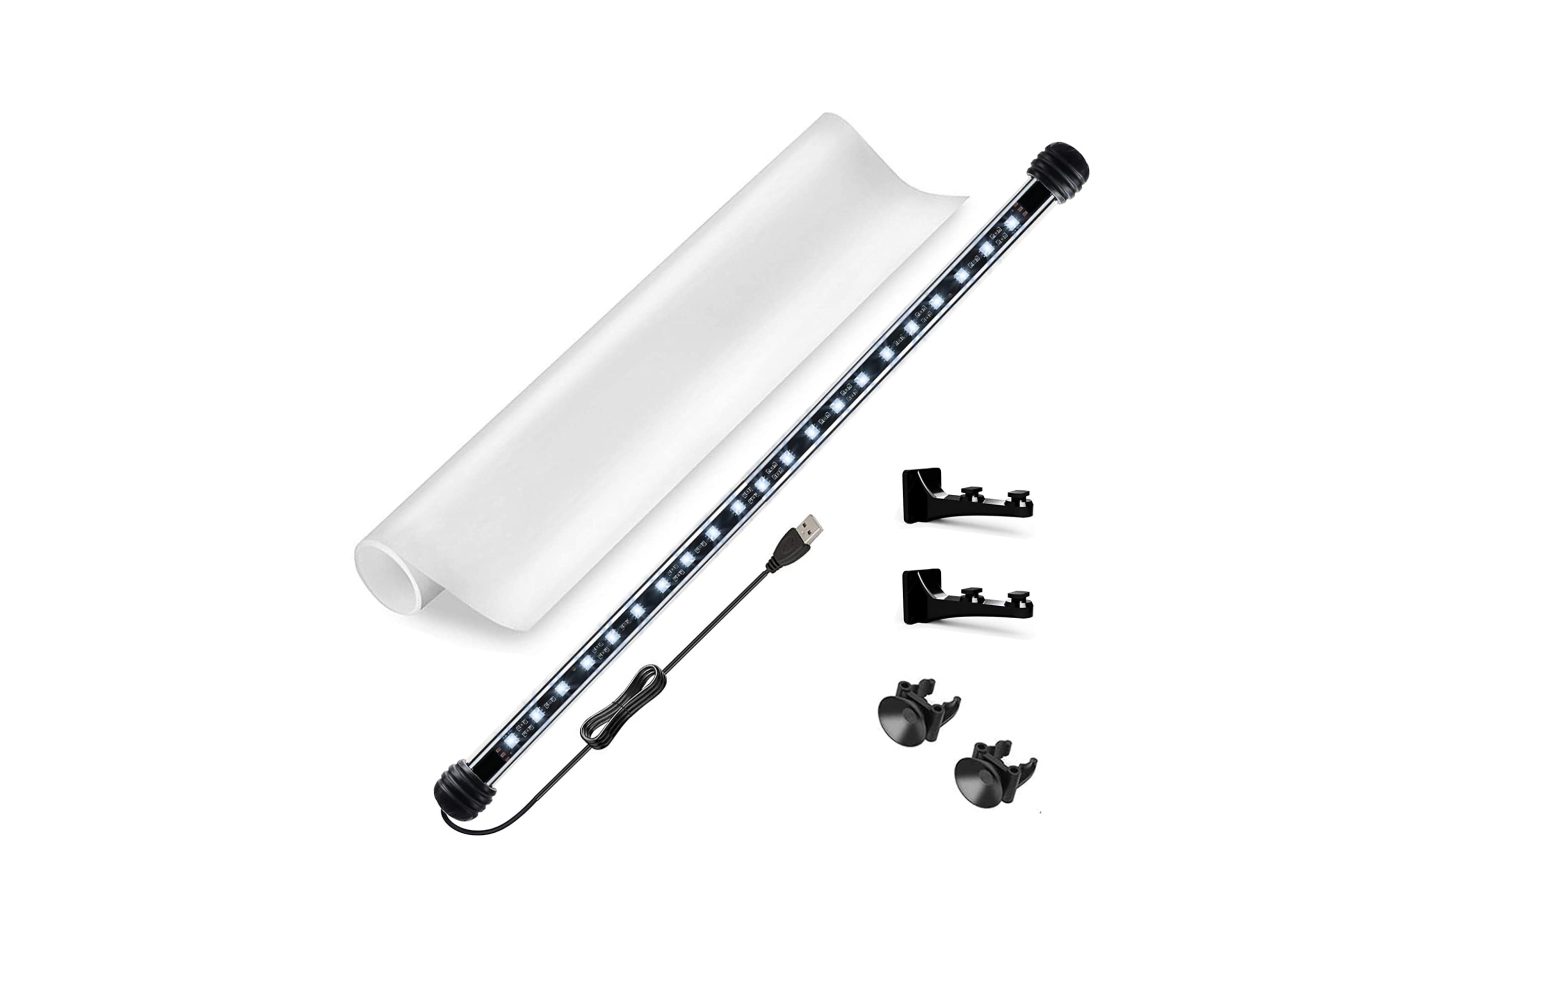
SERENE ACCESSORY BACKGROUND LIGHT
What’s IncludedEach Serene Accessory Background Light includesIMPORTANT: IF YOU ARE MISSING ANY NY PARTS, PLEASE CONTACT US AT: www.current-usa.com DO NOT CONTACT YOUR RETAILER
Item Description – Quantity A. Serene LED Background LightB. Serene Aquarium Background FilmC. Background LED clips w/suction cupsD. Background mount clips w/tape & screws 2
STEP 1 – Serene Background Installation
NOTE: If simply taping aquarium background film to glass back, follow steps 1-3 then use clear tape to attach background to aquarium. Trim if needed. If using static cling method, please follow ALL steps below.
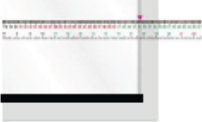 1. Measure glass aquarium back & lightly mark cutting lines on the back side of film material.
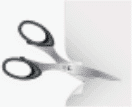 2. CAREFULLY cut background film to size using scissors or a razor blade knife.
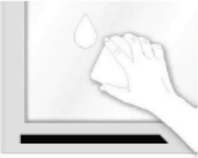 3. Remove any aquarium components (such as a hang-on filter) and clean aquarium back using freshwater (do not use soap or spray cleaner.)
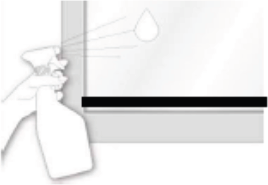 4. Thorougly wet back of glass with clean freshwater using a sponge or sprayer.
 5. Remove corner of film backing and stick to top corner of aquarium. Peel clear film backing and apply background to wet glass. (TIP: Using more water on glass back while installing the glass film will make positioning easier.)
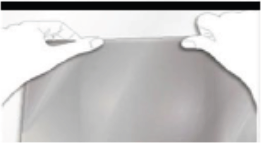 6. Use your hand to position film and remove any large air bubbles.
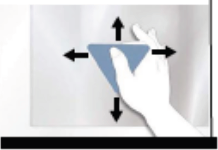 7. Squeeze out water and air bubbles with a smooth tool (such as a flat ruler or credit card.) Check for tiny air bubbles from both sides of the glass. If there are tiny bubbles, do more squeegeeing.
8. Place ruler or card at aquarium glass edge and carefully trim background material using a razor blade. Wipe any excess water with a lint free cloth, then re-install any aquarium accessories.
STEP 2 – Serene Background LED Light Installation
Two installation methods for the Serene Background LED light are included with each Serene LED Kit:
- Swivel clips with stand mounts – this is the ideal method of mounting and will provide the strongest lighting effect for background lighting, however does require space (6″+) for installation. This is also the preferred method if installing on a rimless/frameless aquarium.
- Swivel clips with suction cups – this is the easiest method of installation, however does require a surface for suction cup mounting (either aquarium plastic frame or glass top.)
Note: The Serene Background LED light is IP68/Submersible and waterproof, so installing under glass canopies or inside aquarium on back wall is acceptable.
Installation Method #1 – Swivel Clips with Stand Mounts
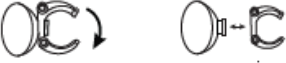 1. Remove light swivel clips from suction cups by turning 90 degrees and removing.
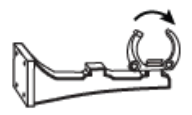 2. Place clips onto outer tabon stand mounts and turn 90 degrees to attach.
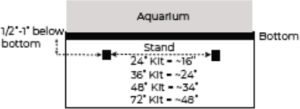 3. Mark installation location of stand mounts (ideally, 1/2″-1″ below bottom of aquarium and 1″-6″ from ends.
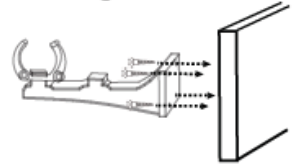 4. Attach stand mounts to back of stand using 4 small wood screws. (NOTE: 3M adhesive tape is also included for installation, Skip to Step 6 below.)
 5. Insert Background LED light into swivel clips and swivel LEDs to illuminate background film.
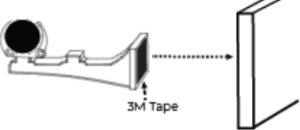 6. If using 3M adhesive tape, insert Background LED light into swivel clips and position LEDs to illuminate background light. Attach 3M adhesive tape to stand mounts and position into place by pressing firmly towards stand.
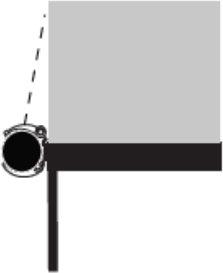
 Installed background light with stand mounts.
STEP 2 – Serene Background LED Light Installation
Installation Method #2 – Swivel Clips with Suction Cups
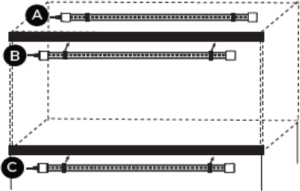
The included suction cups are a simple way to install the background LED light, especially for framed aquariums or aquariums with glass tops. The best mounting locations include:
A. Inside or outside Glass TopB. Top aquarium frameC. Bottom aquarium frame
1. Locate Background LED light mounting location and clean of any dirt, algae or debris.
 2. Slightely moisten inside of suction cups and firmly press LED light into desired location.
 3. Swivel LED light to illuminate backround film.
Note: To get the strongest background lighting effect, it’s best to place light a few inches away from background vs. lighting close. This provides distance for the LED light to spread evenly over the background film andcover a wider surface area.
STEP 3 -Connect Background Light to Controller
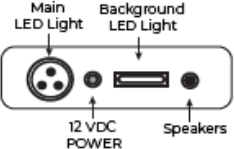
1. Plug-in Background Light USB plug to controller. Press any background fade key on remote to turn-on. Follow programming instructions Main Background in manual to begin your Serene background experience!
Safety Wamings and Warranty
IMPORTANT WARNINGS SAVE THESE INSTRUCTIONS
This ts NOT a page of legalese. It contains important safety information that you should read and save tor future reference. Remember you can always quickly access instructions for all our products at www.current-usa.com.
- Never attempt repairs yourself; return the appliance to an authorized service facility for service or discard the appliance,
- Carefully examine the fixture after installation and BEFORE you plug it into the GFC! wail outlet. Be sure there is no water on any part of the light fixture or the timer.
- Never plug in & wet cord. If a plugged in unit or socket does get wet, DON’T touch it. Insteed, promptly disconnect the fuse or circuit breaker that supplies power to the fixture. Then, you may unplug the fixture and examine for the preeance of water.
- Never operate a fixture that is damaged or malfunctioning, scontinue use immediately and retum the appliance to an authorized service facility,
- Glose supervision is necessary when any appliance is used by or near children,
- Always unplug the fixture when not in use, before putting on or taking off parts, and before cleaning. Naver pull the cord to unplug from the GFCI.
- Do nat use the fixture for anything other than intended use. The use of attachments not recommended or sold by the fixture manufacturer may cause an unsafe condition and will void your warranty,
- Do not install or store the fixture where it will be exposed to the weather or to temperatures below O° Celsius or 32° Fahrenheit. Do not operate at temperatures above 50° Celsius or 122° Fahrenheit.
- Ensure the fixture is securely installed before supplying power to the unit.
- Read and observe ail the important notices and warnings on the fixture and power cord. DO NOT REMOVE THE WARNING LABEL.
- if an extension cord is necessary, a oord with a rating at least 15 amperes should be used. A cord rated for less amperes or watts than the fixture rating may overheat, Care should be taken to arrange the cord so that i will nat be tripped over or pulled.
- Do not look directly into the LEDs,
- Do not install pumps where strong currents can harm animals. Do Not install close to sand bed where it can suck/stir sand.
- Pumps can produce powerful wave action in both wave and surge modes. Ensure your aquarium is designed for wave pumps and ensure pumps are mounted low enough not to push water out of the aquarium tank.
- Magnet assembly is VERY powerful. Be cautious not to cause injury to fingers.
- Keep magnets and all accessories out of reach of children.
- Never place magnets or pump near sensitive electronics, sharp objects or other attractive surfaces.
- Do not run pumps dry or out of water.
- Always place spacer between magnets when not in use.
- Always unplug with dry hands for maintenance or servicing.
- Tum all controllers OF F and disconnect power supply before performing any service or maintenance.
- This product MUST be powered by a UL or ETL listed power supply.
- To avoid possible electric shock, power supply MUST be plugged into a GFCI wall outlet installed by a certified electrician in accordance with ail local codes. All products must have a drip loop.
Important Warnings Drip Loops
Drip Loops should always be used to help prevent water from Information that you should read and save for future reference. traveling along the cord and conting into contact with an electrical Remember you can always quickly access instructions for all outlet.
Current-USA One Year Limited Warranty
This product MUST be purchased from an authorized Current-USA reseller. Visit our website for a list of unauthorized resellers. Current USA, Inc. warrants this product against defects inmaterials and worksmanship for ONE (1) YEAR from the date of original retail purchase and is none transferable.
Warranty on all Products, including Aquariums, is limited to replacement of the product and does not cover fish loss, personal injury, property loss or direct, incidental or consequential darmage arising from the use of this product.
Note: Current-USA, Inc. One-Year Limited Warranty does not cover damage caused by the following: improper installation, saltwater corrosion, electrical surges, or mosifications.
If the aquarium is found to be defective, Current-USA will repair or replace the aquarium, provided the following stipulations are met:
Aquarium must be placed on a level, suitably designed and correctly sized aquarium stand.
Aquarium has not been moved or lifted when filled with water or any decorations such as decorations, rock, wood or substrate. Aquarium and stand has not been altered or modified in anyway (including drilling additional holes) or used for anything for its intended purpose Violating any of these stipulations voids warranty.
 report this ad
This warranty does not apply if the product has been damaged by accident, abuse, misuse or misapplication or if the product has bee modified without the written permission of Currant-USA, Inc,; or any Current-USA, Inc. logos have bean removed or defaced.
[xyz-ips snippet=”download-snippet”]