current Serene Sun / Aquaserene Led
User Manual
![]()
SERENE SUN / AQUASERENE LED
Additional Help
For additional installation instructions and videos, please visit our website at www.current-usa.com
What’s Included
Each Serene Sun / AquaSerene LED lighting system includes:

NOTE: If your LED light is missing any of the above components, please contact us directly by visiting www.current-usa.com/support. Do not return to your retailer.
Optional Accessories
The following optional accessories are compatible with the Serene Sun and Aqua Serene LED light. For more information, visit www.current-usa.com.
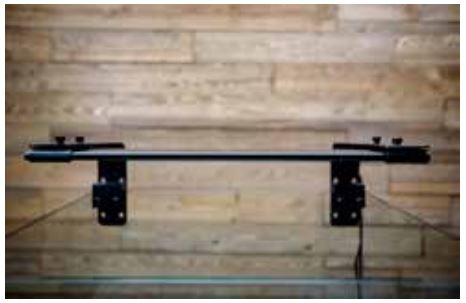
Tank Mount Arm BracketsClean, sleek, easy to install. For rimless and framed aquariums.
Serene Background Light Kits(Connects directly to your Serene LED, Light & background film included) Available in 24″ – 72″ lengths

STEP 1 – Serene LED Light Installation
- Unpack light fixture and components. Remove any plastic film on light fixture.
- Slide the adjustable docking legs on the side of the light fixture to match the length of aquarium. (Refer to Adjustable Tank Mounting Bracket instructions if applicable.)
- Set fixture on aquarium and ensure docking legs fit snug on edges of aquarium.
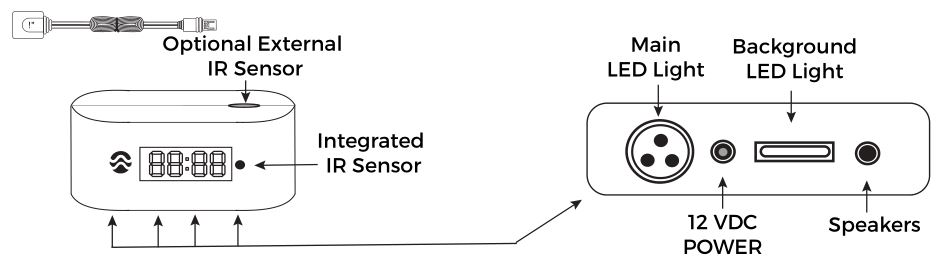
STEP 2 – Serene LED Controller Installation
- Choose a location underneath your aquarium cabinet free of excessive moisture and allows for direct line of site for IR sensor* to receive signals from remote control.(NOTE: An additional External IR sensor with 12″ cable is included for under cabinet installation.)

- IMPORTANT: Plug-in all lighting, power and speaker cables as shown above before mounting controller.
- Place Serene controller in clear protective case and mount to stand using 3M adhesive tape. (If using optional external IR sensor, connect to control and ensure end of sensor has a clear line of site for remote control.
- Position audio speakers on each side of stand or attach to sides of stand using the included Velcro tape.
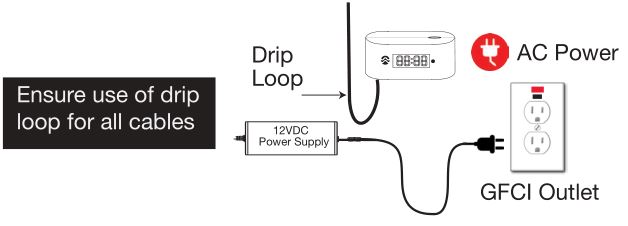
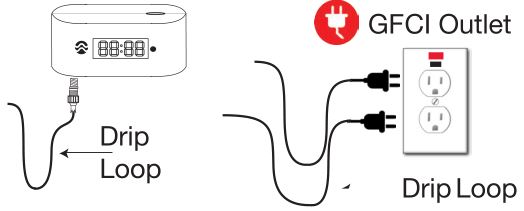
- Plug-in 12VDC power supply into a GFCI approved outlet. Ensure a drip loop is in place for all cables.
- Remove plastic cover from remote control and remove plastic battery tab at bottom of remote. Press the Main power key to ensure controller turns on. Follow programming instructions on page 6 to begin your Serene Experience!
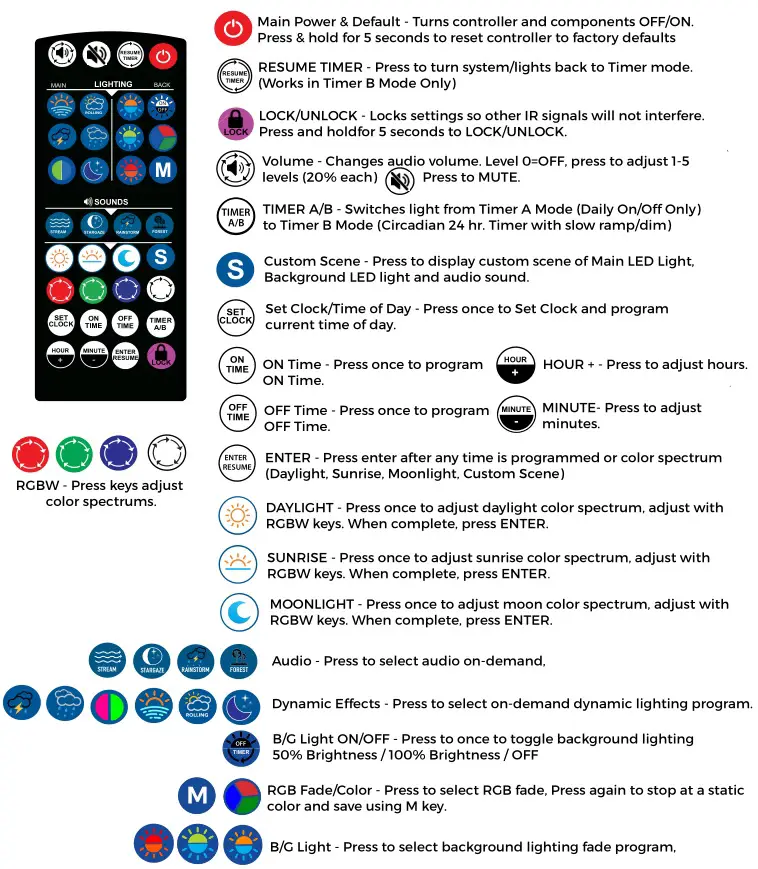
STEP 3 – Serene Remote Overview
STEP 4 – Serene Timer Overview
The Serene LED light controller features two timer functions:
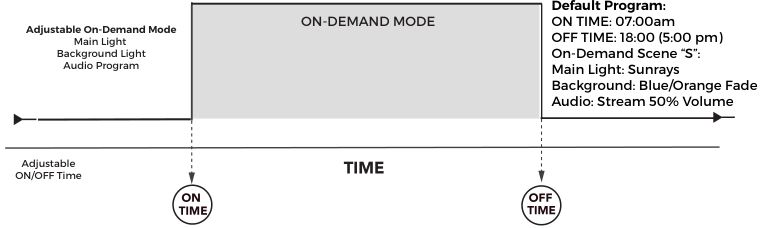
- Timer A – Dynamic On/Off timer for playing a custom scene (main light, background light and audio) with a simple daily ON/OFF time.
- Timer B – Circadian 24-Hour mode for running a gradual Sunrise, Daylight, Sunset, and Moonlight programmed around a daily ON/OFF time.
TIMER MODE A – Simple Dynamic ON/OFF
TIMER MODE B – 24 Hour Circadian Timer
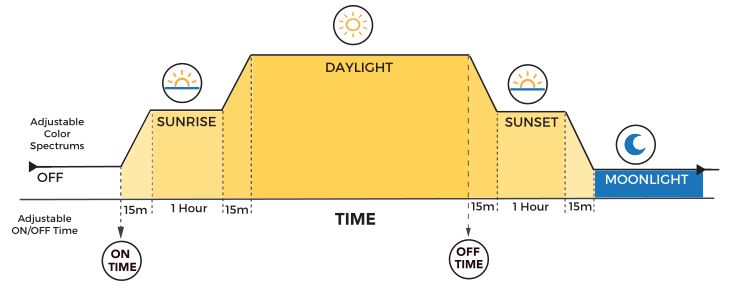
Default Program:ON TIME: 07:00OFF TIME: 18:00Daylight Spectrum: W-100%, R-100%, G-100%, B-100%Sunrise/Sunset Color Spectrum: W-50%, R-75%, G-5%, B-75%Moonlight Color Spectrum: W-0%, R-50%, G-0%, B-10%“M”: 100% Red (same as A mode)
STEP 5 – Dynamic Lighting & Audio
DYNAMIC LIGHTING & AUDIO EFFECTS
The Serene LED Kit is designed to be simple and is plug-in-play ready to change your aquarium experience. To begin and explore Serene, we suggest installing all the lighting and audio components, turning the controller on and try all of the incredible dynamic lighting and audio effects on-demand by simply pressing any of the dynamic keys below.
Running your Serene LED in a timer mode is not required. You can enjoy the Serene experience on-demand and simply press the POWER ON/OFF key when you desire.
What’s to experience? Here is a brief overview of the sleek effects Serene has built-in and ready to play on-demand:

Main Programming Functions:
![]() Turning Serene ON/OFFPress the MAIN ON/OFF power key to turn the Serene LED lights, background light and controller ON or OFF.
Turning Serene ON/OFFPress the MAIN ON/OFF power key to turn the Serene LED lights, background light and controller ON or OFF.
![]() LOCK & UNLOCK SettingsThe integrated LOCK/UNLOCK feature is designed to ensure other IR signals (e.g. LOCK TV remote) do not intefere with your Serene LED system. To LOCK all settings, simply press the LOCK icon, “—-” will display.
LOCK & UNLOCK SettingsThe integrated LOCK/UNLOCK feature is designed to ensure other IR signals (e.g. LOCK TV remote) do not intefere with your Serene LED system. To LOCK all settings, simply press the LOCK icon, “—-” will display.
STEP 6 – CONTROLLER PROGRAMMING
MAIN PROGRAMMING FUNCTIONS
Audio Volume Control![]() You can adjust the audio level on your Serene LED system by simply pressing the volume key. There are 6 total levels available, each will show on the display when pressed. Display will read U0=OFF, U1=20%,..U5=100%. (Volume can also be adjusted on the speakers (back dial) or muted by pressing the MUTE key.
You can adjust the audio level on your Serene LED system by simply pressing the volume key. There are 6 total levels available, each will show on the display when pressed. Display will read U0=OFF, U1=20%,..U5=100%. (Volume can also be adjusted on the speakers (back dial) or muted by pressing the MUTE key.
PROGRAMMING TIMER A MODE:
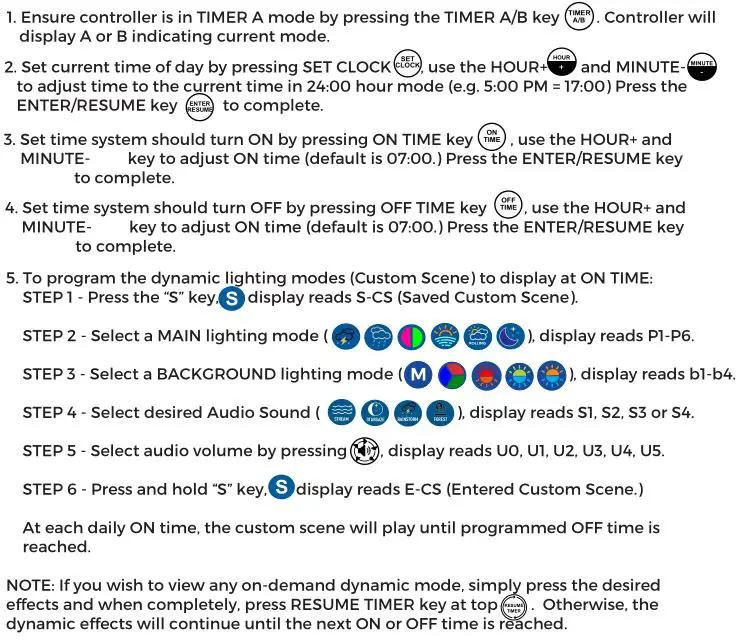
STEP 7 – CONTROLLER PROGRAMMING
PROGRAMMING TIMER B MODE:
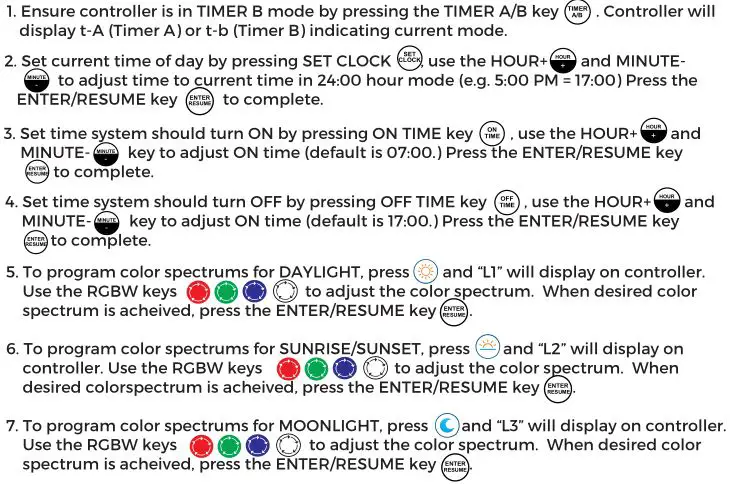
NOTE: In TIMER B Mode, the “S” key can only be used on-demand and cannot be programmed into the daily lighting schedule.
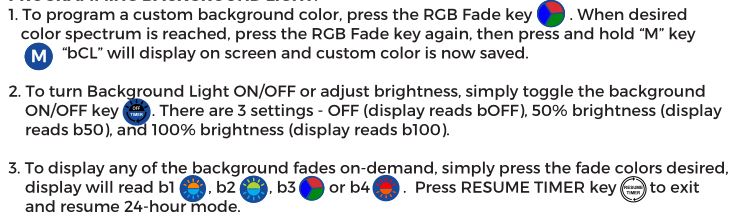
PROGRAMMING BACKGROUND LIGHT:
SAFETY & WARRANTY INFORMATION
IMPORTANT WARNINGS | SAVE THESE INSTRUCTIONS
This is NOT a page of legalese. It contains important safety information that you should read and save for future reference. Remember you can always quickly access instructions for all our products at www.current-usa.com.
- Never attempt repairs yourself; return the appliance to an authorized service facility for service or discard the appliance.
- Carefully examine the fixture after installation and BEFORE you plug it into the GFCI wall outlet. Be sure there is no water on any part of the light fixture or the timer.
- Never plug in a wet cord. If a plugged in unit or socket does get wet, DON’T touch it. Instead, promptly disconnect the fuse or circuit breaker that supplies power to the fixture. Then, you may unplug the fixture and examine for the presence of water.
- Never operate a fixture that is damaged or malfunctioning, discontinue use immediately and return the appliance to anauthorized service facility.
- Close supervision is necessary when any appliance is used by or near children.
- Always unplug the fixture when not in use, before putting on or taking off parts, and before cleaning. Never pull the cord to unplug from the GFCI.
- Do not use the fixture for anything other than intended use. The use of attachments not recommended or sold by the fixture manufacturer may cause an unsafe condition and will void your warranty.
- Do not install or store the fixture where it will be exposed to the weather or to temperatures below 0° Celsius or 32° Fahrenheit.
- Do not operate at temperatures above 50° Celsius or 122° Fahrenheit.
- Ensure the fixture is securely installed before supplying power to the unit.
- Read and observe all the important notices and warnings on the fixture and power cord. DO NOT REMOVE THE WARNING LABEL.
- If an extension cord is necessary, a cord with a rating at least 15 amperes should be used. A cord rated for less amperes or watts than the fixture rating may overheat. Care should be taken to arrange the cord so that it will not be tripped over or pulled.
- Do not look directly into the LEDs.
- Always unplug with dry hands for maintenance or servicing.
- Turn all controllers OFF and disconnect power supply before performing any service or maintenance.
- This product MUST be powered by a UL or ETL listed power supply.
- To avoid possible electric shock, power supply MUST be plugged into a GFCI wall outlet installed by a certified electrician in accordance with all local codes. All products must have a drip loop.
Important Warnings | Drip Loops
Drip Loops should always be used to help prevent water from coming in contact with electrical connections and power outlet. Drip loops must always be below the level of the outlet.
Current-USA One Year Limited Warranty
This product MUST be purchased from an authorized Current-USA reseller. Visit our website for a list of unauthorized resellers. Current USA, Inc. warrants this product against defects in materials and worksmanship for ONE (1) YEAR from the date of original retail purchase and is none transferable.
Warranty on all Products, including Aquariums, is limited to replacement of the product and does not cover fish loss, personal injury, property loss or direct, incidental or consequential damage arising from the use of this product.
Note: Current-USA, Inc. One-Year Limited Warranty does not cover damage caused by the following: improper installation, saltwater corrosion, electrical surges, or modifications.
If you discover a defect, please see your retail store or point of purchase. Current USA, Inc. will, at it’s option, repair or replace the product at no charge to you, provided you return it during the warranty period. A copy of the bill of sale is required as proof of original purchase date in the event the product needs repairs within the warranty period. Please see your dealer for return options and warranty replacement parts.This warranty applies only to products by or for Current USA, Inc. that can be identified by trade name, or logo affixed to them. Current-USA, Inc. does not warrant any products that are not Current-USA, Inc
This warranty does not apply if the product has been damaged by accident, abuse, misuse or misapplication or if the product has been modified without the written permission of Current-USA, Inc .; or if any Current-USA, Inc. logos have been removed or defaced.
THE WARRANTY AND REMEDIES SET FORTH ABOVE ARE EXCLUSIVE AND IN LIEU OF ALL OTHERS, WHETHER ORAL OR WRITTEN, EXPRESSED OR IMPLIE URRENT USA, INC. SPECIFICALLY DISCLAIMS ANY AND ALL IMPLIED WARRANTIES, INCLUDING BUT NOT LIMITED TO LOST PROFITS, DOWNTIME, GOODWILL, DAMAGE TO OR REPLACEMENT OF EQUIPMENT AND PROPERTY, AND ANY COSTS OF RECOVERING ANIMALS, PLANTS, TANKS OR OTHER AQUARIUM RELATED ITEMS AND/OR EQUIPMENT. CURRENT USA, INC. IS NOT RESPONSIBLE FOR SPECIAL, INCIDENTAL, OR CONSEQUENTIAL DAMAGES RESULTING FROM ANY BREACH OF WARRANTY, OR REPLACEMENT OF EQUIPMENT OR PROPERTY, OR ANY COSTS OF RECOVERING OR REPRODUCING ANY EQUIPMENT, ANIMALS OR PLANTS USED OR GROWN WITH CURRENT USA, INC. PRODUCTS. Some jurisdictions do not allow the exclusion or limitation of incidental or consequential damages or exclusions of implied warranties, so the above limitations or exclusions may not apply to you. This warranty gives you specific legal rights, and you may also have other rights that vary from jurisdiction to jurisdiction.
[xyz-ips snippet=”download-snippet”]