
D-Link JustConnect 16-Channel PoE Network
Video Recorder Installation Guide
Documentation also available on CD and via the D-Link Website
About This Guide
This guide provides step-by-step instructions for setting up your D-Link DNR-2020-04P JustConnect 16-Channel PoE Network Video Recorder. Please note that the model you have purchased may appear slightly different from those shown in the illustrations.
The DNR-2020-04P is a reliable Network Video Recorder (NVR) for home and business. The DNR-2020-04P provides a range of display, storage, and management functions for users to easily manage their surveillance system.
Unpacking the Product
Open the shipping carton and carefully unpack its contents. Please consult the following packing list to make sure that all the items are present and un-damaged. If any item is missing or damaged, please contact your local D-Link reseller for a replacement.
- DNR-2020-04P JustConnect 16-Channel PoE Network Video Recorder
- hard disk screw x 8
- rackmount bracket x 2
- rackmount bracket screw x 8
- power adapter x 1
- power adapter cable
- Ethernet cable (CAT5 UTP)
- Quick Installation Guide
- CD-ROM (contains DNR-2020-04P applications and product documentation)
Product Overview
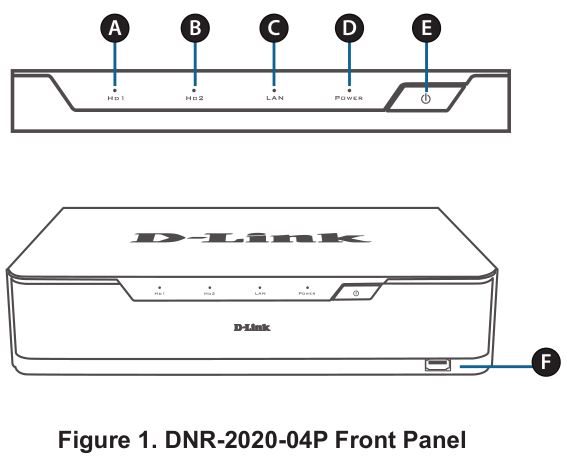
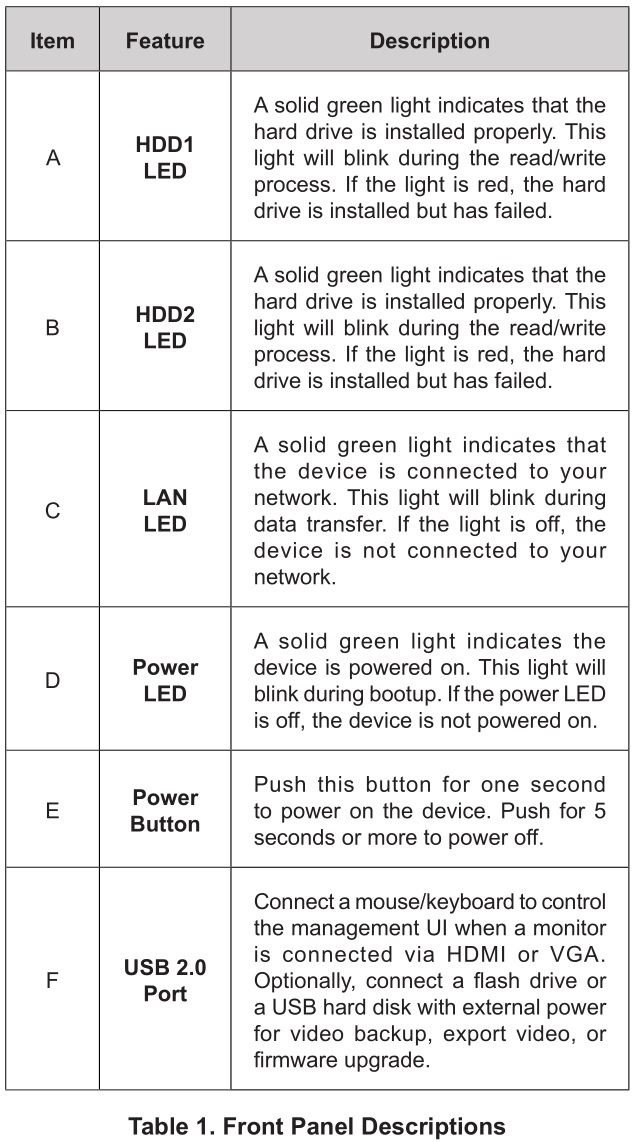
Front Panel – DNR-2020-04P
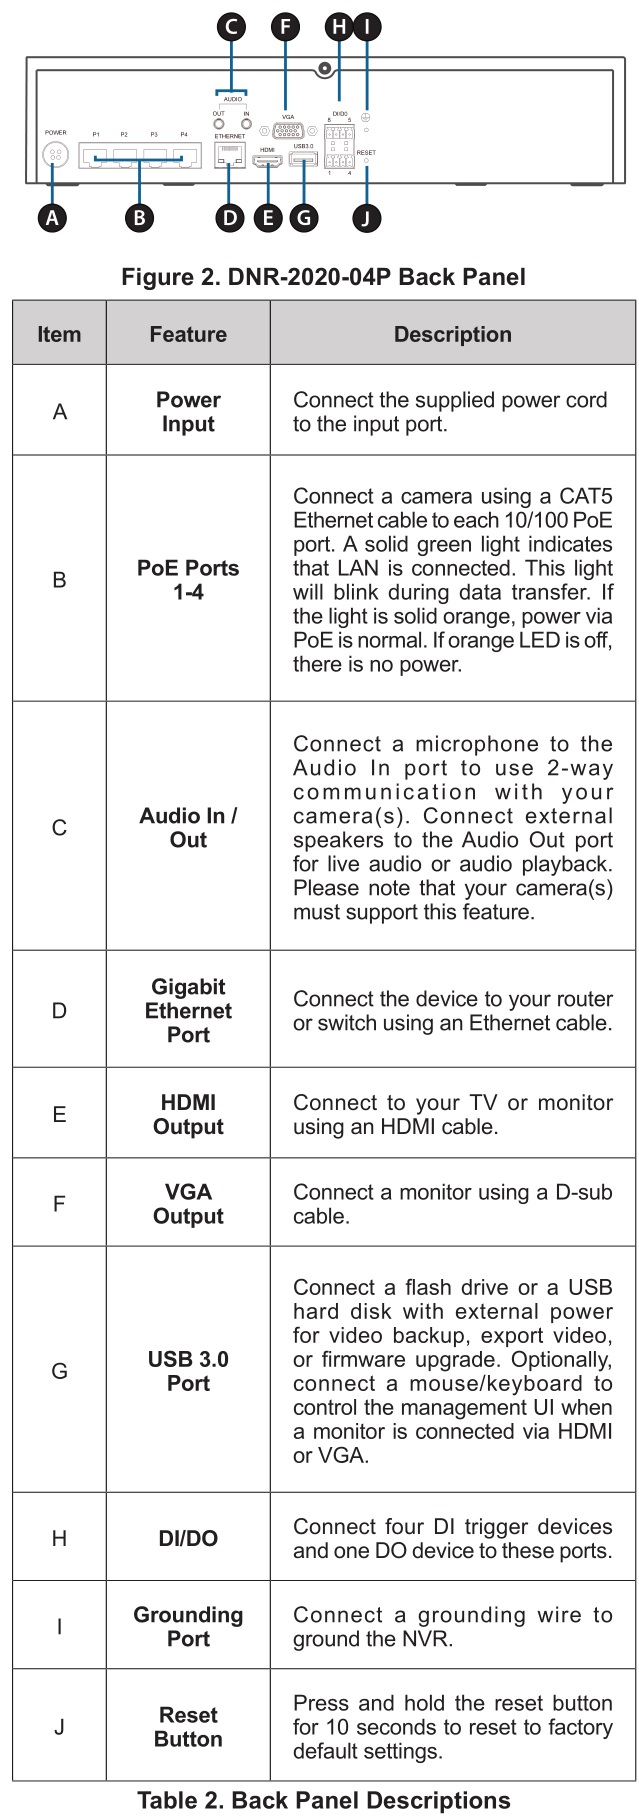
Back Panel – DNR-2020-04P
Hardware Installation
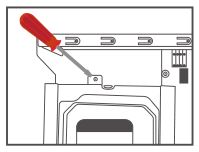
Hard Drive Installation
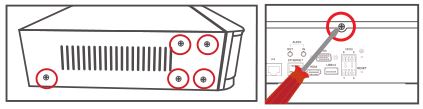
- Access the DNR-2020-04P’s hard disk drive (HDD) bays by removing the screws from the sides and back of the device.

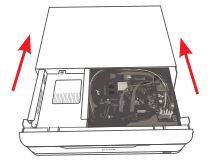
- Once the cover is removed, slide it rearward to remove it from the device.
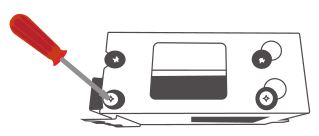
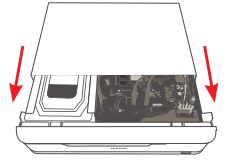
- Detach the HDD bay bracket, then insert one or two 3.5″ SATA hard drives into the drive bays and use the provided screws to secure the drives in the bracket.
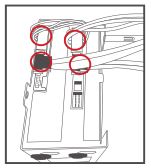
- Connect the power and SATA cables from the device to each HDD. If a drive has been inserted correctly, the HDD LED will light up.
- Re-attach the drive bay bracket to the device enclosure by sliding the tabs into the holes and using the screws provided to secure it.
- Re-attach the top cover by sliding it over the device. Re-insert the screw in the rear of the cover to secure it.
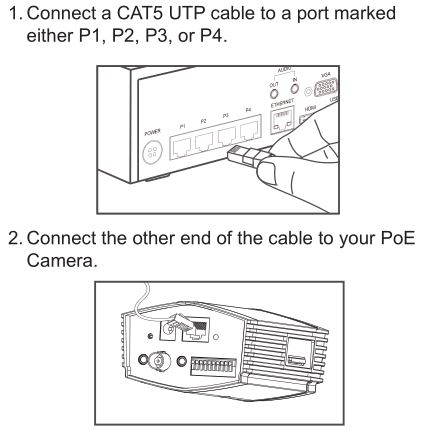
Connect Your Network Camera(s)
You can connect PoE network cameras directly to your DNR-2020-04P.Note: The total PoE budget is 45 watts.
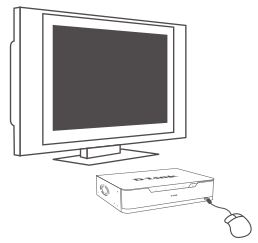
Connect Your Monitor (Optional)
You can set up your NVR without using a PC by connecting a VGA or HDMI display to the respective ports on the back of the device. To control the GUI, connect a USB mouse to the USB port on the front panel.
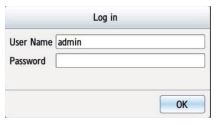
Type admin in the User Name box using the virtual keyboard and leave the password blank, then hit Enter.
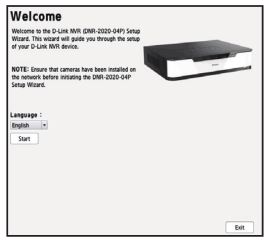
Once you are on the home screen, click on the icon to start the setup wizard. Select a language and click Start to proceed with configuration.
Configuration
Power On
Connect the power adapter, then, switch the NVR on and ensure the power LED on the front of the unit is lit.
Getting Started
- Make sure the NVR is connected to a network via a router or a switch, or directly connected to a PC.
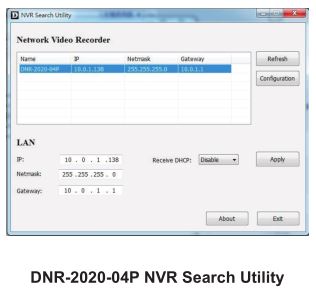
- Insert the DNR-2020-04P CD into the CD-ROM drive. If the CD Autorun function does not automatically start on your computer, go to Start > Run. In the Run box, type D:\autorun.exe (where D: represents the drive letter of your CD-ROM drive) and click OK. When the autorun screen appears, click NVR Search Utility.
- Highlight an available NVR and click Configuration to access the NVR’s web UI.For more detailed configuration instructions, please refer to the user manual on the CD-ROM.
Additional Information
You can refer to the additional documentation on the accompanying master CD or you can visit the d-link support website (see page 5) to download supplementary materials and updates for use with your DNR-2020-04P.
– D-Link NVR User ManualThis manual describes the general operation and control of the NVR firmware which manages connected network cameras. It includes details on setting up and configuring the NVR for scheduled and automated monitoring and recording of your target environment.
– D-Link NVR Search UtilityThis PC software helps find and set up your NVR for access in your network.
– Playback ManagerThis software includes a clear and simple web GUI that lets administrators play, search, or export video easily.
– Remote Backup ToolThis tool allows for easy management of backups.
– Verification ToolThis tool helps you verify that surveillance recordings have not been tampered with, so its authenticity will be upheld in a court of law.
– Firmware UpdatesKeep your DNR-2020-04P secure by checking for updates to its firmware regularly.
Online SupportIf there are any issues which are not in the user manual, please visit the d-link support website (see page 5), which will direct you to your appropriate local D-Link support website.
Technical Support
Having trouble installing your new product? D-Link’s website contains the latest user documentation and software updates for D-Link products. U.S. and Canadian customers can contact D-Link Technical Support through our website.
United StatesInternet: http://support.dlink.com
CanadaInternet: http://support.dlink.ca
©2019 D-Link. All rights reserved. D-Link and the D-Link logo are trademarks or registered trademarks of D-Link Corporation or its subsidiaries. All other third-party marks mentioned herein may be trademarks of their respective owners. This publication may not be reproduced, in whole or in part, without prior express written permission from D-Link Systems, Inc.
![]()
Ver. 1.10(NA)_130x1832019/05/10RMN0101982A
References
[xyz-ips snippet=”download-snippet”]