![]()
 Quick Installation GuideNuclias Connect HubDNH-100
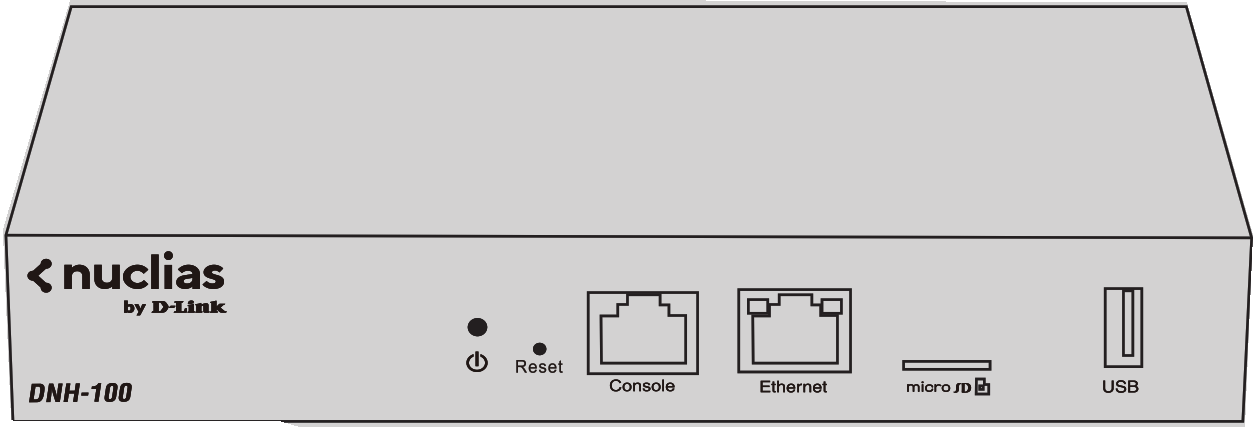
Additional documentation is also available on the D-Link website
Before You Begin
This installation guide provides instructions for installing the DNH-100 on your network. Additional documentation is also available on the D-Link support website.
• DNH-100 User Manual: For additional information and instructions on how to configure the device using the web user interface.
Package Contents
This DNH-100 package includes the following items:•DNH-100 Nuclias Connect Hub• Power Cord• Rack Mount Kit•Quick Start Guide• 16 Gb MicroSD Card (Optional1)If any of the above items are damaged or missing, please contact your local D-Link reseller.
System Requirements
• Computers with Windows®, Macintosh®, or Linux-based operating systems with an installed Ethernet Adapter• Internet Explorer 11, Safari 7, Firefox 28, or Google Chrome 33 and above (for configuration)
Hardware Overview
LED Indicators
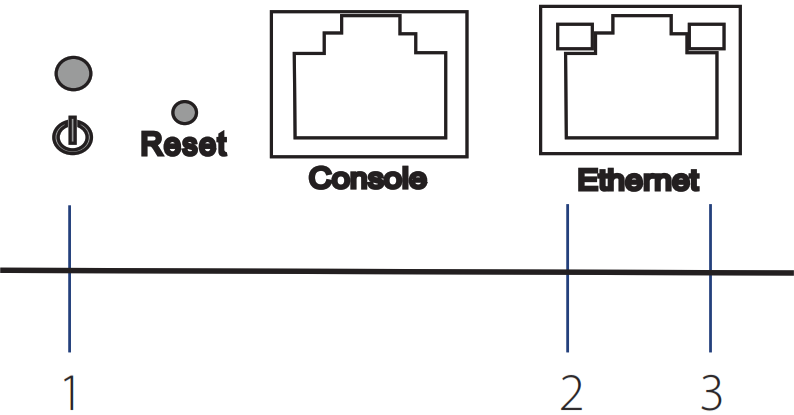
Figure 1: Front Panel LED
| # | LED | Description |
| 1 | Power | Solid Green – The device is powered on and ready for use, and it is in standalone mode.
Blinking Green – The device is booting up. Solid Orange – The device is connected to the Nucleus server and single sign-on is available for use. Solid Red – Device is unable to boot. |
| 2 | Link speed (10/100 Mbps) | Solid Green – Port is operating at10/100 Mbps Light Off – No Link. |
| 3 | Link Speed (1000 Mbps) | Solid Green – Port is operating at 1000 Mbps Light Off – No Link. |
Table 1: LED Description
Interface Connectors Figure 2: Front Connectors
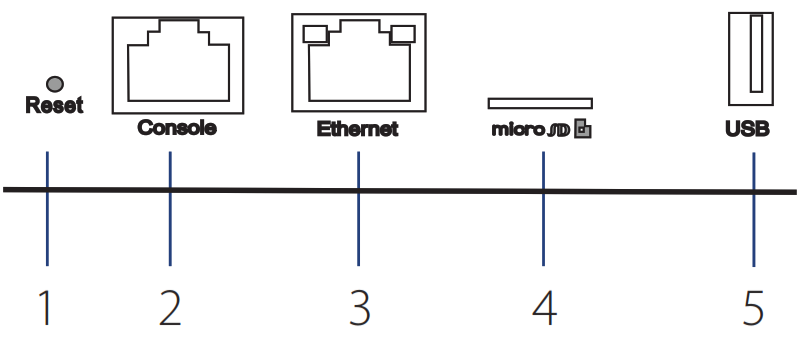 Figure 2: Front Connectors
| # | Connector | Description |
| 1 | Reset | Used for rebooting or resetting the device back to factory default settings. |
| 2 | Console Port | RJ-45 port to connect the RJ-45console cable for CLI management. |
| 3 | Ethernet
Port |
Gigabit RJ-45 port for LAN connection. |
| 4 | MicroSD
Slot |
MicroSD slot for MicroSD card 2,3 up to 32 Gb. |
| 5 | USB Port | USB 3.0 Type A port 2 (provides 5V/1A power for optional HDD connection). |
Table 2: Interface Description
Installation
The DNH-100 can be powered using the following methods:Using the Power Adapter1. Connect the power connector of the adapter to the power input on the DNH-100 and plug the adapter into a nearby power outlet.
Configuration
Using Nuclias ConnectThe DNH-100 comes preloaded with Nuclias Connect. For detailed instructions on the use of Nuclias Connect please refer to the Nuclias Connect Manual.
Manual Configuration
Note: D-Link recommends manually configuring the device before mounting it. The management computer, DHCP server and DNH-100 must be in the same subnet. Use one of the following methods to access the web user interface:
Connecting through EthernetYou need the following equipment to access the Web UI of your device:• A PC with a RJ-45 Ethernet connection• A standard Ethernet cable1. Use an Ethernet cable to connect the DNH-100 to the management computer or to the switch or router the management computer is connected.2. Manage the device from a computer. Enter https://192.168.0.200 in the address field of your browser.3. Log in to the administration user interface. The default login information isUsername: adminPassword: admin
Connecting through a Console Connection
Use a console cable4 to connect to the switch’s console port. This cable is an RS-232 serial to RJ45 connector cable designed to use with this switch. A terminal emulation program is required to connect to the console port on the switch.1. Connect the RS-232 serial interface to the serial port of the management PC.2. Connect the RJ-45 interface to the console port of the switch.3. Open a terminal emulation program on the management PC and configure the properties of the connection as follows:• The speed (baud): 115200 bps• The data bits: 8• The parity: None• The stop bits: 1• The flow control should be None.4. Connect to the switch and the Limited Command Line Interface (CLI) should be available.|
Mounting
Mounting on a Solid Wall or Ceiling
The DNH-100 can be mounted in an EIA standard-size 19-inch rack, which can be placed in a wiring closet with other equipment.
1. Attach the L-shaped mounting brackets to each side of the chassis as shown in Figure 3 and secure them with the screws provided.
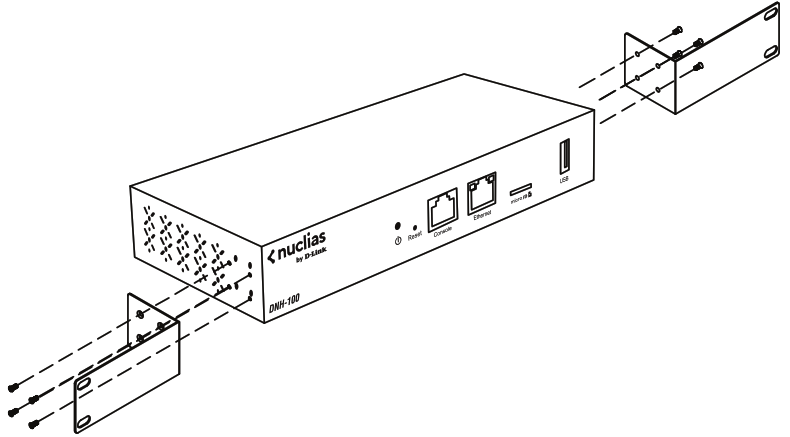
Figure 3: Attaching the Rack Mount Brackets
2. Mount the device in the rack using a screwdriver and the supplied rack mounting screws.
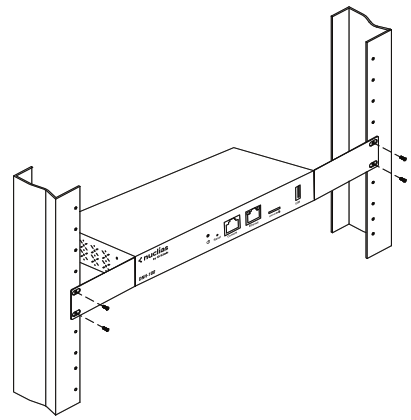
Figure 4: Installing in the Rack
Connecting Power
The AC power cord shipped with the device connects the device to the earth ground when plugged into a grounded AC power outlet. The device must be rounded during normal operation. To connect the device to a power source, plug one end of the AC power cord into the AC power connector on the back panel of the device. Plug the other end into an AC power source.1. Due to EU regulations the 16 Gb MicroSD card is only included in the WW version.2. Only FAT32 format is supported. 3. Do not remove the microSD card while the power is on as this may damage your card.3. A D-Link console cable is recommended for best performance.
DISPOSING AND RECYCLING YOUR PRODUCT![]() This symbol on the product or packaging means that according to local laws and regulations this product should be not be disposed of in the household waste but sent for recycling. Please take it to a collection point designated by your local authorities once it has reached the end of its life, some will accept products for free. By recycling the product and its packaging in this manner you help to conserve the environment and protect human health.
This symbol on the product or packaging means that according to local laws and regulations this product should be not be disposed of in the household waste but sent for recycling. Please take it to a collection point designated by your local authorities once it has reached the end of its life, some will accept products for free. By recycling the product and its packaging in this manner you help to conserve the environment and protect human health.
![]()
 Ver. 1.00(WW)_130x1832020/01/09660-DL1-GR331A0A000
References
[xyz-ips snippet=”download-snippet”]