
Daiwa Hubble Massage Chair 
IMPORTANT SAFETY PRECAUTIONS
Basic precautions should always be followed when using an electrical unit, including the following.Please ensure that you read all instructions before using the Olympia.
DANGER: To reduce the risk of electric shock: Always unplug this unit from the electrical outlet immediately after using and before cleaning.
WARNING: To reduce the risk of burns, fire, electric shock, or injury to persons:
- Always insert the power plug all the way into the outlet to reduce the risk of short-circuit and fire.
- The unit should never be left unattended when plugged in. Always unplug the unit when not in use.
- The unit is not to be used by people who cannot move or communicate on their own.
- Only use the unit for the purpose described in these instructions.
- Do not stand on the unit.
- Always return the seat to the upright position and make sure the legrest is completely retracted. Be careful that nothing is obstructing the legrest while retracting. Keep children away from the legrest.
- Never operate the unit if it has a damaged power cord or plug. Return the unit to the nearest authorized service center if it is not working properly, if it has been dropped or damaged, or if it has been immersed in water.
- Keep power cords away from heated surfaces. Do not carry the unit by the power cord.
- Never block the air openings during operation and make sure that all air openings are kept free of lint and hair, etc. Do not drop or insert anything into any of the openings of the unit.
- Do not use the unit on top of heating appliances, such as electric carpets, etc. Do not operate the unit under a blanket or pillow. Excessive heating can occur and cause fire, electric shock, or injury to persons.
- Do not use the unit in bathrooms or other damp or humid places as this may cause electric shock or cause the unit to malfunction. Do not spill water, etc. onto the controller.
- Do not use the unit outdoors.
- Do not use or operate where aerosol spray products are being used or where oxygen is being administered.
- When unplugging the unit, turn off all controls before removing the plug from power outlet. Do not use the unit with a transformer as this may lead to malfunction or electric shock.
- Connect this unit to a properly grounded outlet only. See Grounding Instructions.
- Use heated surfaces carefully. May cause serious burns. Do not use over sensitive skin areas or in the presence of poor circulation. The unattended use of heat by children or incapacitated persons may be dangerous.
SAFETY INFORMATION
Usage Environment
- Do not use this appliance in environments where temperature is over 40°C/104°F.
- Ensure chair is placed on a flat, level floor prior to use.
- Do not use this appliance in an excessively humid or dusty environment, or when any part of the body is in contact with water.
- Keep the air openings free of lint, hair, and the like. Check clearance of passages regularly or when you experience a reduction in performance.
- Unplug entire chair from the outlet during thunder or lightning storms, and before putting on or taking off parts.
- Do not use outdoors.
- Do not store near heat or open flame. Avoid excessive sunlight.
Best Practices For Safe Use
- Intended only for users below 250lbs (120kg).
- Use this product only for its intended use as described in this manual.
- Do not use the product for therapeutic treatment purpose. This product is not intended as a replacement for treatment by a qualified, trained medical professional.
- Chair should only be used by one person—do not use with two or more persons at the same time to avoid damage to the products.
- Do not use the product right after a meal, as it may cause discomfort.
- Prior to use, remove jewelry and accessories from the arms, neck, and hands, and empty pockets.
- Check the upholstery and under the cushions and other spots, and if any damage is
- present discontinue use and contact the manufacturer for servicing.
- If you feel any abnormal discomfort during the operation of this product, turn off the power immediately and do not use further. Consult your doctor before resuming use.
- Limiting use of the massage chair for 20 minutes at a time is highly recommended.
- Make sure there are no obstructions behind the chair and that there is sufficient clearance before adjusting the backrest or legrest angle. Look out for pets or children when raising or lowering the chair.
- Make sure that no extra weight or pressure is pressing down on the backrest or legrest apart from the user.
- Make sure there are no children, pets or other objects under the backrest or legrest.
- Please stay properly seated while using the appliance.
- Do not drag or push the chair or caster across wood floor or carpet to avoid damage.
- Never operate this chair if it has damaged or if it has exposed parts or shows signs of power leakage.
- Do not stand on or stack heavy objects on the Legrest, armrests, or backrest.
- Children should be supervised to ensure that they do not play with the massage chair.
- Do not fall into sleep while the chair is operating.
- Avoid using the chair under the influence of alcohol or sedatives.
- Do not put hands or fingers in any openings of the chair to avoid injury to self or damage to the chair.
- If there is any smoke or unusual smell while using, stop using immediately and unplug the power cord.
- Do not disassemble this chair.
- Do not dismantle, fix or modify the chair yourself; please contact an authorized dealer or service agent.
- Fully unplug the power cord before maintenance or moving. Never plug-in or pull out power cord with damp hands, to avoid shock or injury.
- Unplug the power cord when chair is not in use.
- Unplug from outlet when the power supply is cut, and switch all controls to off.
PARTS
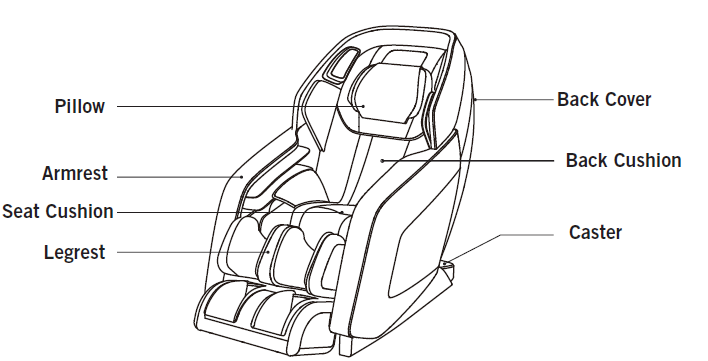
EXTERIOR PARTS
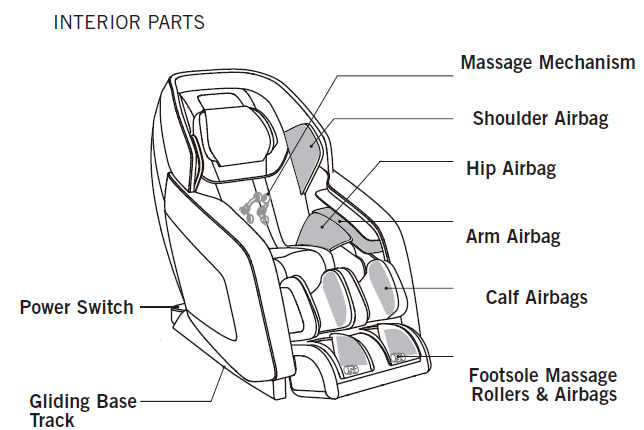
INTERIOR PARTS
CONTROLLER

REMOTE CONTROL USER GUIDE
CONTROLLER OPERATION
Power ButtonPress to turn on the unit. The display screen will light up. Use the Direction Dial to highlight your preferred massage mode and preference. Press the center OK key to select. Press again to turn off all functions.Menu ButtonDuring any massage operation, press here to select a massage function or to start or stop a feature during your current massage program.
Point Position Adjustment ButtonsWhile the Point Mode manual program in running, use to adjust the massage location point to your desired position. Use this to target a specific sore spot, for example.Auto mode buttonPress to access the chair’s Automatic Massage Programs.Direction DialTo navigate the menus on the display, use the Up, Down, Left, or Right direction keys to move among selections. Press the center OK key to confirm a selection.During a massage, press the Up or Down direction keys to adjust the massage speed. Press the Left, Right direction keys to adjust the airbag force.
Raise Legrest ButtonPress and hold to raise the legrest to your desired position.Lower Legrest ButtonPress and hold to lower the legrest.Backrest Up ButtonPress and hold to raise the Backrest.Backrest Down ButtonPress and hold to lower the Backrest
3D Roller AdjustmentPress to adjust the strength of the 3D rollers during and an Auto Mode or Manual Mode massage program. (During a 3D Mode massage program, roller strength is set automatically.)Extend Legrest ButtonPress and hold to extend the Legrest.Retract Legrest ButtonPress and hold to retract the Legrest if your legs need more room.
After a massage, pressing the Power button will restore the chair to its default position. If you change your mind and wish to stop it from doing so, press any button on the controller to stop the chair from returning to its default, and then press the Power button again for further operation.
DISPLAY SCREEN OPERATION
Instructions: Navigate the menus using the Direction Dial. Press Right to go to the next sub-menu of your current selection and press Left to return the previous screen. Up and Down move through the listed options. Press the center OK button to make a selection.
AUTOMATIC PROGRAMS
Press followed by to bring up the Automatic Programs menu.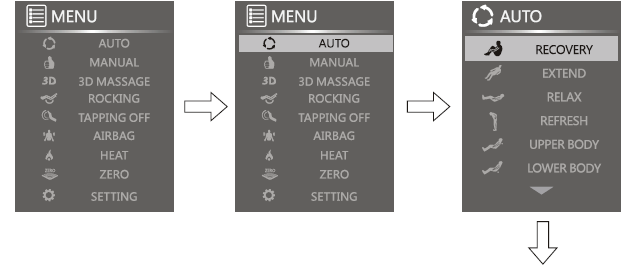
Use the Direction Dial to choose one of the nine Auto Massage programs:
Auto Program Name DescriptionRECOVERY Warm upEXTEND StretchRELAX Cool downREFRESH Light massage UPPER BODY AUTO Focused massage on the upper bodyLOWER BODY AUTO Focused massage on the lower bodyROYAL TREATMENT Pressure Point back massageSTRESS RELIEF Invigorating neck and shoulder massageGENTLE CARE Light back massage MANUAL PROGRAMSDirection: Press the Menu Button and scroll down to the Manual option. Press the OK button to select. Use the Directional Dial to choose a massage and options based on the descriptions below. Press Right and Left to select menus and OK to set options.
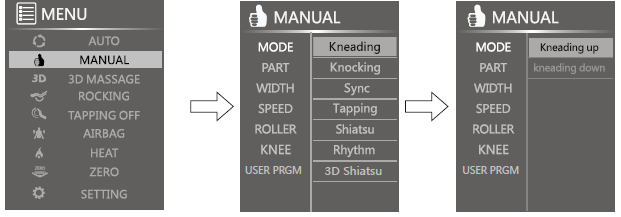
MODEUse the direction Dial to choose between Kneading, Knocking, Sync, Tapping, Shiatsu, Rhythm, or 3D Shiatsu Massage Modes. Kneading offers the options of Kneading Up or Kneading Down.KNEADINGKneading offers the options of Kneading Up or Kneading Down.
PARTPart offers the option to massage the entire back, to focus on one area, or to focus on a single point.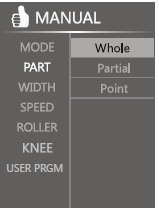
WIDTHWidth offers adjustments on how far the rollers spread out from the center of the back.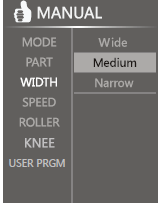
SPEEDAdjust Back Roller speed levels from slow to fast, 1 to 6.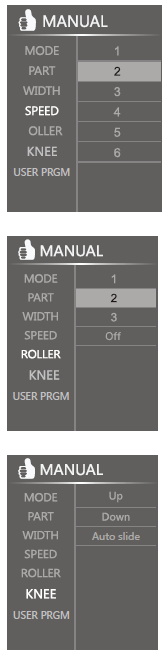
ROLLERFoot rollers can be adjusted from speed levels 1-3 or turned off completely.
KNEEAdjust the position of the leg unit to massage the knee. Turn or off the auto position choice.
USER PROGRAMSave your favorite manual massage selections as a custom user program. After making your sections, use the direction dial to select PRGM A OR B. Then select “Save” to save your custom program or “Start” to begin a previously saved program.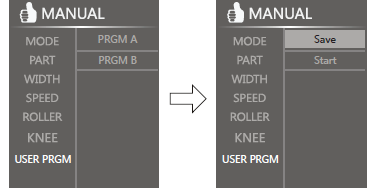
3D MassageUse the Direction Dial to choose one of the three 3D Massage programs: Deep Shiatsu, Breathe, or Revive.
ForceAdjust the strength of the 3D rollers from weak to strong, 1-5. You can adjust the strength during any auto or manual program. You cannot adjust the strength during a 3D auto program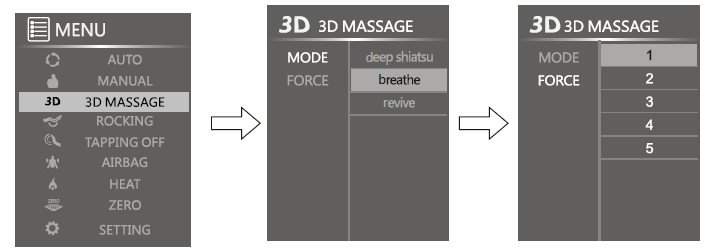
AIRBAGMassaging airbags can be adjusted to focus on a particular area only. You can also adjust the strength of the Airbags or turn them off completely.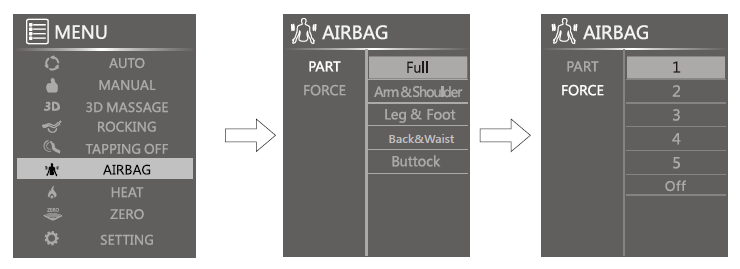
HEATUse the Direction Dial to turn the Heat feature on or off.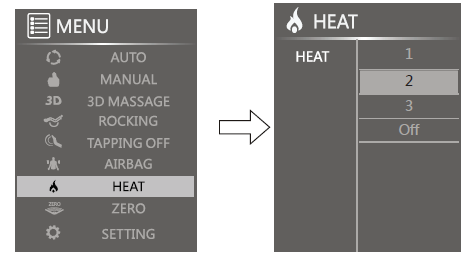
ZERO GRAVITYUse the Direction Dial to activate Zero Gravity recline mode 1 or 2, or select Off to return to default upright position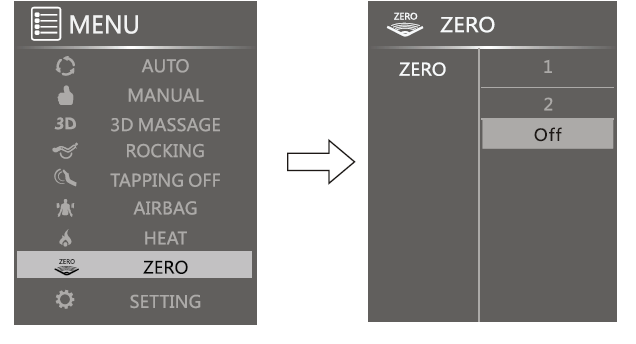
Rocking
Use the Direction Dial to turn Rocking on or off
TAPPING OFFUse the Direction Dial to turn the Tapping Massage function on or off.
SETTINGSettings allow you to change the duration, to set your language, to turn on Bluetooth, and to turn ambient lights on or off. Use the Direction Dial to navigate and set these options.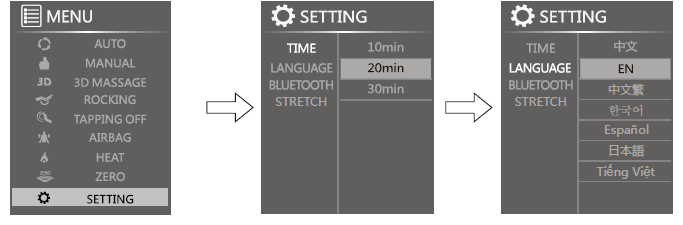 TIMEMassage durations can be set to 10 mins, 20 mins, or 30 mins.LANGUAGEAccess alternate languages for the Controller.BLUETOOTHTurn Bluetooth on or off.
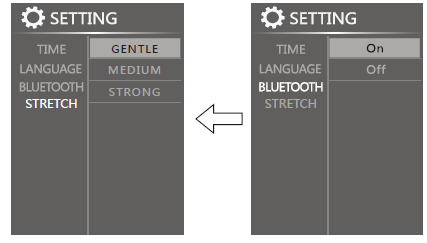
StretchSets the intensity of the bend of the legrest during a stretch.
Notes:Upon making any selections within the Automatic or Manual Mode menus, after 10 seconds of inactivity, the display screen will return to the home page.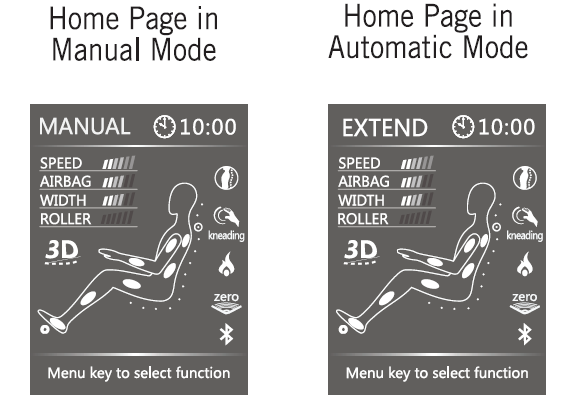
2. With the exception of the “Lower Auto” option, each automatic program will begin with the movement of massage nodes along the backrest, in order to pinpoint the user’s shoulder position.
SMARTPHONE APP & BLUETOOTH
To listen to music or have the chair synchronize its massage movements to your music, connect any wireless (Bluetooth-enabled) music player to the chair’s wireless Bluetooth speakers.
- Note: there is also an extra audio input jack next to the controller input, in case you do not have a wireless Bluetooth music device. HUBBLE APP DOWNLOAD & INSTALLATION The app for controlling the massage chair via your smart device works via a wireless (Bluetooth) connection.
Once you install the app and open it, you will be prompted to connect to the chair from your device using Bluetooth and then you may control its features from your device. APPLE IOS
- In the App Store, search for the Hubble Massage Chair. Install and open the app.
- From within the app, connect to the chair via Bluetooth.
SETUP
INSTALLATION METHOD
- Unpack Parts & CheckCarefully lift the chair and all of its parts from packaging. Remove any protective wrapping and check to make sure that all parts are present.
- Install the ArmrestsConnect the Air Hoses of the base unit to the Air Nozzles of one Armrest. (Illustration 1)
- Installing the Legrest
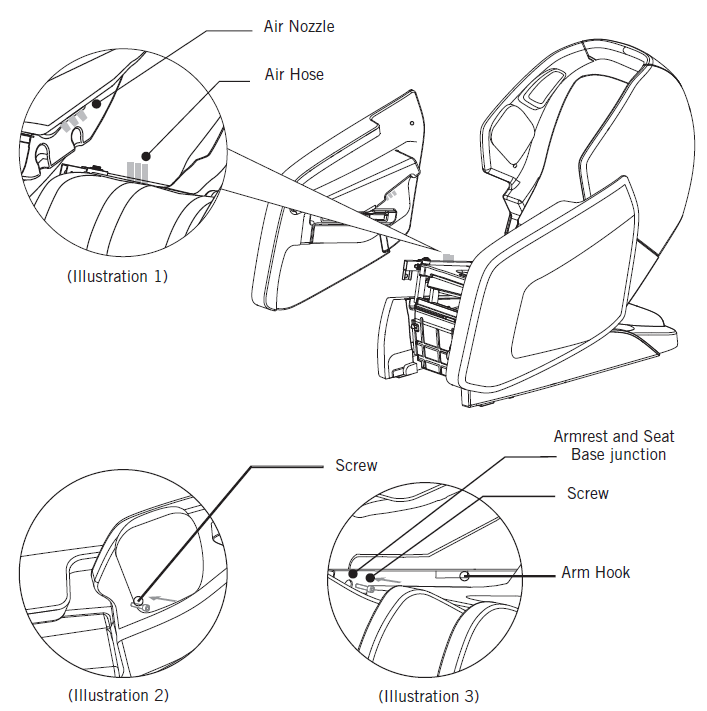
Lift the footrest and connect it with the coupling shaft by hanging (pay attention to the balance), move the hook to one side of the coupling shaft, then attach the other side. Pay attention to the balance, then attach the other side.
After attaching the legrest, lock connecting rods into place by sliding one of the included locks over the edge of the rod and pressing down until it clicks. Lift the legrest. Attach the corresponding connectors to the ports located on the back of the legrest.
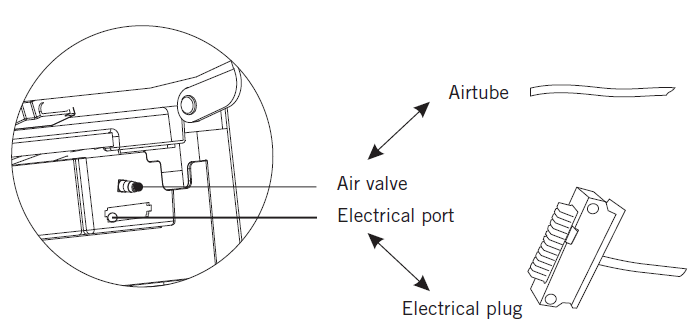 4. Installing the Controller UnitConnect the controller to the port on the inner side of the right armrest. Use the Screw Cap to tighten the connection. (See figure below)
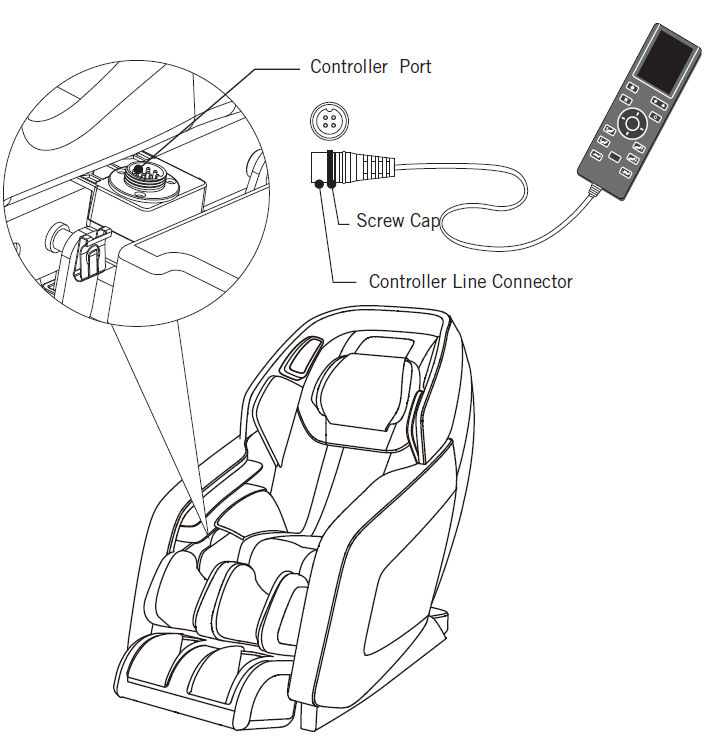 5. Power SupplyConnect the controller to its corresponding port on the power supply box. Insert the power plug of the chair into a wall outlet, then turn on power to return the chair’s backrest to its upright position.
 After all parts assembled, please insert the power cord into the power socket, and then turn on the switch, press the power on the remote control to start massage.
INSTALLATION SITEWhen looking for a location to place your massage chair, keep following in mind: The chair takes up more space when stretched out, than when in an upright position. With the chair upright, allow at least at least 19 inches of space in front of the Legrest. To prevent wearing out the floor beneath the chair, we advise placing some cushioning material, such as a rug or plastic mat, underneath the chair. To prevent fire or damage to its leather material, keep the massage chair away from any sources of heat (such as a stove or furnace).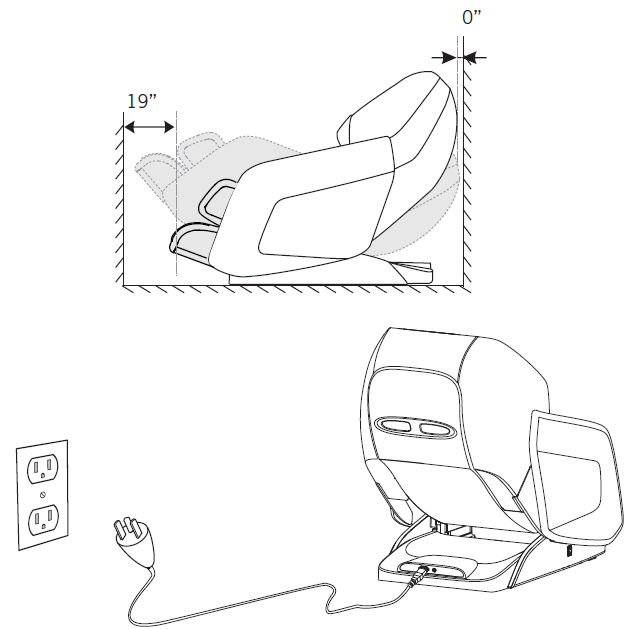 CAUTION
- Keep the distance between the power socket and power switch within 59 in. to avoid damage of power cord while massage chair sliding forward.
- Straighten the power cord while in use to avoid tangle or damage.
- When the massage chair sliding forwards or back, Please check to make sure there is no children, pets or other obstacles around to avoid accident.
WHERE TO USE THE UNITWhen placing a mat under the unit, the size of the mat should be sufficient to cover the areas where the unit touches and where the leg rest could touch the floor (at least 48in. by 72in.; or 122cm by 183cm).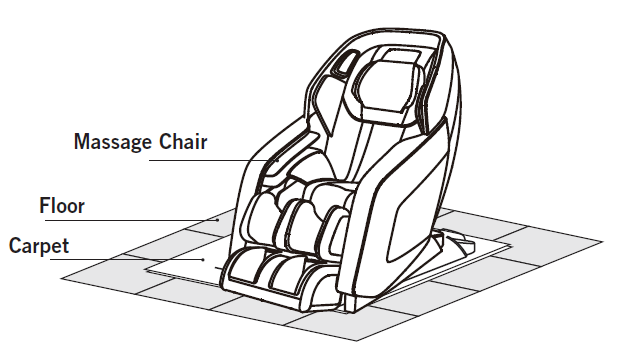 BEST CIRCUMSTANCES
To prevent possible electrical leakage, do not place the massage chair in or near a damp environment, such as a bathroom or spa.Do not expose the massage lounger to direct sunlight or high temperatures, such as in front of heating sources, because this can cause discoloration or hardening of the synthetic leather.
GROUNDING INSTRUCTIONS
This massage chair belongs to Class I of the IEC Protection Class. Be sure to use a three-prong power supply socket. To avoid electric shock, leakage, or other electric risk, ensure the ground wire connected to the power supply has obtained a stable ground connection.
DANGER
- This product is for use on a nominal 120-volt circuit and has a grounding plug that looks like the plug illustrated. Make sure that the product is connected to an outlet having the same configuration as the plug. No adapter should be used with this product.
- Improper connection of the equipment-grounding conductor can result in a risk of electric shock. Check with a qualified electrician or serviceman if you are in doubt as to whether the product is properly grounded. Do not modify the plug provided with the product – if it will not fit the outlet, have a proper outlet installed by a qualified electrician.
GROUNDING
This massage chair belongs to Class I of the IEC Protection Class. Be sure to use a three-core power supply socket. To avoid electric shock, leakage, or other electric risk, ensure the ground wire connected to the power supply has obtained a stable ground connection.
INITIAL OPERATION
- Make sure there are no objects, people, or pets in the vicinity of the unit.
- Prior to sitting, use the controller to recline the Backrest to its furthest outstretched position and raise the Legrest to its highest position.
- Make sure that sufficient open space surrounds the chair on all sides. Check to make sure that the Legrest is properly connected to the main body of the chair.
Return the chair to its original, upright position.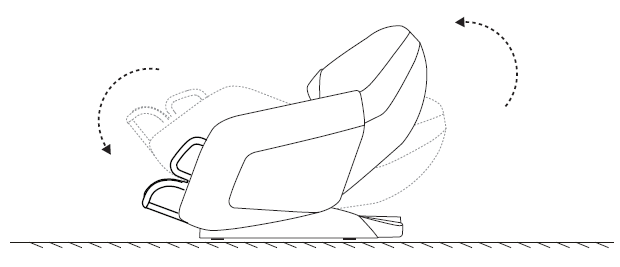 BEFORE SITTING
- Verify that the Legrest Massage Unit is well secured onto the main chair body.
- Make sure all components appear properly secured. If not, switch the power Off and completely secure all parts.
WARNING
- Do not allow anyone to sit on the Legrest while the Legrest is rising.
- To avoid possible damage, do not suddenly load the Legrest with heavy weight.
MOVE METHOD
- Make sure that the backrest is in its highest upright position.
- Shut off power and remove the power plug from the wall outlet.
Standing behind the back of the chair, grasp its backrest and tilt it downward, so that the front of the chair rises off of the floor. Push the chair to the location you desire.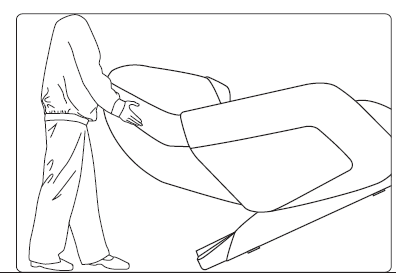 CAUTION
- Do not attempt to move the chair while someone is still sitting on it.
When moving the chair, always grasp it by the backrest. Do not move the chair by pulling its armrests, as the armrests can dislodge.CONNECT TO POWER
- Before plugging in, inspect the entire power cord and plug for any possible damage.
- Make sure that no electrical wires are exposed.
- Make sure that the power supply switch is turned OFF before inserting the power plug into a wall outlet.
CARE & MAINTENANCE
CLEANING
- Before cleaning, switch off power and remove the power plug from the wall outlet.
- Dip a soft, cotton cloth in neutral detergent and wring dry. Use it to wipe the pillow cushion, back cushion, armrests, Legrest, and any plastic parts of the chair.
- Use a piece of wet cloth (without detergent) to re-wipe the pillow cushion and back cushion. Place them in a well-ventilated location for drying.
- Use a soft, dry cloth to re-wipe the armrests, Legrest, and any plastic parts of the chair.
- Use a soft, dry cloth to wipe the controller, the DVD player, and the power supply box.
CAUTION
- Before any maintenance, always disconnect the power plug from the wall outlet.
- To avoid electric shock, never touch the power plug with wet hands.
- When cleaning the back cover of the massage chair, do not allow any detergent to seep into the power supply box.
- Do not use abrasive chemicals, such as benzene or alcohol, to clean this chair.
- Damage to the chair may result.
- DO NOT apply an iron or any other heated device to the chair.
STORAGE
Before putting into storage, wipe off all accumulated dirt and dust from the surface of the chair. Cover the entire surface of the chair with a dust cover (not included).
MAINTENANCE
Upon detecting any of the following conditions during daily use, immediately turn off power, disconnect the power plug from the wall outlet, and contact an authorized repairman:
- A burning smell
- Power cord feels hot.
- Any other abnormal symptoms
CAUTION
To avoid fading of the PU leather upholstery, do not store the product under direct sunlight and avoid storing in a location with high temperatures.
TROUBLESHOOTING
| No. | Problem | Check the following: | Explanations / Remedies |
|
|
Slight noises is heard during operation. |
N/A |
These noises are normal and arise from slight friction between the massage rollers and the leather cover. |
|
|
Operation fails to start |
Has the power plug slipped out of the wall outlet?
Is the power switch in the “off” position? Has the fuse blown out? |
Connect the power plug securely to the wall outlet. Switch power to the “on” position. Replace the fuse with another of the same type. |
|
|
Airbags within the seat and the Legrest fail to work properly | Are the air tubes blocked? | Clear the air tubes of any blockages. |
|
|
Airbags within the seat and the Legrest fail to work properly | The massage chair has detected some error that it is unable to display. | Turn off power, wait 10 minutes, and then turn it on again. If the problem persists, disconnect the power plug from the wall outlet and contact an authorized repairman |
|
5 |
Music is not coming from the speakers even after Bluetooth is connected. | The volume on your Bluetooth device is set low or muted. | Adjust the volume on your device. |
If you encounter problems operating the Hubble Massage Lounger, please check the points above to see if they can be rectified. If your chair still malfunctions or does not work, please turn off the chair and remove the power plug from the electrical outlet. Contact Daiwa Repair Services at 833-542-1918 for assistance.
PRODUCT SPECIFICATIONS
Product Name : Hubble Massage LoungerModel Number : HUBL-1Rated Voltage : 110-120V~Rated Frequency : 60HRated current : 1.78A![]()
[xyz-ips snippet=”download-snippet”]