PROGRESSIONM550 MONO& S350 STEREOAMPLIFIERSOWNER’S MANUAL
Thank you for purchasing one of our second-generation Progression amplifiers. We are thrilled with the enhanced performance we were able to achieve in the new ProgressionM550 and S350 models.There is no mistaking the D’Agostino family styling of the new Progression M550 Mono Amplifier and the Progression S350 Stereo Amplifier. Immediately grabbing one’s attention is the unique heat sink design. Drawn directly from the Relentless Mono Amplifier, this highly efficient elliptical form dramatically improves the cooling ability of the design and assures that the Progression Amplifiers run safely and reliably even when delivering their full rated power. A major revision of the input topology highlights the audio circuitry improvements. The Progression M550 and S350 distortion, signal/noise ratio, channel separation, and bandwidth measurements have all improved. Coupling this advanced front end to a new output stage has improved the dynamic impact, tonal richness, and spatial integrity of the amplifiers’ playback.A new transistor, first used in the Relentless Mono Amplifier, extends high-frequency response increases power handling by 50% and features exceptionally tight tolerances forgain matching between complementary pairs. Coupling the new output device to the high-efficiency heat sink design affords an increase in operating bias and thus power. A core belief of ours is that power is essential to great sound reproduction. The 550-watt output of the Progression M550 Mono and the 350-watt/channel output of the progression S350 Stereo offers something magical to a speaker. Of course, they will play loud, but it is the control of the speaker drivers that we desired. With virtually unlimited power output, the Progression amplifiers deliver intimate musical details, three-dimensional sound staging, and startling dynamics not possible from less capable designs.From the start of Dan D’Agostino Master Audio Systems, one of our main goals was to make components that perform at the top of their field yet are also the most beautiful produced in the industry—we hope you agree. We are proud to say your amplifier was built by hand at our Arizona factory, using advanced manufacturing techniques and the best parts available, by a talented team of technicians and craftsmen. We hope you enjoy the Progression amplifier as much as we enjoyed designing and building it, and hope you’ll keep an eye out for our future designs, too.Sincerely, Dan and the Team from Dan D’Agostino Master Audio Systems
LEGAL NOTIFICATIONS
Dan D’Agostino Master Audio Systems is a registered trademark of Dan D’Agostino Master Audio Systems. The information in this owner’s manual is subject to change without notice. Current Version 1.2 of this manual was produced by the Dan D’Agostino Master Audio Systems engineering, sales, and marketing departments.The information in this manual is the sole property of Dan D’Agostino Master Audio Systems. Any reproduction in whole or part without the expressed written permission of Dan D’Agostino Master Audio Systems is prohibited. No material herein may be transmitted in any way including either electronic or mechanical methods for any purpose without expressed written permission of Dan D’Agostino Master Audio Systems.

CAUTION: NO USER-SERVICEABLE PARTS INSIDE. Do not open the amplifier’s chassis or remove any of its screws. Contact Dan D’Agostino Master Audio Systems or your dealer if you have service needs.WARNING: Do not expose this amplifier to moisture or excessive humidity, and do not use it outdoors. A fire hazard may result. The lightning flash with arrowhead, within an equilateral triangle, is intended to alert the user to the presence of uninsulated “dangerous voltage” within the product’s enclosure that may be of sufficient magnitude to constitute a risk of electrical shock to persons.
![]() The exclamation point within an equilateral triangle is intended to alert the user to the presence of important operating maintenance (servicing) instructions in the literature accompanying the appliance.
The exclamation point within an equilateral triangle is intended to alert the user to the presence of important operating maintenance (servicing) instructions in the literature accompanying the appliance.
PACKAGE CONTENTS
If any of the following items are missing, please contact your dealer:
✔ 1 Progression mono or stereo amplifier encased in protective packaging✔ 1 owner’s manual✔ 1 pair of white lifting gloves✔ 1 microfiber cleaning cloth✔ 1 AC power cord
UNPACKING AND INSTALLATION
Unpacking the Progression amplifier from the shipping boxTwo adults are recommended for lifting the nearly 115-pound amplifier from the shipping box. Position the shipping box so that one person stands at the front of the amplifier and one person stands at the back of the amplifier. Both people need to grab a pair of the cardboard handle cutouts (one pair located at the front of the amplifier and one pair located at the back of the amplifier) and simultaneously lift the amplifier straight up and out of the carton. Bend and lift with your knees, not your back. Move it to a location near the place where it will be installed and remove the outer foam blocks and protective plastic covering. We recommend you remove all jewelry including watches, rings, and belts from your person to avoid damage to the exterior of the amplifier during the removal and installation.Installation requirementsThe surface that will support the Progression amplifier must be capable of safely holding the nearly 115-pound weight of each amplifier.Adequate ventilation must be provided for the amplifier. There should be at least 3 inches of clearance on each side of the amplifier and 3 inches of clearance at the top, and the bottom vents of the amplifier must not be obstructed by thick carpet, dust, etc. We recommend that the amplifier be installed in an open equipment rack or on amplifier stands to assure proper ventilation. The amplifier may be installed in a closed cabinet or in an equipment closet, but the cabinet or closet must be designed with substantial ventilation at the top and bottom; active ventilation (i.e., powered fans) is preferred. Do not place the amplifier directly on a carpeted floor. For the best possible sound quality and maximum output, we recommend you connect each pair of Progression mono amplifiers, or single progression stereo amplifiers, to a dedicated 15-amp outlet.If you need to return the amplifier for serviceIf you should need to send the Progression amplifier back to Dan D’Agostino Master Audio Systems for service, be sure to use the original box and materials for shipment.Before you ship the amplifier, unplug it from the wall and let it cool down for 6 hours. To protect the finish during shipping, return the amplifier to its original plastic shipping wrap. Make sure the amp is completely cool and has not been plugged in for 6 hours before you do this. Wrapping the amplifier when it is warm will cause the plastic to leach into the amplifier’s surface and will permanently damage the finish.
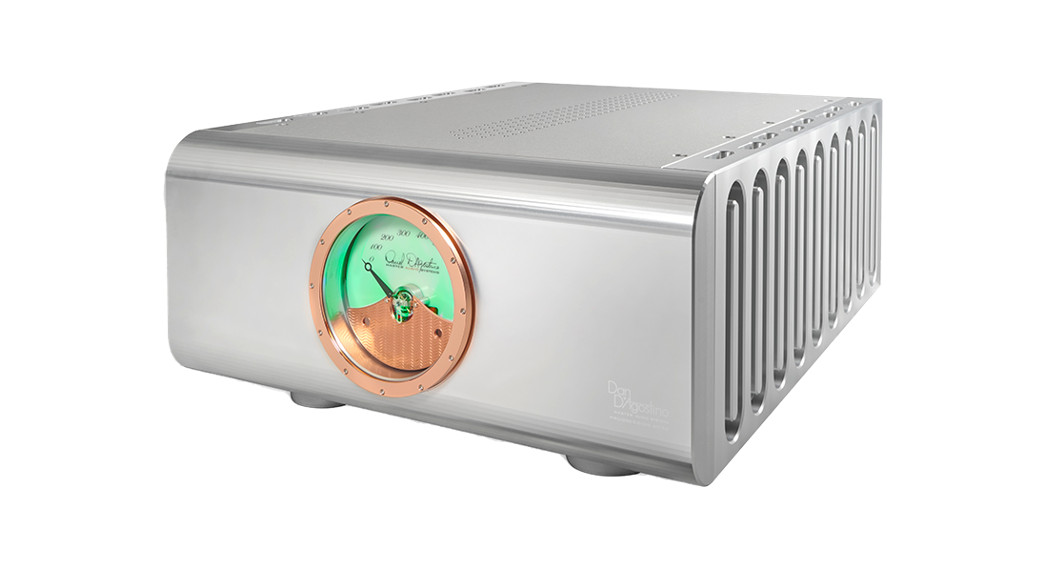
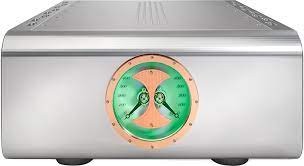
 FRONT PANEL
 FRONT PANEL
- Power meter (L & R output for stereo)
- Heat sink elliptical openings
- Top panel vents
- Power button

REAR PANEL
- 112 V on/off trigger input
- 12 V trigger output
- Three-position toggle switch for power meter brightness
- XLR audio input (1 each mono / 2 each stereo)
- Speaker cable binding posts (1 pair mono / 2 pair stereo)
- The main power breaker switch
- IEC AC power connector
MAKING CONNECTIONS TO THE PROGRESSION AMPLIFIER
Speaker cablesInstall the speaker cables first. We recommend the use of high-quality cables terminated with spade or ring lugs that will fit the Progression’s binding posts. Alternatively, the use of pin connectors, banana plugs, or bare-wire connections is acceptable. Note that the positive (+) binding post has a red ring and the negative (–) binding post has a black ring. Double-check to confirm that you are connecting the cable’s conductors to the appropriate binding posts—red to positive, black to negative. If your cables are marked to show the desired signal flow, orient the cable to conform to the cable manufacturer’s instructions.To install speaker cables tipped with spade lugs or rings, carefully loosen each speaker binding post. Turn counter-clockwise to loosen. If using spade lugs, insert each spade lug so that its two tines straddle the binding post, then tighten the binding post nut. If using rings, remove the binding post nut entirely, place the ring on the binding post, then replace the nut and tighten it securely. A firm connection, tight enough that the spade lug or ring cannot move, is all that is needed. Overtightening could damage the binding posts. Do not use a conventional wrench to tighten the binding posts.Interconnect cablesWe recommend the use of a high-quality balanced XLR audio interconnect cable with the Progression amplifier; one for each mono and a pair for the stereo version. If your preamp does not offer XLR outputs, use a high-quality RCA-to-XLR adapter. Connect the XLR cable to the input by pushing the cable onto the jack. To release the XLR cable, push on the small tab on the end of the jack, then grasp the cable by the plug and gently pull it out. Never grasp interconnect cables by the cable itself—you could damage the cable.AC cordThe Progression amplifier is supplied with a high-quality AC cord tipped with a 20-amp IEC connector at the amplifier end and a three-conductor AC plug at the other end. You may use a different power cord with the Progression amplifier if you wish, as long as it is tipped with a 20-amp IEC connector and a three-conductor AC plug. After the speaker and interconnect cables are connected, push the IEC connector on the power cord into the IEC jack on the Progression amplifier.12 V trigger on/off input and outputThe input allows you to turn the Progression amplifier on or to standby from other components. The output sends 12 VDC (12 V trigger) power on/off signals to other Dan ’Agostino Master Audio Systems components or other devices that incorporate a 12 V trigger input. Mono 3.5 mm connectors are used in the following configuration: Tip = +12 V, Sleeve = GND.
Note: When the Progression amplifier is in operational mode, the 12 V trigger provides 12 volts of DC output. When the amplifier is in standby mode or off, the DC output is volts. A maximum of 500 mA is available from the 12 V trigger output. Consult the owner’s manual of the components used in the system to take full advantage of the remote capabilities of the Progression amplifier.
OPERATION
Initial power-up of the amplifierMove the rear panel power breaker switch to the up position to place the amplifier in standby mode. The main power button is located on the front underside edge of the amplifier. Pressing the button will power up the amplifier and illuminate the power meter.Note: If the 12V trigger input is being used, the amplifier is moved from standby to operation and vice versa by the 12V trigger output provided by a device connected to the 12V trigger input. The main power button is not operable.After power is switched on, the Progression amplifier requires approximately 30 minutes to reach optimal operating temperature. Although the amplifier will sound excellent upon initial listening, the sound quality will improve as it warms up.During operationThe Progression amplifier requires no adjustments during normal operation. If there is no sound or the sound quality is in some way impaired, consult the Troubleshooting section in this manual.Light switchThis switch has three positions. Move it to the left (when looking at the amp from the rear) for low brightness and to the right for high brightness. The center position, off, turns the meter illumination completely off.
MAINTENANCE
The Progression amplifier requires no user maintenance other than to keep it clean and ensure that the vents remain unobstructed.To clean the amplifier, first, disconnect the AC plug. Spray a small amount of distilled water or a cleaning solution such Endust® or Pledge® onto the supplied microfiber cloth and gently wipe the amplifier’s surface along the direction of the metal grain, with light pressure only. Never use a circular motion or heavy pressure, as this can permanently scratch the machined surfaces. Do not spray the cleaner directly onto the amplifier.If dust or other contaminants or objects collect around the heat sink ventures or the vents at the top and bottom of the amplifier, remove small objects by hand and use a shop vacuum or hand vacuum to remove the dust. Use a brush attachment on the vacuum to avoid scratching the amplifier’s surface.
TROUBLESHOOTING
The amplifier will not power upIf the front meter is not illuminated, follow the procedure outlined below. If one step succeeds in inactivating the power, stop there, and ignore the other steps.
- Push the power switch on the front underside edge of the amplifier.
- Check to make sure the AC cord is plugged into the wall outlet.
- Check at the back of the amplifier to make sure the IEC connector is pushed all the way into the jack on the back of the amplifier.
- Check your household electrical box to make sure the circuit breaker has not been tripped. If it has, flip the breaker back on.
- If the breaker trips again, check the speaker cable connection(s) on the amplifier and the speaker(s) to make sure that the terminals are not shorted, and check the entire length of the cable(s) to ensure there is no damage.
- If all of these steps fail to return power to the amplifier, consult your dealer for service.
The front meter is illuminated but you hear no soundFollow these steps in order. If one step succeeds in restoring sound, stop there and ignore the other steps.
- Check your preamp and source device to make sure they are both turned on.
- Check the source device to make sure it is playing; i.e., if it’s a record player, make sure it’s spinning and the tonearm is lowered, or if it’s a CD player, make sure it’s in play mode and not in pause.
- Make sure your preamp is not muted and that the desired source is selected.
- Check the line-level connections between the source device and the preamp, and between the preamp and the amplifier(s). Reconnect any cables that may have become disconnected.
- Check the cables between the amplifier(s) and the speaker(s) to make sure they are properly connected and that the cables have not become damaged.
- If you have a spare pair of interconnect cables (even cheap ones will work temporarily), try using them between the source device and the preamp and between the preamp and the amplifier. If this restores sound, replace the defective cables.
- If all of these steps fail to restore sound, consult your dealer for service.
Sound comes from only one channelFollow the below steps in order. If one of these steps succeeds in restoring the sound, stop there and ignore the other steps.
- Check to make sure the face of the power meter is illuminated. If not, follow the troubleshooting steps under “Amplifier will not power up” to restore power.
- Check speaker cable connections for the malfunctioning channel. Reconnect any cables that may have become disconnected. Inspect the cable to make sure it has not been damaged. If it has been damaged, replace it.
- Swap the left-channel interconnect cable from the preamp to the amplifier with the right-channel interconnect cable. If the malfunctioning channel now works but the other channel does not replace the defective interconnect cable with one of the exact same types. You may have to replace both right and left cables to make sure they match.
- Swap the left-channel interconnect cable from the source device to the preamp with the right-channel interconnect cable. If the malfunctioning channel now works but the other channel does not replace the defective interconnect cable with one of the exact same types. You may have to replace both right and left cables to make sure they match.
- Try using a different source device. If the alternate source device delivers sound in both channels, it is likely the original source device is defective.
- If possible, try using a different preamp. If the alternate preamp delivers sound in both channels, it is likely the original preamp is defective.
- If all of these steps fail to restore sound, consult your dealer for service.
The sound seems unclear or unfocusedFollow the below steps in order. If one of these steps fixes the problem, stop there and ignore the other steps.
- Play a CD (not a record) of a vocalist and sit in your usual listening position, which should be equidistant from each speaker and typically 8 to 15 feet away from them. If the vocal image appears centered between the speakers, they are connected correctly and your system is probably operating properly.
- If the vocal image is unfocused and the vocal seems to come from all over the room, your speakers are probably wired out of phase. Make sure that the speaker cables are connected correctly. The cable connector marked + or colored red should be connected to the speaker binding post with the red ring. The cable connector marked – or colored black should be connected to the speaker binding post with the black ring.
- If the sound is still unclear or unfocused, consult your dealer. Your system may have a setup problem outside the scope of this manual.

PROGRESSION AMPLIFIERLIMITED WARRANTY
Dan D’Agostino Master Audio Systems warrants each Progression amplifier against manufacturing defects and defects in materials for three years from the date of retail purchase from an authorized Dan D’Agostino Master Audio Systems dealer or four years from the original date of manufacture, subject to the conditions listed below:
- The warranty covers only new products purchased from an authorized Dan D’Agostino Master Audio Systems dealer.
- The warranty is non-transferable and is valid only for the original purchaser.
- The warranty is valid only if the product has been used according to the instructions in the owner’s manual. Damage due to accidents or owner abuse or neglect is not covered under this warranty.
- All services must be performed by an authorized Dan D’Agostino Master Audio Systems dealer. Damage resulting from service by other parties is not covered under the warranty.
- All products returned for service must be packaged in the original packaging and must include a photocopy of the original purchase receipt. If the original container has been lost or discarded, contact Dan D’Agostino Master Audio Systems for a replacement.
- If the product must be shipped back to Dan D’Agostino Master Audio Systems for warranty service, the customer shall pay shipping costs. Dan D’Agostino Master Audio Systems will pay for return shipping.
- Before shipping the product to Dan D’Agostino Master Audio Systems for service, the customer must first obtain a Return Authorization (RA) number by calling Dan D’Agostino Master Audio Systems. The RA number must be marked clearly on the side of the package.
- This warranty covers only defects in products made by Dan D’Agostino Master Audio Systems. It does not cover incidental or consequential damages or damages to otherproducts resulting from defects in Dan D’Agostino Master Audio Systems products.
- Metal and metal finishing have natural variations in color, gloss, and texture. Variations in these characteristics are not considered defects and are not covered by the warranty.
- U.S. residents: Depending on the state in which you live, you may have other rights not elaborated in this document. For further information, contact Dan D’Agostino Master Audio Systems.
- Residents of other countries: Your authorized importer or dealer bears the direct responsibility for warranty coverage of your amplifier. Please contact your importer or dealer with requests for service under warranty. Dan D’Agostino Master Audio Systems will work with your importer or dealer to assure that the terms of the warranty are fulfilled.
It is important that you register your Progression amplifier with us online at www.dandagostino.com. For questions on warranty and service matters, contact Dan D’Agostino Master Audio Systems at: +1.480.575.3069 or [email protected]
SPECIFICATIONS
| M550 Mono | S350 Stereo | |
| Power Output
|
550 watts @ 8Ω1,100 watts @ 4Ω2,200 watts @ 2Ω | 350 watts /per channel @ 8Ω700 watts /per channel @ 4Ω1,400 watts /per channel @ 2Ω |
| Frequency Response | 1 Hz to 80 kHz, –1 dB20 Hz to 22 kHz, ±0.01 dB | 1 Hz to 80 kHz, –1 dB20 Hz to 22 kHz, ±0.01 dB |
| Distortion | 550 watts @ 8Ω0.015% @ 1 kHz800 watts @ 8Ω0.1% @ 1 kHz | 350 watts @ 8Ω0.015% @ 1 kHz500 watts @ 8Ω0.1% @ 1 kHz |
| Signal-to-Noise Ratio | 105 dB, unweighted75 dB, A-weighted | 105 dB, unweighted75 dB, A-weighted |
| Input | 1 balanced XLR | 2 balanced XLR |
| Input Impedance | 100 KΩ | 100 KΩ |
| Output Impedance | 0.10Ω | 0.10Ω |
| Dimensions (WxHxD) | 17.875 x 9.0 x 23.0 in45.4 x 23.0 x 58.4 cm | 17.875 x 9.0 x 23.0 in45.4 x 23.0 x 58.4 cm |
| Weight | 115 lbs / 52.2 kg | 125 lbs / 57 kg |
Handbuilt in the USA using USA machinists, vendors, and parts procurement.For more information about Dan D’Agostino Master Audio Systems, visit: www.dandagostino.com© 2021 Dan D’Agostino Master Audio Systems, LLC. All rights reserved.
References
[xyz-ips snippet=”download-snippet”]