![]()
SafeConsole On-Prem Install GuideDataLocker Inc.April, 2021
Reference for SafeConsole OnPrem
SafeConsole On-Prem Install Guide
Introduction
This guide describes how to install a new SafeConsole server on Windows using the SafeConsole installer. The installation wizard and the SafeConsole Server Configurator will guide you through the setup that provides all the necessary components (other than the host operating system).
Please note that safe console Cloud(DataLocker’s Device Management SaaS) is also available and offers the quickest way to get started and experience SafeConsole.
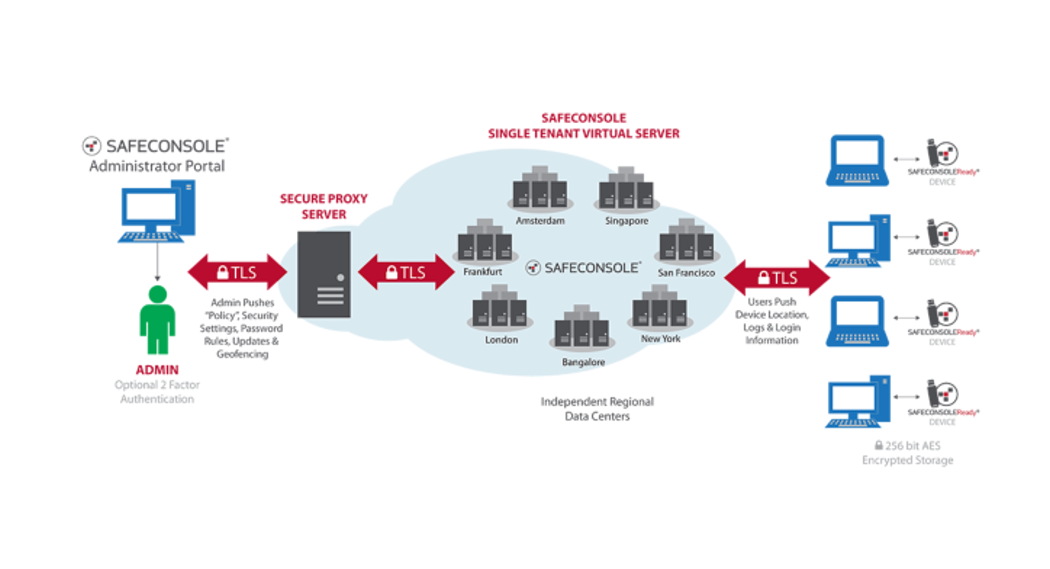
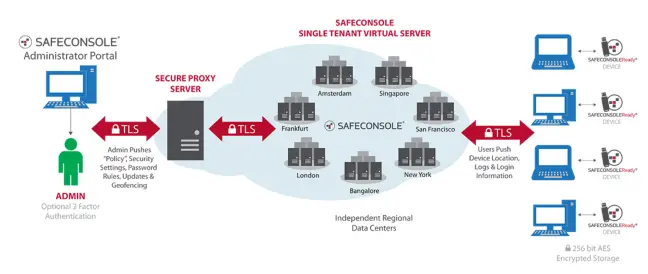
What is SafeConsole?The SafeConsole installer will install a web server and a database that is accessible to authenticated administrators. Using a web browser, administrators can register and configure SafeConsoleReady secure USB drives and endpoints.
The SafeConsole endpoints connect to the SafeConsole server through HTTP over SSL (TLS 1.2 overa configurable port – with 443 set as the default) to register and fetch their policies and configurations.
How do the drives become managed by SafeConsole?Drives are registered to SafeConsole, using the standalone device software on the read-only partition,either by:
- The device software recognizing a deployed registry key that contains the SafeConsole ConnectionToken – this prompts the device software to enter the setup process and pre-fills the Connection Token from the registry key contents.
- The user enters a server common SafeConsole Connection Token in the device software,optionally paired with a random unique registration token. Both of which can be emailed toyour users through SafeConsole with the Quick Connect Guide.
Once registered, the drives have the server information embedded in a hidden area of the deviceand can be used on any computer – if your device policy allows.
Drives can be reassigned to another user within the SafeConsole if you wish to register drives onbehalf of your end-users.
PortBlocker endpoints register in a similar fashion as SafeConsoleReady drives. However, instead of running the software from a removable storage device, it can be deployed directly to users’ computers. For more information see the port blocker Admin Guide. PortBlocker requires an available license seat per endpoint. Please contact [email protected] call us at 913-310-9088 for more information on purchasing PortBlocker.
The process for endpoint communication and setup is the same for SafeConsole Cloud and SafeConsole On-Prem.
SafeConsole installation options
- SafeConsole can be installed in the DMZ or inside the firewall to allow the management of drives over the Internet.
- SafeConsole can run with or without Active Directory integration over LDAP (TCP/UDP 389) or LDAPS (TCP 636) for administrator and user authentication and/or to import the directory structure. For more information, see this article on connecting SafeConsole to Active Directory over SSL.
- SafeConsole can also be installed on private networks without public internet access.
Installation checklist
Essential components
- Downloaded latestSafeConsole On-Prem installationfile.
- Valid SafeConsole v5.x license key.
- SafeConsole uses an SSL certificate to identify itself to the drives and encrypt communication.SafeConsole can generate this for you or you can use your own, however, make sure that thevalidity is at least 10 years. It is imperative to save the password to the SSL certificate and thecertificate itself. This will be required during any future reinstallation. Without it, all drives mustbe manually reset (provided that this is allowed) to reconnect. Wildcard certificates cannotbe used.– The Certificate should be in p12/pfx format and password protected. This required formatis a binary format for storing the server certificate, any intermediate certificates, and the private key into a single encryptable file. PFX files are usually found with the extensions .pfx and .p12.– The Private Key needs to be included in the certificate. The PFX files are typically used in a Windows environment to import and export certificates and private keys.– The Common Name needs to match the domain name of the SafeConsole Server. The Common Name is typically composed of Host + Domain Name and will look like “hostname. your site. loc”. SSL Server Certificates are specific to the Common Name that they have been issued to at the Host level.SafeConsole On-Prem Install Guide– An IP address should not be used as the common name of the certificate.– Subject Alternative Name Extension should be configured for the server to suppress webbrowserwarnings. The Subject Alternative Name field lets you specify additional hostnames (sites, IP addresses, common names, etc.) to be protected by a single SSL Certificate, such as a Multi-Domain (SAN) or Extend Validation Multi-Domain Certificate which are not to be used.
Networking
- All endpoint host computers must be able to access the SafeConsole server over the local network and/or Internet to allow registration and management. Coordinate with your firewall administrator on where to place SafeConsole to ensure that endpoints and administrators have access. Note that offline use of the endpoints can be allowed by the SafeConsole administrator after the drives have initially been registered and fetched the policy. The default TCP port is 443 but can be configured for any unused port on the server.
- Verify that any host-based endpoint protection (device control, port control, antivirus) allows access to SafeConsoleReady drives and that each endpoint has a connection to the SafeConsole server.
- A DNS record for the SafeConsole computer that can be reconfigured and accessible from any machine both internally and outside of the corporate network. ie: sc.mycompany.com. If you want to be able to manage drives over the Internet you will need to add the record in your DNS.
- The SafeConsole server should be allowed to send emails using SMTP or utilize the default mail service built into SafeConsole. The default mail service requires a connection to api.sendgrid.com over TCP port 443
- For software license activation purposes, the SafeConsole computer should be allowed to send activation requests to the activation Server. (Activation hostname: wyday.com over TCP port 443) If your server does not have access to the Internet please see this article on offline activation: Manual Activation for SafeConsole.
- If you are utilizing the maps widget then you will need to whitelist these hosts on your network:– https://maps.google.comfor mapping information– https://csi.gstatic.comfor mapping information– https://maps.googleapis.com mapping information– https://ip-api.comfor GeoLocation information– http://ipinfo.iofor GeoLocation information– https://pro.ip-api.comfor GeoLocation information
- If you are utilizing SMS 2-Factor Authentication, then you will need to whitelist ttps://api.twilio.com over TCP port 443.Active Directory – optional
Active Directory integration can be used to:– Allow authentication to access SafeConsole using LDAP you will need to organize SafeConsoleadministrators, SafeConsole managers, and SafeConsole support staff into Active Directory security groups. These groups can either be existing security groups or be created specifically for SafeConsole.– Allow for the one-way directory structure import into the SafeConsole database, you need to have active non-privileged user credentials with reading access available.Software and hardware requirements
- Up to date web browser to access the SafeConsole. (Web browsers currently supported: Chrome, Firefox, Safari, IE11, and Edge)
- Hardware/Virtual Machine: A recent server (multicore CPU), at least 4 GB of available RAM, and 200MB of disk space available for the installation. Ensure that there is storage space available for the database as it grows, for safe measure allocate 10 GB.
- Windows operating system with administrator rights that can be configured to allow external network connections. Windows Server 2012/2016/2019 or Windows 10 is recommended. This computer should have a backup and restore the system in place to allow easy data recovery.
- Please note that it is possible to configure and utilize SafeConsole in ways that are more or less resource-intensive. For example, doing extensive file publishing from the server to drives or consistently auditing extreme amounts of file transfers to a large number of drives. Another example is utilizing your SafeConsole server with a large number (200+) of the concurrent device and/or admin connections. In these scenarios, a multicore CPU machine will increase the speed of processing the requests or potential queue, and therefore, speed up the response time for your users. In addition, a Network Interface Card with higher bandwidth may be necessary. Due to the varied usage of SafeConsole, it is a recommended practice to monitor SafeConsole during the deployment and initial production phase and allocate moreresources if required.
- Optional External database. SeeDatabase Settings
General Server SecurityThe SafeConsole Server software relies on a trustworthy local operating system and network resources. These resources should be configured according to industry best practices and provide services including reliable timestamps, user and group account management, file-level backups, login, and logout services via a local or network directory service, remote access control, and audit log management services to include offloading of audit logs to other servers. The SafeConsole server is expected to be configured in a state that limits its network role to only providing management functionality to SafeConsoleReady devices.
Upgrading and migrating from legacy versions
As of SafeConsole 5.1.0, the installation wizard includes a migration tool that allows upgrading directly from version 4.7.x and also directly from 4.9.x. If you are on a version prior to 4.7.x you should update first to 4.7.x. Prior to any upgrading taking place, you should take a full backup of the complete SafeConsole directory. If you are using MySQL as your database server, also remember to take a backup of the database. Never generate a new server certificate during an upgrade.
Installation
- Run the standard installation wizard of the latest SafeConsole OnPrem Installer that you havedownloaded.
- License Key Activation: You will be prompted during installation to input your license key.To complete the license installation, access to ttps://wyday.com will be required over TCPport 443. If your server does not have access to the Internet please see this article on offlineactivation: Manual Activation for SafeConsole.
- During the installation, you can choose to have SafeConsole automatically check and apply updates on a set schedule.
- After the installation wizard concludes the SafeConsole Configurator will automatically be started. If needed later, you will find the SafeConsole Configurator in the Windows Start menu and in the selected installation folder.
SafeConsole runs on the local machine as a service named SafeConsole. Configuration After completing the SafeConsole install wizard, the SafeConsole Configurator will launch. The SafeConsole Configurator will set the initial server options before the web application starts. These settings can be changed at any time during the lifecycle of the SafeConsole server, except for Syncing Users from Active Directory, which must be done before the database is created.
Domain settings
The SafeConsole Configurator will automatically discover your domain name and primary domain controller if the currently logged-in user is a domain user. The entered domain name will be the root Path for SafeConsole policies.Integrate with Active DirectoryIt is optional to integrate with Active Directory. If SafeConsole is integrated with AD it:
- Allows SafeConsole to fetch admin user emails and verify users against their AD credentials.
- Enables automatic disablement of drives if the user account is disabled in AD.
- Creates a tree matching the AD to allow easy configurations based on OUs before the users connect endpoints. As the users register endpoints, they will appear on the server.
- Allows administrators and support staff to log into the server with their AD credentials.
Domain Controller and PortThis is the fully qualified domain name of the Active Directory Domain Controller that can be reached by the SafeConsole server. The default port for Active Directory LDAP traffic is TCP and UDP 389. If LDAPS (Port 636) is desired, please reference this article for more information on connecting SafeConsole to Active Directory over SSL.Non-Privileged AD User and PasswordYou will have to specify a non-privileged directory user with reading access to allow the server to connect to your directory server to import and verify user data. The user must be a member of one of the security groups you specify on the next page. Recommendation Copy and paste both the verified username and password into the fields to ensure that they are input correctly.
Disable Syncing (Only used for web logins)
By ticking this box you will disable Active Directory synchronization with SafeConsole. Note that SafeConsole only listens to the Active Directory and does not write to it. The purpose of disabling the sync may be to only use AD for administrator logins to SafeConsole and not to sync any endpoint users. It is possible to perform initial sync and then later disable it by running the configurator anew.
Without Active Directory integration
If you wish to set up the SafeConsole server without Active Directory, do not tick the ‘integrate withactive directory’ box and click next.The SafeConsole Configurator will verify your settings when you click next. You may have a fewprompts to accept.
Access settings
Access to the SafeConsole server is available via default roles with three access levels:
- SafeConsole administrators have full access to the admin interface, including certificatesand server settings. Only administrators can install the license.
- SafeConsole managers can audit SafeConsole Ready Devices and change policies.
- SafeConsole support can perform device password resets.
Access settings configuration with Active Directory
If you have chosen to integrate with Active Directory, this is controlled by assigning the above rolesto security groups that are present in AD. It is optional to create new security groups for this task.
- You can type in a part of the name and click the arrow on the drop-down lists to search for the security groups.
- If the security groups are not available in the drop-down you can enter them manually.
- Security group names are case-sensitive.
- SafeConsole users must be immediate members of the security groups you select. Recursive membership is not supported.
Domain user and role base
This is an optional step to limit SafeConsole’s integration to Active Directory. This can be used if you would only like to sync a certain OU of the Active Directory. For example, if all of your SafeConsole users will be in an organizational unit called users you can limit to just that OU, instead of the entire AD structure. Simply add CN=users to the beginning of the input box. There are two settings, one for users and another for staff that will log in to the SafeConsole dashboard. By default, the entire domain is made available.
Access settings configuration without Active Directory
If you are not integrating with Active Directory, you will be asked to specify three user names and passwords for the above roles. Should you forget the password to any of the roles you will need to rerun the SafeConsole Configurator and set new passwords.
Please note
The SafeConsole Configurator allows you to configure only one of these roles if desired. However, if you are integrating with a Single Sign-On provider, you will need to have the SUPPORT user created. More information on Single Sign-On can be found in the support article: Single Sign-On SettingsThe SafeConsole Configurator will verify your settings when you click next.
Synchronization settings (only for Active Directory integration) – Optional step
This step is only displayed if you are integrating with Active Directory during the first run of the SafeConsole Configurator. We recommend that you perform a partial synchronization as this is the fastest and still makes available the directory tree in SafeConsole. With a partial synchronization, when a user registers a drive to the server, both the user and drive will become visible. If you are considering registering drives on behalf of your users and then reassigning the drive to the correct user, you should perform a full synchronization. The SafeConsole Configurator will perform the initial synchronization when you finalize your settings. Click Next.
Database settings
There are three supported database types in which SafeConsole can be configured to use.1. HSQLDB Built-in Database This is the preferred database type for development use. This optionsaves the database to the SafeConsole install folder. No further configuration is needed if thisdatabase option is selected.2. MySQL External Server This is the preferred database type for production use. This option allows you to use an external MySQL server to save your Database. Before connecting to the MySQL server, a new database should be created for SafeConsole along with a user that has appropriate permissions. For more information on this process please refer to the MySQL Reference Manual. The SafeConsole Configurator will create the initial database structure when finalizing your settings. After the database has been created on the SQL Server, you will need to provide:
- Host Fully qualified DNS name or IP address of the MySQL server.
- Port that the MySQL service is listening on. (Default 3306)
- Database Name of the database that SafeConsole will use.
- Username MySQL user that has permissions to read and write to the Database.
- Password Corresponding password for the user.
- Connect with SSL Check box to use SSL communication with the SQL Server. If this is checked you will need to either 1) generate a new SSL certificate, 2) import an existing certificate, 3) use the SafeConsole SSL Certificate that is used to communicate with drives. Whatever option is chosen here needs to be the same certificate that is configured on the server. For more information on configuring SSL on your MySQL server see Server-Side Configuration for Secure Connections.
After all the settings have been configured, clicking the Test Connection button will attempt to connect to the server. If a valid connection can be made to the MySQL server then a message will be displayed showing your server information.
3. MSSQL External Server (BETA) Requires SafeConsole v5.9+ This is the alternative preferred database type for production use. This option allows you to use an external MSSQL server to save your Database. Before connection to the MSSQL server, a new database should be created for SafeConsole along with a user that has appropriate permissions. For more information on MSSQL installation and user setup, please refer to the SQL Server technical documentation. The SafeConsole Configurator will create the initial database structure when finalizing your settings. After the database has been created on the SQL Server, you will needto provide:
- Host Fully qualified DNS name or IP address of the MSSQL server.
- Port that the MSSQL service is listening on. (Default 1433)
- Database Name of the database that SafeConsole will use.
- Username MSSQL user that has permissions to read and write to the Database.
- Password Corresponding password for the user.
- Connect with SSL This option is currently disabled for MSSQL Database servers. As furthertesting is completed between SafeConsole and MSSQL, this option will be incorporated to provide additional security between the SafeConsole server and the MSSQL Database server.
Click Next.
Mail server settingsEmails are used to add new SafeConsole Admins and to send users invitations to connect drives. There are two options available to send these emails:
- Use a built-in mail system managed by DataLocker. This system utilizes SendGrid to send emailsfrom your console. The deliverability is high and the system is stable. Recommendation Whitelisting the SendGrid servers in your email filters will increase deliverability. If you send an admin invite from SafeConsole to a known email address and monitor the traffic in your filter service, you will be able to see all the details in the header of that email.
- Use custom mail server. This option allows you to specify your own email server. This is a more advanced option and requires knowledge about your SMTP server settings. You will need to provide:
- Host Fully qualified DNS name or IP address of the SMTP mail server.
- Port that the SMTP is configured to use. The default is 25 when not using a secure connection.
- Secure Connection Checkbox to use SMTP-SSL.
- Disable SSLSocketFactory If you are experiencing issues connecting with SSL this can potentially be used to solve handshake issues. Select this if you are using TLS(587). If using TLS(587), verify may not work. Continue and check by attempting to add an admin once SafeConsole is running.
- User A user or email address to authenticate, if your SMTP server requires authentication.
- Password The password corresponding to the above user.
- Send From Email The email address which appears in the From field for emails sent using SafeConsole.
- Verify After entering custom Mail Server Settings, use the verify button to send a test email. You will need to enter a recipient’s email address. If no error is detected you should receive a SafeConsole SMTP verification email.
Click next to confirm the email settings and proceed.
SSL CertificateThis is a crucial step of the configuration and we emphasize that full attention is required. The server needs an SSL certificate to identify itself to the drives and encrypt the communication. There are two options:1. You may choose to have the SafeConsole Configurator generate a new certificate.2. You can import an existing certificate.Opting to generate certificateIf you opt to generate a certificate make sure to enter the server name that is used to connect to the server. This will be the common name of the certificate and should match the server’s Fully Qualified Domain Name, and shouldn’t contain any illegal characters such as underscores (_). Do not use an IP address for the common name.Opting to import certificateIf you have your own CA, you may have it issue the certificate.Recommendation The certificate validity should be at least 10 years to provide longevity for your device usage. We also recommended not changing the certificate during the solution’s lifespan as this could require devices to be reset and potentially cause data loss.
IMPORTANT – SSL certificate precautions
- Please note that this certificate should never be changed or regenerated once the SafeConsole server is installed or all drives running device software prior to 4.7 that are connected to the server must be manually factory reset.
- Always take a backup of the certificate once the configuration is completed. The certificate is available in the SafeConsole installation directory as the file Keystore.p12.
- Make absolutely sure that you do not lose the password to the certificate as this will be needed for any future migrations or restores.
Listen on portThe default setting is 443. If this port is in use by another service enter a different port or change the other service. IIS, for example, uses 443 by default and can be manually changed. In addition, Skype and other IM clients are known to use port 443. If you close these programs and start them after the SafeConsole onfiguration is completed they usually select a different non-conflicting port.
Support TLS v1.0Devices running a device client prior to v4.8.5 use TLS v1.0 to communicate. Enabling the TLS v1.0the option allows the server to communicate with these older devices.New Installs should leave this box unchecked to provide greater security and compliance with strict regulations.Limit log outputThe default setting is INFO. The SafeConsole.log file is saved to the install folder under logs. Logs are automatically rotated, compressed, and retained indefinitely unless manually deleted by an Admin. To reduce the size of your log file use the dropdown tool to select your desired verbosity (level of detail). If you are experiencing issues with your server and you need to contact support please re-run the SafeConsole Configurator and select Trace.This computer is connected to the InternetUnchecking this box will disable some of the SafeConsole features that require Internet connectivity. Enable crash data reporting If checked, this option will crash reports to DataLocker for review.Check firewall settingsThis will create an inbound and outbound exception in Windows Firewall based on the port that you provided. If you are using a third-party firewall program or hardware firewall then this port will need to be manually whitelisted.SafeConsole URLThis address is generated once the certificate is in place using the certificate’s CN. The SafeConsole service will only start after the configuration is completed, therefore it is not available until the configuration concludes. You can make note of the URL for future use. The SafeConsole Configurator will finalize the installation and install the server certificate to be trusted on the local machine when you click next. It will then attempt to launch your browser to access the SafeConsole web interface.
After the SafeConsole Configurator has concluded
Certificate InstallationWhen you have concluded the SafeConsole Configurator a Security Warning will be shown. This is because the SafeConsole Configurator is installing the server certificate to be trusted on the
local machine. This will allow you to log into the server without any browser security warnings. The certificate should be installed on all computers from where you want to log into the SafeConsole web interface.
First steps using SafeConsole
After the certificate installation is concluded the SafeConsole service is started and your default browser opens pointing to the SafeConsole URL.1. Logon to SafeConsole as an administratorYou should now log in with credentials belonging to the SafeConsole Administrator role as configured in the access settings step. This will allow you to configure your default policy and add any additional administrators.2. Confirm and save the Default PolicyClick the notification or the Modify Default Policy button to configure and save the default policy. This policy will be the base and fallback policy for all drives that connect.3. Connect your first device to SafeConsoleNavigate to the Quick Connect Guide under the Help section in the left-hand main menu. Follow the steps that are described.4. Confirm device registration to SafeConsoleClick Manage > Drives in the left-hand main menu. Your device should now be visible. Note that the drives fetch new configurations and policies each time they are unlocked.5. Familiarize yourself with SafeConsoleWe recommend taking the time to explore the interface. Many features are self-explanatory but there are also More info icons under the Manage > Policies that will explain each policy. Furthermore, there is a manual if you navigate to Support under the Help section in the left-hand main menu.Uninstall SafeConsoleDevices will need to be factory reset to connect to a new server. Make sure that you allow users to factory reset their drives (navigate to Manage>Policies and verify the User Defaults in the Policy Editor) OR issue a reset command to the device(s) prior to uninstalling (Note: This render all device data inaccessible). Make sure that all drives have fetched the policy update, this can be confirmed under drives. To completely uninstall SafeConsole follow these steps:
- Uninstall SafeConsole from the Control Panel > Uninstall Programs
- Remove the remaining configuration and data files in the SafeConsole install folder (usually “c:/program files/safe console”).
- SafeConsole has now been completely removed from your system. If you are about to reinstallmake sure to revisit the steps in the deployment as the registry key and certificate may have changed.
Troubleshooting
Restarting The SafeConsole ServiceTo restart the SafeConsole service, the configurator can be run. The steps can be clicked through until prompted to start SafeConsole. Click Yes to start.
Support
 report this ad
In SafeConsole, Under Help > Support, you will find links to:
- Request customer support – through our online knowledgebase.
- The SafeConsole Admin manual
- Release notes for SafeConsole
- Download the latest device updates.Please visithttp://support.datalocker.com/to find the most up-to-date resources.
References
wyDay — premium licensing and software development tools for high-tech companies
api.twilio.com
Support : DataLocker Support
ipinfo.io
Google Maps Platform | Google Developers Google Google
How do I connect SafeConsole to my Active Directory over SSL? : DataLocker Support
MySQL :: MySQL 5.7 Reference Manual :: 6.3.1 Configuring MySQL to Use Encrypted Connections
Google Maps
ip-api | pro
Manual Activation for SafeConsole : DataLocker Support
SQL Server technical documentation – SQL Server | Microsoft Docs
MySQL :: MySQL 5.7 Reference Manual
wyDay — premium licensing and software development tools for high-tech companies
media.datalocker.com/downloads/safeconsole/onprem/SafeConsole-Setup.exe
[xyz-ips snippet=”download-snippet”]