LTE Replacement Board Kit
for EnviroMonitor Gateway and Vantage Connect
User Manual
Product number 6682
You can use this kit to convert a Vantage Connect (product numbers 6620, 6621, 6622) or older EnviroMonitor Gateway (product numbers 6800 or 6801) into a 6802 LTE Gateway.
Note: This kit is for systems installed in the US only.
Contents of Kit
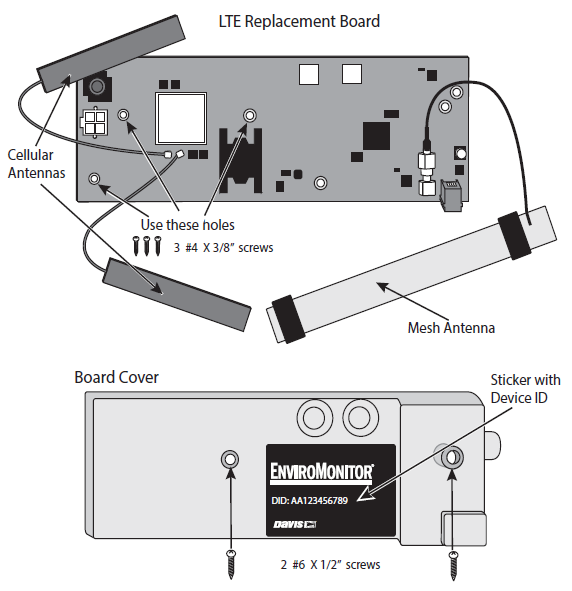
The LTE Replacement Board Kit comes with a new board with two cellular antennas and a mesh antenna attached, and a new gray plastic board cover. There is a sticker for the plastic cover with the new Device ID, as well as troubleshooting stickers for inside the door of your shelter. The hardware kit includes 3 #4 x 3/8” screws for attaching the board to the shelter and 2 #6 X 1/2” screws to secure the cover.
Note: Please handle the board and antennas with care, especially the connection between the cellular antennas and the board. The connections allows for turning but can be broken if pulled or handled roughly.
Vantage Connect: Remove the Old Board
Tools Needed:
Phillips head screwdrivers: #3 (small) and #2 (medium)
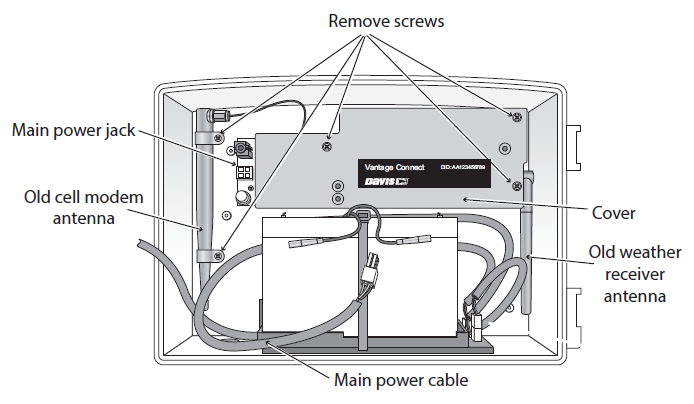
- Open your Vantage Connect shelter.
- Unplug the main power cable from the main power jack and disconnect the battery cables to allow for easier access to the board.
- Unscrew the three screws holding the plastic cover over the board, and remove the cover. Unscrew the two screws securing the cellular antenna.
- Using a small Phillips head screwdriver, unscrew the two screws securing the board.
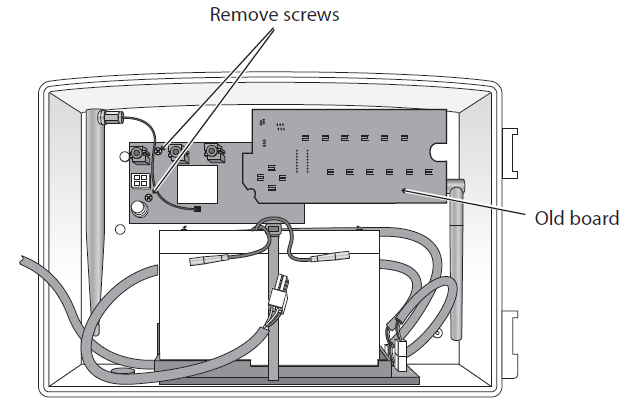
5. Lift out the board and antennas.
6. Install the new board. See page 4: Install the LTE Replacement Board.
EnviroMonitor Gateway: Remove the old Board

- Open your Gateway shelter.
- Unplug the main power cable from the main power jack and disconnect the battery cables to allow for easier access to the board.
- Unscrew the two screws holding the plastic cover over the board, and remove the cover. Unscrew the two screws securing the cellular antenna.
- Using a small Phillips head screwdriver, unscrew the three screws securing the board.

5. Lift out the board and antennas.
6. Install the new board. See page 4: Install the LTE Replacement Board.
Install the LTE Replacement Board
- Being careful with the antenna cables, center the new board with the screw holes above the appropriate bosses in the shelter.
- Using the three #4 x 3/8” screws, attach the board.

3. Install the new cover. Make sure the new mesh antenna cable exits through the opening on the right hand side of the cover, and the new cellular antennas cables exit through one of the openings on the left side of the cover. Attach the cover using the two #6 x 1/2” screws.4. Put the new black label with the new DID on the cover.
Tip: Make a note of the new Device ID (DID).
5. Peel the backing from the adhesive tape on the new antennas and adhere them to the inner walls of the shelter. The two cellular antennas should be placed at right angles to each other, rather than parallel. Reconnect the battery cables and main power cable.
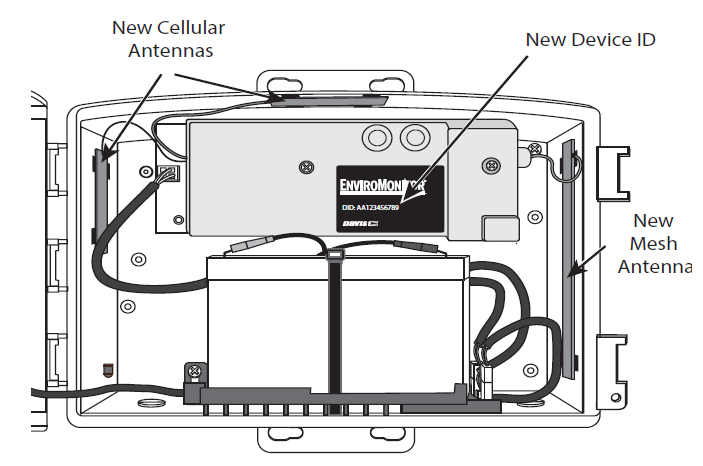
Replace the Old Device ID with the New
Your current data on WeatherLink.com is associated with your device through the Device ID or DID. For uninterrupted data, you must tell the system to replace or merge the old board’s DID with the new board’s DID. The new DID is on the label on the new board’s cover.
Old EnviroMonitor Gateway to an LTE EnviroMonitor Gateway:
- Open the EnviroMonitor app on your smart phone.
- Click on the old Gateway that will be upgraded.
- Tap the Menu icon in the upper right corner. Scroll down to the Replace button.
- Follow the prompts to complete the process.
Old Vantage Connect to LTE EnviroMonitor Gateway:
- Open the EnviroMonitor app on your smart phone.
- Follow the prompts to set up your EnviroMonitor Gateway.
You will now have two stations on WeatherLink.com:
your old Vantage Connect with all its data, and your new Gateway with any data it has collected since you powered it up. You can leave these two stations as is, or you can merge the old data into the new.
- Log into your account on WeatherLink.com and select the new EnviroMonitor Gateway.
- Click Tools icon (it looks like a wrench).
- Select “device”, then “Import.” Follow the prompts to complete the merge.
- If you want to delete the old station, please contact Technical Support.
Connect and Remount your Gateway
Now you are ready to connect and remount your Gateway and add Nodes as desired. For instructions on how to do this, please refer to the EnviroMonitor Gateway and Node User Guide. It can be found in the support section of www.davisinstruments.com.
Contacting Davis Technical Support
For questions about installing or operating your EnviroMonitor Gateway, please contact Davis Technical Support. We’ll be glad to help.
Online: www.davisinstruments.com
See the Weather Support section for copies of user manuals, product specifications, application notes,software updates, and more.
E-mail: Telephone: (510) 732-7814Monday – Friday, 7:00 a.m. – 5:30 p.m. Pacific Time.
LTE EnviroMonitor® Replacement KitProduct Number 6882 Document Number: 07395.376 Rev.B 7/7/20EnviroMonitor®, Vantage Pro®, Vantage Pro2™, and WeatherLink® are trademarks of Davis InstrumentsCorp., Hayward, CA.
© Davis Instruments Corp. 2020. All rights reserved.Information in this document subject to change without notice. Davis Instruments Quality ManagementSystem is ISO 9001 certified.

3465 Diablo Avenue, Hayward, CA 94545-2778 U.S.A.510-732-9229 • Fax: 510-732-9188
References
[xyz-ips snippet=”download-snippet”]