Low-Frequency DSP ControllerModel: DSP-LFUser Manual
Overview
The Dayton Audio DSP-LF, when combined with the iWoofer app, allows for Bluetooth controls of all of the popular DSP functions you can expect to find in a subwoofer DSP.There are two versions of the iWoofer app. The free version that is available on both Android and iOS has the following features.
– Adjustable frequency and slope high/low pass filters (up to 48 db/oct)– Parametric EQ (up to 25 bands)– Gain Control– Subharmonic Synthesis– Delay Control– Phase Control– Limiter / Compressor– Dynamic Bass
The premium version of the app (iWoofer Pro, $5) is only available on iOS. The main difference between these apps is the addition of a room correction feature that utilizes the microphone of your iPhone or iPad and corrects the room response of your subwoofer with advanced algorithms that automatically create FIR filters tailored to your specific room and subwoofer. The premium version of the app is only available on iOS because all iOS devices use consistent microphones with a smooth, predictable frequency response that can be compensated for in software. Android microphones are not as predictable as an iOS microphones, due to the number of manufacturers and different implementations. The premium version of iWoofer also adds extra settings for the limiter/compressor and dynamic bass control.
Device Connection and Setup
PowerBecause of its minimal current draw and convenient 5V micro USB power connection, the DSP-LF can be powered by nearly any USB Type-A port with a standard micro USB cable. You could use the supplied power brick, a TV USB port, a desktop or laptop port, or even the port found on the Dayton Audio BSA200 or other subwoofer amplifiers to power the DSP-LF. Since Dayton Audio cannot verify the integrity of all power sources, if results are not satisfactory, it is recommended to use the supplied USB power brick.Input Audio SignalConnecting the DSP-LF to a typical AV receiver is easy. Simply use the provided RCA to 3.5 mm cable by plugging the RCA end into the ‘sub out’ port on your AV Receiver (AVR) and the 3.5mm end into the input side of your DSP-LF. It is okay only to use either the red or white RCA plug, and leave the other one unused, but you can also use an RCA Y Adapter that is 2 Females to 1 Male to eliminate this.
If you are currently using the high-level inputs on your subwoofer amp to add a subwoofer to your system, adding a DSP-LF might not be possible without modifying what equipment you’re using. It is possible to use a 3.5mm male to dual 3.5mm female cable (also known as an ‘aux splitter’) with the DSPLF, which might allow you to use the DSP-LF if you are currently using high-level inputs on a subwoofer amplifier.
Output Audio Signal
The 3.5mm output jack on your DSP-LF should be hooked up to the line-level input to your subwoofer amplifier using the provided stereo 3.5mm to RCA cable. If your subwoofer amplifier only has one RCA jack instead of two (often labeled LFE), it is okay only to attach only one of the RCA plugs into your amplifier.
If you have two subwoofers in your system, you can use a 3.5mm male to dual 3.5mm female cable (also known as an ‘aux splitter’) or other types of “Y” cables on the output of the DSP-LF to hook up both of your subwoofers. You could even use a typical 3.5mm male to stereo RCA cable, and use the white RCA plug for one subwoofer, and the red RCA plug for the other subwoofer.
AV Receiver and Subwoofer Amplifier Settings
To avoid conflicts between the DSP-LF’s settings and your AVR / subwoofer amplifier settings, make sure to make the following adjustments on both before using your DSP- LF. If your AVR or sub amp supports these settings, you will be able to find how to adjust them in that product’s user manual/guide.
- Adjust the low pass dial to the highest frequency available on your AV receiver and subwoofer amp to prevent interference between your plate amp crossover and the iWoofer crossover. It is recommended to use the iWoofer software crossover as opposed to the crossover on your subwoofer amp.a. Note: A low pass filter means that all of the frequencies below this value will pass through, and frequencies above this value will be attenuated and then altogether eliminated. This filter is essential for subwoofers and is one of the main things that separates a subwoofer amplifier from a normal amplifier.
- Turn off any EQ settings your amplifier or AVR might have for bass to prevent interference between these settings and the iWoofer software. In particular, EQ settings on an amp or AVR will prevent you from getting optimal results from the iWoofer Pro’s room correction algorithm.
- Turn off any additional processing you can find within your subwoofer amplifier or AVR unless you are confident it will not conflict with any DSP settings in iWoofer.
- Note about AVR Crossovers: For many AV receivers, there will be a single ‘crossover’ frequency setting that will high pass your main speakers at this frequency and low pass the signal going to the ‘sub out’ on your AVR. If this is the case for your system, you will want to utilize this crossover, and set the low-pass frequency within the iWoofer app to 500 Hz (all of the way up). It is important to high pass your mains with this crossover whenever possible to prevent interference in the bass range between your mains and your subwoofer. Although it’s possible to get a good response without high passing your mains, the iWoofer room correction algorithm cannot account for the bass response of your mains, which is why we recommend high passing them.
iWoofer App Quick Start
Note: All screenshots shown are from the iOS version of the app. These instructions will work for the Android app as well, but the look of the app is different.
- Navigate to the app store of your smart device and search for the “iWoofer” or “iWoofer Pro” app by Artem Khlyupin and install it.
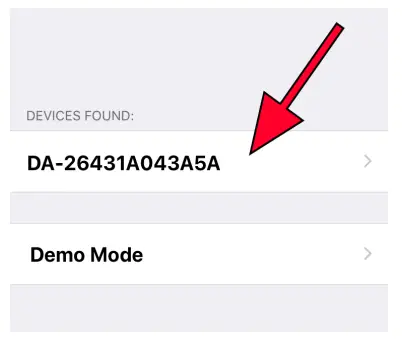
- As long as your DSP-LF has power and the Bluetooth of your smart device is turned on, you will see a seemingly random string of letters and numbers when opening the app (this can be renamed in the options menu of the app). Press this one, or if you don’t yet have a DSP-LF, press demo mode to view the app. If you have multiple DSP-LF devices, they will all show up here. Troubleshooting: The device will enter standby after a while if it does not sense any input signal and will not show up on this screen. If this happens to you, either unplug your device and plug it back in, or provide an input signal to kick it out of standby. If this does not work, make sure no other smart device is connected to the DSP-LF with the iWoofer app. Otherwise, try a different smartphone or tablet.

- After connecting to the DSP-LF hardware, you should see the home screen of the app like below(room correction will not be available if you don’t use the pro app).
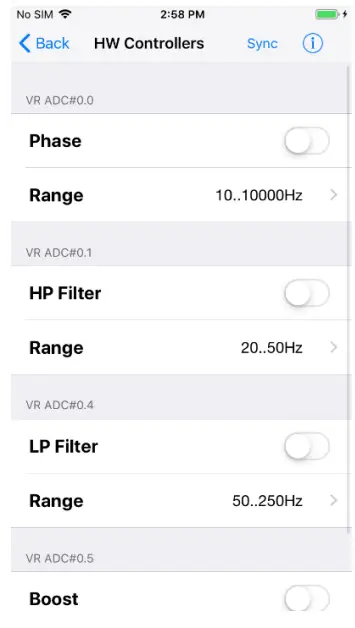
- Before you start exploring the app, navigate to the “HW Controllers” screen found by pressing Options -> HW Controllers. The screen should look like the screenshot below. Everything on this menu should be turned OFF, as the DSP-LF does not have any hardware controllers and leaving these on can result in a distortion of frequency response (because nothing is connected to these pins in the DSP-LF. Note: If you restore the DSP-LF to factory defaults, you MUST turn these settings off again as they might be activated by the factory reset.
Notes about the iWoofer App
- When it asks to import presets from DSP, if you press yes, that means it will import the settings currently set on the device to your app. If you say no, it will use the default (or locally stored) settings stored in the app. You will get this message if you make initial adjustments with one smart device and then connect to the same DSP-LF with a different smart device.
- When the app says, “import preset is not a success,” that is a typo. It is actually successful.
- There are many features and settings to explore in the app, make sure to try them all.
Automatic Room Correction with iWoofer Pro
Even with high-class speakers and subwoofers, the complexity of room acoustics can cause nonlinearities in audio signals once the sound bounces around your room and eventually reaches your listening position. Room reflections combined with the direct sound from a speaker will usually create a misrepresentation of your audio signal, meaning what you hear is not the same as what the recording / mastering engineer heard in their studio. Phasing issues are especially true with the very long wavelengths of bass frequencies, as they wrap around the whole room and then eventually find their way to your listening position. Room reflections are the main reason that recording engineers go through the extraordinary effort with room treatment, speaker placement, and sometimes precise EQ to make their studios and speakers have as a flat response as possible. Flat response means the audio signal is represented accurately (it will look like a straight, horizontal line when taking frequency response measurements).Room correction is powerful because it can take a measurement of your listening position, and apply precise FIR filters to automatically ‘flatten’ the response and minimize any adverse effects of room acoustics. The Automatic Room Correction algorithm works by taking a measurement right next to your subwoofer (a near field measurement) and then taking more measurements in your listening position to determine what DSP parameters need adjusting for optimum room correction. If you look closely, you will see that your near-field response will look more like a flat line while your listening position measurement will likely look more ragged as represented by dips and peaks throughout. Depending on which type of correction you choose, the app will apply equalization to make your listening position more faithfully represent the original audio signal.
Before you start
– For optimal results, take off any case you might have on your iOS device. Because the microphone on your iOS device was calibrated for the iWoofer app without a case on, your car can causes inaccuracies in measurements due to diffraction.– Make sure to follow the “AVR and Subwoofer Amplifier Settings” section earlier in the manual before proceeding with room correction.-In the X-Over menu of the iWoofer app, set your desired high pass (subsonic filter) and low pass filters for your subwoofer. These settings are used by the room correction function to determine how high and low to correct the frequency response. If you decide to change these crossover points after doing room correction, you will need to rerun the room correction function for optimal results.– Remove all EQ settings you might have made in the X-Over menu.– If a sweep is not audible while running the AutoEQ, make sure your sub is powered on, and audio connections are correct. If the sweep is not audible once confirming the subwoofer is connected correctly, try restarting the app and or removing and then reconnecting power to DSP-LF hardware unit. The DSP-LF unit has a standby function and will temporarily shut off if it does do not receive input for a period of time, but you can quickly kick it out of standby with apower cycle.– Turn off any input signal going into your DSP-LF, so it does not interfere with your measurements.
Room Correction Settings
- Auto Level – When this is on, the DSP will automatically change the swept volume to a specific level, as interpreted by your iOS device’s microphone. During room correction measuring, you will hear a series of very short sweeps of varying volume levels before each measurement. The DSP is trying to find out how loud the subwoofer should be to achieve the target volume. It is recommended to keep this feature on for optimum results.
- Auto Range Recognition – This setting affects how ‘optimistic’ the iWoofer is about the limits of your subwoofer, as in how low it is capable of playing. If you’re confident your subwoofer can handle extremely low notes, you can increase your optimism. If you’re unsure, leave the setting at the default or off.
- Frequency Step Delay – The frequency step delay setting will affect how long the sweeps are. The lower the delay number, the shorter the sweep will be. The larger the number, the longer the sweep, but the more accurate, the sweep will be.
- Max Boost of Compensation – This is the maximum limit that the DSP will boost a frequency band. It’s recommended to leave this at its default value of 9 or reduce it for a gentler correction.
Room Correction Process
YouTube VideoOnce you have done everything in the “before you start” section and adjust the “room correction settings” menu, click the “wizard” section in the room correction menu, which will bring you to the screen below.Note: Remain quiet and block out outside noises as much as possible during this whole process for optimal response. A loud noise during your measurements will not ruin the measurements. However, it’s recommended to restart if noise interference occurs while measuring.Note: The intention of this algorithm is not to correct the response of an entire room, but rather a single listening position (for example, an area of a few square feet, like an armchair or at most an entire couch). Although the algorithm isn’t optimized for it, and Dayton Audio does not recommend it, you can try to use it to correct the sound across the entire room by averaging responses across the room in the 2nd step. Ultimately, if you like the way it corrects your room, you can call it successful!
There are three main steps that the wizard will take in order to do room correction.
- The first step is a near-field measurement of your subwoofer that will occur right when you press next on the screen above. This measurement gives the app knowledge about the initial response of your subwoofer, without any of the effects of room acoustics. You will hear it first make a few rapid sweep sounds at varying volumes while it figures out how loudly it should perform the real sweep. You will then hear it play a longer sweep, the length of which depends on the “frequency step delay setting.”a. You will have the option to average as many responses together as you want. We recommend averaging at least three measurements for optimal response. Keep the iOS device close to the subwoofer, but move it around for each measurement, especially if your subwoofer has a port.
- The second step is to choose the correction type and to take measurements in your listening position. A description of each correction type is below. Because the correction process is quick and easy, it’s recommended to try each of the three types to see what kind of sound you like best. While conducting measurements in your listening position, take an average of at least three measurements while slightly moving your phone around your listening position. You will want to place the phone near where your ears are while you’re sitting in the listening position. Boomy Region – Suitable for most types of subwoofers, this mode will retain the original ‘punch’ of your subwoofer but remove the most obvious and undesirable response issues from room reflections. The Boomy Region mode will correct the frequency response to fit the ideal flat line from 70 Hz and up, which is where the most annoying room reflections are likely to occur. Choose this mode if unsure of which model to use.Near Field – Suitable for any subwoofer, this model will fit the response of your listening position to match the near field response of your subwoofer. Near Field mode only eliminates room reflections and does not alter the initial response of your subwoofer. This mode simulates what it would be like if you moved your subwoofer into your listening position.Linear – Suitable for high-class and high-performance subwoofers, this mode will equalize the entire frequency spectrum of your subwoofer’s response to create an ideal, flat response, much like what is found in mastering studios. This mode will significantly reduce the effects of room reflections and also will equalize the initial response of your subwoofer to an ideal flat line. This mode might result in less “punch,” but it is a more accurate sound suitable for audiophiles or audio professionals. Using the Linear mode is a good starting point for further EQ customization.
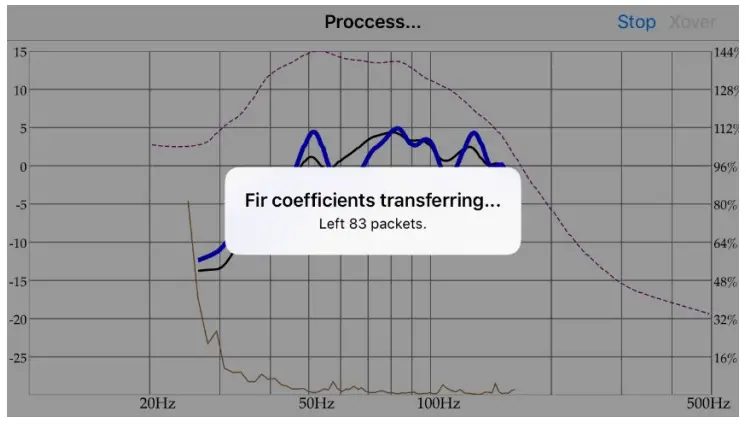
- Once you have finished taking your averages and press “no, next” you will see the following screen. The DSP calculates what filters are necessary to correct your response and then applies them. While this is taking place, keep your phone in your listening position. The app will immediately take another measurement once it’s finished calculating to show you the final results of your room correction. If you took measurements from a wide range of positions in your room for the 2nd steps, this measurement might not be totally reflective of how successful the correction was, as this final measurement is only taken in one spot.
- The image below shows an example result of a completed correction process. This measurement was completed using the linear model of correction, and three measurements averaged together for both near field and listening position. The result also used all of the settings found in previous screenshots.
Bass Shaker Tuning Guide
The DSP-LF combined with the iWoofer app is a great way to tune your bass shakers while sitting in your chair or couch. You will immediately feel the difference when adjusting parameters, giving you the ability to tune precisely to your liking. The list of different iWoofer features below offers a quick description of guidance for how it can be used for bass shakers for each function.High Pass Filter (HPF) – It’s recommended to keep this at 20hz for a bass shaker setup, as feeling those extra-low, infrasonic notes is a primary benefit of bass shakers. A high pass filter means that frequencies above this frequency will pass, and frequencies below it will be attenuated and eventually eliminated.Low Pass Filter (LPF) – This is going to be a personal preference mostly, and will heavily depend on the specific bass shaker setup. The upper limit for this filter is going to be around 150 Hz. Anything above that, you will start to hear voices and other sounds coming from your bass shakers. For a more ‘fun’ and novel feel, you’ll want to keep this filter around 100 Hz, so you get the bass shaker effects from the entire bass range. If you are adding bass shakers to your setup to augment a setup with existing high-quality subwoofers, you might want to make the filter much lower to avoid a “rumble interference” from your subwoofer and bass shakers hitting your chair at the same notes.PEQ – When used with bass shakers, the PEQ is an essential function. Every chair and couch will react differently to even the same bass shaker. You might find that a specific frequency range is not present enough or too present. With the PEQ, you can slide around a narrow filter to figure out which frequency range you like most or feel like needs more energy. You can even use a narrow EQ band to create a ‘notch’ filter to eliminate undesirable resonances.Subharmonic Synthesis – Subharmonic synthesis will add energy to the output at half the frequency of the input signal’s original bass tone. Subharmonic synthesis is suitable for any audio source that lacks sub-bass. However, Subharmonic synthesis can be a lot of fun with bass shakers regardless of the source. For some genres like hip hop, electronic music, or modern movies, it might produce a strange effect because they will already have content at very low frequencies.Revision LogVersion 1.0 – Initial Guide
5-Year Limited WarrantySee daytonaudio.com for details
Dayton Audio”daytonaudio.comtel + 937743.8248infoOdaytonaudio.com705 Pleasant Valley Dr.Springboro. OH 45066USA

 report this ad
Last Revised: 3/12/2020
[xyz-ips snippet=”download-snippet”]