
![]()
Deerma Handheld Wireless Vacuum Cleaner
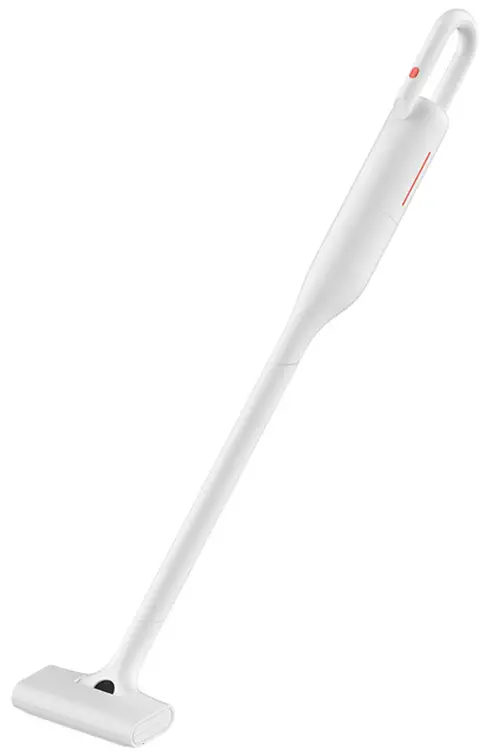
Continuous large suction can take away the dustIt is great at picking up fine dust rapidly and flexibly for each corner.It is effective in storing the dust not backflow to give you a clean living area.VC01
Thank you for purchasing this product. Please read the instruction carefully before using, to ensure safety. Deerma products will bring you and your family life more fun and delicacy!
Brand Introduction
Deerma is an innovative electrical appliance brand that is dedicated to designing, producing, and sales of household appliances. Founded in 2011, through direct industry chain control and precise selection strategy, Deerma can produce well-designed, reliable, and cost-effective small home appliances.Since its establishment in 2011, Deerma has been highly recognized and loved by consumers. Its strong research – production-sales power enables it to win the “iF Product Design Award” and “AWE Award”, and enter the shortlist of China’s “Top 100 Online Brands” and “Popular Online Household Appliances”. And has won many special honors, such as “Guangdong Top 500 Enterprises”, “Guangdong Manufacturing Top 100 Enterprises”, “Guangdong High-tech Products”, “Guangdong Outstanding Independent Brands” and “Guangdong Top 100 Circulation Enterprises”.Our featured products, including humidifier and stick vacuum cleaner, have grown to be the benchmark of this industry. Now Deerma has been introduced to nearly 200 platforms, including major Chinese E-commerce platforms, gift-giving platforms, bank malls, and points-based malls. As for the global market, our products have been sold to more than 130 countries in the Americas, Europe, and Southeast Asia, providing global users with more valuable products.With “good design, high quality, and favorable price” in mind, Deana provides customers with elegant, high-performance, and high value-added products that are well designed in terms of appearance, functions, quality, and applications, striving to meet users’ demand for a better life. Deerma will always provide customers with high-quality household appliances and contribute its share in improving users’ lives.
Safety Precautions
Standing
- Please handle the vacuum cleaner with care to avoid impact;
- Never place the vacuum cleaner too close to the fire source and at other places where the temperature is high;
- Never place the vacuum cleaner under extremely unfavorable conditions for use and storage, such as extreme temperature, etc. It is recommended to operate the vacuum cleaner an indoor ambient temperature of 0 – 35°C. Please store the vacuum cleaner in a cool and dry place;
- If the vacuum cleaner is stored for a long time, it is recommended to charge the battery every three months.
Before operation
- Please check whether the USB cable of the adapter is intact before charging;
- After storage for a long time, please fully charge the battery before use;
- Make sure the filter element is installed properly when operating the vacuum cleaner for the first time or replacing the specified filter element.
During operation
- Never operate the vacuum cleaner under inflammable and explosive gas;
- Never remove detergent, kerosene, glass debris, needles, wet dust, sewage, matches, and other items with the vacuum cleaner;
- Never remove tiny particles such as cement, gypsum powder, and wall powder, or large objects such as toys and spitballs with the vacuum cleaner, to avoid any faults to the vacuum cleaner;
- Never remove water or other liquids with the vacuum cleaner, and never rinse the vacuum cleaner with water so as to avoid short circuits;
- If the battery is fully charged but the vacuum cleaner still fails to work, the vacuum cleaner must be inspected and repaired at the designated maintenance place. Never disassemble and assemble the vacuum cleaner without permission;
- Operating the vacuum cleaner without the dust cup will be strictly prohibited;
- Never allow children or people who are incapacitated or mentally disabled to operate the vacuum cleaner;
Cleaning and Maintenance
- Please clean the vacuum cleaner with dry cloth. The chemical solvents such as gasoline, alcohol, and banana oil shall not be used, otherwise, the shell will be cracked or discolored;
- Please turn off the vacuum cleaner if cleaning and maintenance are necessary;
- If there is more debris in the dust cup, please remove such debris in time to ensure a smooth ventilation path and avoid blocking that may lead to a suction reduction or motor heating;
- It is recommended to replace the filter element every three months. If the vacuum cleaner is frequently used, the replacement period may be shortened according to the actual usage.
Notes for Use of Power Supply
- When charging, the vacuum cleaner is in the standby state and cannot be operated normally;
- The waste battery packs should be safely recycled for disposal; they shall not be discarded at will;– When discarding the product, remove the battery from the product;– The product must be powered off when the battery is removed;– The battery should be disposed of safely.
- If the power cord is damaged, it must be replaced with a dedicated cord or dedicated subassembly purchased from the manufacturer or service department
Scrapping Method
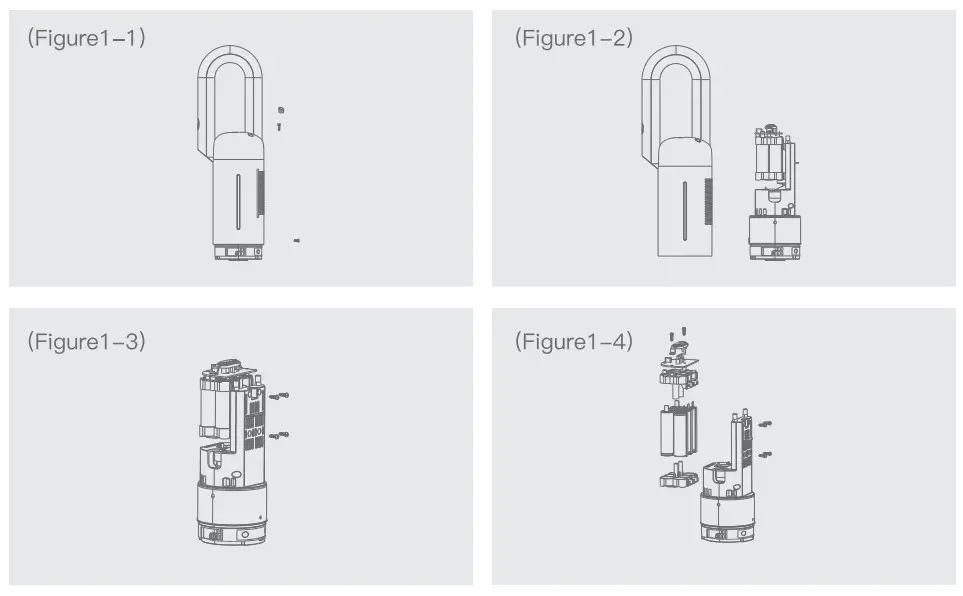
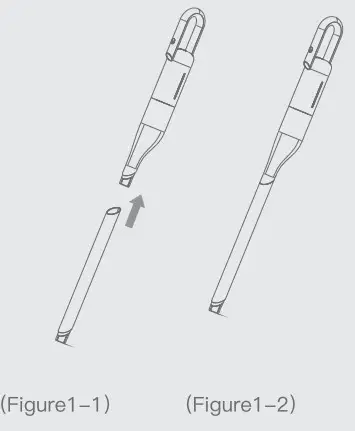
- Remove the silica gel pad of the screw hole on the top of the main engine, and use a special
- See Figure 1-2 for the separation of the shell and interior of the main engine. screwdriver to remove the three screws of the main engine as shown in Figure 1-1.
- Use a special screwdriver to remove the four screws on the side which are used to fix the battery pack, as shown in Figure 1-3.
- Use a special screwdriver to remove the two screws on the top of the battery pack, and use scissors to cut tinfoil which is used to connect the four batteries, at this time, the battery can be separated and discarded, as shown in Figure 1-4.
Product Parts
Schematic Diagram and Assembly of Product Parts
After unpacking, please check the contents for any defects. If yes, please contact the after-sales service staff as follows:
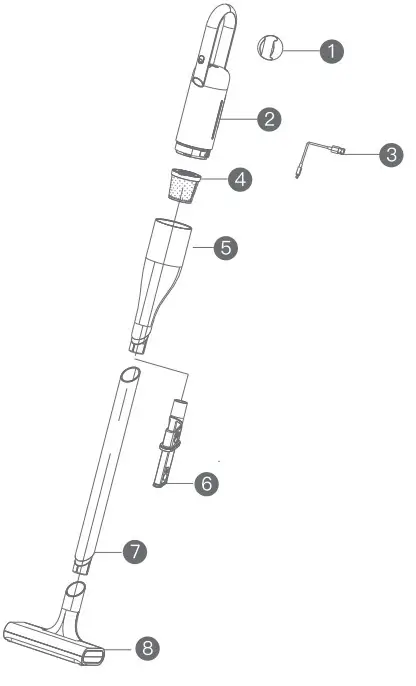
- Main engine silicone rack
- Main engine
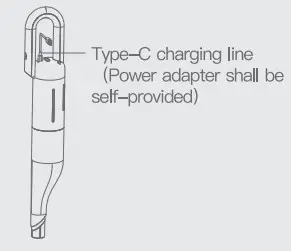
- Type-C charging line
- Filtering assembly
- Dust bucket assembly
- Tow-hone beg flat action
- Connecting tube
- Ground brush assemblyNote: The above specifications and configurations may be diffracted from that of the product purchased, please refer to the product purchased.
Technical parameter of Product.
a. Parameters
| Name | Handheld wireless vacuum cleaner | Model | VC01 |
| Rated voltage | 14.4V |
Rated power | 125W |
| The capacity of lithium battery | 2200mAh | Size | 210x180x1155mm |
| Limited voltage for charging | 5V: |
Charging current | 1 A/2A/2.5A/3A |
| Weight | 1.6kg | Volume capacity of the dust cup | 0.6L |
| Duration(Standard/high-speed) | About 30min/15min | Material | ABS |
| Noise | ≤80dB(A) |
b. Product characteristics
- The appearance of the product is novel and fashionable. The floor brush is connected with the machine through a plastic pipe;
- Combined type, the pushrod, and handle are integrated together, the floor brush part is detachable, and the main engine can be used with other accessories to achieve multi-functional requirements;
- The multiple filtration system of “Cyclone + HEPA” has not only high efficiency of dust filtration but also cleanliness;
- The buckle structure for the dust cap and the main engine are easy to separate and convenient for pouring dust;
- Wireless charging type machine is not only easy to use but also avoids the defects such as jamming wire and changing socket, so it can be used to clean at any time and anywhere; 6.Plastic pipe for connection;
Instructions
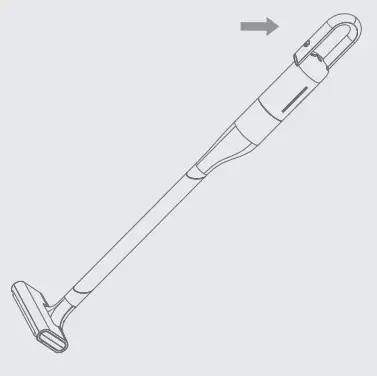
Remove the sticker from the rear of the main engine rack, and paste it on the wall at a height equal to the handle. Insert the machine into the rack as shown in the figure.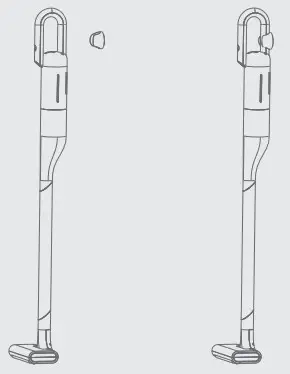
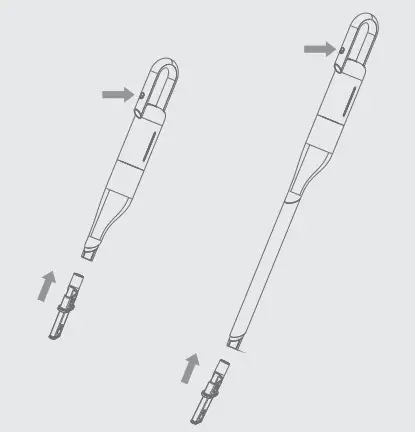
- Insert the connecting assembly (Figure 1-1) into the docking position of the main engine according to the direction shown in the figure, pay attention to the matching connection of the two inclined planes, and ensure that it is installed in place, as shown in Figure 1-2.

- Mount the floor brush assembly (Figure 2-1) on the connecting pipe according to the direction shown in the figure, pay attention to the matching connection between the two inclined surfaces and ensure that it is installed in place, as shown in Figure 2-2.
- Press the power button to start the vacuum cleaner, the vacuum cleaner will enter the standard vacuum mode, then press it again, the vacuum cleaner will enter the strong vacuum mode, finally press it once more, the vacuum cleaner will to enter the shutdown mode. repeatedly press the power button, the vacuum mode can be switched back and forth.
- According to the direction shown in the figure, insert the 2 in flat suction into the interface direction of the main engine or connecting assembly according to the actual demand, and press power on to start the machine to realize different functional requirements after it is confirmed that the connection is firm.
Cleaning and Maintenance
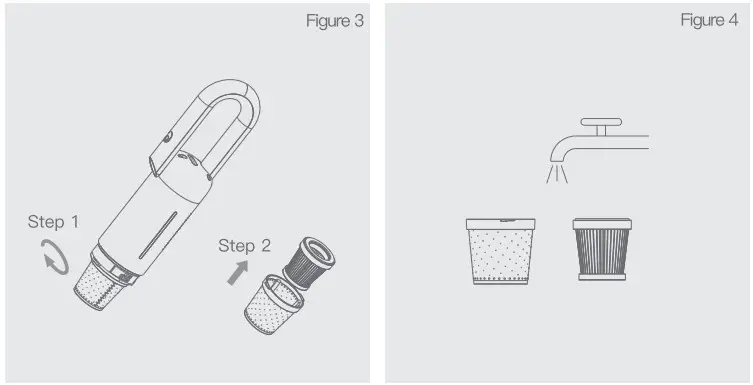
Removal, cleaning, and installation of the dust cup
- Rotate the dust cup according to the direction shown in the figure, take out the dust cap from the position the triangle arrow that points to is.
- Separate the dust bucket from the main engine according to the direction shown in the figure. At this time, dust can be poured out of the dust cup for cleaning.
- Rotate the filter assembly in the direction shown in the figure, and then take out it.
- Rinse the filter assembly directly with water after cleaning and dry it before use.

Charging Mode
- Charging: Four LED indicator lamps will be blue alternatively. According to the charging progress, one LED indicator lamp will be always blue once the battery level reaches 25%, two LED indicator lamps will be always blue once the battery level reaches 50%, three LED indicator lamps will be always blue once the battery level reaches 75%, four LED indicator lamps will be always blue and charging is automatically stopped once the battery level reaches 100%. It goes out when the over-discharge protection value is reached.
- In case of power shortage: four LED indicator lamps are on and the red lamp flashes for 3S.
Charging hour:
- Charging time at 1A: ≤48.5 hours
- Charging time at 2A: ≤C4.5 hours
- Charging time at 2.5A: ≤C3.5 hours
- Charging time at 3A: ≤3.0 hours
Display Status of Indicator
There are 4 indicator lamps. The blue one is always on after the machine is turned on. The indicator lamps will be on for 3 seconds and then off after the machine is turned off to indicate standby; When the first blue lamp from top to bottom is off, it means that 25% of the power has been consumed; When the second blue lamp from top to bottom is off, it means that 50% of the power has been consumed; When the third blue lamp from top to bottom is off, it means that 75% of the power has been consumed; When the forth blue lamp from top to bottom is off, it means that the power has been completely consumed; If you forcibly turn on the machine after the battery is used up, the 4 indicator lamps will flash red 3 times at the same time, indicating that the machine can be used after charging; Four LED indicator lamps will be blue alternatively from bottom to top. According to the charging progress, one LED indicator lamp will be always blue once the battery level reaches 25%, two LED indicator lamps will be always blue once the battery level reaches 50%, three LED indicator lamps will be always blue once the battery level reaches 75%, and four LED indicator lamps will be always blue once the battery level reaches 100% and the charging has been completed.

Analysis and Solution to Faults
| Faults | Causes | Solution |
|
|
|
| Suction reduction |
|
|
| The indicator lamp is not on or fails to flash when charging |
|
|
Note: If the vacuum cleaner cannot be operated normally, please perform troubleshooting by yourself or contact the customer service staff in time.
Fault Mode
| Causes | Solution |
| Temperature protection during charging | The blue lamp flashes at 3Hz for 3 hours, and the temperature does not drop to the recovery temperature. But the blue lamp goes out |
| Charging in temperature protection | During the charging process, the blue lamp flashes at 1 Hz (fake charge), and the temperature does not drop to the recovery temperature after 3 hours. But the blue lamp goes out |
| The temperature protection for charging is recovered | When the temperature drops to the recovery temperature, the battery willautomatically resume charging, and the blue lamp will flash at 1 Hz |
| Discharge temperature protection | The machine is shut down, LED doesn’t indicate the status |
| Press the button after over-discharge protection and when there is no charging after protection | The blue lamp flashes at 3Hz for 3 seconds and the key within the 3 seconds is invalid |
| Output short circuit protection | blue ue lamp flashes at 3Hz for 6 seconds, and the key within the 6seconds is invalid |
| Output over-current protection | The blue lamp flashes at 3Hz for 10 seconds and the key within the 10 seconds is invalid |
| The blue lamp is on while discharging, and the 1 Hz lamp flashes when voltage is under 19.2V | |
| Discharge | |
| The short circuit protection of the main engine | The blue lamp flashes quickly for 6 seconds, and the key within the 6 seconds is invalid |
Note: This manual is carefully checked, in case there is any printing errors or misunderstandings on the content, the company reserves the power of interpretation.If there is any change in product function, appearance, or color, without prior notice, product appearance depends on goods.
![]()
Foshan Shunde Deerma Electric Appliance Co., Ltd.Add: No.4-1 Longhui Road, Malong Village Committee, Beijiao, Shunde, Foshan City, Guangdong, China
[xyz-ips snippet=”download-snippet”]