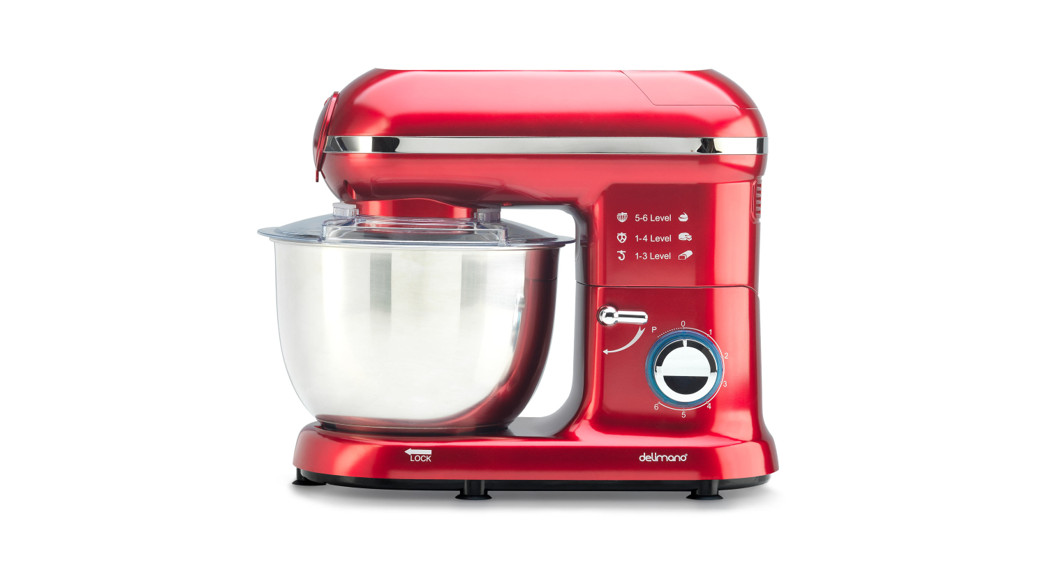
![]() KITCHEN ROBOT PROUSER MANUALModel No.: SM-1519BM
KITCHEN ROBOT PROUSER MANUALModel No.: SM-1519BM
Thank you for selecting Delimano products!Delano brings an innovative range of great quality kitchenware that is designed to provide a healthy, tasty, and enjoyable cooking experience (preparation, cooking, and consumption of food), encouraging a passion for cooking and entertaining no matter the level of cooking skills. Cook. Celebrate. Every day.Delano Kitchen Robot PRO – User ManualPlease read this manual thoroughly before using it and save it for future reference.
WARNINGS
- To protect against the risk of electrical shock do not put the main unit in water or other liquid.
- Plug-in power supply that corresponds to the rated one on product only.
- Before use, place the product on a hard, flat, stable, and dry surface.
- Close supervision is necessary when any appliance is used near children.
- Children must be supervised not to play with this appliance.
- If the device is not working as it should, has received a sharp blow, has been dropped, damaged, left outdoors, or dropped into water, do not use it.
- Do not attempt any modification or repair by yourself and ensure that any repair is conducted only by an appropriately qualified technician.
- If the supply cord is damaged, it must be replaced immediately by authorized and qualified personnel only.
- This device should never be switched on or stay plugged in the power supply when not in use, while replacing accessories or during cleaning.
- Never feed food by hand. Always use a food pusher.
- Use extreme caution when manipulating the parts to avoid any injuries due to the sharp blades.
- The use of attachment, not recommended or sold by the manufacturer may cause fire, electric shock, or injury.
- The appliance cannot be used for blending hard and dry substances, otherwise the blade could be blunted.
- Do not let the cord hang over the edge of the table or counter.
- Do not use fingers to scrape food away from the discharge disc while the appliance is operating. Cut type injury may result.
- This device is intended for household indoor and dry use only.
- Never run the appliance empty after assembling the blade and blade disk. Otherwise, the blade and blade disk will be abraded seriously, and accelerate the unit aging.
- This appliance can be used by children aged 8 years and above and persons with reduced physical, sensory or mental capabilities or lack of experience and knowledge if they have been given supervision or instruction concerning the use of the appliance in a safe way and understand the hazards involved. Children shall not play with the appliance. Cleaning and user maintenance shall not be made by children unless they are older than 8 and supervised.
- In order to avoid a hazard due to inadvertent resetting of the thermal cut-out, this appliance must not be supplied through an external switching device, such as a timer, or connected to a circuit that is regularly switched on and off by the utility.
- Do not interfere with any safety switches.
- Do not insert anything into the rotating parts while the machine is working.
- This device should never operate empty/unloaded because such action could result in appliance failure and/or injuries to the user.
- Wash and dry thoroughly before first use.
- Never fill the blending jar with boiling liquid. The highest temperature of liquid or food for blending should not exceed 55°C. Do not blend ice cubes.
- Although the device has been checked its usage and consequences are strictly user responsibility.
PARTS
The Delimano Kitchen Robot PRO contains the following parts for the following functions:
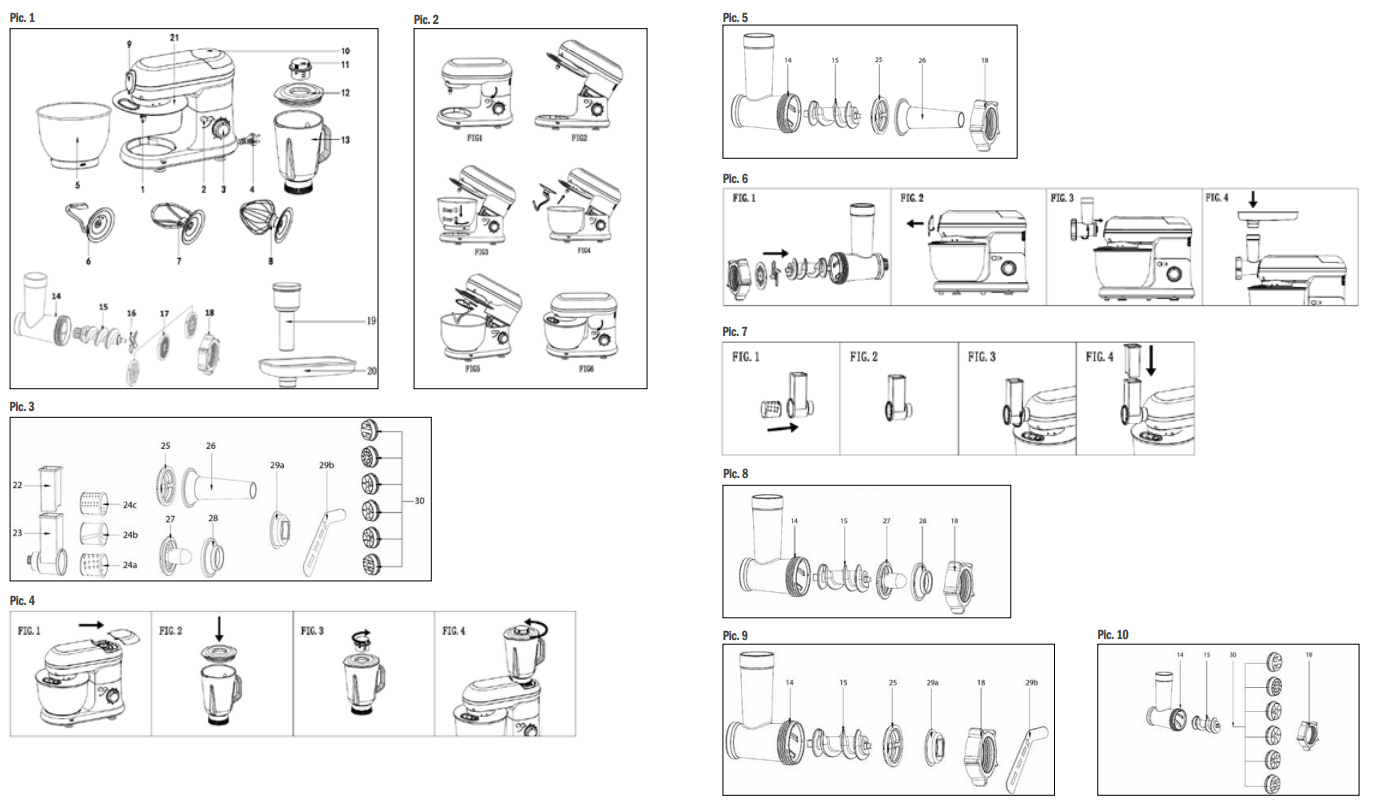
| Pic. 1 (see: PICTURES, Pic. 1) | |||
| 1. Main unit2. Rise knob3. Speed knob4. Power cable5. Mixing bowl | 6. Dough hook7. Beater8. Whisk9. Front cover10. Rear cover | 11. Measuring cup*12. Jar lid*13. Blending jar*14. Helix housing*15. Helix* | 16. Blade*17. Mincing discs*18. Locking nut*19. Meat mincer pusher*20. Filling tray*21. Splashing protector |
| Pic. 3 (see: PICTURES, Pic. 3) | |||
| 22. Pusher*23. Housing*24a. Coarse shredder*24b. Slicer*24c. Fine shredder* | 25. Sausage segmentation plate*26. Sausage tube*27. Kibbe cone*28. Kibbe shaper* | 29a. Cookie shaper holder*29b. Cookie shaper* | 30. Pasta shaping discs (6 pcs)* |
* available separately
HOW TO USE THE BASIC SET/MAIN UNIT (Pic.2)
NOTE: Before use, place the product on a hard, flat, stable, and dry surface.
- In order to lift the arm, rotate the rise knob (see Pic 1, 2) clockwise. The arm will now move upwards. (FIG.1)
- Slide the splashing protector (21) onto the main unit from below. (FIG.2)
- Place the mixing bowl into its holding place (Step ①) and turn the bowl clockwise until it locks (Step ②). (FIG.3)
- Mount the required utensil (6-8) by inserting the top over the output shaft and turn counterclockwise until it locks into place. (FIG.4 & FIG. 5)
- Fill in the ingredients. Do not overfill the machine – the maximum quantity of ingredients is 1, 2 kg of liquid up to MAX level indicated on the inner side of the mixing bowl.
- Release the arm by turning the rise knob clockwise and lower it. (FIG.6)
- Insert the power cable into the power supply socket.
- When you use the mixing bowl, always make sure the rear cover (10) is properly installed.
- Turn the machine on by rotating the speed knob to a 1 – 6 speed setting.
- For pulse operation (kneading at short intervals), turn and hold the speed knob in the “PULSE” position. When the speed knob is released it returns automatically to the “0” position and the device turns off.
- After kneading/stirring turn the speed knob (3) back to the “0” position as soon as the mixture has formed a ball and unplug the device from the power supply.
- Press the rise knob (2) downwards and the arm will be raised.
- The mixture can now be released with the help of a spatula and removed from the mixing bowl.
- The mixing bowl can now be removed (rotate counterclockwise and raise).
- Clean the parts as described under the “Cleaning” section.
ADJUSTING THE LEVELS AND USING THE HOOK
| Use | Speed setting | Time (min) | Maximum | Remelts |
| Dough hook | 1-3 | 3 | 700 g flour and 380 g water | Heavy mixtures (e.g. bread or short pastry) |
| Beater | 1-4 | 3 | 400 g flour and 400 – 500g water | Medium-heavy mixtures (e.g.crepes or cake mature) |
| Whisk | 5-6 | 3 | Minimum 3 egg w hit es | Light metures (e.g. cream.egg white….) |
NOTES: With heavy mixtures, do not operate the machine for more than six minutes, and then allow it to cool down for a further ten minutes.Never use more than 1,2 of the mixture.
HOW TO USE GLASS BLENDING JAR 1,5 L
The blender can be used for pureeing and for blending. It can be used for e.g. soups (max temperature 55°C), sauces, milkshakes, baby food, vegetable, fruit, puree, etc. If necessary cut solid ingredients into smaller pieces (2,5 x 2,5 cm) before you put them in the blender.Important:
- Before use: do not plug the device into the power supply until you have attached the blender jar and the jar lid in the correct way.
- After use: unplug the device from the power supply before you remove the blender jar from the housing.
- Do not fill the blender jar with ingredients that are hotter than 55°C.
- To prevent spilling, do not put more than 1,5 liters of liquid in the blender jar.
- Never <remove the jar lid while the blender is operational.
- Always install cover the jar lid before installing the blender jar onto the machine or dismounting the blender jar from the machine.
- Do not operate the blender attachment for over 3 minutes continuously.
- Clean the parts as described under the “Cleaning” section.
How to use the blender (Pic.4):NOTE: Make sure the device is unplugged from power supply.
- Remove the rear cover. (FIG.1)
- Place the food you wish to process into the blending jar.
- Press the jar lid onto the jar until firm fit. (FIG.2)
- Place the blender measuring cup into the jar lid and turn it clockwise to lock. (FIG.3)
- Place the blender jar onto the main unit and turn it counterclockwise until it is firmly fixed. Follow OPEN CLOSE markings on the main unit. (FIG.4)
- Plug the device into the power supply.
- Set the speed knob to position 6.
NOTE
- You can add ingredients while the appliance is running by removing the measuring cup (11) ONLY from the jar lid.
- It may be necessary to turn off the appliance from time to time to remove pieces of food sticking to the inside of the blender jar.– Switch off the appliance and unplug it from the power supply.– Remove the jar lid.– Use a soft spatula to remove the pieces of food stuck to the inside of the blender jar. Keep the spatula at a safe distance from the knives.– Turn the blender jar clockwise to take out the blender jar.
HOW TO USE THE MEAT & SAUSAGE SET (Pic. 5, Pic. 6, Pic. 8)
A) HOW TO USE MEAT MINCER SET
- Assembling the attachment: place the blade (16) on the end of the helix (15) and then a grinding disc (17) of your choice. Please pay attention to the grinding disc and the recesses on the helix housing (14). Screw the locking nut (18) on until it is “hand tight”.(FIG.1)
- Remove the front cover (FIG.2) from the main unit.
- Press the fixing button then place the helix housing into the machine and turn it counterclockwise to lock (FIG.3)
- Place the filling tray (20) on the helix housing feeder (FIG. 4)
- Place a bowl under the mincer’s outlet.
- Plug the device into the power supply and set the speed control to position 3. Put the pieces of meat onto the filling tray (20) and into the filler neck. If necessary, push the meat with the pusher (19). CAUTION: Do not use your fingers to push the meat!
- After use, switch off the appliance and unplug it .
- NOTE: Cut the meat into pieces of about 2,5 cm. Please take care that the meat does not contain any bones or sinews.
- Steel grinding discs (17) require extra care to prevent them from rusting. To prevent rust on the metal grinding discs, it is recommended to wipe them until completely dry after washing and store them covered with a light coating of oil or grease. Wash well before every usage.
- Helix housing (14), locking nut (18), helix (15), grinding discs (17) are NOT DISHWASHER SAFE. Wash them under warm soapy water and dry them completely with a cloth.
B) HOW TO USE SAUSAGE SET (Pic. 5, 6. and 8.)
- Hold the helix housing (14) by the feed tube, with the wider opening facing upwards.
- Insert the helix (15) (gear side first) into the body.
- Fit the sausage segmentation plate (25) onto the shaft side from the feed screw.
- Fit the sausage tube (26) on the segmentation plate.
- Screw the locking nut (18) on the helix house in the clockwise direction.
- Remove the front cover (FIG.2) from the machine.
- Press the fixing button then place the helix housing into the main unit and turn counterclockwise to lock it (FIG.3)
- Place the filling tray (20) on the helix housing feeder (FIG. 4). Place a bowl under the mincer’s outlet.
- Plug the device into the power supply and set the speed control to position 3. Put the pieces of meat onto the filling tray (20) and into the filler neck. If necessary, push the meat with the pusher (19). CAUTION: Do not use your fingers to push the meat!
- After use, switch off the appliance and unplug it from the power supply.
- NOTE: Cut the meat into pieces of about 2.5 cm. Please take care that the meat does not contain any bones or sinews.
C) HOW TO USE KIBBE SET
- Kibbe attachment – method is the same as for sausage attachment
- Clean the parts as described under “Cleaning”.
- TIPS:– You can use either natural or artificial casing.-If you have decided on the natural casing, soak them beforehand for some time in the water.– Make a knot at the end of the casing.– Push the casing over the sausage adapter.– The sausage mass is pressed through the sausage adapter and the casing is filled.– Make sure that the sausage casing is filled “loosely”. Otherwise, the casing could burst as the sausage expands when cooking and or frying.– After the first sausage has achieved the required length, press the sausage together at the end of the sausage adapter with your fingers.-Until you get the necessary skills, you can switch the appliance off after each sausage section.– Twist the sausage once or twice around its own axis.
HOW TO USE SLICE & GRATE SET (Pic. 1 and 7)
- Remove the front cover (9) from the main unit.
- Insert the selected cutter – coarse shredder (24a), slicer (24b),or fine shredder(24c) – into the housing (23). (Pic.7: FIG.1 &2)
- Press the fixed button then attach the cutter housing onto the main unit and turn counterclockwise to lock it(FIG.3)
- Now the attachment is ready for slicing/grating.
- Place a bowl under the slicer’s outlet.
- Plug the device into the power supply and set the speed control to position 3-5. Cut the potato or other vegetable to pieces, suitable for the feeder of housing. Put the food pieces into the housing and press slightly with a pusher (22). (FIG.4)
- NOTE: Never press food with fingers, use a pusher.
- After use, turn the device off and unplug it from the power supply
- Clean the parts as described under “Cleaning”.
NOTE: These attachments can be used with DELIMANO KITCHEN ROBOT MEAT & SAUSAGE SET only.A) HOW TO USE COOKIE SET (Pic. 9)NOTE: Make sure the device is unplugged from power supply.
- Hold the helix housing (14) by the feed tube, with the wider opening facing upwards.
- Insert the helix (15) (gear side first) into the body.
- Fit the sausage segmentation plate (25) onto the shaft side from the feed screw.
- Please pay attention to align the notch of the sausage segmentation plate with the fixing pin of the helix housing as shown in the picture
- Fit the cookie shaper holder on the segmentation plate.
- Screw the locking nut (18) on the body in the clockwise direction.
- Insert the cookie shaper (29b) in the cookie shaper holder from the side and position the selected cookie shape.
- Plug the device into the power supply and turn the speed knob to speed 3.
- Feed the kneaded dough into helix housing’s feeder – the cookies will be extruded through the helix housing’s outlet
- In the case of the dough sticking to the inner wall of the helix housing, you can use a meat mincer presser to push the dough into the helix housing.
- Clean the parts as described under “Cleaning”.
B) HOW TO USE PASTA SET (Pic. 10)NOTE: Make sure the device is unplugged from power supply.
- Hold the helix housing (14) by the feed tube, with the wider opening facing upwards.
- Insert the helix (15) (gear side first) into the body.
- Fit the selected pasta shaping disc (30) on the helix and fasten with a locking nut (in a clockwise direction).
- Screw the fastening nut (18) on the body in the clockwise direction.
- Plug the device into the power supply and turn the speed knob to speed 3.
- Feed the kneaded dough into helix housing’s feeder – the pasta will be extruded through the helix housing’s outlet
- In case of the dough sticking to the inner wall of the helix housing, you can use a meat mincer presser to push the dough into the helix housing.
- Clean the parts as described under “Cleaning”.
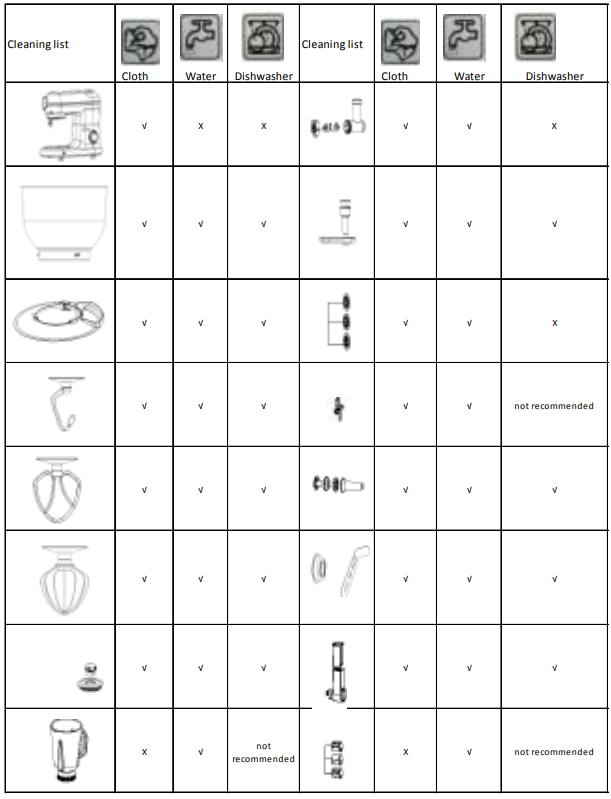
CLEANING
- Before cleaning, unplug the device from the power supply.
- Never immerse the main unit in the water!
- Do not use any sharp or abrasive cleaning utensils or agents.
Main Unit
- Only a damp cloth should be used to clean the outside of the housing. Do not use any solvents.
Components
- Steel grinding discs (17) require extra care to prevent them from rusting. To prevent rust on the metal grinding discs, it is recommended to wipe them until completely dry after washing and store them covered with a light coating of oil or grease. Wash well before every usage.
- MEAT & SAUSAGE SET: Helix housing (14), locking nut (18), helix (15), grinding discs (17) are NOT DISHWASHER SAFE. Wash them under warm soapy water and dry them completely with a cloth.
- It is highly recommended that all other components are cleaned under warm soapy water and dried thoroughly immediately after. If put in a dishwasher, low temperatures should be used.
- Allow the parts to dry thoroughly before reassembling the device.
TROUBLESHOOTING
| NO. | Issue | Possible solution |
| 1 | The machine doesn’t work |
|
| 2 | Noise in the bung bowl when working (the access scraped the bowl) |
|
| 3 | The splash protector doesn’t fit the mixing bowl properly |
|
| 4 | The machine doesn’t work at a certain speed |
|
| 5 | Movements when the machine is operating |
|
| 6 | The rise button tiOnt spring back in place after installing the miring bowl and splash protector |
|
References
ÐомоÑÑ.ÐодÑобноÑÑи доÑÑавки, оплаÑÑ, инÑоÑмаÑÐ¸Ñ Ð¾ магазине Топ Шоп
.: Refaccionaria Moderna ® :.
Топ Шоп – онлайн магазин Top Shop
Studio Moderna, multi-brand and direct-to-consumer electronic retailer
Internetinė parduotuvė | Top Shop
Svorio Ir LieknÄjimÄ
[xyz-ips snippet=”download-snippet”]