Alienware Aurora R8 Setup and Specifications
Set up your computer
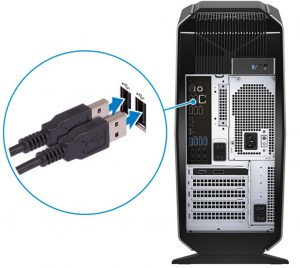
- Connect the keyboard and mouse.

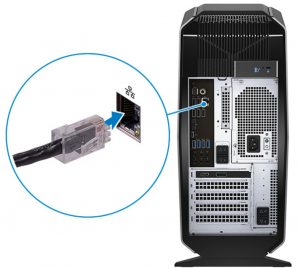
- Connect to your network using a cable, or connect to a wireless network.
- Connect the display. NOTE: If you ordered your computer with a discrete graphics card, the HDMI and the display ports on the back panel of your computer are covered. Connect the display to the discrete graphics card. NOTE: If you have two graphics cards, the card installed in PCI Express X16 (graphics slot 1) is the primary graphics card.
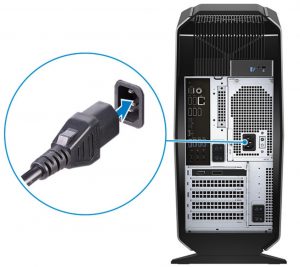
- Connect the power cable.
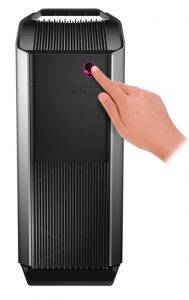
- Press the power button.
- Create recovery drive for Windows.NOTE: It is recommended to create a recovery drive to troubleshoot and fiÚ problems that may occur with Windows.

For more information, see Create a USB recovery drive for Windows.
Create a USB recovery drive for Windows
Create a recovery drive to troubleshoot and fiÚ problems that may occur with Windows. An empty USB floÁ drive with a minimum capacity of 16 GB is required to create the recovery drive.![]() NOTE: This process may take up to an hour to complete.
NOTE: This process may take up to an hour to complete.![]() NOTE: The following steps may vary depending on the version of Windows installed. Refer to the Microsoft support site for latest instructions.
NOTE: The following steps may vary depending on the version of Windows installed. Refer to the Microsoft support site for latest instructions.
- Connect the USB floÁ drive to your computer.
- In Windows search, type Recovery.
- In the search results, click Create a recovery drive.The User Account Control window is displayed.
- Click Yes to continue.The Recovery Drive window is displayed.
- Select Back up system file to the recovery drive and click Next.
- Select the USB flash drive and click Next.A message appears, indicating that all data in the USB floÁ drive will be deleted.
- Click Create.
- Click Finish.For more information about reinstalling Windows using the USB recovery drive, see the Troubleshooting section of your product’s Service Manual at www.dell.com/support/manuals.
Setting up the Virtual Reality (VR) headset — optional
![]() NOTE: The VR headset is sold separately.
NOTE: The VR headset is sold separately.
- Download and run the setup tools for your VR headset at www.dell.com/VRsupport.
- Connect the VR headset to the USB 3.1 Gen 1 and HDMI ports on your computer, when prompted. NOTE: Connect the headset to the HDMI port on the primary graphics card and connect the display to any available port on the card.
- Follow the instructions on the screen to complete the setup.

Views of Alienware Aurora R8
Front
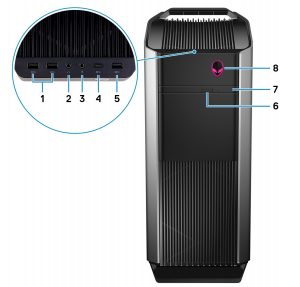
- USB 3.1 Gen 1 ports (2)Connect peripherals such as external storage devices and printers. Provides data transfer speeds up to 5 Gbps.
- Headphone portConnect a headphone or speakers.
- Microphone portConnect an external microphone to provide sound input.
- USB 3.1 Gen 1 Type-C portConnect to external storage devices. Provides data transfer speeds up to 5 Gbps. NOTE: This port does not support video/audio streaming or power delivery.
- USB 3.1 Gen 1 portConnect peripherals such as external storage devices and printers. Provides data transfer speeds up to 5 Gbps.
- Optical-drive eject buttonPress to open the optical drive tray.
- Optical drive (optional)Reads from and writes to CDs, DVDs, and Blu‑ray discs.
- Power button (AlienHead)Press to turn on the computer if it is turned ¯äĘ in sleep state, or in hibernate state.Press to put the computer in sleep state if it is turned on.Press and hold for 4 seconds to force shut-down the computer.
![]() NOTE: You can customize the power-button behavior in Power Options.
NOTE: You can customize the power-button behavior in Power Options.
Back
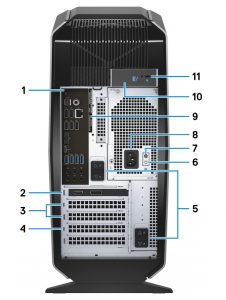
- Back panelConnect USB, audio, video, and other devices.
- PCI-Express X16 (graphics slot 1)Connect a PCI-Express card such as graphics, audio, or network card to enhance the capabilities of your computer.For optimal graphics performance, use a PCI-Express X16 slot for connecting the graphics card. NOTE: The PCI-Express X16 slot works at X8 speed only.NOTE: If you have two graphics cards, the card installed in PCI Express X16 (graphics slot 1) is the primarygraphics card.
- PCI-Express X4 slots (2)Connect a PCI-Express card such as graphics, audio, or network card to enhance the capabilities of your computer.
- PCI-Express X16 (graphics slot 2)Connect a PCI-Express card such as graphics, audio, or network card to enhance the capabilities of your computer.For optimal graphics performance, use a PCI-Express X16 slot for connecting the graphics card. NOTE: The PCI-Express X16 slot works at X8 speed only.
- Power-supply cage release-latches (2)Allows you to remove the power supply unit from your computer.
- Power-supply diagnostics buttonPress to check the power‑supply state.
- Power-supply diagnostics lightIndicates the power-supply state.
- Power portConnect a power cable to provide power to your computer.
- Service Tag labelThe Service Tag is a unique alphanumeric identfier that enables Dell service technicians to identify the hardware components in your computer and access warranty information.
- Side panel release latchAllows you to remove the side panel from your computer.
- Security-cable slot (for Kensington locks)Connect a security cable to prevent unauthorized movement of your computer.
Back panel
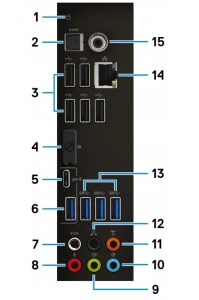
- Hard-drive activity lightTurns on when the computer reads from or writes to the hard drive.
- Optical S/PDIF portConnect an omº¢fi ½Ę speakers, or a TV for digital audio output through an optical cable.
- USB 2.0 ports (5)Connect peripherals such as external storage devices and printers. Provides data transfer speeds up to 480 Mbps.
- Display PortConnect an external display or a projector.NOTE: The DisplayPort on the back panel of your computer is covered. Connect the display to the discrete graphics card of your computer.
- USB 3.1 Gen 2 Type-C portConnect peripherals, such as external storage devices and printers. Provides data transfer speeds up to 10 Gbps.NOTE: This port does not support video/audio streaming or power delivery.
- USB 3.1 Gen 2 portConnect peripherals, such as external storage devices and printers. Provides data transfer speeds up to 10 Gbps.
- Side L/R surround portConnect audio-output devices such as speakers and omº¢fi ½Áĝ In a 7.1 speaker channel setup, connect the side-left and side-right speakers.
- Microphone portConnect an external microphone to provide sound input.
- Front L/R surround line-out portConnect audio-output devices such as speakers and omº¢fi ½Áĝ In a 2.1 speaker channel setup, connect the left and rightspeakers. In a 5.1 or a 7.1 speaker channel setup, connect the front-left and front-right speakers.
- Line-in portConnect recording or playback devices such as a microphone or CD player.
- Center/subwoofer LFE surround portConnect the center speaker or the subwoofer. NOTE: For more information about the speaker setup, refer the documentation that shipped with the speakers.
- Rear L/R surround portConnect audio-output devices such as speakers and omº¢fi ½Áĝ In a 5.1 or a 7.1 speaker channel setup, connect the rearleft and rear-right speakers.
- USB 3.1 Gen 1 ports (3)Connect peripherals such as external storage devices and printers. Provides data transfer speeds up to 5 Gbps.
- Network port (with lights)Connect an Ethernet (RJ45) cable from a router or a broadband modem for network or Internet access.The two lights next to the connector indicate the connectivity status and network activity.
- Coaxial S/PDIF portConnect an omº¢fi ½Ę speakers, or a TV for digital audio output through a coaxial cable.
Specifications of Alienware Aurora R8
Dimensions and weight
Table 1. Dimensions and weightDescription: ValuesHeight:Front: 422.8 mm (16.65 in.)Rear: 472.5 mm (18.60 in.)Width: 212 mm (8.34 in.)Depth: 360.50 mm (14.19 in.)Weight (maximum): 14.82 kg (32.67 lb)![]() NOTE: The weight of your computer depends on the configuration ordered and the manufacturing variability.
NOTE: The weight of your computer depends on the configuration ordered and the manufacturing variability.
Processors
Table 2. Processor specificatoinsDescription: ValuesProcessor: 8th Generation Intel Core i3/i5/i7 & 9th Generation Intel Core i5k/i7k/i9kWattage: 65W & 95WCore count: 2/4/4 & 6/8/8Thread count 6/8/8 & 6/8/16Speed: Up to 3.40 GHz/3.90 GHz/4.6 GHz Turbo Boost & Up to 4.6 GHz/4.9 GHz/5.0 GHz Turbo BoostIntel Smart Cache: 4 MB/6 MB/8 MB & 9 MB/12 MB/16 MBIntegrated graphics: Intel UHD Graphics 620 & Intel UHD Graphics 630
Chipset
Table 3. Chipset specificationsDescription: ValuesChipset: Intel Z370 chipsetProcessor: 8th Generation Intel Core i3/i5/i7 & 9th Generation Intel Core i5k/i7k/i9kDRAM bus width: Not supportedFlash EPROM: 16 MBPCIe bus: PCIe Gen3External bus frequency PCIe Gen3x:4
Operating system
- Windows 10 Home (64-bit)
- Windows 10 Professional (64-bit)
Memory
Table 4. Memory specificationsDescription: Values
Slots: Four DIMM socketsType: DDR4Speed:* 2666 MHz* Up to HyperX FURY DDR4 XMP at 3200 MHzMaximum memory 64 GBMinimum memory 4 GBMemory per slot 4 GB, 8 GB, and 16 GBConfigurations supported:* 8 GB DDR4 at 2666 MHz* 16 GB DDR4 at 2666 MHz* 32 GB DDR4 at 2666 MHz* 64 GB DDR4 at 2666 MHz* 8 GB XMP at 2933 MHz* 16 GB XMP at 2933 MHz* 32 GB XMP at 2933 MHz* 64 GB XMP at 2933 MHz* 16 GB XMP at 3200 MHz* 32 GB XMP at 3200 MHz* 64 GB XMP at 3200 MHz
Intel Optane memory
Intel Optane memory functions only as a storage accelerator. It neither replaces nor adds to the memory (RAM) installed on your computer.![]() NOTE: Intel Optane memory is supported on computers that meet the following requirements:
NOTE: Intel Optane memory is supported on computers that meet the following requirements:
- 7th Generation or higher Intel Core i3/i5/i7 processor
- Windows 10 64-bit version or higher
- Intel Rapid Storage Technology driver version 15.9.1.1018 or higher
Table 5. Intel Optane memory specifictionsDescription: ValuesType: Storage accelaratorInterface: PCIe 3.0×4Connector: M.2 2280Configurations supported: 16 GB and 32 GBCapacity: Up to 32 GB
Ports and connectors
Table 6. External ports and connectors specificationsDescription: ValuesFront:USB:* Three USB 3.1 Gen 1 ports* One USB 3.1 Gen 1 Type-C portAudio:* One audio output/headphone port (supports 2 channel audio)* One audio input/microphone portBack:Network: One RJ-45 portUSB:* Five USB 2.0 ports* Three USB 3.1 Gen 1 ports* One USB 3.1 Gen 2 port* One USB 3.1 Gen 2 Type-C portAudio:* One audio input/microphone port* One optical S/PDIF port* One coaxial S/PDIF port* One front L/R surround line-out port* One side L/R surround port* One rear L/R surround port* One center/subwoofer LFE surround port* One line-in portVideo: One DisplayPort – optional![]() NOTE: The DisplayPort on the back panel of your computer is covered. Connect the display to the discrete graphics card of your computer.Media-cardreader: Not supportedPoweradapterport: Not supportedSecurity: Kensington locksLegacyports: Not supported
NOTE: The DisplayPort on the back panel of your computer is covered. Connect the display to the discrete graphics card of your computer.Media-cardreader: Not supportedPoweradapterport: Not supportedSecurity: Kensington locksLegacyports: Not supported
Table 7. Internal ports and connectors specificationsDescription: ValuesExpansion:* Two PCIe x16 slots* Two PCIe x4 slotsM.2:* One M.2 slot for Wi-Fi and Bluetooth combo card* One PCIe/SATA M.2 2280 slots for solid-state drive
Communications
Ethernet
Table 8. Ethernet specificationsDescription: ValuesModel number: Killer E2500 Ethernet controller integrated on system boardTransfer rate: 10/100/1000 Mbps
Wireless module
Table 9. Wireless module specifictionsDescription: ValuesModel number: QCA9377 (DW1810) & QCA61x4A (DW1820) & Rivet 1535 (Killer)Transfer rate: 433 Mbps & Up to 867 Mbps & Up to 867 Mbps (1.867 Gbps with Doubleshot Pro technology)Frequency bands supported: Dual band 2.4 GHz/5 GHz & Dual band 2.4 GHz/5 GHz & Dual band 2.4 GHz/5 GHzWireless standards: WiFi 802.11ac & WiFi 802.11a/b/g/n/ac & WiFi 802.11a/b/g/n/acEncryption:* 64-bit and 128-bit WEP* CKIP* TKIP* AES-CCMP&* 64-bit and 128-bit WEP* CKIP* TKIP* AES-CCMP&* 64-bit and 128-bit WEP* CKIP* TKIP* AES-CCMPBluetooth: Bluetooth 4.1 & Bluetooth 4.1 & Bluetooth 4.2
Video
Table 10. Discrete graphics specifications
Discrete graphicsController: External display support: Memory size: Memory typeNVIDIA GeForce RTX 2080: One HDMI port and one DisplayPort: 8 GB: GDDR6NVIDIA GeForce RTX 2080 Ti: One HDMI port and one DisplayPort: 11 GB: GDDR6
Table 11. Integrated graphics specifictions
Controller: External display support: Memory size: ProcessorIntel UHD Graphics 620: One DisplayPort: Shared system memory: 8th Generation Intel Core i3/i5/i7![]() NOTE: Use discrete card output for best performance.Intel UHD Graphics 630: One DisplayPort: Shared system memory: 9th Generation Intel Core i5k/i7k/i9k
NOTE: Use discrete card output for best performance.Intel UHD Graphics 630: One DisplayPort: Shared system memory: 9th Generation Intel Core i5k/i7k/i9k![]() NOTE: Use discrete card output for best performance.
NOTE: Use discrete card output for best performance.
Audio
Table 12. Audio specificationsDescription: ValuesType: Integrated 7.1 channel audio with S/PDIF supportController: Realtek ALC3861Internal interface: High-definition audioExternal interface: 7.1 channel output, microphone-in, stereo headphones, and headset combo connector
Storage
Your computer supports one of the following specification:
- One U.2 drive and two 2.5-inch hard drives
- One M.2 2242/2260/2280 solid-state drive, one 3.5-inch hard drive, and two 2.5-inch hard drives
- One 3.5-inch hard drive and two 2.5-inch hard drives
![]() NOTE: The primary drive of your computer varies depending on the storage configuration.For computers:
NOTE: The primary drive of your computer varies depending on the storage configuration.For computers:
- with a U.2 drive, the U.2 drive is the primary drive
- with an M.2 drive, the M.2 drive is the primary drive.
- without both U.2 drive and M.2 drive, the 3.5-inch drive is the primary drive.
Table 13. Storage specifications
Storage type: Interface type: CapacityTwo 2.5-inch hard drives: SATA AHCI 6 Gbps: Up to 2 TBOne 3.5-inch hard drive: SATA AHCI 6 Gbps: Up to 1 TBTwo M.2 2242/2260/2280 solid-state drives:* SATA AHCI 6 Gbps* PCIe NVMe up to 32 Gbps: Up to 1 TBOne U.2 drive: PCIe NVMe up to 32 Gbps (U.2 drive): Up to 280 GBOne 9.5 mm slim drive for DVD+/-RW drive or Blueray Disc.: SATA 1.5 Gbps: Not applicable
Power ratings
Table 14. Power ratingsDescription: ValuesInput voltage: 100 VAC to 240 VACInput frequency: 50 Hz to 60 HzTemperature range:Operating: 5°C to 50°C (41°F to 122°F)Storage: -40°C to 70°C (-40°F to 158°F)Type 460 W 850 WInput current (maximum) 8 A 10 AOutput current (continuous) 3.3V/17A, 5V/25A, 12VA/18A, 12VB/16A, 12VC/8A, 5Vaux/3A & 3.3V/20A, 5V/20A, 12VA/32A, 12VB/ 48A, 12VD/16A, -12V/0.5A, 5Vaux/4ARated output voltage 3.3V, 5V, 12VA, 12VB, 12VC, 5Vaux & 3.3V, 5V, 12VA, 12VB, 12VD, -12V, 5Vaux
Computer environment
Airborne contaminant level: Gl as defined by ISA-S71.04-1985Table 15. Computer environment. : Operating : StorageTemperature range: 5°C to 35°C (41°F to 95°F): –40°C to 65°C ( 40°F to 149°F)Relative humidity (maximum): 10% to 90% (non-condensing) 0% to 95% (non-condensing)Vibration (maximum): 0.26 GRMS 1.30 GRMSShock (maximum): 40 G for 2 ms with a change in velocity of 20 in/s (51 cm/s)†: 105 G for 2 ms with a change in velocity of 52.5 in/s (133 cm/s)‡Altitude (maximum): –15.2 m to 3,048 m (–50 ft to 10,000 ft): –15.2 m to 10,668 m (–50 ft to 35,000 ft)
* Measured using a random vibration spectrum that simulates user environment.† Measured using a 2 ms half-sine pulse when the hard drive is in use.‡ Measured using a 2 ms half-sine pulse when the hard-drive head is in parked position.
Getting help and contacting Alienware
Self-help resources
You can get information and help on Alienware products and services using these online self-help resources:Table 16. Alienware products and online self-help resourcesSelf-help resources: Resource locationInformation about Alienware products and services: www.alienware.comTips: ![]() Contact Support: In Windows search, type Contact Support, and press Enter.Online help for operating system: www.dell.com/support/windowswww.dell.com/support/linuxTroubleshooting information, user manuals, setup instructions, product specifications, technical help blogs, drivers, software updates, and so on: www.alienware.com/gamingservicesVR Support: www.dell.com/VRsupportVideos providing step-by-step instructions to service your computer: www.youtube.com/alienwareservices
Contact Support: In Windows search, type Contact Support, and press Enter.Online help for operating system: www.dell.com/support/windowswww.dell.com/support/linuxTroubleshooting information, user manuals, setup instructions, product specifications, technical help blogs, drivers, software updates, and so on: www.alienware.com/gamingservicesVR Support: www.dell.com/VRsupportVideos providing step-by-step instructions to service your computer: www.youtube.com/alienwareservices
Contacting Alienware
To contact Alienware for sales, technical support, or customer service issues, see www.alienware.com.![]() NOTE: Availability varies by country and product, and some services may not be available in your country.
NOTE: Availability varies by country and product, and some services may not be available in your country.![]() NOTE: If you do not have an active Internet connection, you can fi© contact information about your purchase invoice, packing slip, bill, or Dell product catalog.
NOTE: If you do not have an active Internet connection, you can fi© contact information about your purchase invoice, packing slip, bill, or Dell product catalog.
Alienware Aurora R8 Setup and Specifications Manual – Alienware Aurora R8 Setup and Specifications Manual –
[xyz-ips snippet=”download-snippet”]