DELL Inspiron 7306 2-in-1 Silver Installation Guide
Regulatory Model: P124GRegulatory Type: P124G002October 2020Rev. A01
Notes, cautions, and warnings
© 2020 Dell Inc. or its subsidiaries. All rights reserved. Dell, EMC, and other trademarks are trademarks of Dell Inc. or its subsidiaries. Other trademarks may be trademarks of their respective owners.
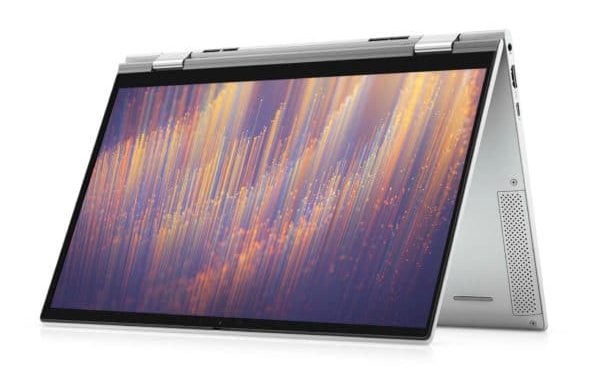
Set up your Inspiron 7306 2-in-1 Silver
NOTE: The images in this document may differ from your computer depending on the configuration you ordered.
- Connect the power adapter and press the power button.
NOTE: The battery may go into power-saving mode during shipment to conserve charge on the battery. Ensure that the power adapter is connected to your computer when it is turned on for the first time.
2. Finish Windows setup.Follow the on-screen instructions to complete the setup. When setting up, Dell recommends that you:
- Connect to a network for Windows updates.
NOTE: If connecting to a secured wireless network, enter the password for the wireless network access when prompted.
- If connected to the Internet, sign in with or create a Microsoft account. If not connected to the Internet, create an offline account.
- On the Support and Protection screen, enter your contact details.
3. Locate and use Dell apps from the Windows Start menu—Recommended.
Table 1. Locate Dell apps
Views of Inspiron 7306 2-in-1 Silver
Right
- microSD-card slotReads from and writes to the microSD-card. The computer supports the following card types:● micro-Secure Digital (mSD)● micro-Secure Digital High Capacity (mSDHC)● micro-Secure Digital Extended Capacity (mSDXC)
- Headset portConnect headphones or a headset (headphone and microphone combo).
- USB 3.2 Gen 1 portConnect devices such as external storage devices and printers. Provides data transfer speeds up to 5 Gbps.
Left
- Power-adapter portConnect a power adapter to provide power to your computer.
- Power and battery-status lightIndicates the power state and battery state of the computer.Solid white—Power adapter is connected and the battery is charging.Solid amber—Battery charge is low or critical.Off—Battery is fully charged.
- HDMI portConnect to a TV or another HDMI-in enabled device. Provides video and audio output.
- Thunderbolt 4 USB Type-C port with Power DeliveryThunderbolt 4 enables you to connect to an external display using a display adapter. Provides data transfer rates of up to 40 Gbps for Thunderbolt 4. Supports Power Delivery that enables two-way power supply between devices. Provides up to 5 V/3 A power output that enables faster charging.
NOTE: You can connect a Dell Docking Station to the Thunderbolt 4 port. For more information, see the knowledge base article SLN286158 at www.dell.com/support
NOTE: A USB Type-C to Display Port adapter (sold separately) is required to connect a Display Port device
Base
![]()
- TouchpadMove your finger on the touchpad to move the mouse pointer. Tap to left-click and two finger tap to right-click.
- Left-click areaPress to left-click.
- Right-click areaPress to right-click.
- Power button with fingerprint readerPress to turn on the computer if it is turned off, in sleep state, or in hibernate state.When the computer is turned on, press the power button to put the computer into sleep state; press and hold the power button for 10 seconds to force shut-down the computer.Place your finger on the power button to log-in with the fingerprint reader.
NOTE: You can customize power-button behavior in Windows. For more information, see Me and My Dell at www.dell.com/support/manuals
Display
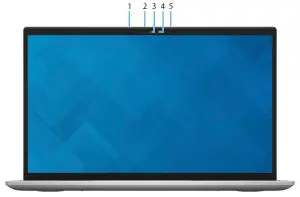
- Left microphoneProvides digital sound input for audio recording and voice calls.
- Privacy shutterSlide the privacy shutter to cover the camera lens and protect your privacy when the camera is not in use.
- CameraEnables you to video chat, capture photos, and record videos.
- Camera-status lightTurns on when the camera is in use.
- Right microphoneProvides digital sound input for audio recording and voice calls.
Bottom
- Left speakerProvides audio output.
- Right speakerProvides audio output.
- Service Tag labelThe Service Tag is a unique alphanumeric identifier that enables Dell service technicians to identify the hardware components in your computer and access warranty information.
ModesNotebook NOTE: The images in this document may differ from your computer depending on the configuration ordered.
![]()
Tablet
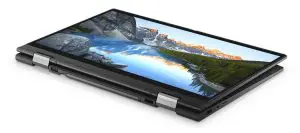
Stand
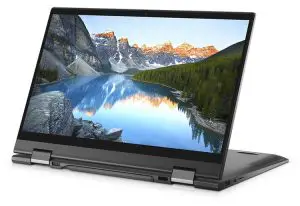
Tent
Using the privacy shutter
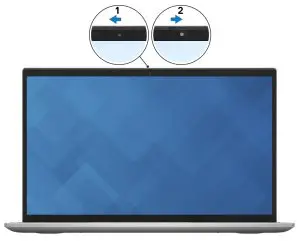
- Slide the privacy shutter to the left to access the camera lens.
- Slide the privacy shutter to the right to cover the camera lens.
Specifications of Inspiron 7306 2-in-1 Silver
Dimensions and weightThe following table lists the height, width, depth, and weight of your Inspiron 7306 2-in-1 Silver.
Table 2. Dimensions and weight
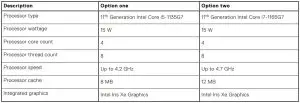
ProcessorThe following table lists the details of the processors supported by your Inspiron 7306 2-in-1 Silver.
Table 3. Processor
ChipsetThe following table lists the details of the chipset supported by your Inspiron 7306 2-in-1 Silver.
Table 4. Chipset
Operating systemYour Inspiron 7306 2-in-1 Silver supports the following operating systems:
- Windows 10 Home, 64-bit
- Windows 10 Pro, 64-bit
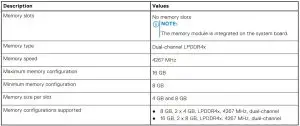
MemoryThe following table lists the memory specifications of your Inspiron 7306 2-in-1 Silver.
Table 5. Memory specifications
External ports
The following table lists the external ports on your Inspiron 7306 2-in-1 Silver.
Table 6. External ports
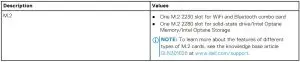
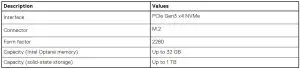
Internal slotsThe following table lists the internal slots of your Inspiron 7306 2-in-1 Silver.
Table 7. Internal slots
Wireless moduleThe following table lists the Wireless Local Area Network (WLAN) module supported on your Inspiron 7306 2-in-1 Silver. NOTE: The wireless module is integrated on the system board.
Table 8. Wireless module specifications
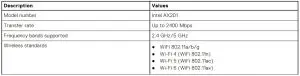
Table 8. Wireless module specifications (continued)

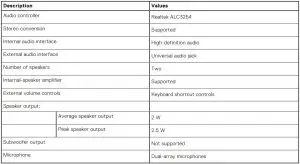
AudioThe following table lists the audio specifications of your Inspiron 7306 2-in-1 Silver.
Table 9. Audio specifications
StorageThis section lists the storage options on your Inspiron 7306 2-in-1 Silver.Your Inspiron 7306 2-in-1 Silver supports one of the following storage configurations:
- One M.2 2230/2280 solid-state drive
- One M.2 2280 Intel Optane Memory H10The primary drive of your Inspiron 7306 2-in-1 Silver varies with the storage configuration. For computers:
- with the M.2 2230/2280 solid-state drive, the solid-state drive is the primary drive.
- with the M.2 2280 Intel Optane Memory H10, the Intel Optane Memory is the primary drive.
Table 10. Storage specifications

Intel Optane Memory H10 with solid-state storage (optional)
Intel Optane Memory technology utilizes 3D XPoint memory technology and functions as a non-volatile storage cache/ accelerator and/or storage device depending on the Intel Optane Memory installed in your computer.
Intel Optane Memory H10 with solid-state storage functions as both a non-volatile storage cache/accelerator (enabling enhanced read/write speeds for hard-drive storage) and a solid-state storage solution. It neither replaces nor adds to the memory (RAM) installed on your computer.
Table 11. Intel Optane Memory H10 with solid-state storage specifications
NOTE: Intel Optane Memory H10 with solid-state storage is supported on computers that meet the following requirements:
- 9th Generation or higher Intel Core i3/i5/i7 processors
- Windows 10 64-bit version or higher (Anniversary Update)
- Intel Rapid Storage Technology driver version 15.9.1.1018 or higher
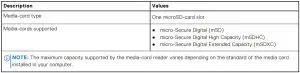
Media-card readerThe following table lists the media cards supported by your Inspiron 7306 2-in-1 Silver.
Table 12. Media-card reader specifications
KeyboardThe following table lists the keyboard specifications of your Inspiron 7306 2-in-1 Silver.
Table 13. Keyboard specifications
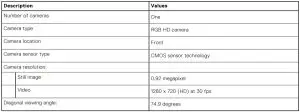
CameraThe following table lists the camera specifications of your Inspiron 7306 2-in-1 Silver.
Table 14. Camera specifications
TouchpadThe following table lists the touchpad specifications of your Inspiron 7306 2-in-1 Silver.
Table 15. Touchpad specifications
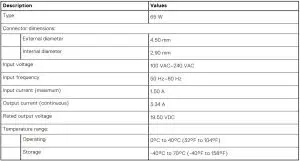
Power adapterThe following table lists the power adapter specifications of your Inspiron 7306 2-in-1 Silver.
Table 16. Power adapter specifications
BatteryThe following table lists the battery specifications of your Inspiron 7306 2-in-1 Silver.
Table 17. Battery specifications
DisplayThe following table lists the display specifications of your Inspiron 7306 2-in-1 Silver.
Table 18. Display specifications

Fingerprint readerThe following table lists the fingerprint-reader specifications of your Inspiron 7306 2-in-1 Silver. NOTE: The fingerprint reader is located on the power button.
Table 19. Fingerprint reader specifications

GPU—IntegratedThe following table lists the specifications of the integrated Graphics Processing Unit (GPU) supported by your Inspiron 7306 2- in-1 Silver.
Table 20. GPU—Integrated
![]()
Operating and storage environmentThis table lists the operating and storage specifications of your Inspiron 7306 2-in-1 Silver.Airborne contaminant level: G1 as defined by ISA-S71.04-1985
Table 21. Computer environment

* Measured using a random vibration spectrum that simulates user environment.† Measured using a 2 ms half-sine pulse when the hard drive is in use.
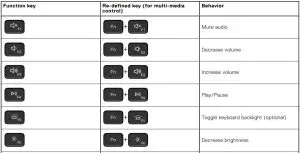
Keyboard shortcuts
NOTE: Keyboard characters may differ depending on the keyboard language configuration. Keys used for shortcuts remain the same across all language configurations.
Some keys on your keyboard have two symbols on them. These keys can be used to type alternate characters or to perform secondary functions. The symbol shown on the lower part of the key refers to the character that is typed out when the key is pressed. If you press shift and the key, the symbol shown on the upper part of the key is typed out. For example, if you press 2,2 is typed out; if you press Shift + 2, @ is typed out.
The keys F1-F12 at the top row of the keyboard are function keys for multi-media control, as indicated by the icon at the bottom of the key. Press the function key to invoke the task represented by the icon. For example, pressing F1 mutes the audio (refer to the table below).
However, if the function keys F1-F12 are needed for specific software applications, multi-media functionality can be disabled by pressing Fn + Esc. Subsequently, multi-media control can be invoked by pressing Fn and the respective function key. For example, mute audio by pressing Fn + F1.
NOTE: You can also define the primary behavior of the function keys (F1–F12) by changing Function Key Behavior in BIOS setup program.
Table 22. List of keyboard shortcuts
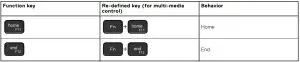
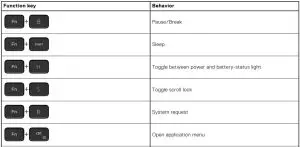
The Fn key is also used with selected keys on the keyboard to invoke other secondary functions.
Table 23. List of keyboard shortcuts
Getting help and contacting Dell
Self-help resourcesYou can get information and help on Dell products and services using these self-help resources:
Table 24. Self-help resources

Contacting DellTo contact Dell for sales, technical support, or customer service issues, see www.dell.com/contactdell
NOTE: Availability varies by country/region and product, and some services may not be available in your country/region.
NOTE: If you do not have an active Internet connection, you can find contact information about your purchase invoice, packing slip, bill, or Dell product catalog.
report this adReferences
Computers, Monitors & Technology Solutions | Dell USA
Microsoft Support
Guide to Dell Docking Stations | Dell US
Dell Update and Alienware Update – Overview and common questions | Dell US
Computers, Monitors & Technology Solutions | Dell USA
Contact Support | Dell US
Manuals | Dell US
Support | Dell US
Computers, Monitors & Technology Solutions | Dell USA
Touch gestures for Windows
How to distinguish the differences between M.2 cards | Dell US
Windows Operating Systems | Dell US
Support | Dell US
Support for SupportAssist for Home PCs | Documentation | Dell US
Windows Operating Systems | Dell US
Manuals | Dell US
Contact Information | Dell US
dell.com/support/article/sln153764/
Microsoft Support
[xyz-ips snippet=”download-snippet”]