DELL XPS 15 9500 User Manual
XPS 15 9500Setup and Specifications
 Regulatory Model: P91FRegulatory Type: P91F001
Notes, cautions, and warnings
NOTE: A NOTE indicates important information that helps you make better use of your product.
CAUTION: A CAUTION indicates either potential damage to hardware or loss of data and tells you how to avoid the problem.
WARNING: A WARNING indicates a potential for property damage, personal injury, or death.
© 2020 Dell Inc. or its subsidiaries. All rights reserved. Dell, EMC, and other trademarks are trademarks of Dell Inc. or its subsidiaries. Other trademarks may be trademarks of their respective owners. Rev. A00
Set up your XPS 15 9500
NOTE: The images in this document may differ from your computer, depending on the computer configuration you ordered.
1. Connect the power adapter to a power source and to the Thunderbolt 3 (USB Type-C) port with Power Delivery. Then press the power button on your computer.
NOTE: You can charge your XPS 15 9500 by connecting the power adapter to one of the Thunderbolt 3 (USB TypeC) ports that are located on the left side of your computer or to the USB 3.2 Gen 2 (Type-C) port located on the right side of your computer.
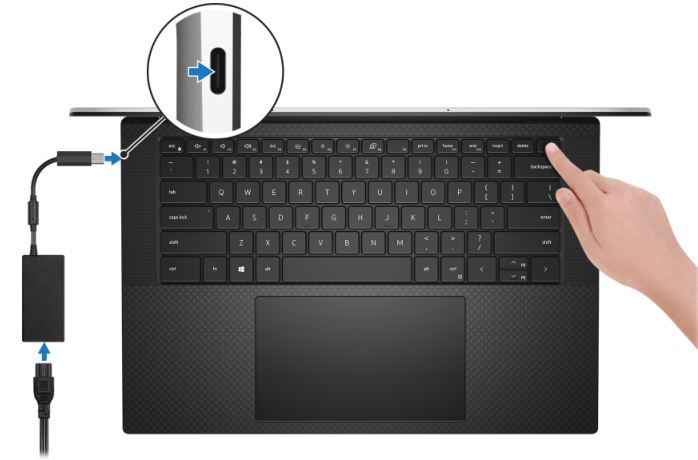
NOTE: The battery may go into power-saving mode during shipment to conserve charge on the battery. Ensure that the power adapter is connected to your computer when it is turned on for the first time.
2. Complete the operating system setup.

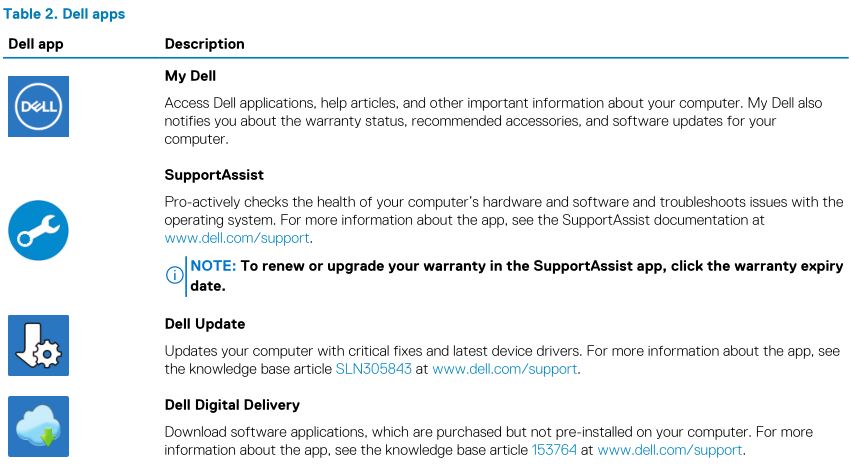
3. If Windows is installed on your computer, there are Dell apps with which you can get assistance and software updates.
NOTE: Dell apps are not available on Ubuntu.
Views of XPS 15 9500
Left

- Security-cable slot (wedge-shaped)Connect a security cable to prevent unauthorized movement of your computer.
- Thunderbolt 3 (USB Type-C) port with Power Delivery (2)Supports USB 3.2 Gen 2, DisplayPort 1.2, Thunderbolt 3 and also enables you to connect to an external display using a display adapter. Provides data transfer rates up to 10 Gbps for USB 3.2 Gen 2 and up to 40 Gbps for Thunderbolt 3. Supports Power Delivery that enables two-way power supply between devices. Provides up to 5 V power output that enables faster charging.NOTE: A USB Type-C to DisplayPort adapter (sold separately) is required to connect a DisplayPort device.
Right

- USB 3.2 Gen 2 (Type-C) port with DisplayPortConnect peripherals such as external storage devices, printers, and external displays. Provides data transfer rate of up to 10 Gbps. Supports DisplayPort 1.4 and also enables you to connect an external display using a display adapter.NOTE: A USB Type-C to DisplayPort adapter (sold separately) is required to connect a DisplayPort device.
- SD-card slotReads from and writes to the SD card. The computer supports the following card types:
- Secure Digital (SD)
- Secure Digital High Capacity (SDHC)
- Secure Digital Extended Capacity (SDXC)
- Headset portConnect headphones or a headset (headphone and microphone combo).
Base
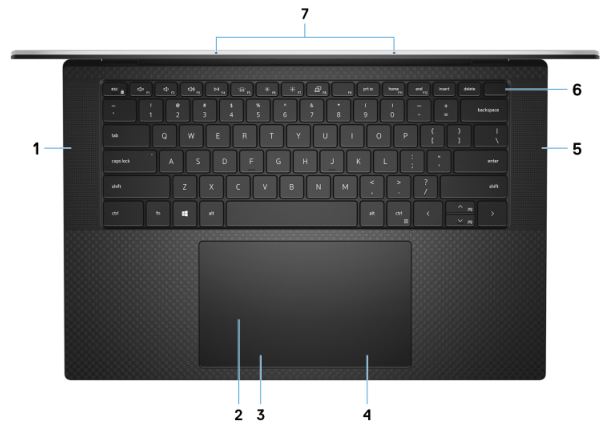
- Left speakerProvides audio output.
- TouchpadMove your finger on the touchpad to move the mouse pointer. Tap to left-click and two finger tap to right-click.
- Left-click areaPress to left-click.
- Right-click areaPress to right-click.
- Right speakerProvides audio output.
- Power button with fingerprint readerPress to turn on the computer if it is turned off, in sleep state, or in hibernate state.When the computer is turned on, press the power button to put the computer into sleep state; press and hold the power button for 10 seconds to force shut-down the computer.Place your finger on the power button to log-in with the fingerprint reader.NOTE: You can customize power-button behavior in Windows. For more information, see Me and My Dell at www.dell.com/support/manuals.
- Microphones (2)Provide digital sound input for audio recording, voice calls, and so on.
Display
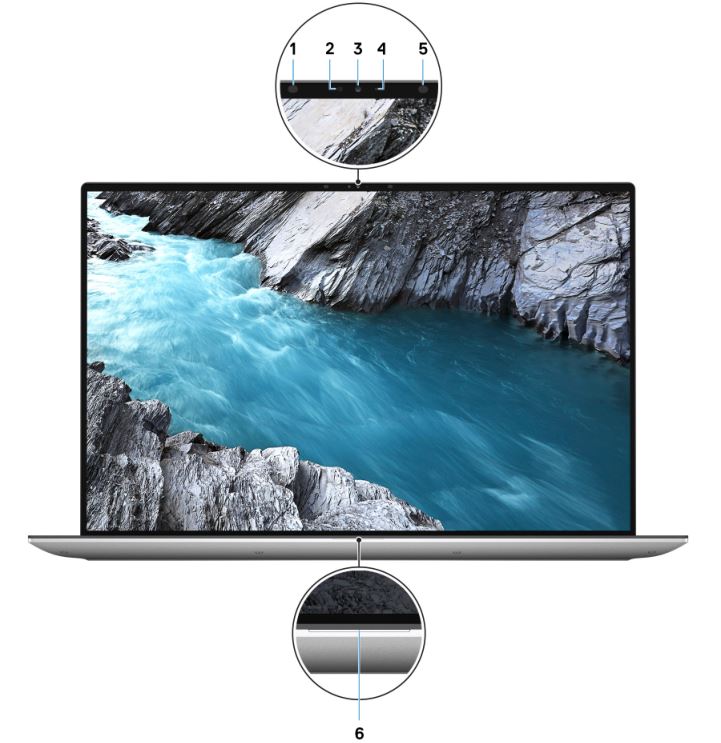
- Infrared emitterEmits infrared light, which enables the infrared camera to sense and track motion.
- Ambient-light sensorDetects the ambient light and automatically adjusts the keyboard backlight and display brightness.
- RGB-infrared cameraThis combined camera supports both infrared Windows Hello facial recognition and standard RGB imaging for photos and videos.
- Camera-status lightTurns on when the camera is in use.
- Infrared emitterEmits infrared light, which enables the infrared camera to sense and track motion.
- Battery-status lightIndicates the battery-charge status.
Bottom
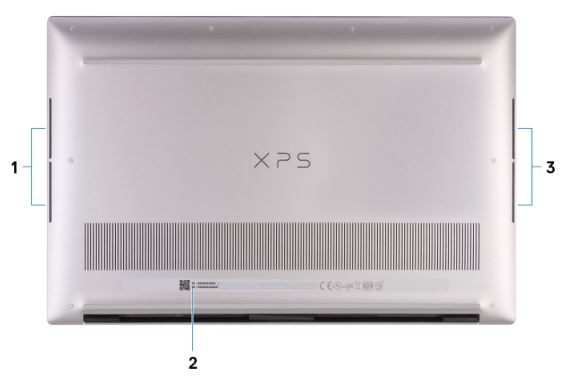
- Left wooferEnhances low-frequency audio output.
- Service Tag labelThe Service Tag is a unique alphanumeric identifier that enables Dell service technicians to identify the hardware components in your computer and access warranty information.
- Right wooferEnhances low-frequency audio output.
Specifications of XPS 15 9500
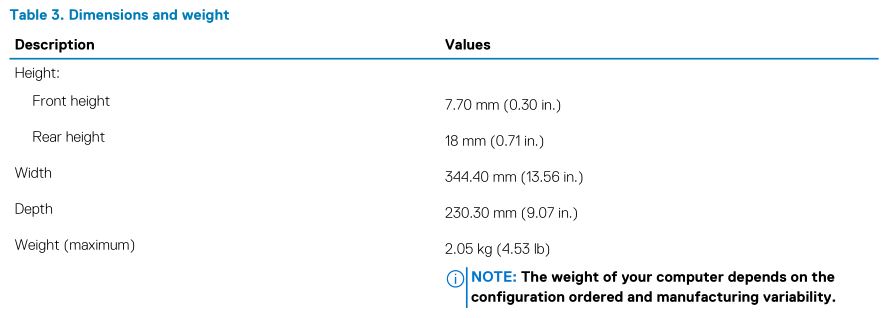
Dimensions and weight
The following table lists the height, width, depth, and weight of your XPS 15 9500.
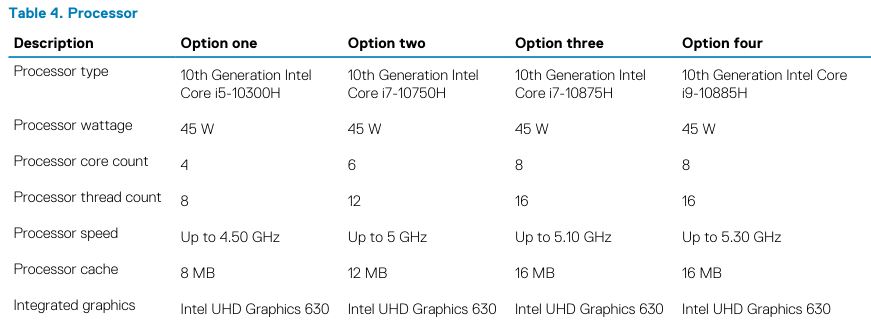
 Processor
The following table lists the details of the processors supported by your XPS 15 9500.
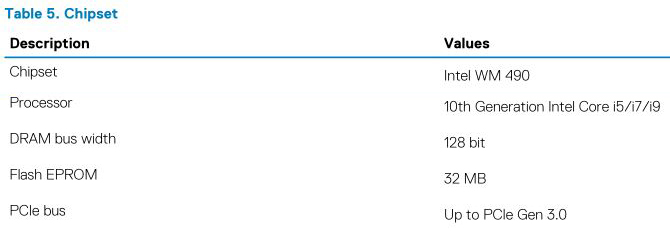
Chipset
The following table lists the details of the chipset supported by your XPS 15 9500.
Operating system
Your XPS 15 9500 supports the following operating systems:
- Windows 10 Home, 64-bit
- Windows 10 Pro, 64-bit
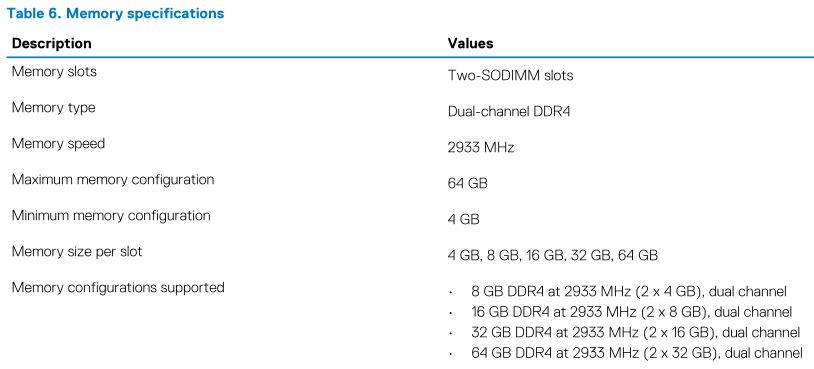
Memory
The following table lists the memory specifications of your XPS 15 9500.
Internal slots
The following table lists the internal slots of your XPS 15 9500.

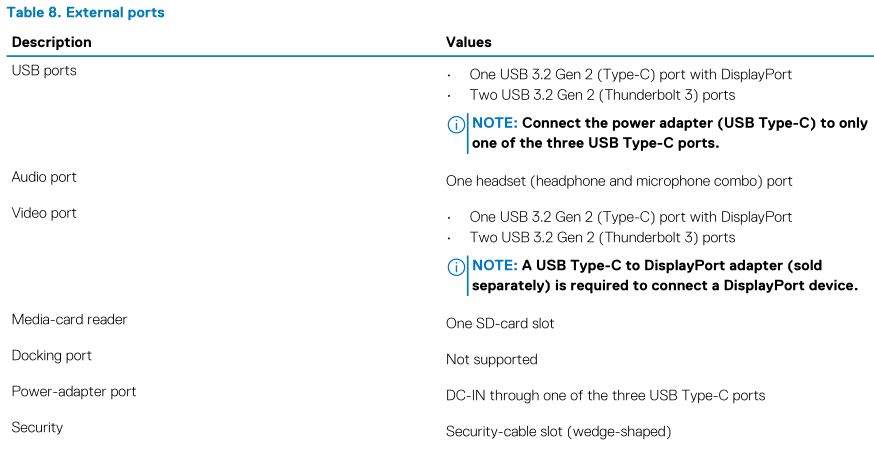
External ports
The following table lists the external ports on your XPS 15 9500.
Wireless module
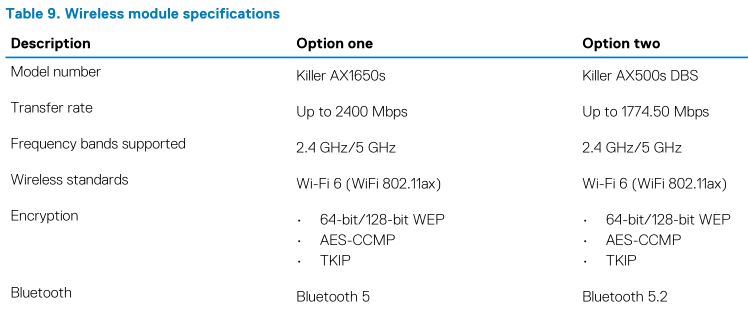
The following table lists the Wireless Local Area Network (WLAN) module specifications of your XPS 15 9500.
NOTE: The wireless module is integrated on the system board.
Audio
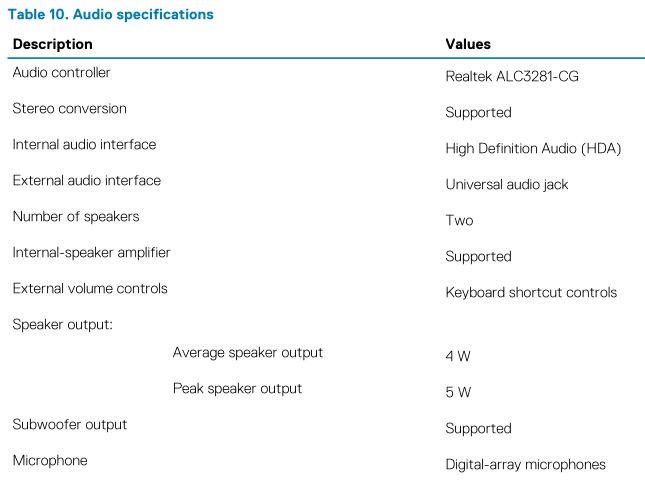
The following table lists the audio specifications of your XPS 15 9500.
Storage
This section lists the storage options on your XPS 15 9500.Your XPS 15 9500 supports one of the following storage options:
- One M.2 2230 solid-state drive
- One M.2 2280 solid-state drive

Media-card reader
The following table lists the media cards supported by your XPS 15 9500.
 NOTE: The maximum capacity supported by the media-card reader varies depending on the standard of the media card installed in your computer.
Keyboard
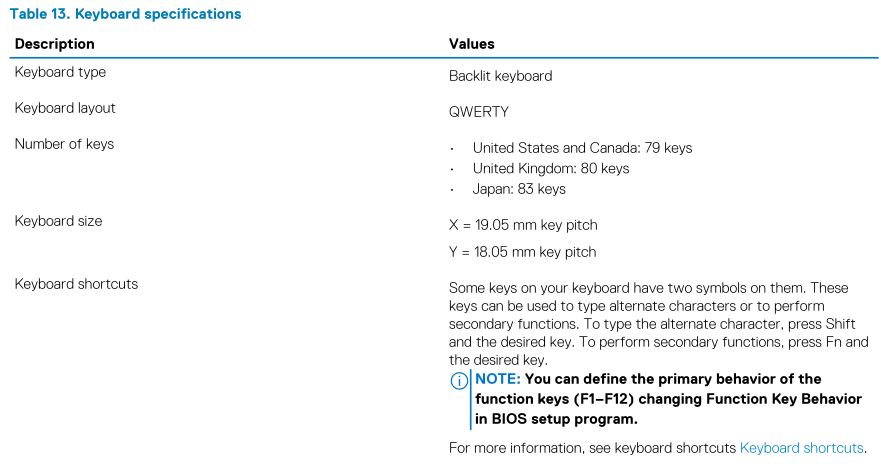
The following table lists the keyboard specifications of your XPS 15 9500.
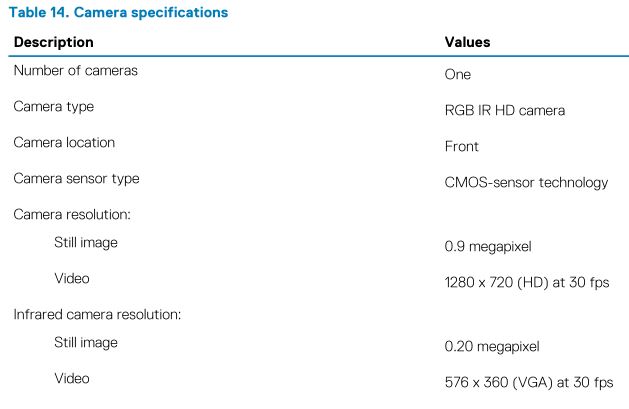
Camera
The following table lists the camera specifications of your XPS 15 9500.

Touchpad
The following table lists the touchpad specifications of your XPS 15 9500.

Power adapter
The following table lists the power adapter specifications of your XPS 15 9500.

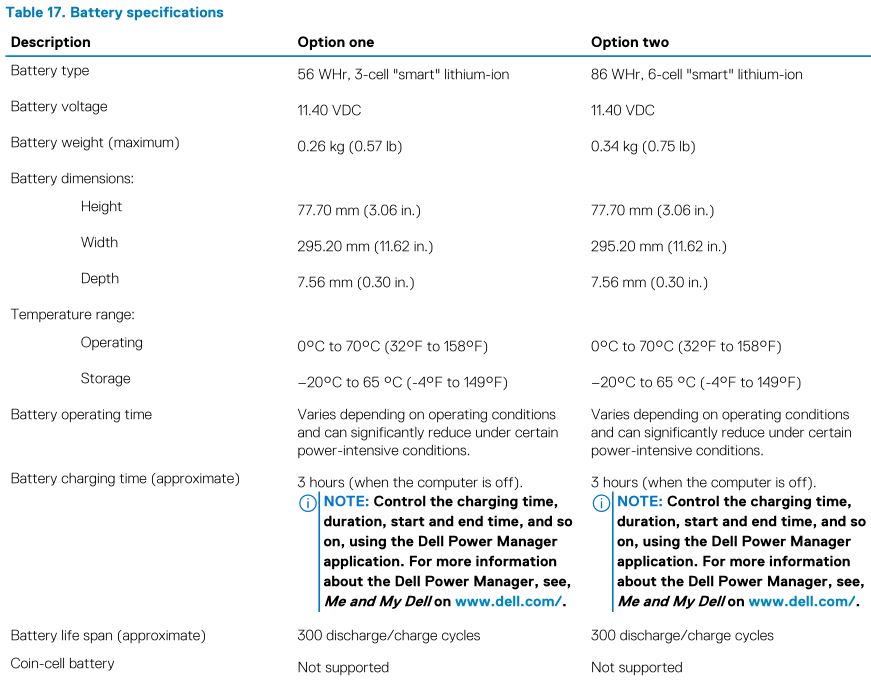
Battery
The following table lists the battery specifications of your XPS 15 9500.
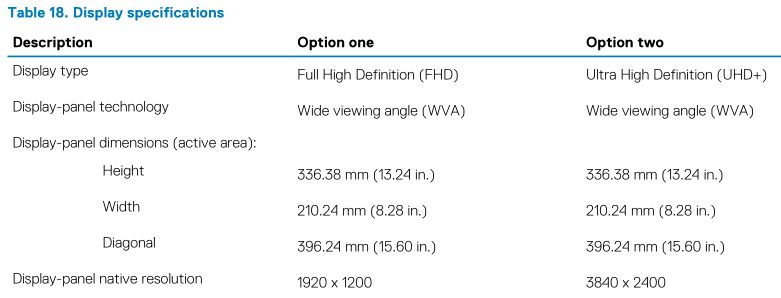
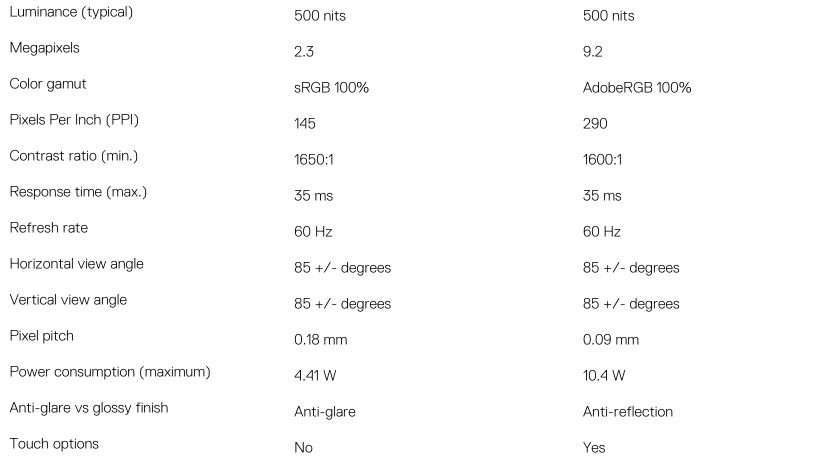
Display
The following table lists the display specifications of your XPS 15 9500.
Fingerprint reader
The following table lists the fingerprint-reader specifications of your XPS 15 9500.NOTE: The fingerprint reader is located on the power button.

GPU–Integrated
The following table lists the specifications of the integrated Graphics Processing Unit (GPU) supported by your XPS 15 9500.

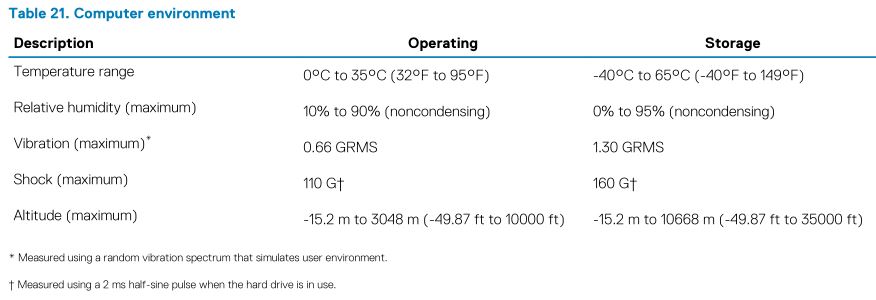
Operating and storage environment
This table lists the operating and storage specifications of your XPS 15 9500.Airborne contaminant level: G1 as defined by ISA-S71.04-1985
Dell low blue light display
WARNING: Prolonged exposure to blue light from the display may lead to long-term effects such as eye strain, eye fatigue, or damage to the eyes.
The ComfortView feature on Dell laptops and displays is designed to minimize blue light emitted from the display for better eye comfort.
To reduce the risk of eye strain after looking at the laptop’s display for an extended period of time, it is recommended that you:
- Set the laptop’s display at a comfortable viewing distance between 20 inches and 28 inches (50 cm and 70 cm) from your eyes.
- Blink frequently to moisten your eyes, or wet your eyes with water.
- Take a break for 20 minutes every two hours.
- Look away from your display, and gaze at a distant object at 20 ft (609.60 cm) away for at least 20 seconds during each break.
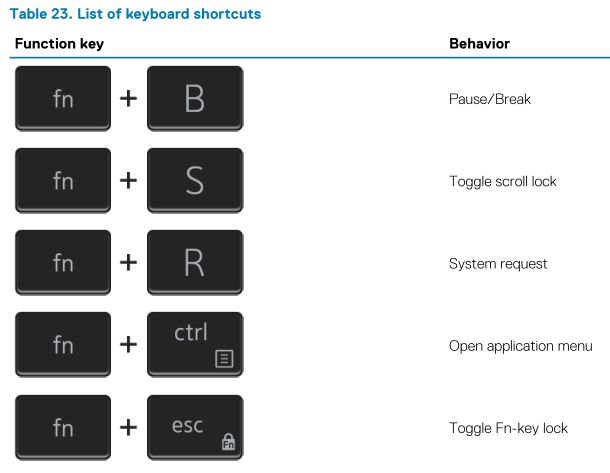
Keyboard shortcuts of XPS 15 9500
NOTE: Keyboard characters may differ depending on the keyboard language configuration. Keys used for shortcuts remain the same across all language configurations.
Some keys on your keyboard have two symbols on them. These keys can be used to type alternate characters or to perform secondary functions. The symbol shown on the lower part of the key refers to the character that is typed out when the key is pressed. If you press shift and the key, the symbol shown on the upper part of the key is typed out. For example, if you press 2, 2 is typed out; if you press Shift + 2, @ is typed out.
The keys F1-F12 at the top row of the keyboard are function keys for multi-media control, as indicated by the icon at the bottom of the key. Press the function key to invoke the task represented by the icon. For example, pressing F1 mutes the audio (refer to the table below).
However, if the function keys F1-F12 are needed for specific software applications, multi-media functionality can be disabled by pressing Fn + esc. Subsequently, multimedia control can be invoked by pressing Fn and the respective function key. For example, mute audio by pressing Fn + F1.
NOTE: You can also define the primary behavior of the function keys (F1-F12) by changing Function Key Behavior in BIOS setup program.


Getting help and contacting Dell
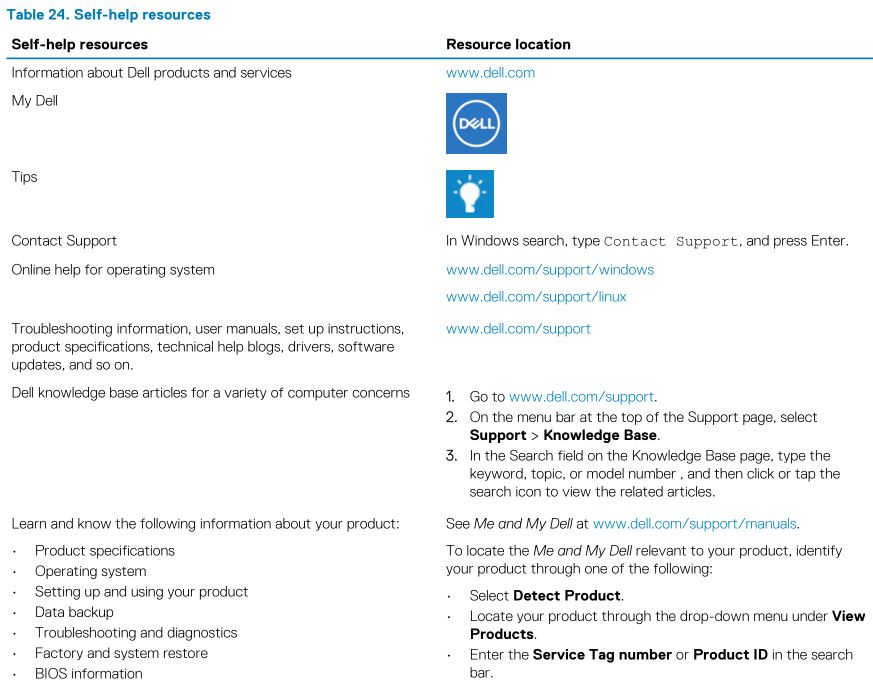
Self-help resources
You can get information and help on Dell products and services using these self-help resources:
Contacting Dell
To contact Dell for sales, technical support, or customer service issues, see www.dell.com/contactdell.
NOTE: Availability varies by country/region and product, and some services may not be available in your country/region.
NOTE: If you do not have an active Internet connection, you can find contact information about your purchase invoice, packing slip, bill, or Dell product catalog.
References
Dell – Dell Linux – Community Web
Windows Operating Systems | Dell US
Manuals | Dell US
Contact Information | Dell US
Dell – Dell Linux – Community Web
Computers, Monitors & Technology Solutions | Dell USA
Manuals | Dell US
Touch gestures for Windows
How to configure Ubuntu Linux after it\’s first installed on your Dell PC | Dell US
Windows Operating Systems | Dell US
Support | Dell US
Microsoft Support
Support for SupportAssist for Home PCs | Documentation | Dell US
Computers, Monitors & Technology Solutions | Dell USA
Microsoft Support
How to distinguish the differences between M.2 cards | Dell US
Contact Support | Dell US
Computers, Monitors & Technology Solutions | Dell USA
Support | Dell US
Computers, Monitors & Technology Solutions | Dell USA
[xyz-ips snippet=”download-snippet”]

 Processor